Pages

Clouds in my coffee...

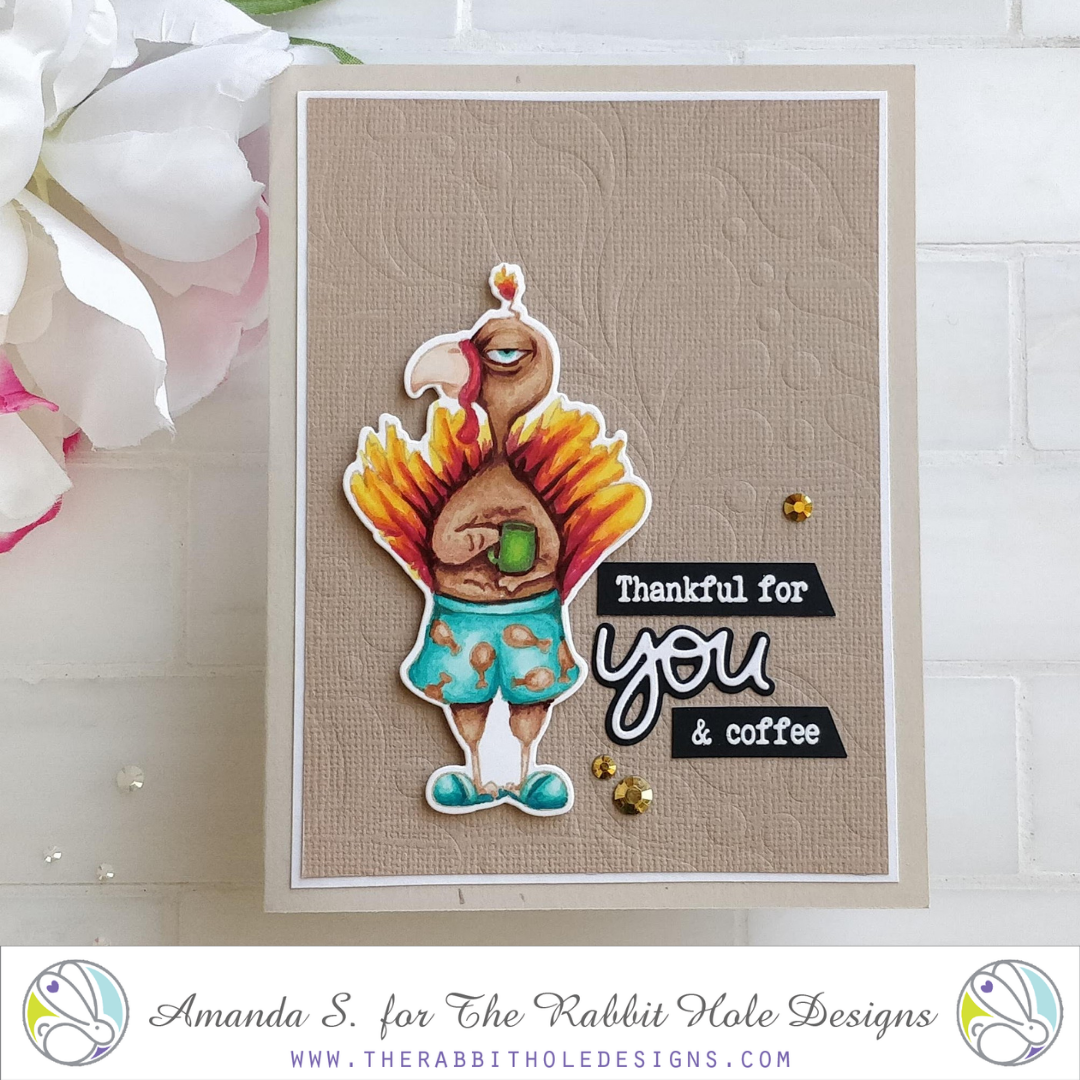
Hola Crafty Friends! Amy here and I'm so excited to share a card with you today featuring the Blended Sentiments 2 Stamp set and the Clouds In My Coffee Stencil from the November 2020 Release at The Rabbit Hole Designs


It's so hard to pick a sentiment when you have so many like this to choose from!


For this card I was really inspired by the name of the stencil Clouds in My Coffee, so I used that as the inspiration to create my card. For this card I did some actual drawing to create the coffee cup because I didn't have any stamps or dies that fit the look I was going for. 


I essentially drew the shape of the coffee cup and masked around all over the card to create the sky and the gradient on the coffee cup itself. For the Sky I used the negative pieces of the cloud stencil and ink blended around them to leave the center portions white. I then mirrored the same clouds as a reflection in the coffee and ink blended with brown inks to create the coffee itself. 

I then chose a very fitting sentiment from the Blended Sentiments 2 set and angled it so that it fit the contour of the coffee cup shape. I attached the panel to the card base and that's it, a sassy and snarky caffeinated card to share with a love one. 


Thank you for checking out my project today. I hope that you enjoyed it! Be sure to check out all the items from the new release as well as all the other fabulous products that The Rabbit Hole Designs carries. You can follow this link HERE to see their whole product line. 


Thanks for stopping by!
If you want to check out additional information on the products that I used to create this card you can visit my blog at amyswares.com 

-Amy


For more inspiration, updates, and news make sure to check out these places.

Because Adulting Is So Hard!!! - coffee card

Hello my crafty friends and welcome to The Rabbit Hole Designs blog.  Let's take a break for ADULTING!  Who's with me?  Somedays you just want a break from all the responsibilities, don't you agree?   

Today I am sharing a simple card created with the Chain Mail stencil and the Blended Sentiments 2 stamp set.  I love the sharp look of this stencil blended with Pine Needles and Festive Berries Distress Oxide Inks and the Cotton Tail Blending Brushes. (Do you spy those fun colored clips on my Cotton Tail Blending Brushes?  They are from Make It By Marko - check out her store on Etsy)


I used Pixie Spray (a low tack adhesive spray) to attach the Chain Mail stencil to a piece of sage colored cardstock  and blended the two Distress Oxide inks creating this festive background.  I used a coffee cup die from my craft stash and die cut a cup shape.  I shaded the cup with alcohol markers to give it some depth.  I grabbed a holiday "falalala" sentiment to stamp across the cup.  It goes perfect with the "Well Latte-da!" sentiment from the Blended Sentiments 2 stamp set.  I distressed a piece of 4" x 5 1/4" kraft cardstock to look like coffee stains and drips to create the background for the card.  I stamped the "Caffeine: Because adulting is hard" sentiment, also from the Blended Sentiments 2 stamp set, at the top of the coffee stained card front.  I attached it to a white A2 card base and mounted the Chain Mail coffee cup using double sided adhesive foam tape finishing the card.


I hope you enjoyed this fun sassy coffee card featuring the Blended Sentiments 2 stamps set and the Chain Mail stencil. 


Make sure to take advantage of the Black Friday/Cyber Monday savings before they expire!


Here are The Rabbit Hole Designs products used in this card:


Chain Mail Stencil 6x6


Blended Sentiments 2 stamps set


Cotton Tail Blending Brushes


My favorite way to destress form adulting is to go on a long drive taking the country highways!  I love to get lost in the scenery around me.    I love hearing from you. Tell me your favorite what to destress from adulting? 


Be Creative ~ Stay Inspired

Jenn Gross


Follow me, Journey Coach Jenn, on 

Instagram - https://www.instagram.com/journeycoachjenn 

YouTube - http://www.youtube.com/c/JourneyCoachJenn 

Blog - http://www.journeycoachjenn.com/ 


For more inspiration, updates, and news make sure to check out these places


The Rabbit Hole Designs

The Rabbit Hole Designs Instagram

The Rabbit Hole Designs Facebook Page

The Rabbit Hole Designs Pinterest

The Rabbit Hole Designs YouTube


Sweet & Sassy Christmas Tags

 Hello my crafty friends! Today I am sharing a couple sassy and sweet Christmas tags.


For both tags I used a tag die from my stash, I wanted to keep the theme in the Christmas spirit. My family always have sassy Christmas tags so I used the Blended Sentiments 2 for the sentiment. I added a little flair to the Caffeinated Giraffe by adding a few holly leaves to his robe.


Both the Caffeinated Reindeer and the Caffeinated Giraffe were colored with my alcohol markers. I love how well they pair together and make a quick and easy holiday tag!


It's going to be OWL-right


    Hello there! Michelle here, sharing a hope themed card! I used OWL- Right stamp set and Chain Mail Stencil  in shades of orange.  I inked up the stencil with distress oxides in dried marigold, ripe persimmon, and crackling campfire.
Here are some fun facts about the color orange..."The color psychology of orange is optimistic and uplifting, rejuvenating our spirit. In fact orange is so optimistic and uplifting..."

Effects of Orange


Enthusiasm: Orange is optimistic and extroverted - the color of the uninhibited.

Rejuvenation: Orange helps to restore balance to our physical energies.

Stimulation: Orange is not as passionate or as excitable as red, but it is stimulating, particularly to the appetite - the worst color to have in the kitchen if you want to lose weight.

Courage: Orange helps us to take account of our lives, to face the consequences, to take action and make appropriate changes, and then to move onward and upward.

Vitality: Orange has a more balanced energy than red, not as passionate and aggressive, but full of vitality.


I colored the owl clan in similar tones using Copic Markers in shades YR00, YR04, YR07. I embossed the sentiment with copper embossing powder and scattered some copper hued gems.

Thanks for taking a peek today! I am preparing my Thanksgiving feast for tomorrow! I hope you will be spending the day with someone you love!!! 


For more inspiration, updates, and news make sure to check out these fantastic places! 

Better Latte Than Never!

 Hi everyone! Von Marie here and I am happy to be on the Blog today using some of my Favorite TRHD products!


I love Rory! I used Rory-Caffeinated Raccoon, and Blended Sentiments 2 for my card today. I first stamped and Heat embossed Rory onto Neenah Solar White cardstock with Versafine ink and clear embossing powder. I then colored him in with my Copic Markers and fussy cut him out. I paper pieced his big mug with Doodlebug pattern paper and outlined it with a black marker.


I also used the same Doodlebug Pattern paper for my panel. I stamped and heat embossed the sentiment and coffee bean images from Blended Sentiments 2 onto Black cardstock with Versamark and white embossing powder. It was cut out with a banner die from my stash. I glued everything onto a A2 card base and added blue gems and white gel accents. I hope you like my card, thank you for stopping by!

TRHD Products Used:

Rory Caffeinated Raccoon


Blended Sentiments 2


Happy crafting!

Von Marie

For more inspiration, updates, and news make sure to check out these awesome places! 

The Rabbit Hole Designs 

The Rabbit Hole Designs Instagram

The Rabbit Hole Designs Facebook Fan Page

The Rabbit Hole Designs Pinterest

The Rabbit Hole Designs YouTube


Caffeinate & Create my friends


Hey yall!  Happy weekend!  I have a fun stencil & sentiment card for you today!  I used the Pinwheel Stencil, the Blended Sentiments 2 set and, of course, our Cotton Tail Blending brushes.  I started with some pale pink Distress Ink all over my base piece.  I don't typically like the ink "uniform" looking so it's lighter in some places than others.  Then I went over the edges (with the stencil still in place) with some medium brown Oxide ink.

I randomly added a few of the smaller coffee beans from the sentiment set.  I chose a few sentiments that I wanted to use and stamped them in a darker brown ink, adding a little of the medium brown around the edges.  Those pieces are popped up on the base.  Just to add a little more texture, etc.  I added a crinkle ribbon/button at the top.

All of the items I linked in my post are available at The Rabbit Hole Designs.

You can also read about this card on my blog, here with links to the products I used, etc.  Thanks for popping by, come back again soon!

Let's Talk Turkey...


Hey crafty friend, it's Amanda from Pear Blossom Press again. With Thanksgiving less than a week away, I wanted to share one more card for the occasion. The Caffeinated Turkey is such a fun focal point, I had to use him again.

For today's card, I stamped my turkey with Warm Glow ink and Copic colored him, before cutting him out with the coordinating die. To create the embossed background, I ran a tan sheet of cardstock through my die cutting machine, sandwiched between a squishy pad, and the Splish Splash stencil. This is one of my most favorite stenciling techniques (it's fast and mess free too)! 


To pull the card together, I glued the embossed panel to a slightly larger white panel, then glued that to a sand colored card base. Foam tape pops the turkey up. The sentiment is a combination of heat embossed, and die cut words. To make them pop, I used white powder on black Perfect Sentiment Cardstock. This black cardstock is coated, so embossing powder melts fast and smoothly, without sinking into the paper. A few gold gems finish the card. 


Before I go, I wanted to share a side by side comparison of Caffeinated Turkeys. I still have the card I made with him last year, and when I pulled it out, I was pleasantly surprised to see how far my coloring skills have come! I no longer emboss before coloring. I've ventured into no-line coloring, and I'm not afraid to choose markers with big gaps between numbers. I'm not looking for gradual transitions from one color to the next, I want contrast. Obviously, I have lots of room to grow, and I really want to practice more with adding colored pencil details, but I'm happy with my progress so far! I'll have to remember to color this stamp again next year, and see the difference then.


What do you think of my turkeys? I actually love both cards. Lol, so now the question is, do I send the cards out? Or hoard them to compare again next year? Let me know in the comments below. 

Thanks for stopping by today. I'll be back again soon with another fun card to share! Until then, head on over to my blog for links to the products I used, and for some of the coloring tricks I've picked up along the way. 

For more inspiration, updates, and news make sure to check out these fantastic places! 


Throwback Thursday- Happy Birthday Style


Hello everyone,

Today we are sharing our Scripty Happy Birthday 3x4 stamp set in all it's glory for our Throwback Thursday.  This stamp is perfect for all manner of birthday cards, used with a stencil it carries it's own every time and would be perfect with a scattering of sequins or even a cute ink blended background.  We hope you enjoy seeing some of our beautiful projects from our very own Brand Ambassadors.


As always we are so thankful for all of you and if you have not done so already please join us on Instagram and our FaceBook Fan Page 
See you soon!

Monochromatic Chubby Unicorn


Hiya! It's Lauren on the blog today with this fun monochromatic masculine card using the new Chainmail stencil and Caffeinated Rhino stamp set. This rhino looks exactly like my husband in the morning except my husband has brown eyes!

To create the stenciled chainmail background, I blended Black Soot distressed oxide ink onto a silver shimmer cardstock panel (A2 sized). I trimmed it a bit so it was just under 4.25x5.5, adhered it to a dark grey A2 sized background then mounted that onto an A2 top folding card base.


Then using black ink, I stamped the rhino onto gray cardstock. I colored him using Prismacolor pencils then fussy cut him out ( the coordinating die is now available!).
The colors I used were:
Rhino: French Grey, 10%, 20% and 50%
Boxers: White, and Lemon Yellow
Mug: White
Eye: White, Blue Denim, Cerulean Blue, Indigo blue


After coloring the boxers, I used my Versamark pen to go over each star and covered them with glow-in-the-dark embossing powder. Then I heat set the powder. Then I placed him onto the card using double sided foam tape.


Using black ink, I stamped the sentiment onto the same silver shimmer paper. Then trimmed it using a rectangular die and adhered it onto a dark grey stitched banner I had cut out. I adhered it onto the card above the rhino. To give the card a more polished look, I placed a silver self adhesive "rivet" onto the banner before and after the sentiment.


That completes my card. I hope you enjoy my chubby unicorn. Thanks for visiting!

For more inspiration, updates, and news make sure to check out these fantastic places! 

Thankful for Leftovers

 Hello my crafty friends! For my card today I wanted to make a Thanksgiving card using the new Pinwheel Stencil and the Caffeinated Turkey.


For the background I wanted to make have similar coloring to falling leaves so I went in with my Cottontail Blending Brushes and 3 distress oxides, mustard seed, crackling campfire, and gathered twigs. I used the mustard seed in the center to keep it light, then went in with the crackling campfire and just a little bit of gathered twigs on the edges to deepen it up just a bit.

I added just a little bit of splatter to give it some texture and popped the sentiment and my turkey on some foam square and of course added a little bling! I think this makes for the perfect Thanksgiving card!


Birthday SHAKER card

 HELLO!  It's Kelly here. Today I am sharing a shaker card I made using one of the newest caffeinated critters by The Rabbit Hole Designs, "Caffeinated Parrot" with a sentiment from "Blended Sentiments 2".  

I started this card by inking a piece of Bristol Smooth cardstock with Distress Oxide inks with Cotton Tail Blending Brushes.  I set that to dry and then I stamped the parrot, colored him with matching Copics and cut him out.  

I used a circle die to cut the shaker window and strategically stamped the coffee symbol in blue ink on the background panel.  I then built the shaker elements.  

I embossed the sentiment in white on black cardstock and adhered the Parrot on the front. I added a bit of shimmer pen to his feathers and gloss to the cup. 


Thank you for joining me today. 

Check back each day for more 

inspiration using The Rabbit Hole Designs products. 

-Kelly


For more inspiration, updates, and news make sure to check out these places.