Pages

Friday, May 31, 2024

Cute mermaid tags to celebrate the start of summer!


With summer officially started, we all experience bbq's, pool parties, and more get togethers with your friends and loved ones.  These tags would be adorable to attach to any hostess gift or birthday present.  I love that The Rabbit Hole Designs has everything you need to create such a quick but thoughtful addition.  Make sure to check out their website to see all of the amazing products from the new release. 

I challenge you to recreate this. Make sure to tag me @craftwithme101 and The Rabbit Hole Designs on Instagram if you do. 


Monday, May 27, 2024

A Look Beneath the Surface - In-FIN-ity Shaker Card

Hello crafty friends, Jenn here, you can also catch me on social media @journeycoachjenn.  Today I am sharing an A2 infinity shaker card using The Rabbit Hole Designs new Fin-tastic stamp set.  It is paired with the Harmony stamp set and coordinating dies an A2 Shaker Acetate Sheets, and I have a clever way to use the Clear Enamel Dots. 
1 - I colored the koi image from the Harmony stamp set with OLO marker in Violet and die cut it out with the coordinating dies. 

 2 & 3 - I turned the fish over and added about 8 small dots of liquid glue stratigically to the underside of the tail and body of the fish and added the small Clear Enamel Dots over the glue. 

4 - Adding the Clear Enamel Dots will allow the koi fish to swim/slide in the shaker. The card base is a piece of 4 1/8 x 5 3/8"  printed cardstock.   I attached the A2 Shaker Acetate Sheets to the card base leaving the top open to add shaker bits and the fish slider before sealing it closed.
I treated a piece of 5 1/2" x 3/4" Heat resistant vellum with the Cottontail Embossing Powder Tool and stamped the sentiment from the Fin-tastic stamp set ant heat embossed it with black embossing powder.  It is added the sentiment to the card front across the top of the shaker.
The acetate shaker card front is adhered to a white A2 card base. What a fun interactive shaker card with a surprise koi shaker piece.


The Rabbit Hole Design Supplies


Thank you, I appreciate you taking time from your day to stop by and check out today’s The Rabbit Hole Design project.  I hope you are inspired to create something lovely today!


Be Creative ~ Stay Inspired

Jenn Gross


Follow me, Journey Coach Jenn, on 

Instagram - https://www.instagram.com/journeycoachjenn/

YouTube - http://www.youtube.com/c/JourneyCoachJenn

Blog - https://journeycoachjenn.blogspot.com/  


For more inspiration, updates, and news make sure to check out these places


The Rabbit Hole Designs

The Rabbit Hole Designs Instagram

The Rabbit Hole Designs Facebook Page

The Rabbit Hole Designs Pinterest

The Rabbit Hole Designs YouTube


Sunday, May 26, 2024

Creating A Pretty Mermaid Scene


Hi friends! It's Lauren here today with this sweet mermaid card I created using the new High Tide stamp set illustrated by Agota Pop! I had such a fun time coloring this lovely mermaid. 

I created a tutorial video showing how I created this fun scene. Here's the link to it:
                                              

I am really pleased with how my card came together. I hope I've inspired you to create your own mermaid scene. I've linked the products I used, below. Thanks for visiting!

Disclosure:
I use affiliate links when I can. This does not add any extra cost to you, but I do receive a small commission which helps keep me creating.
Thank you for visiting!

*You can use code Lauren10 at checkout to save on your purchase.*

High Tide Stamp Set, The Rabbit Hole Designs: https://shrsl.com/4in95

Salty Air Stamp Set, TRHD: https://shrsl.com/4jf9u

Making Waves Stencil: https://shrsl.com/45syq 
  Cottontail Blending Brush: https://shrsl.com/3htkd


Saturday, May 25, 2024

Creating custom paper with ink blending


Have you ever wanted a specific paper or background and just couldn't find it in your supplies?  Today I am sharing a way to create your own.  This process works with any stamp set but I am using The Rabbit Hole Designs newest release.  This release was filled with so many awesome seaside and mermaid images. 
 Let's get started!

1. I stamped out the images onto the A2 size card panel.  

2.  Next, I used my favorite ink cubes to ink blending with 3 complementing colors, making sure to blend any noticeable lines between colors.  I also added TRHD clear enamel dots to act as bubbles.

3.  Then, I stamped out a sentiment on a white strip, using matching ink.

4.  To finish it off, I cut a pastel pink panel down to the A2 size and glue that down to the card base the same size.  I also trimmed the completed panel down a bit on the sides to let the pink accent show, then glued the sentiment strip onto the card.

That's it friends!  You have created your own accent panel for a beautiful one of a kind card!

I challenge you to recreate this. Make sure to tag me @craftwithme101 and The Rabbit Hole Designs on Instagram if you do. 

For more inspiration, updates, and news make sure to check out these awesome places! 


Friday, May 24, 2024

I am here to kelp! - a Fin-tastic interactive wobbler card.


Hello crafty friends!  Jenn here! You can also find me on social media @journeycoachjenn.  Today I am on The Rabbit Hole Designs Blog sharing an adorable  interactive wobbler card.  It is created with The Rabbit Hole Designs new Fin-tastic stamp set (an Agota Pop illustration) paired with the Deco Flowers layered stencil, You've Been Framed dies, Splish Splash Stencil and the Making Waves stencil.
I colored the Mermaid with OLO markers using YG 8.3, 8.5 and 8.7 for the hair. The skintone is BG 7.0, 7.2, and 7.3.  The mermaid tail is colored with BG 2.1, 2.3 and 2.4.  The sea shells and coral are colored with R 2.2 , 2.4 and OR 1.3 and 1.6. She has been cut out and a wobbler has been attached to her back and then to the card panel. 

I created the card background by lightly stenciling the Splish Splash stencil in a light blue. I added the kelp using 3 of the stencil layers from the Deco Flower stencil. The ocean floor is stenciled in brown gray ink using the Making Waves stencil.

The sentiment is stamped on a blue cardstock  and fussy cut. I use the You've Been Framed dies to cut out the card front and the blue layer, before attaching them to an A2 kraft cardstock card base.

Supplies List
Action Wobblers 
Liquid glue

Thank you, I appreciate you taking time from your day to stop by and check out today’s The Rabbit Hole Design project.  I hope you are inspired to create something lovely today!


Be Creative ~ Stay Inspired

Jenn Gross


Follow me, Journey Coach Jenn, on 

Instagram - https://www.instagram.com/journeycoachjenn/

YouTube - http://www.youtube.com/c/JourneyCoachJenn

Blog - https://journeycoachjenn.blogspot.com/  


For more inspiration, updates, and news make sure to check out these places


The Rabbit Hole Designs

The Rabbit Hole Designs Instagram

The Rabbit Hole Designs Facebook Page

The Rabbit Hole Designs Pinterest

The Rabbit Hole Designs YouTube


Sunday, May 19, 2024

Crafting a Stunning Underwater Scene Card with The Rabbit Hole Designs

Hello, crafty friends! It's Rick here from The Rabbit Hole Designs, and I'm thrilled to be sharing another creative project with you today. Get ready to dive deep into the world of card making as we explore how to create a breathtaking underwater scene card featuring our very own Salty Air Stamp Set & Salty Air Dies.

Materials Used:

Let's gather our supplies for this aquatic adventure:

Setting the Scene:

Imagine the tranquil beauty of the ocean – that's the vibe we're capturing in this project. Begin by ink blending the background with three shades of blue ink, gradually transitioning from dark to light to mimic the depths of the sea.

Adding Movement:

To infuse our scene with energy and motion, we'll utilize The Rabbit Hole Designs' Splish Splash 6 x 6 Stencil. By blending ink over the stencil with the CottonTail Blending Brushes, we'll create the illusion of rippling water, adding depth and realism to our card.

Bringing it to Life:

Now it's time to bring our underwater world to life! With the Salty Air Stamp Set, we'll stamp images of seashells, fish, seaweed and the mermaid onto our cardstock. Then, using watercolor pencils, we'll add color and dimension to each element, creating a stunning watercolor effect.

Creating Texture:

No underwater scene would be complete without sandy shores! Using white cardstock, we'll cut out sand mounds and ink blend them using the CottonTail Blending Brushes with various shades of brown ink for texture. By layering these mounds with dimensional foam adhesive, we'll add depth and dimension to our card.

Pro Tips for Card Makers:

  • Blend ink in a circular motion for seamless backgrounds.
  • Use a light touch with watercolor pencils for a soft, natural look.
  • Strategically layer dimensional adhesive for added dimension without overcrowding your card.

And there you have it – a breathtaking underwater scene card that's sure to make a splash! I hope you've enjoyed diving into this project with me. Remember, the possibilities are endless when it comes to card making, so don't be afraid to let your creativity shine.

Stay tuned for more inspiring projects and card making tips from The Rabbit Hole Designs. Until next time, happy crafting!

Rick


The RHD Affiliate Disclaimer:


We want to ensure transparency and honesty in our interactions with you, our valued readers. Please be aware that the links provided on The Rabbit Hole Designs Blog may be affiliate links. This means that if you make a purchase through these links, the project designer may earn a small commission at no extra cost to you. Your support means the world to us!


We kindly request that you accept the tracking cookie for the affiliate websites. Rest assured, this will not expose your computer to viruses or compromise your information. It's a necessary step for the company to attribute the sale to the affiliate, ensuring that creators like our creatives receive their rightful commissions.


Your trust and support empower our creators to continue sharing creativity and inspiration through our blog. Thank you for being an integral part of The Rabbit Hole Designs community!

Saturday, May 18, 2024

Sweet No-line Colored Mermaid


Hi! It's Lauren on the blog today. I am loving Mer-May and all the fun images there are to color in these fabulous sets illustrated by Agota Pop! I used the Salty Air set to create my card in a classic pink and blue color combo. 

I started out by stamping my images in a no-line/fade out ink. Then I colored all the images using my colored pencils.


Next, I used my colored pencils to color a few of the Matte White Enamel Dots so that they matched my mermaid perfectly. I added them to my panel then adhered the panel to a white, top folding, A2 card base (4.25x5.5")

Here's a quick video showing me stamp my background and color the enamel dots.


I hope you are loving this Mer-May release and that I have inspired you to create your own Mer-May card! I've linked the products I used below and added a special coupon code for you! Thanks for watching! 

(Use code Lauren10 at checkout to save)
Disclosure: I use affiliate links where I can. This does not add any extra cost to you, but I do receive a small amount which helps keep me in craft supplies. Thank You for visiting!

Salty Air Stamp Set: https://shrsl.com/4jf9u
Matte White Enamel Dots: https://shrsl.com/4jf9s 

Friday, May 17, 2024

You Mermaid It! - Graduation Gift Card Tag


Hello crafty friends.  I hope you are having a mermazing day!  Jenn here! You can also follow me on social media @journeycoachjenn.  With graduations just around the corner, I thought I would be fun to create a super cute graduation gift card holder with the new Fin-tastic stamp set  (illustrated by Agota Pop).  I used the sentiment from the Salty Air stamps set.  The background is created with the Splish Splash stencil. 
A -  The Splish Splash stencil is used to create the water background on a piece of 4" x 5 1/4" Aqua Sky cardstock. For the ink blending, I use TRHD Bitty Blending Brushes with a light green and a light aqua ink

B - Using a tag die from my stash, I cut out two  2 1/2" x 4 1/2" This size tags to allow for a gift card to be added.  Die cut one tag from gray cardstock for the tag back. Die cut a second tag from the Splish Splash stenciled panel for the tag front. The mermaid and coral cluster is colored with OLO Markers 

C - I stamped the "Congrats! You mermaid it!" sentiment to the upper left of the tag front and glued the mermaid in place. The coral cluster is attached with double sided foam tape.  Attach the to tags together using 1/4" double sided ashesive foam tape, making sure to leave a pocket opening at the top of the tag. I added six Clear Sparkle Enamel Dots to the tag

D - Insert a gift card and tie the tag opening closed with green twine.  This will be such a lovely graduation gift.  You can replace the gift card with cash if you prefer


Thank you, I appreciate you taking time from your day to stop by and check out today’s The Rabbit Hole Design project.  I hope you are inspired to create something lovely today!


Be Creative ~ Stay Inspired

Jenn Gross


Follow me, Journey Coach Jenn, on 

Instagram - https://www.instagram.com/journeycoachjenn/

YouTube - http://www.youtube.com/c/JourneyCoachJenn

Blog - https://journeycoachjenn.blogspot.com/  


For more inspiration, updates, and news make sure to check out these places


The Rabbit Hole Designs

The Rabbit Hole Designs Instagram

The Rabbit Hole Designs Facebook Page

The Rabbit Hole Designs Pinterest

The Rabbit Hole Designs YouTube


Sunday, May 12, 2024

Thanks for your kelp :)


Hi friends!  Today I have a mermaid card for you.  Who doesn't love a mermaid right?!
I used the making waves stencil to create the entire background.  It has everything you need to create this oceanic look.  I also used the newest release, Fin-tastic by TRHD for the focal image and sentiment.  This was so fun to make and I encourage you to recreate it.  

I challenge you to recreate this. Make sure to tag me @craftwithme101 and The Rabbit Hole Designs on Instagram if you do. 

For more inspiration, updates, and news make sure to check out these awesome places! 


Saturday, May 11, 2024

Above & Below Water Slimline Scene Card

Hello and welcome to the Rabbit Hole Designs blog; it's Rick back with you again today and I am sharing a slimline scene card that will take you both above the water surface and below. This was actually very easy to create it was a mater of putting the elements in the right place and changing the tones and values of the ink blending from the sky and underneath the water.

Friday, May 10, 2024

Stormy Sea Light Up Card


Hello! It's Lauren here today sharing this pretty light up card featuring the lighthouse image and a sentiment from the new, High Tide Stamp set illustrated by Agota Pop. 

I started out creating a stormy/cloudy night background using Lindy's Gang Magical's in Pocketwatch Pewter and Black Hole Black.


While my background was drying, I stamped my lighthouse in a fadeout/no line ink then colored it using my colored pencils. I also cut out the lighthouse light opening and fussy cut out the whole image.


Next, I lined up where I wanted my light house to sit and used my pokey tool to mark and poke holes where the lights would be into the background.


I then lined the background over a white, top folding A2 sized (4.25x5.5") card base. I used a pencil through the holes to make marks on the card base where the lights would be.


Next, I positioned the 3 bulbs from Pear Blossom Press EZ-Light over the marks and secured them down with tape. I also secured the battery button part using double sided tape on the back of it. 


I then placed double sided foam tape from Pear Blossom Press (it is repositionable for up to approx. 30 min.) to the back of my lighthouse panel, making sure to leave an open space for the battery. I removed the backing paper and secured it onto the card base.


Once I had the panel aligned directly over the lights, I adhered the lighthouse on.


I then stamped the "press here" (from Pear Blossom Press) directly over top of the button that turns the light on.


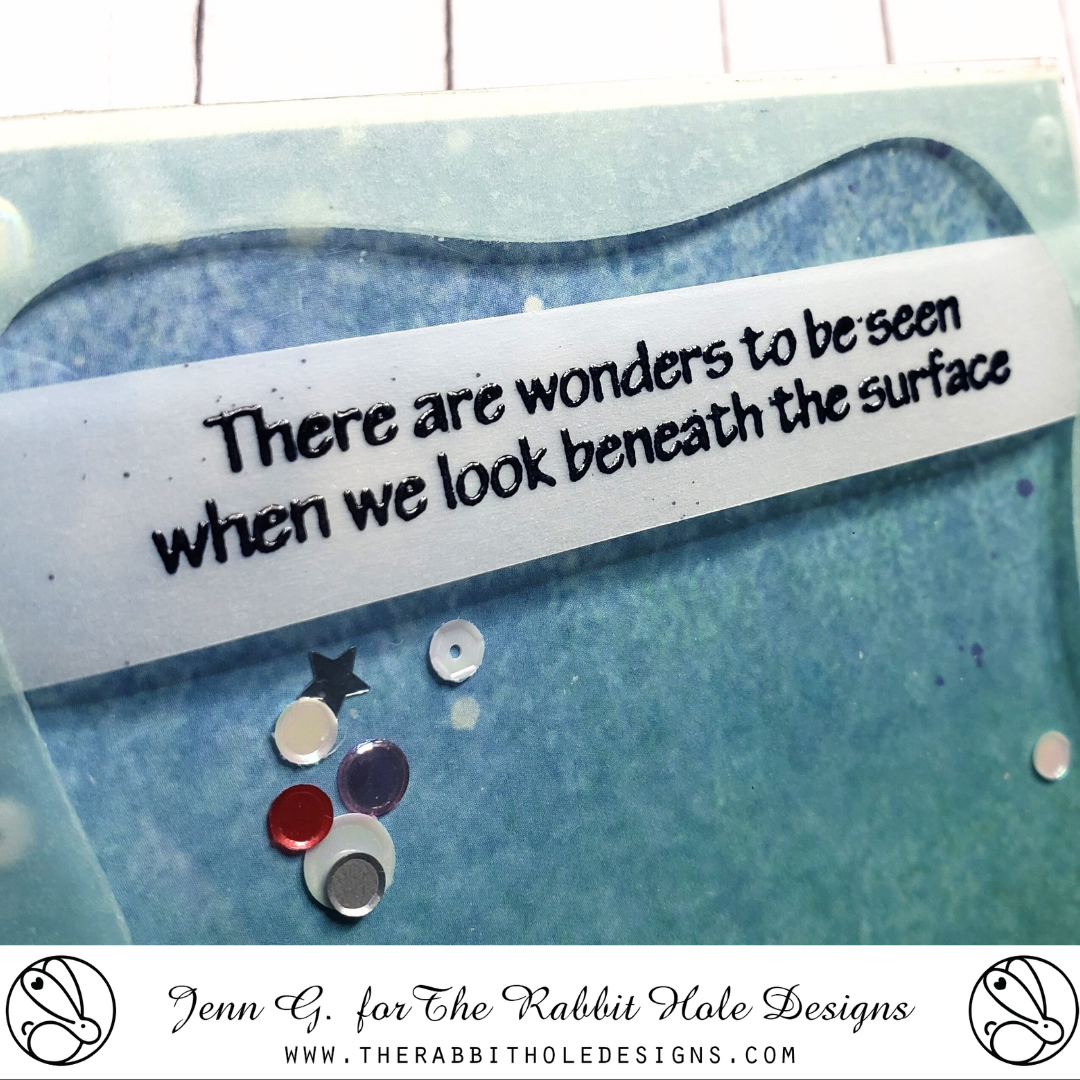
Lastly, I stamped my sentiment, die cut it out using a die from the You've Been Framed die set from The Rabbit Hole Designs and shaded it with my pencils. Then I adhered it to my card.


I just love how this card turned out! I hope I have inspired you to create your own light up card using this awesome lighthouse! I've linked products I used, below. Thanks for visiting!

(Use code Lauren10 at checkout to save)
Disclosure: I use affiliate links where I can. This does not add any extra cost to you, but I do receive a small amount which helps keep me in craft supplies. Thank You for visiting!

High Tide Stamp Set: https://shrsl.com/4in95j

You've Been Framed Die Set, The Rabbit Hole Designs: https://shrsl.com/3xto5