Hello crafty friends! Jenn Gross here, with and interactive card using stamps and stencils from The Rabbit Hole Designs, You can also find my projects on IG under @journeycoachjenn. It seems that love is in the air and in the clouds!
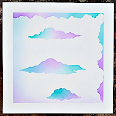
Today I am sharing aninteractive Valentine card. This swinging cupid card is created with The Rabbit Hole Designs' Cupid Clarence stamp set (a Dusting Pike illustration) I used Cottontail Blending Brushes, Clouds in my Coffee stencil paired with the radiant die from the You've Been Framed die set for the background.
Let's take a look at how this card is created:
A - I stamp the Cupid Clarence image twice. I colored the head of one of the images and the body of the other image using blue violet (BV) Olo Markers. I fussy cut the colored head and body, leaving about 1/2" of paper above the neck of the body piece to attach Clarence's head with a foam square. I angle the head at a slight upward angle and secured it to the body.
B - I randomly ink blended a cloud background with the Clouds In My Coffee stencil using Cotton Tail Blending Brushes. and Victorian Velvet, Spun Sugar, Kitsch Flamingo and Wilted Violet Distress Oxide ink on a 4" x 5 1/4' piece of white cardstock.
C & D - Using a standard hole punch, I added a hole 5/8" below the top center of the card front. I positioned the radiant die from the You've been Framed die set about 1/2' below the hole and die cut the design.
E - I used the standard hole punch to add a hole on each end of a 2' x 1/2" strip of clear acetate. This will be used for an interactive swing bar.
F - I added small jump rings to the back of Clarence's envelope and on the bottom of Clarence's shorts to add a small bit of weight for balance. The jump rings are attached with redline tape and a small piece of paper is glued over the top to secure the jumb rings into place. I used Gem-Tack adhesive to attach a slider snap on side of the back of Clarence's arrow hand.
G & H - I let the snap dry in place and attached one hole at the end of the acetate strip over the snap on Clarence's hand and snapped it in place. I snapped the other end of the acetate to the hole on the top of the card and tested the swing movement. I removed the snap and acetate from the top card hole so I could stamp the sentiment at the bottom of the card.
I & J - I snapped the acetate swing bar to the top of the card front I used a small cloud die cut from my stash to die cut a cloud to hide the snap attachment at the top of the card. The cloud is placed over the snap with thick double-sided adhesive foam tape on each side of the cloud. This space allows the acetate bar to swing freely.
K - I attached the card front to a lilac A2 card base using double-sided adhesive foam tape completing this fun interactive card.
Products Used
Thank you, I appreciate you taking time from your day to stop by and check out today’s interactive Valentine card featuring The Rabbit Hole Designs' new Cupid Clarence stamp set. I hope you are inspired to create something lovely today!
Be Creative ~ Stay Inspired
Jenn Gross
Follow me, Journey Coach Jenn, on
Instagram - https://www.instagram.com/journeycoachjenn/
YouTube - http://www.youtube.com/c/JourneyCoachJenn
Blog - http://www.journeycoachjenn.com/
For more inspiration, updates, and news make sure to check out these places
The Rabbit Hole Designs Instagram
The Rabbit Hole Designs Facebook Page


No comments:
Post a Comment