Pages

Showing posts with label Embossing Folders. Show all posts

Cattitude by Martha Lucia

Hi there, Martha Lucia with you!
Today I have a fun project to share, a Cattitude Card that I made, using the recently released Cattitude Stamp Set.


Create this was very simple:
  1. Create the card base using Basic Black cardstock.
  2. Cut a second layer with Pacific Point cardstock.
  3. Create the third layer of the card using a embossing/cut folder. I am using the Moroccan View Cut and Emboss Folder from Spellbinders.
  4. Paste the embossed layer over the card base using double sided foam tape.
  5. Stamp the images from the Cattitude Stamp Set onto whisper white card stock. I used Memento Tuxedo Black Ink to stamp the images.
  6. Color your cats with your favorite medium. I used Spectrum Noir Alcohol Markers to colored mine.
  7. Fussy cut the images with scissors.
  8. Arrange the images over the decorated card base and paste them with double sided foam tape

Thanks for stopping by and if you want to see more inspiration with the Cattitude Stamp set you can visit The Rabbit Hole Designs Blog and Store.

Doggone Shaker Card by Martha Lucia

Happy Monday crafty friends, Martha Lucia here with you!

Today I have a fun project to share, Doggone Shaker Card that I made, of course, using the recently released Doggone Stamp Set.


 Create this was very simple:
  1. Emboss the front of your card base using a embossing folder of your preference.
  2. Create the pieces to make the shaker design. 
  3. Ink one of the small frames with the color that you prefer. I used Peacock Featers and Broken China Distress Ink and used my Clarity Brushes to apply the ink.
  4. Cut the stitched heart included on the same set of die cut from the inked layer.
  5. Cut a piece of clear sheets that cover the window created with the heart die cut and paste it over the window.
  6. Add some sprinkles under the clear window. 
  7. Paste double sided foam tape around the window and around all the borders of the scalloped frame and cover it with the second white piece. 
  8. Add the shaker piece to the embossed card base.
  9. Stamp your favorite dog from the Doggnone stamp set. I used one small and colored it Spectrum Noir Alcohol Markers. Paste partially over the clear window. To stamp the image, I used Memento Tuxedo Black Ink.
  10. Finalize your card adding a stamped sentiment. I stamped one of the sentiments included on the stamp set Doggnone following the shape of one of the die cut tags included on the Favor Bag Die Creative Cut with Memento Tuxedo Black Ink.


Thanks for stopping by!  See you soon!

Foxy Dad-isms


Hello again!  Shanna here from Caffeinated Craftiness again to share a fabulous Father's Day card using The Rabbit Hole Design's slightly cranky, under-caffeinated, just waking up Caffeinated Fox! I really wanted to use this guy for a Father's Day card for my husband, and the Sassy Sentiments paired perfectly with him for a "dad-ism" card.  My favorite is "Here, hold my beer".  I picked my favorites and stamped directly onto my coffee sleeve after dry embossing with a striped folder.  Sooo many to pick from, but I narrowed it down to the 4 that reminded me most of him. 


The coffee-shaped card was die-cut, then after fussy cutting my Caffeinated Fox, I mounted him directly onto the sleeve so he can slide off and the card can open.  He was watercolored using my Zig real brush markers on Canson Mixed Media paper. I chose to paper-piece his robe with a small print I had in my scraps though, I like how it looks like a pattered fabric! Add "#1 Dad" to the mug and Voila! I plan on inserting a gift card or two inside for a sweet little gift from me and the kids.  That along with his favorite meal, and we will have a successful Father's Day in the books!

Well, that's all for today.. Guest Designing for The Rabbit Hole Designs has been a ton of fun this month for such a fresh, fun company...Thanks for stopping by!  If you would like to follow along with my caffeinated adventures, stop by my blog here and say hi!

We are Family by Martha Lucia

Hi there! Martha Lucia here with you.

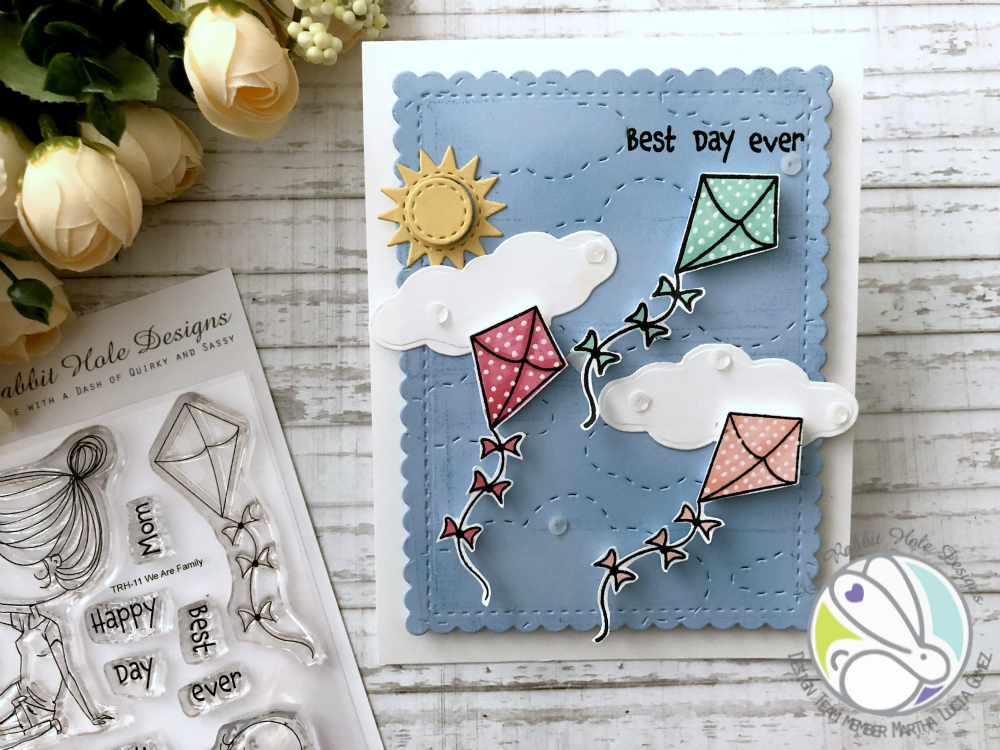
Today I am featuring the stamp set We are Family from The Rabbit Hole Designs. I created a card full of layers and special details. Take a look at my card:


 Let me share with you the steps to create the card:
  1. Cut your card base. I used whisper white card stock of 4-1/4"x11" with score in 5-1/2".
  2. Cut the second layer using the Cloud Die. I used the Cloud Die from Kat Scrappiness and I inked a little the die before to pass it through the cutting machine to add more dimension to the layer.
  3. Cut the cloud stitched die created before using a Stitched Scalloped Rectangle.
  4. Stamp the sentiment from the We are Family set using Memento Tuxedo Black Ink.
  5. Paste the second layer to the card base using double sided foam tape.
  6. Stamp the kite from the stamp set We are Family over whisper white card stock.
  7. Color the stamped kites using alcohol markers and make tiny dots with a white gel pen.
  8. Fussy cut the stamped kites with your scissors.
  9. Cut two clouds from the He is Risen die using whisper white card stock and arrange them over the decorated card base using double sided foam tape.
  10. Paste the stamped images with double sided foam tape and personalize your card adding some sequins.

Thank you for joining me today and let me share the We are Family stamp with you. This set available in The Rabbit Hole Designs.

Easter Embroidery Hoop with Katie

Happy Monday!

I am back again for another week with another fun project.  This time I am using the Easter Bounty set. 


Here is what I did: 
  • I stared by stamping my bunny on white Copic friendly CS.  Next I stamped it again on a post it and cut it out to create a mask.  I placed the mask over the bunny and then stamped the egg in the proper place. 
  • Next I came in with my Copics and colored them both.  Then I cut them out with my Scan n' Cut and set them aside. 
  • I used cut out this embroidery hoop die in three different colors (brown for the hoop, vanilla for the interior and gold for the metal pieces and put it together.
  • I stamped the little flower and leaves from the set at the top and colored them.  Then I created faux stitching around the inside.  Next I placed my bunny in the middle. 
  • I had this piece of CS pre-embossed and thought it was perfect so I placed my embroidery hoop on top of this with dimensionals and adhered it all to a base. 
  • Lastly, I die cut this hello sentiment in a nice yellow to compliment the pastels and adhered it. 
Here is one more view of the card from a different angle. 


For more inspiration, updates, and news make sure to check out these places.


Thank you for the visit today and I hope you enjoyed this project.  Fore more details on supplies you can visit my blog- KBStamps