Pages

Faux Framed Wedding Scene


Hey, everyone! It's Lynnea Hollendonner with a quick way to create a faux frame! This technique is great for framing up little scenes and as soon as I saw this couple in the Happily Ever After stamp set I knew I wanted to frame them!


How - To

  • Mask off a semi circle at the bottom of a piece of A2 cardstock and blend on green ink for the grass. Use a cloud stencil and light blue ink to create clouds in the sky. 
  • Stamp 3 flowers from the Easter Bounty stamp set repeatedly across the hill and color with Copics. 
  • Stamp and clear emboss sentiment from Happily Ever After onto the hill. 
  • Stamp, color, and cut the image and glue onto the scene. 
  • Die cut a rectangle from a piece of A2 cardstock to create a frame. Using scissors snip from the outside corner to the inside corner at each corner. This will leave 4 strips - 2 short and 2 long. 
  • Using light gray Copic markers flick color onto the end of each strip and assemble them onto the card with foam tape. 


Products List


For more inspiration, updates, and news make sure to check out these places


Thank you for stopping by! I hope you'll try this super easy technique and create some framed scenes of your own!

April Release Winners & From prize winner, to Guest Design Team, to full time Design Team.


Good Morning,
today we want to share some news with you all.  Lisa Golzbein was a winner from our very first release and she wasted no time creating some amazing projects using the stamps she won.  We were so impressed with her projects we reached out to her and invited her to be a Guest Design Team Member for the month of March.  She happily said yes and set about creating even more projects and posting them to the Fan Page and all over her social media. Again the projects she created just floored us, we had to take a chance and ask her if she would be interested in a full time spot on our Design team. Guess what? She said Yes!

So we would like to officially welcome Lisa Golzbein to the Design team as a permanent designer for The Rabbit Hole Designs. The April release starts her term with us and we hope you will enjoy her as much as we do.


~

Now for the other exciting news:
Announcing the winners from the new releases Blog Hop

From Day 1 on The Rabbit Hole Designs Blog is

From Day 2 on Martha Lucia Gomez's Blog is


email info@therabbitholedesigns.com to claim Winners have until 04-05-2019 to claim or prize is forfeited

For more inspiration, updates, and news make sure to check out these places.

Thank you for falling down The Rabbit Hole for a few minutes!


Pop-up Crib Baby Shower Card


Hello again, Amanda from Pear Blossom Press here with a fun pop-up card for you today. I've combined images from the new We Are Family set with a sentiment from the new Happily Ever After set to create a baby shower card with a crib that pops up when you open it! It may seem complicated, but it was actually pretty easy to make.

First I stamped and embossed the family images, then used watercolors to paint them. Once they were dry, I cut them out with my ScanNCut. (No sore thumbs here folks!) While my stamping and watercolor supplies were still out, I also stamped and embossed the sentiment and a few little flowers from the Easter Bounty set onto a die cut tag, then I painted it. The tag dies I used are nesting, so I cut out a slightly larger frame and painted it aqua to coordinate. I wanted the sentiment to look like a framed picture hanging in the baby's room.


To make the pop-up crib, I took a 1 1/2" x 8 1/2" strip of white cardstock and scored it at 2 5/8," 4 1/8," 6 3/4," and 8 1/4." When you fold the piece up, you get a little box shape with a tab for gluing it together. Before I glued it together though, I cut notches out of the bottom of each section to look like crib feet. The shorter sides are the head and foot of the crib. I cut out a pair of the same tag dies I used for the sentiment and trimmed them to fit as the headboard and footboard. I glued the crib together. Then I cut a pair of pattern paper "blankets" with a scalloped rectangle die and glued them over the sides of the crib. (This way, I didn't have to try to make slats in the sides.)

The card base was created from a 4 1/2" x 12" piece of cardstock. I scored it at 2 3/4" and 4 3/8" to form a z-fold card. I nestled the crib inside the fold and glued the headboard and back side to the card. Now when it is unfolded the crib pops up! I like z-fold cards because you are decorating the inside and outside at the same time ;)


To add a mobile above the crib, I took a 1/2" x 6 1/4" strip of the same paper I made the card base with and I folded it at 1 1/2," 3," 4 1/2," and 6." This forms another little box with a 1/4" flap for gluing. I taped clear thread with double-sided butterfly die cuts to the center of each section and I suspended a fifth butterfly from a thread that spans two folds. I covered the tape with a second strip of pattern paper, then glued the box into place above the crib.

To finish my card, I glued the sentiment and frame in place. Then I popped the family images into place with a little foam tape for more dimension. There is some negative space that my ScanNCut missed between mom and daughter; I just colored it with a marker in the same color as the card base so it blends in. This card fits into a #10 envelope (standard letter size). Here it is in action...


A quick note about the pattern papers I chose: for the card base, I chose a soft mushroom color with a pattern that looked like it could be wallpaper in a nursery. Since it's the background, I didn't want it to be too bold or you would miss the focal points. The prints for the blankets offer another splash of color and the patterns are small enough to look proportional in the scene. Remember, when choosing patterns, size matters!

Well, that's my card for today; I hope I've inspired you to give it a try. And if you love the new stamp sets as much as I do, you're going to need them in your collection. They're available now in the shop and guess what? Some lucky winners are going to receive these sets free! Head over to the blog hop for details and enter to win before it's too late! Thanks for stopping by and good luck my crafty friend! (If you are looking for links to other specific products I used to make this card, head over to the sister post on my blog.)

Release Hop for April - Day 2 - We Are Family


Hello and welcome to Day 2 of the release hop. We are so excited for you to join us as we present to you our April release.  Our fabulous Design Team will be sharing their projects using the new stamp set, We are Family.  So please, be sure to visit their blogs and leave them some crafty love. 

All of the new stamp sets are available to purchase right now in the shop.


FREE SHIPPING 
on orders of $25 or more before taxes and shipping
(applies to US orders only)
No code necessary, exclusions apply


The stamp set that is being highlighted today is: 

We Are Family


**Giveaway**
To celebrate day 2 of the release, The Rabbit Hole Designs is giving away the stamp set We are Family to One lucky winner.  Winner will be chosen at random from the comments left on participating blogs, so make sure to visit each stop and leave a comment.  Leave comments by 11:59 pm PST 03-28-2019 on all participating blogs. Winner will be announced on The Rabbit Hole Designs blog 03-29-2019

Here is the line up for the hop:


Thank you so much for stopping by today!

Release Hop for April ~ Day 1 ~ Happily Ever After


Hello and welcome to Day 1 of the release hop. We are so excited for you to join us as we present to you our April release.  Our fabulous Design Team will be sharing their projects today featuring the stamp set Happily Ever After.  So please, be sure to visit their blogs and leave them some crafty love. 

All of the new stamp sets are available to purchase right now in the shop.

FREE SHIPPING 
on orders of $25 or more before taxes and shipping
(applies to US orders only)
No code necessary, exclusions apply


The stamp set that is being spotlighted today is: 

Happily Ever After


**Giveaway**
To celebrate day 1 of the release, The Rabbit Hole Designs is giving away the stamp set Happily Ever After to one lucky winner.  Winner will be chosen at random from the comments left on participating blogs, so make sure to visit each stop and leave a comment.  Leave comments by 11:59 pm PST 03-28-2019 on all participating blogs. Winner will be announced on The Rabbit Hole Designs blog 03-29-2019

Here is the line up for the hop:

Lisa Golzbein
Katie Brooks
Maria Russell
Lynnea Hollendonner
Amanda Stevens
Martha Lucia Gomez
MaryAnn Samuelson

Make sure you come back tomorrow for Day 2 of our release HOP.


For more inspiration, updates, and news make sure to check out these inspiring places! 

The Rabbit Hole Designs 

Thank you so much for stopping by today!

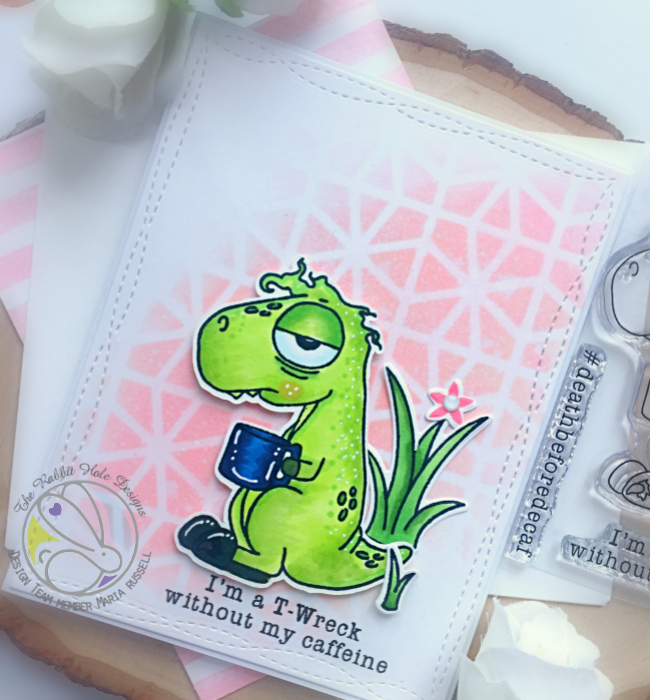
I'm a T-Wreck Without My Caffeine


Hello The Rabbit Hole Designs fans!  Maria here on the blog with you.  April is almost here and do you know what is happening tomorrow down at the rabbit hole?  Tomorrow is the start of our April release and you will be seeing some AWESOME stamp sets and projects made by the entire design team.  Oh yeah, be prepared to ooohhh and aaaahhhh!  You definitely need to stay tuned! 


For my project today, I am showcasing the adorable Caffeinated Dino 3x4 stamp set.   Here's what it looks like:


HERE'S HOW I MADE MY CARD:
  • Stamp the images on smooth white card stock and color the images in with Copic markers (or any coloring medium of your choice).
  • Die-cut the image with an electronic die-cutting machine or fussy cut with scissors.  I used my Brother Scan N Cut 2.
  • Cut an A2 size piece of Bristol smooth white card stock and use the geometric stencil to ink up the background.  I used Worn Lipstick and Antique Linen distress oxide inks.
  • Use the distress sprayer to spritz some water on the colored background and dab it dry with some paper towel.
  • Adhere the colored background on an A2 size side-fold card base.
  • Adhere the images on the card with either Nuvo liquid adhesive and foam adhesive.
  • Stamp the sentiment using Versafine Onyx black ink.

Here's a closer look:


I finished my design by using my Sakura white gel pen to add some dot details to my Dino and the coffee cup.  Here's another look:


If you are looking for further details about my project including supplies used, I would be so grateful if you can stop by my blog today at:


I hope you like my coffee-themed card today.  Have an amazing day and happy crafting!

For more inspiration, updates, and news make sure to check out these places.

Spring is in the air


Good Morning Rabbit Hole Designs Fans

Today is my day here on The Rabbit Hole Designs blog and I want to share an easy to make card with you that features the one of the images from
The Rabbit Hole Designs set Easter Bounty

Today's card was super fun to make and gave me a chance to get a little inky. And best of all was a 1 layer card that came together fairly quick once I had all the supplies gathered up.


Card Recipe
  • I stamped the girl rabbit and gave her a quick coloring with copics. 
  • I then stamped the kite from an upcoming set to be released next week on 03-27-2019 (yes you all are getting a sneak peek) and gave it a quick coloring with copics.  I also stamped the kite on a piece of post it tape to create a mask which I applied over just the diamond shape of the kite.
  • Ink up your background using a cloud stencil or you can use any die cut with wave like border and use that as a stencil.
  • I used Mowed Lawn Distress Oxide ink on a tiny blender brush to apply a patch of grass around the bottom of the bunny's feet.
  • I decided to use the sentiment from Easter Bounty stamped in a pretty purple that closely matched the purple on the bunny's dress.
  • instead of adding some sequins or enamel dots I went with the tiny butterfly also found in the Easter Bounty stamp set.
  • Neenah Classic Crest Solar white in 110lb  was used to create a side fold A2 sized card.
For more inspiration, updates, and news make sure to check out these places.

That is all for me today.  I hope I have inspired you to maybe give this technique a go and create some fast and easy cards.
~
Thank you for falling down The Rabbit Hole for a few minutes!
MaryAnn
~

Caffeinated Bee with Martha Lucia

Hello everyone Martha Lucia here with you! Do you know the Caffeinated Bee
Well today I am featuring this fabulous stamp set created by The Rabbit Hole Designs, that is part of their amazing collection of Caffeinated Stamp Sets.


I created this card in a different way from normally I made. Today, I first stamped the Caffeinated Bee over a whisper white card stock and colored it with Alcohol Markers. Then I started playing with the layers and after saw the eyes of the Caffeinated Bee, I though that it to be the focal point because it reflect our faces many times!


On this card I combined different colors and different textures. First I embossed a basic black layer and pasted it directly over the whisper white card base, then I created a set of banner on three different colors of card stock that I coordinate with the background piece of designer paper. At the end I attached the banners with two yellow brads and added my stamped images, the Caffeinated Bee and the #Buzzed sentiment with double sided foam tape over the colorful card base.

I hope that you like me explore all the possibilities with the caffeinated images and be ready to start every day with the energy of the Caffeinated Bee!

For more inspiration, updates, and news make sure to check out these places.

If you are looking for further details about my project including links to instruction and products not listed please feel free to drop on by my Stampartpapel Blog.


See you soon!

Caffeinated Bee Spinner Cards

Good morning Rabbit Hole fans and welcome back to the blog!
It's Lisa here with you today and this is my last post as a guest 
designer for the month of March. I've enjoyed sharing my cards with 
you all month and today I have 2 fun spinner cards for you.
I used the Caffeinated Bee stamp to make an interactive card and 
I decided to do it 2 different ways.

The first card has the spinner on the front of the card and when 
the card is opened it spins around on a string.
I mirror stamped the bee on both cards so I could have the identical 
symmetrical image on both sides of the spinner.


There are many YouTube videos showing the construction of a spinner card.
They are actually quite easy to make and they look very impressive when
opened by the recipient.  


The second card has the spinner on the inside of the card but essentially 
acts the same way with the bee spinning wildly when the card is opened.


Here are 2 short videos showing the mechanism of the 
spinner when the cards are opened.


Thanks so much for stopping by today!
I hope you enjoyed my cards and maybe you'll 
give the spinner card a try!

For more inspiration, updates, and news make sure to check out these links.

Have a great day, I already am!
🐝 Lisa 🐝


Adding Motion to the Caffeinated Flamingo

Hello crafty friend! It's Amanda again and today I've got a quick and easy way to add some movement to your cards with a simple lever. This is one of those techniques that is much easier to watch than explain, so I've put together a video for you here...

In the video, you saw me stamp out the Caffeinated Flamingo and use her for my focal point. I also used the back of the Caffeinated Crab for the island on my ink blended background. I chose Copic markers to color the flamingo, as well as the tropical die cut pieces used to build the scene; I like the vibrant colors and blendability I get with them. To help the sentiment stand out, I embossed it on a black strip with white powder.

My card front was cut out with a stitched rectangle die and I added a thumb notch to it, as well as the A2 card base, with a stitched circle die. I cut the pull tab and sentiment strip with stitched dies to carry the theme through on all of my pieces. I used a clear piece of acetate to make the second part of the lever so it would blend into the background as much as possible. My ScanNCut is my favorite tool for fussy cutting, but before I could cut out the flamingo and arm, I needed to make sure I prepped my images by adding lines with a Copic Liner (0.3) and whiting out unwanted areas with a paint pen.

To attach the lever pieces together, I used mini brads. You can make thin fasteners from paper, but brads are fast and easier. In order to accommodate the thickness of the brads, I popped my card front and flamingo body up with foam tape. To finish the card, I added some shimmer and shine with several glitter products, and a clear glaze on her eye.

So what do you think of her? Do you have any stamps you can add motion to? Is the Caffeinated Flamingo in your stash yet?! I'd love to know how you add interactive elements to your cards. Be sure to tell me in the comments below...And until next time my friend, stay crafty!

Easter Embroidery Hoop with Katie

Happy Monday!

I am back again for another week with another fun project.  This time I am using the Easter Bounty set. 


Here is what I did: 
  • I stared by stamping my bunny on white Copic friendly CS.  Next I stamped it again on a post it and cut it out to create a mask.  I placed the mask over the bunny and then stamped the egg in the proper place. 
  • Next I came in with my Copics and colored them both.  Then I cut them out with my Scan n' Cut and set them aside. 
  • I used cut out this embroidery hoop die in three different colors (brown for the hoop, vanilla for the interior and gold for the metal pieces and put it together.
  • I stamped the little flower and leaves from the set at the top and colored them.  Then I created faux stitching around the inside.  Next I placed my bunny in the middle. 
  • I had this piece of CS pre-embossed and thought it was perfect so I placed my embroidery hoop on top of this with dimensionals and adhered it all to a base. 
  • Lastly, I die cut this hello sentiment in a nice yellow to compliment the pastels and adhered it. 
Here is one more view of the card from a different angle. 


For more inspiration, updates, and news make sure to check out these places.


Thank you for the visit today and I hope you enjoyed this project.  Fore more details on supplies you can visit my blog- KBStamps

All You Need is a Little Vitamin Sea


Hello The Rabbit Hole Designs fans!  Maria here on the blog with you .  Before I start with my post, I just want to let you all know that TRHD is having a St. Patrick's day special (see details below).   Take advantage and order your favorites now!


For my project today, I am showcasing the beautiful Sofishticated 6x8 stamp set.   Here's what it looks like:


HERE'S HOW I MADE MY CARD:
  • Stamp the images on smooth white card stock and color the images in with Copic markers (or any coloring medium of your choice).
  • Die-cut the image with an electronic die-cutting machine or fussy cut with scissors.  I used my Brother Scan N Cut 2.
  • Use some 110 lb card stock to die-cut using the Coral Collage die and the Under the Sea Collage die.
  • Color with copic markers.


  • Use the Under the Sea Collage die again to die-cut fun foam.  Adhere this piece on top of the "colored" Coral Collage to give them dimension.
  • Adhere the colored images on the foreground.
  • Use Peacock Feathers distress oxide ink to stamp the sentiment "All you need is a little vitamin sea" with your MISTI stamping tool.
Here's a closer look:


I finished my design by adding some sparkling clear jewels to make them look like bubbles.  Here's another look:


If you are looking for further details about my project including supplies used, I would be so grateful if you can stop by my blog today at:


I hope you like my sea-themed card today.  Have an amazing day and happy crafting!

For more inspiration, updates, and news make sure to check out these places.


So-Fishticated ~ CAS Seahorse


Good Morning

MaryAnn here and today is my day on the The Rabbit Hole Designs blog and I want to share an easy to make card with you that features the one of the images from
The Rabbit Hole Designs set So-Fishticated

Today's card is the epitome of CAS (Clean And Simple) and you will be able to make many of this type of card in minutes.  I can see this card being used for Birthdays, Miss you, Thank you, Masculine themed.  It all depends on the colors you choose.


Card Recipe
  • Grab your favorite background stamp and some post it tape or post it's and mask off a nice rectangle on your card base. You can even do this with a masked off square or circle.  I used a top folding A2 sized card base.
  • Ink up your background stamp and stamp your masked off card base and set aside
  • for the seahorse I used Versafine Clair ink in Blue Belle and clear embossing powder applied then heat set. A quick color of the seahorse using Zig clean color brush pens and I was ready to fussy cut.
  • Once you have fussy cut your image apply foam tabe to back for dimension and attach to front of previously masked and stamped card base. Add a couple of sequins and your card is done.
  • Neenah Classic Crest Solar white in 110lb (card base) and 80lb for the seahorse.
For more inspiration, updates, and news make sure to check out these places.

That is all for me today.  I hope I have inspired you to maybe give this technique a go and create some fast and easy cards.
~
Thank you for falling down The Rabbit Hole for a few minutes!
MaryAnn
~