Pages

Showing posts with label Alcohol Markers. Show all posts

Fiddly Jack

Hello friends! Welcome back to the blog. Today's card features the new Jack of All Faces stamp set.


Card details:

  • Die-cut the smallest frame from You've Been Framed dies on white cardstock. 
  • Stamp the image from Jack of All Faces stamp set on the white cardstock panel with an alcohol-friendly black ink and color with alcohol markers.
  • Stamp the sentiment "Trick or Treat" from Jack of All Faces with black ink.
  • Blend the Fiddlehead Stencil with purple ink on a purple A2 panel for a tone-on-tone effect.
  • Attach white cardstock panel to the A2 purple panel.
  • Attach the purple A2 panel to a card base. 


Thanks for visiting!

Amrita

You can find me on IG @amritapettus

For more inspiration, updates, and news check out these awesome places! 


The RHD Affiliate Disclaimer:

We want to ensure transparency and honesty in our interactions with you, our valued readers. Please be aware that the links provided on The Rabbit Hole Designs Blog may be affiliate links. This means that if you make a purchase through these links, the project designer may earn a small commission at no extra cost to you. Your support means the world to us!


We kindly request that you accept the tracking cookie for the affiliate websites. Rest assured, this will not expose your computer to viruses or compromise your information. It's a necessary step for the company to attribute the sale to the affiliate, ensuring that creators like our creatives receive their rightful commissions.


Your trust and support empower our creators to continue sharing creativity and inspiration through our blog. Thank you for being an integral part of The Rabbit Hole Designs community!


Silly Boo Crew

Hello friends! Welcome back to the blog. Today's card features the Silly Pumpkins 3x4 stamp along with a sentiment from the new Jack of All Faces stamp set.


Card details:

  • Die-cut the smallest frame from You've Been Framed dies on white cardstock. 
  • Stamp the Silly Pumpkins image on the white cardstock panel with an alcohol-friendly black ink and color with alcohol markers.
  • Stamp the sentiment "Boo Crew" from Jack of All Faces stamp set with black ink.
  • Attach white cardstock panel to A2-sized black & white patterned paper.
  • Attach the A2 panel to a card base. 
  • Add white gel or acrylic pen details to finish card.


Thanks for visiting!

Amrita

You can find me on IG @amritapettus

For more inspiration, updates, and news check out these awesome places! 


The RHD Affiliate Disclaimer:

We want to ensure transparency and honesty in our interactions with you, our valued readers. Please be aware that the links provided on The Rabbit Hole Designs Blog may be affiliate links. This means that if you make a purchase through these links, the project designer may earn a small commission at no extra cost to you. Your support means the world to us!


We kindly request that you accept the tracking cookie for the affiliate websites. Rest assured, this will not expose your computer to viruses or compromise your information. It's a necessary step for the company to attribute the sale to the affiliate, ensuring that creators like our creatives receive their rightful commissions.


Your trust and support empower our creators to continue sharing creativity and inspiration through our blog. Thank you for being an integral part of The Rabbit Hole Designs community!


Hello Gorgeous!


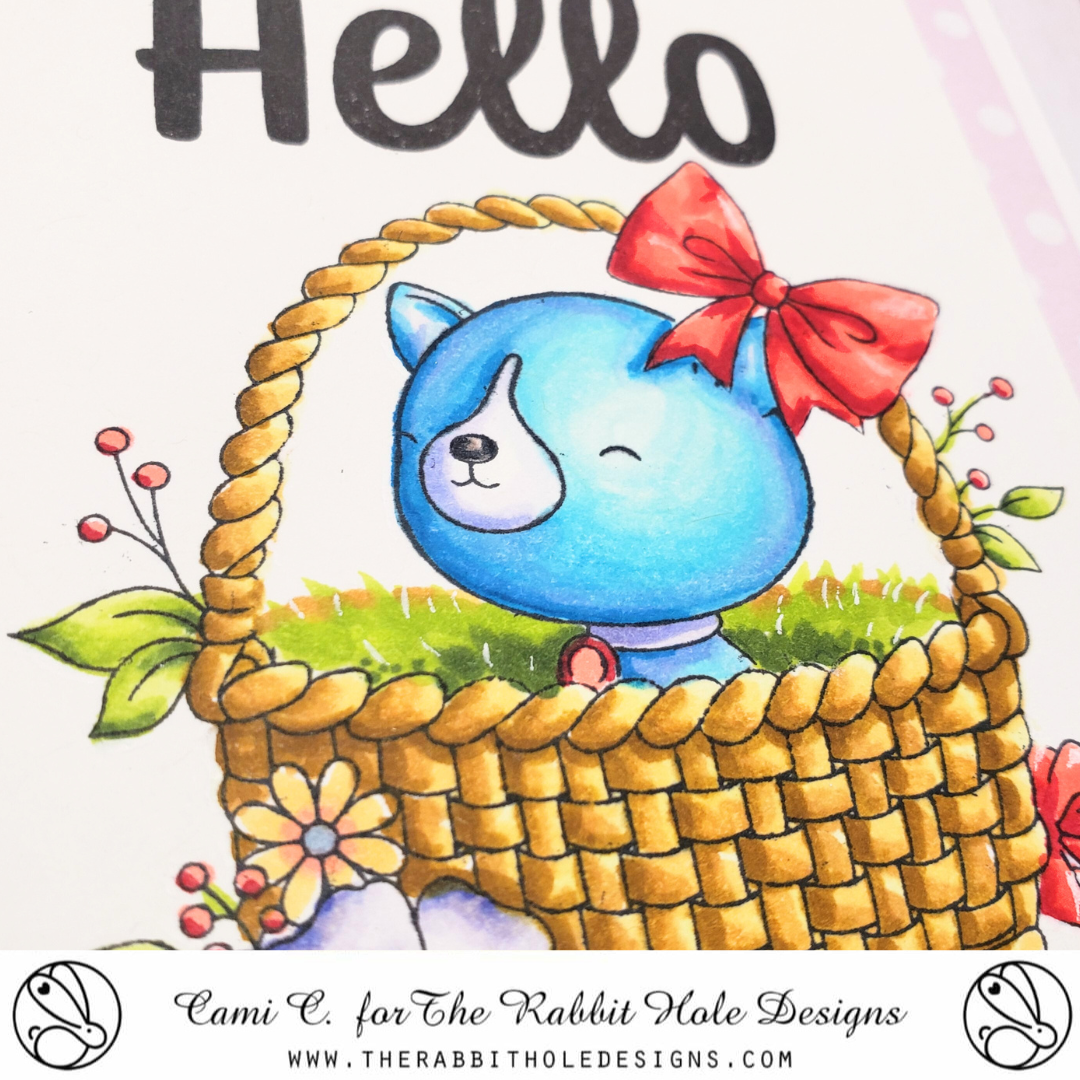
Hey there crafty friends! Now here is a basket full of adorable!  This little blue dog is content sitting outside in the sun just soaking in the beautiful day!

Today I am sharing this lovely card featuring The Rabbit Hole Designs' new Easter Basket stamp set paired with the Year 5 Birthday stamp set (both are illuastrated by Agota Pop) and the Hello word stamp set. 

I started by stamping the Easter Basket stamp on a piece of Masking Magic. I cut the basket out and used a craft knife and cutting mat to carefully cut out the inside area with the eggs. I use this part to mask off the inside of the basket, when I stamped it on coloring cardstock. This way the basket appears empty.  I remove the inner mask and placed the basket mask over the stamped basket image and stamped the dog to sit inside the basket and his bone to the right side of the basket. After removing  the basket mask,  my image is ready to color. 

I colored the dog with blue (B) OLO markers and the basket with orange (O) and orange red (OR) OLO markers. I added grass to the basket using green (G) and yellow green (YG) OLO markers.

The sentiment is from the Hello Word stamp set.  I stamped Hello and gorgeous on the card front using Versafine Black Onyx ink. The finished card panel is trimmed and glued to a 4" x 5 1/4" pale purple polka dot cardstock and attached to an A2 card base completing the card.

Supplies used 

Thank you, I appreciate you taking time from your day to stop by and check out my Hello Gorgeous card on The Rabbit Hole Designs Blog. I hope you are inspired to create something lovely today!


Be Creative ~ Stay Inspired

Jenn Gross


Follow me:

Instagram - https://www.instagram.com/journeycoachjenn/

YouTube - http://www.youtube.com/c/JourneyCoachJenn

Blog - http://www.journeycoachjenn.com/


For more inspiration, updates, and news make sure to check out these places


The Rabbit Hole Designs

The Rabbit Hole Designs Instagram

The Rabbit Hole Designs Facebook Page

The Rabbit Hole Designs Pinterest

The Rabbit Hole Designs YouTube


Otter-ly Content

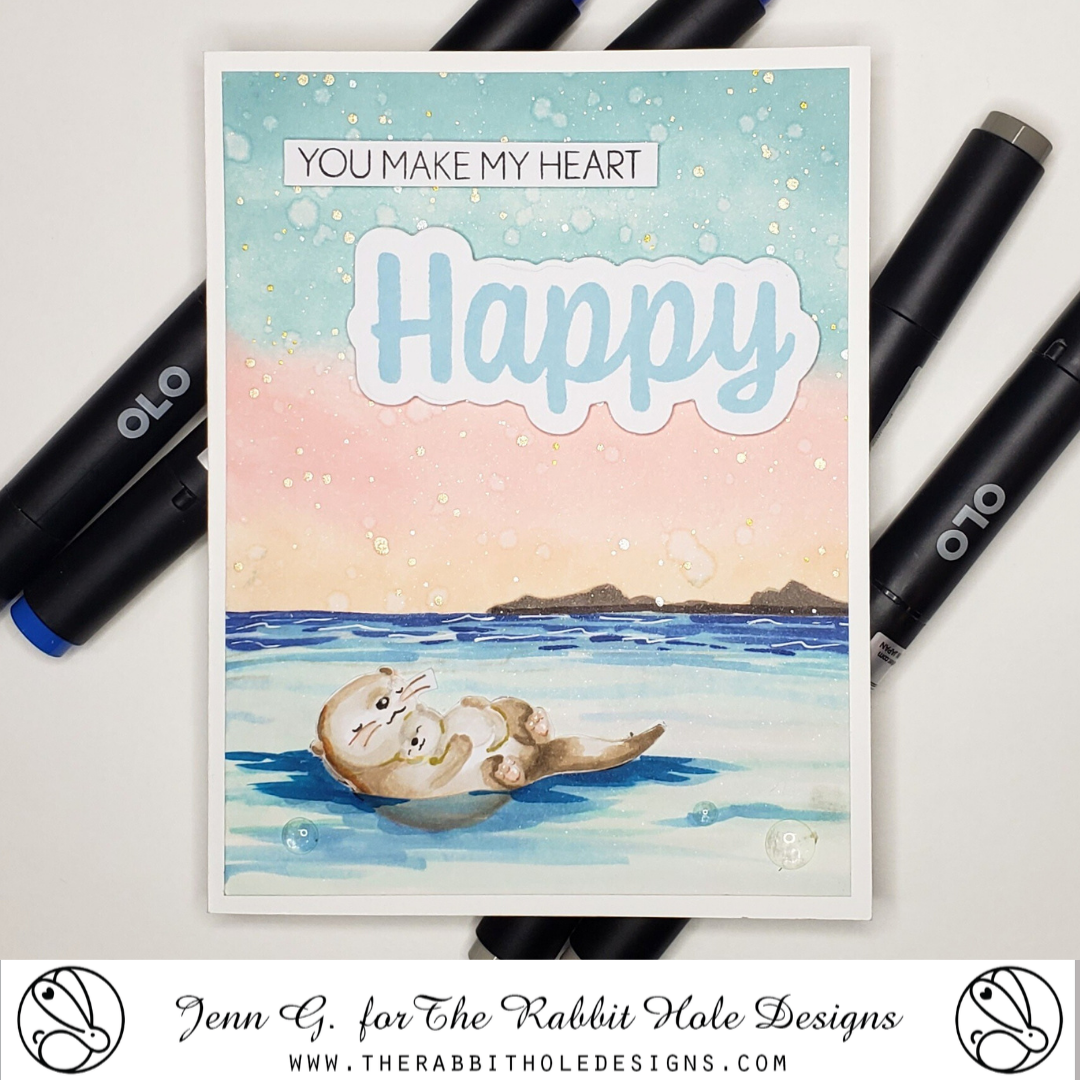
 Hello my crafty friends and welcome to today's blog featuring The Rabbit Hole Designs Otter-ly Adore stamp set (an Agota Pop Illustration). I paired it with the Happy Scripty Word and Shadow Layer dies 

I am sharing this sweet card with an otter mom and her pup!  Don't they look so adorable and content just floating on the calm water?
I stamped the otter image with Pink Sand Fresh ink and colored them with OLO Markers using the Os, ORs and RGs colors before cutting the image out.

The sky background is ink blended using Harbor, Powder, Pink Lemonade, and Nectar colored inks.  I added some liquid gold splashed onto the background.  The water is colored and blended using B and BG Olo Markers. I created a darker area and cut a slit to add the otter image so they look to be floating gently on the water.

The Happy Scripty Word with Shadow Layer die is cut from light blue and white cardstocks. The "You make my heart" sentiment is stampe on white cardstock and cut to a strip.  Both sentiments are added to the sky on the card front with double-side adhesive foam squares. 

The Rabbit Hole Design Products


Thank you, I appreciate you taking time from your day to stop by and check out this Otter-ly Content card featuring the Otter-ly Adore stamp set by The Rabbit Hole Designs . I hope you are inspired to create something lovely! today! 


Be Creative ~ Stay Inspired

Jenn Gross


Follow me, Journey Coach Jenn, on 

Instagram - https://www.instagram.com/journeycoachjenn/

YouTube - http://www.youtube.com/c/JourneyCoachJenn

Blog - http://www.journeycoachjenn.com/


For more inspiration, updates, and news make sure to check out these places


The Rabbit Hole Designs

The Rabbit Hole Designs Instagram

The Rabbit Hole Designs Facebook Page

The Rabbit Hole Designs Pinterest

The Rabbit Hole Designs YouTube

Versatility on Your Stamps


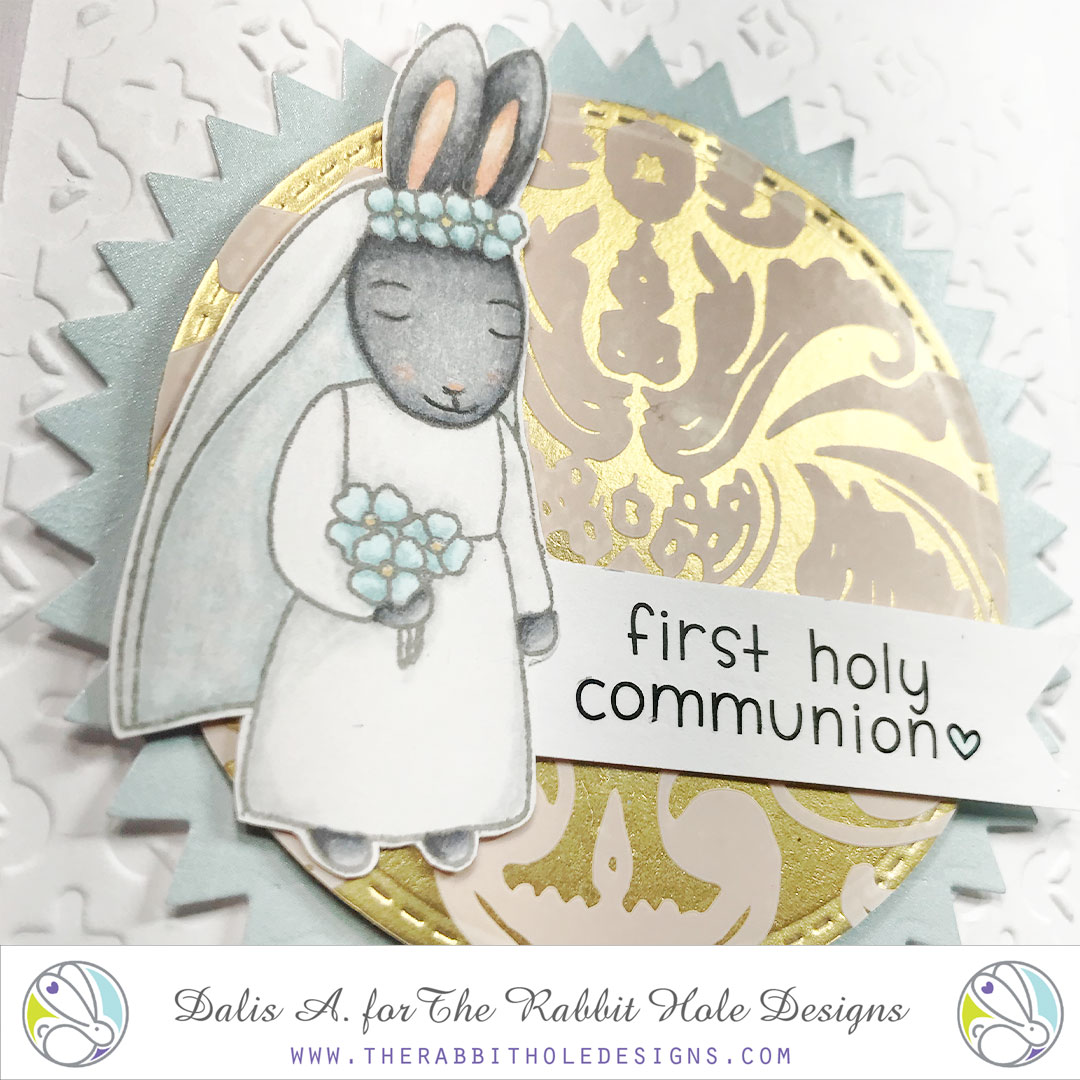
Looking at your stamps in a different way is always the best part of getting a new stamp set. The "Happily Ever After" is a sweet wedding stamp set, but what else can it be? If you mask the groom bunny out of the picture you get this adorable girl bunny that is perfect for a First Holy Communion card. What else do you see when you look at the Happily Ever After couple? Maybe a PROM card, if you mask the veil of the bride? 
After coloring the bunny with alcohol markers, I decided to create the golden backdrop with some stickers to convey the idea of the osties. The embossed folder used even though does not have a cross image, it does bring an idea of a cross, helping bring the theme and the card all together.


For more inspiration, updates, and news make sure to check out these places:

Holding You in My Heart - Cheery Bunny Card

Hello my crafty friends and welcome to The Rabbit Hole Designs blog.  Today I am sharing this bright and joyful card.  As soon as I saw the Bunny Bouquet stamp set, I knew I wanted to color it.  The heart shape made by the ears is so cute and who wouldn’t love being as free as this sweet bunny is in the flowers!


I used Karin Brushmarkerpro watercolor pens to color the flowers and leaves in their vibrant colors.  I used Spectrum Noir Triblends to color the sweet bunny in brown greys and Bright Pink to emphasize the heart.  I imagine our bunny is here enjoying the moment and fond memories.


The Rabbit Hole Designs products used in this card:

 Bunny Bouquet 4x4 stamp set


I hope you enjoyed this bright and joyful card, Holding You in My Heart,  featuring the Bunny Bouquet stamp set. Feel free to leave any questions or comments below.


Be Creative ~ Stay Inspired

Jenn Gross


Follow me, Journey Coach Jenn, on 

Instagram - https://www.instagram.com/journeycoachjenn/

YouTube - http://www.youtube.com/c/JourneyCoachJenn

Blog - http://www.journeycoachjenn.com/


For more inspiration, updates, and news make sure to check out these places


The Rabbit Hole Designs

The Rabbit Hole Designs Instagram

The Rabbit Hole Designs Facebook Page

The Rabbit Hole Designs Pinterest

The Rabbit Hole Designs YouTube


Adios! Safe Travels

 Hi Rabbit Hole fans. I am so excited to share this card today featuring the adorable Adventure Awaits stamp set and the Spring Floral #1 paper pack from the March release at The Rabbit Hole Designs!


On this card I created the background and set the scene with the new Spring Floral #1 paper pack. I love the colors and designs in this paper pack. I used this double sided paper to create a backdrop for the ground and the sky. I ink blended a little bit on the die cut pieces just to give it a little more depth. I also hand cut some pieces of vellum to create the clouds in the sky and layered those on the background. 


For the adorable bunny, I chose one featured from the new Adventure Awaits stamp set. I stamped the image out in black ink and colored it in with my alcohol markers. I fussy cut the image out but Coordinating dies are available for that stamp set. 


I stamped one of the sentiments also from the stamp set onto a piece of the pattern paper and popped that up on the suitcase part of the image. All that was left was to attach all the pieces onto the A2 size card base.

I had so much fun creating this card. I hope that you found some inspiration here. Be sure to check out all the fabulous products that The Rabbit Hole Designs carries. You can follow this link HERE to see their whole product line. 

Thanks for stopping by!
If you want to you can check out my blog at amyswares.com 

-Amy

For more inspiration, updates, and news make sure to check out these places.

Wicked! slimline card


Hello my crafty friends! I hope you are having a wickedly great day!  I have been having such fun creating with The Rabbit Hole Designs witches stamps.  They are whimsy, fun and a tad sassy!
I finally got my hands on the Cocktail Witch stamp set and the sentiment stamp set - Things a Witch Might Say.  I paired them up with the Spell It stencil to create this fun layered slimline card.

I am really enjoy using alcohol markers to color with.  They blend beautifully. I try to keep it simple by using a light, medium and dark marker shade of each color family.  For instance the dress is colored in light medium and dark coral colored markers.


Using the Spell It stencil and my green Cotton Tail Blender Brush, I create a word "WICKED" across the top of the slimline card front with Twisted Citron Distress ink.  I stamped the sentiment "wicked never looked so good" (minus the word wicked) just under the right side of the stenciled WICKED.  I used double side foam adhesive to attach the Cocktail Witch to the right side of the card.  I added some bat bling and retro stars to the card front.  The card front is comprised of three layers of cardstock (darkest blue, cobalt blue and a pink printed cardstock) all layered on top of a lime green slimline card base.

Here are the Rabbit Hole Designs Products used


I hope you enjoyed this Wicked Slimline card  featuring the Cocktail Witch and Things a Witch Might Say stamp sets. I love hearing from you. Please leave me a message letting me know what you like most about the August Release from the Rabbit Hole Designs. 


Be Creative ~ Stay Inspired

Jenn Gross


Follow me, Journey Coach Jenn, on 

Instagram - https://www.instagram.com/journeycoachjenn/

YouTube - http://www.youtube.com/c/JourneyCoachJenn

Blog - http://www.journeycoachjenn.com/


Not All Witches Ride Brooms

Greetings! Alison here. Did you know that not all witches ride brooms? Some ride bicycles! Today, my card uses the Bicycle Witch from The Rabbit Hole Designs, and this marks my last post for The Rabbit Hole Designs Team. I have had an amazing time being on this team, and I look forward to seeing what they'll have next. This is an incredible group of very talented and kind people, and I am so happy to say that I've become friends with them.

Sometimes I like to just sit and create backgrounds. Sometimes they're mono prints, sometimes they're with Distress Oxides, sometimes they're with alcohol inks, etc. I wanted my witch to appear like she was moving, so I used an alcohol ink background that I made some time ago, where I just swiped colors across some glossy photo paper.
I colored my witch and her little kitty with Copics, using some bright colors that worked really well with my alcohol inked background. This wasn't planned, as I chose the background after I had finished coloring the witch.
I added a sentiment with StazOn, a mat of Bo Bunny cardstock with cute teal dots, and put everything on to a gray card base. But she needed some sparkle, of course, so I added some sequins from a few different Sparkle Blends from Doodles Paper Playground coming off the back of the bicycle, as if she was leaving a trail of magic behind.
I love the colors on this card. This is definitely not a witch to fear, and I like that about all of the witches from TRHD. I want to thank The Rabbit Hole Designs for having me on their amazing Design Team over the last few months. I had a blast, and will truly miss working with them. But, you'll still see me using TRHD on my own blog. Please visit me HERE. Thanks so much for stopping by. Have an inspiring day!

For more inspiration, updates, and news make sure to check out these places:

Best Friends - Witches! Slimline Card


Hello my crafty friends and welcome to today's Rabbit Hole Designs blog!  I have been having such a fun time creating slimline cards (I think it might be an obsession).   When I saw The Rabbit Hole Designs Witches release  for August, I could not wait to color them.  They are such fun and whimsy images!  It got me thinking of haunted houses and those photos on the wall that look like they are following you.  So, today's card is that wall in the stairwell of a witch's house.  

I am using the Country Witch and Spellcaster Witch stamp sets to create this slimline portrait wall card.  I chose to color these two witch images as portraits in a gray scale.  I used several gray alcohol markers along with a precision point black pen and white gel pen. I die cut the images with oval dies I had in my craft stash and created larger dark navy oval frames. 


I stamped out many of the additional images in gray ink an colored them in more muted colors.  I then colored over the top of each image in a very light gray alcohol marker.  The purpose is to give the hint of color, but not draw your attention to these smaller images.  I then chose different shaped nesting dies to frame out each image.  I used the same metallic rose gold cardstock for the small frames.
I stamped out the "Good friends..." sentiment on to buttercream cardstock. I cut it to size and then cut a mat for it (slightly bigger from the Rose Gold cardstock


I used a piece of 8 1/2" x 3 1/2" pink pin striped printed cardstock for the wall it is mounted on a 8 5/8" x 3 5/8" piece of grey cardstock.  This is attached to a 9' x 4 " card base.  I  played around with the positioning of the framed images.  Once I was happy with the placement, I used foam squares to attach the portraits and pictures to the card front completing the card 


Here are The Rabbit Hole Design products used in this card:


Country Witch stamp set


Spellcaster Witch stamp set


Thank you for stopping by The Rabbit Hole Designs Blog today! I hope you enjoyed this tutorial using the Spellcaster Witch and Country Witch stamp sets!  Slimline card are all the rage.  Give them a try!  


Be Creative ~ Stay Inspired

Jenn Gross


Follow me, Journey Coach Jenn, on 

Instagram - https://www.instagram.com/journeycoachjenn/

YouTube - http://www.youtube.com/c/JourneyCoachJenn

Blog - http://www.journeycoachjenn.com/