Pages

Showing posts with label Valentine Stencil. Show all posts

Love Puffins

 Hi everybody!  Amy here with you today sharing a card I created featuring the adorable Love Puffin Stamp Set illustrated by Agota Pop, and the You've Been Framed - Layering Dies.

Love Puffin Stamp Set illustrated by Agota Pop, You've Been Framed - Layering Dies, Valentine Stencil, Love - Scripty Word with Shadow Layer Dies by The Rabbit Hole Designs #therabbitholedesignsllc #therabbitholedesigns #trhd

I started this card by die cutting a piece of smooth white cardstock with the second largest die from the You've Been Framed - Layering Dies.  I then used the Valentine Stencil with Distress Oxide Inks Shaded Lilac and Wilted Violet to create a gorgeous purple heart background!  I then splattered the background with watercolor paint and set it aside to dry.

I stamped out this super cute image of the puffin couple from the Love Puffin Stamp Set, colored it with copic markers, and cut it out using the coordinating die set 

Love Puffin Stamp Set illustrated by Agota Pop, You've Been Framed - Layering Dies, Valentine Stencil, Love - Scripty Word with Shadow Layer Dies by The Rabbit Hole Designs #therabbitholedesignsllc #therabbitholedesigns #trhd

Next, I used the Love - Scripty Word with Shadow Layer Dies to create the sentiment.  I die cut the word "Love" out of white glitter cardstock, and the shadow out of purple cardstock.

I assembled my card using purple cardstock for the base.  I used foam tape to pop up the image and sentiment for some dimension!

Love Puffin Stamp Set illustrated by Agota Pop, You've Been Framed - Layering Dies, Valentine Stencil, Love - Scripty Word with Shadow Layer Dies by The Rabbit Hole Designs #therabbitholedesignsllc #therabbitholedesigns #trhd

For finishing touches on this card I added white gel pen accents, glitter, and a few sparkling sequins!  Thank you and I hope you enjoyed my card today!

For more inspiration, updates, and news make sure to check out these places:

Valentine Cupcake

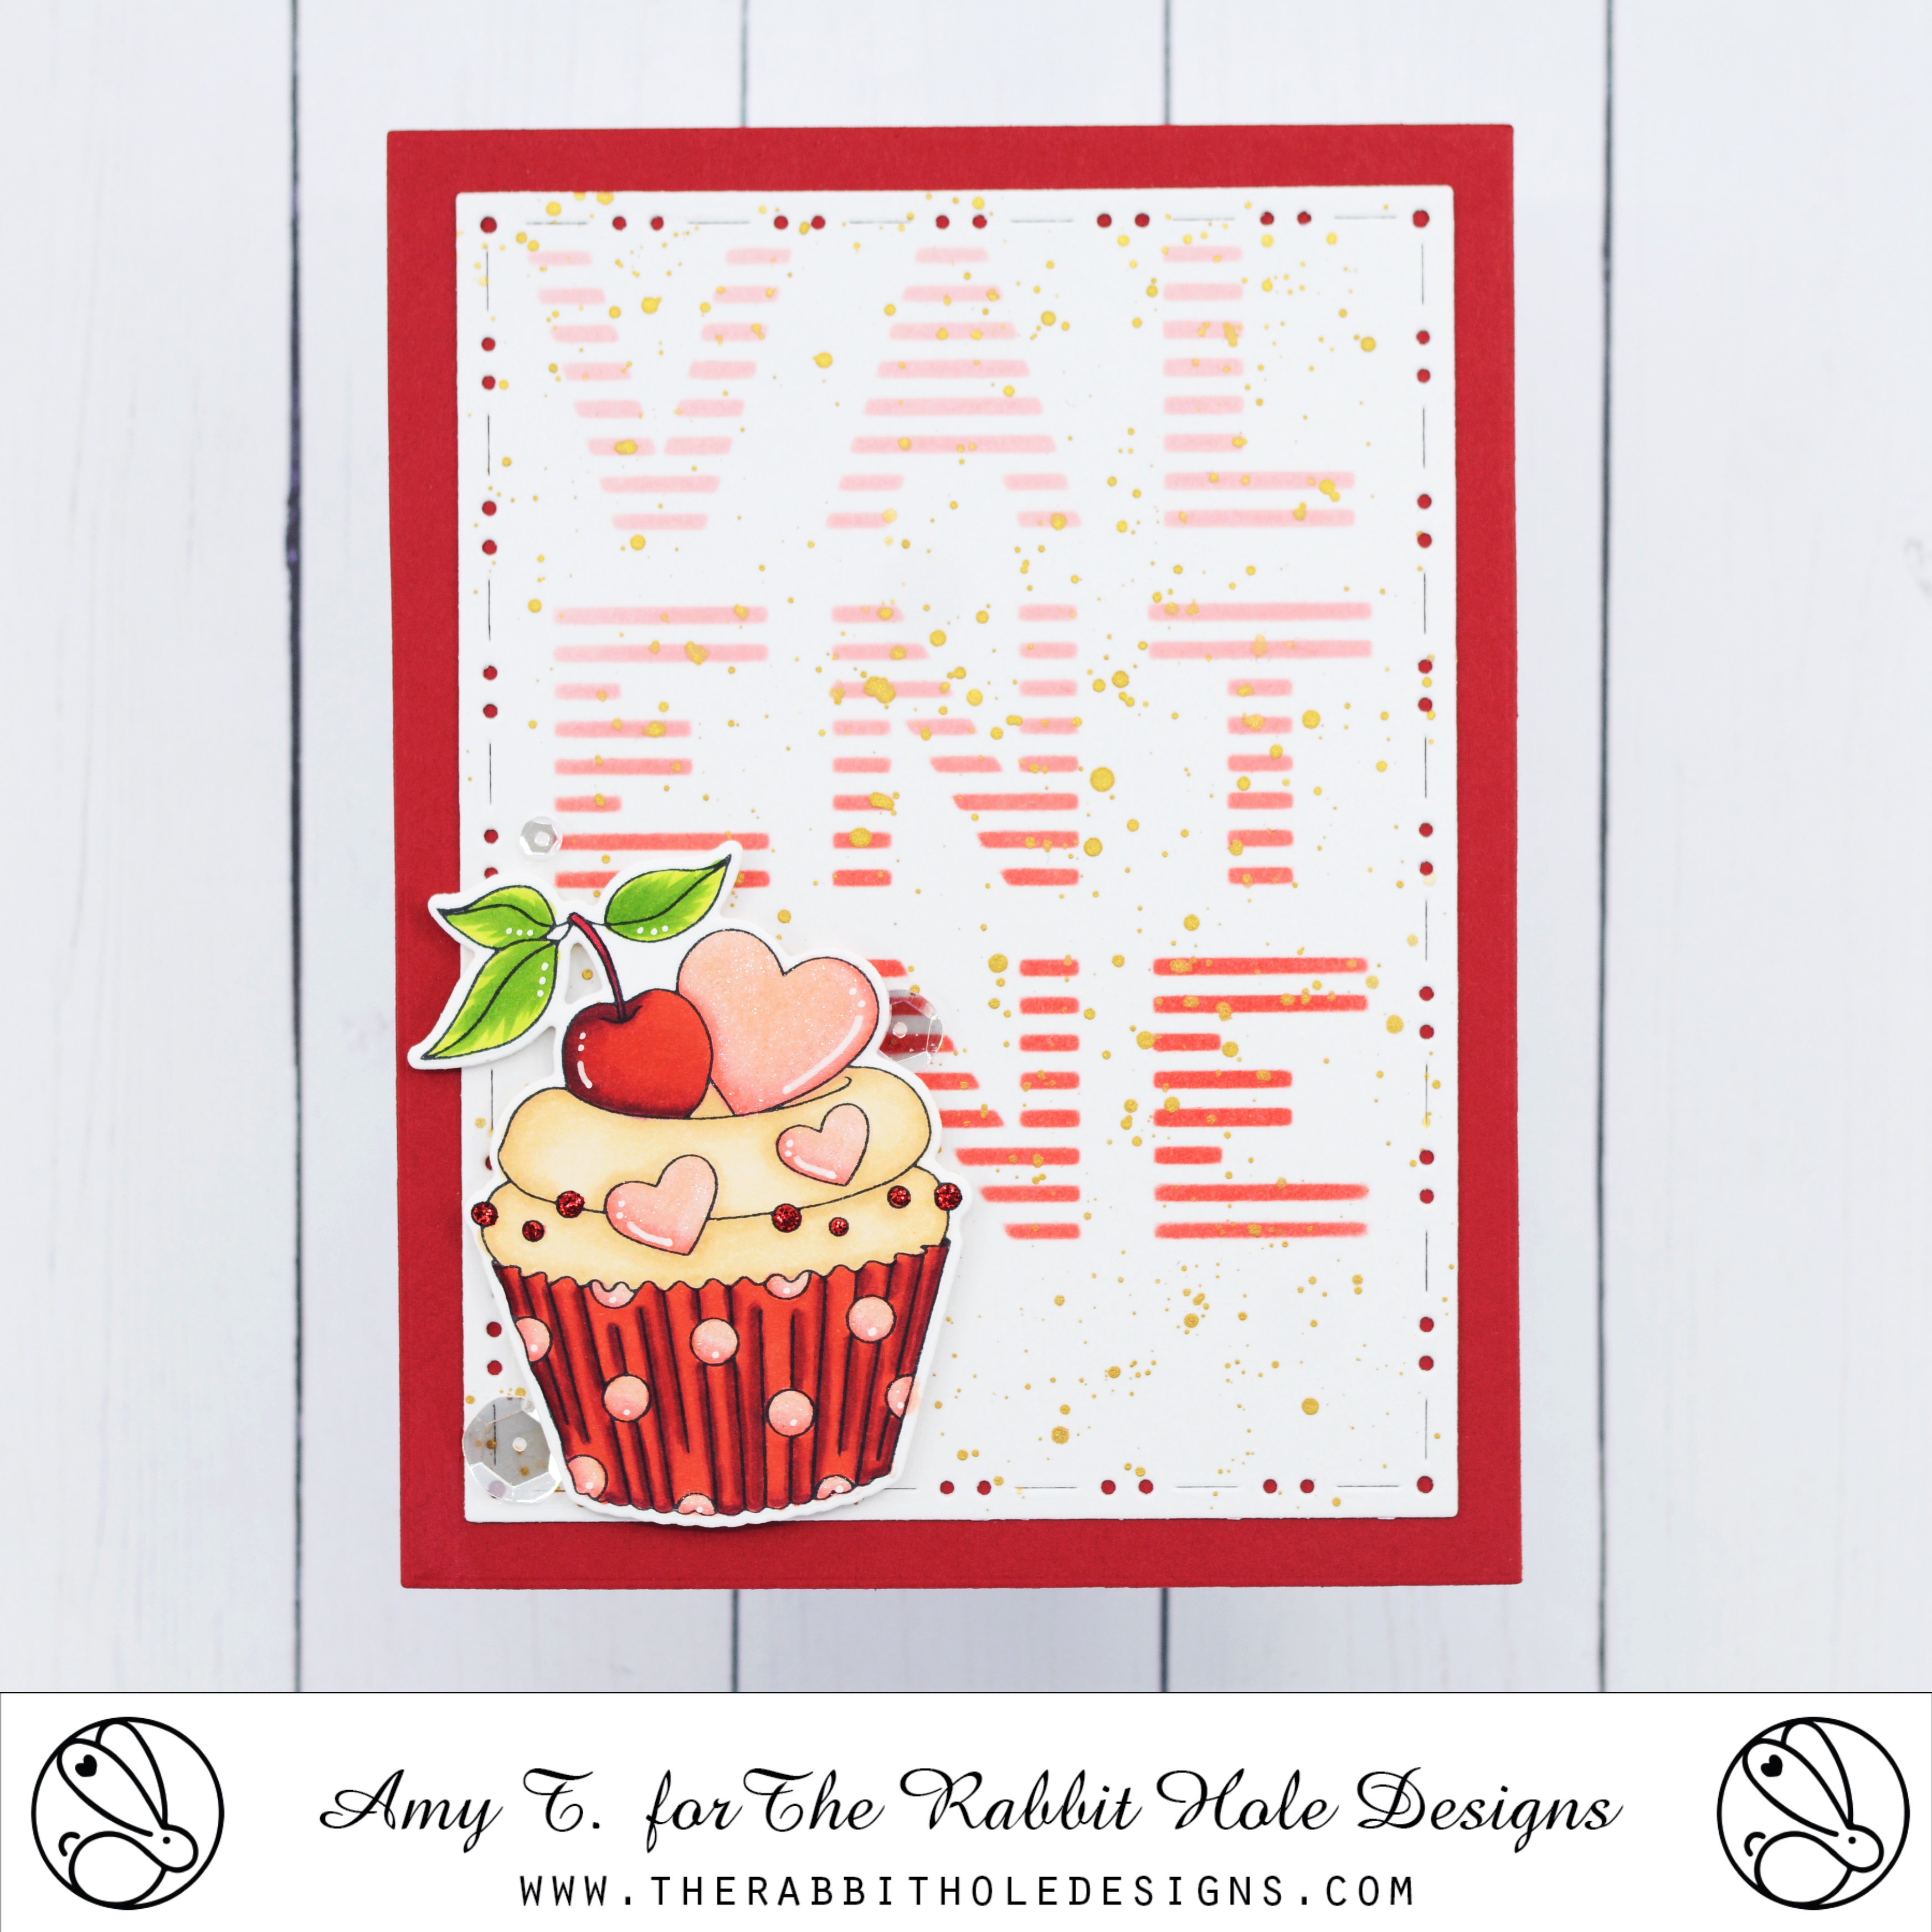
  Hi everybody!  Amy here today sharing a card I created featuring the new Sweet Wishes Stamp Set illustrated by Agota Pop, and the new You've Been Framed - Layering Dies.

Sweet Wishes Stamp and Die Set illustrated by Agota Pop, You've Been Framed Die Set, Valentine Stencil by The Rabbit Hole Designs #therabbitholedesignsllc #therabbitholedesigns #trhd 

I started this card by die cutting a piece of smooth white cardstock with the second largest die from the You've Been Framed - Layering Dies.  I used the Valentine Stencil with Distress Oxide Inks Saltwater Taffy and Candied Apple to create a pink and red background!  I then splattered the background with gold watercolor paint and set it aside to dry.

Sweet Wishes Stamp and Die Set illustrated by Agota Pop, You've Been Framed Die Set, Valentine Stencil by The Rabbit Hole Designs #therabbitholedesignsllc #therabbitholedesigns #trhd

I stamped out this gorgeous cupcake image from the Sweet Wishes Stamp Set, colored it with copic markers, and cut it out using the coordinating die set 

I assembled my card using red cardstock for the base, and foam tape to pop up the image for some dimension!

Sweet Wishes Stamp and Die Set illustrated by Agota Pop, You've Been Framed Die Set, Valentine Stencil by The Rabbit Hole Designs #therabbitholedesignsllc #therabbitholedesigns #trhd

For finishing touches on this card I added white gel pen accents, glitter, and a few sparkling sequins!  Thank you and I hope you enjoyed my card today!

For more inspiration, updates, and news make sure to check out these places:

Sketched Love Bunnies


Hi everyone! It's Lauren on the blog today sharing my easy pull tab Valentine card. The sketched look of the new Je t'aime stamp set gave me the idea to create this black and white "chalk on a blackboard" looking pull card. This is an easy interactive card to make that you do not need any special tools or dies for.


I started out by stamping the bunny couple onto an A2 (5.5x4.25) black cardstock panel using white ink. Then onto white cardstock, I inked the word LOVE from the new Valentine stencil using Fired Brick then Candied Apple distress oxide inks. Using an acrylic block and the straight tines on my glass mat, I traced then cut with scissors the shape of the hidden pull panel.  


After the Love shape pull part was complete, I cut a slit on the black panel above the bunnies using a ruler and xacto knife on my cutting mat. I cut it centimeter (cm) longer than the word love. My word measured 10cm so I cut an 11cm long slit. I put a small pencil dot to mark the center of the panel (7cm mark). I then lined up the 6.5cm mark of my ruler with the pencil dot and made my 11cm long cut. I trimmed the black panel smaller so that a white border of the card base would show and fit the pull panel through the slit in the panel. 


I stamped a bunch of the hearts included in the kit all over the black panel in white. Then 2 hearts on the white pull tab using black ink.

Next, on the back of the black panel I placed double sided foam tape right under the bottom to create a stop. Also along the sides to as guides so that it slides up straight. Then I added more foam tape over the back of the panel. 


Lastly, I peeled off the foam tape backing and placed the panel onto the white card base. I hope you enjoy this simple interactive card and give it a try. Thanks for visiting! 

Lauren


Cupid -FND a slimline card


Hello my crafty friends!  Welcome to today's The Rabbit Hole Designs blog!  So a question for you...  Is it Galantine's or Valentine's Day?  Well, either way you look at it, that little cherub is so FND. That is Fat, Naked and Dangerous! So let's put him on a slimline card, right?

My Cupid -FND slimline card features The Rabbit Hole Designs' new Valentine stencil, the Sassy Anti Valentine stamp set and the soon to be retired Marquee Words stamps set

This is one of those cards where you see it in your mind, try it out, change your mind midway thought, and start over.  Sometimes this is the process when you create - trying by trying and learning as we makers make! 
  

I started off with a piece of 3 1/4" x 8 1/4" pink cardstock.  I stamped the word LOVE, from the Marquee Words stamp set in clear pigment ink 7 times  straight down the card front.  This gives the large letters a subtle shadow of the sentiment for the background.  I placed the three striped hearts on the Valentine stencil on the front of the card front about 1/2' below the top of the card front.  Using a Cotton Tail Blending Brush, I started to stencil it with Honeysuckle Ink.  Once I removed the stencil to reveal the image, I found it to be far too much pink.  I used my heat gun to make sure the ink was dry.  I replaced the stencil over the pink heart stripes and re-stenciled the three hearts in Black Soot Distress Oxide ink.   


Much better!  I needed one more black striped heart, so I positioned the striped heart stencil to add a 4th small striped heart at the bottom of the slimline card front. 


 Chubby cupid, from the Sassy Anti Valentine stamp set, is stamped on white cardstock with Versa Mark clear pigment ink and heat embossed with red glittery Oriental Fire embossing powder.  He is fussy cut and added to the card front. I layered the card front on a piece of red cardstock and tied it with some black twine.


I stamped and added the Fat, Naked and Dangerous  sentiment from the Sassy Anti Valentine stamps set and  attached it to the black twine. I mounted the card front on a dark grey slimline card base and added three black gemstone to finish the card.


Thanks you so much for stopping by today.  I hope you enjoyed this Cupid -FND slimline card featuring The Rabbit Hole Designs' new Valentine stencil, the Sassy Anti Valentine stamp set and the soon to be retired Marquee Words stamps set.  Feel free to ask any question or leave a comment below.


Be Creative ~ Stay Inspired

Jenn Gross


Follow me, Journey Coach Jenn, on 

Instagram - https://www.instagram.com/journeycoachjenn/

YouTube - http://www.youtube.com/c/JourneyCoachJenn

Blog - http://www.journeycoachjenn.com/


For more inspiration, updates, and news make sure to check out these places


The Rabbit Hole Designs

The Rabbit Hole Designs Instagram

The Rabbit Hole Designs Facebook Page

The Rabbit Hole Designs Pinterest

The Rabbit Hole Designs YouTube


Love Ya!

 Hi everyone! Von Marie here and I am so happy to be on the blog today. I have a Valentine card or it could be a anytime card using the Newest TRHD Release.


On my card I used the New Valentine Stencil. I first ink blended white cardstock with Wilted Violet and Dusty Concord Distress Oxide inks using my Cotton Tail Blending Brushes. I then used the stencil for the hearts only onto my panel. I used a Spatula with BM Perfect Plum Glitter Glaze, after it was dry I cut my panel out with my paper trimmer.


I then used some Lavender Glitter cardstock with a Double Stitched A2 Rectangle to layer my stenciled inked background using foam tape. I then added them to a A2 purple heavy weight card base. Oh yes lots of purple goodness. I then used a "love Ya" word die from my stash and cut it out two times in black cardstock. I added my word sentiment to my panel and then added Nuvo Crystal Glaze to make it extra shiny. Lastly, I added some purple glitter enamel dots. I hope you like my card today. Thank you for stopping by!

TRHD products Used:


Cotton Tail Blending Brushes


For more inspiration, updates, and news make sure to check out these awesome places! 

Thank you so much for stopping by today and Happy Crafting!

Von Marie


A LOVE-ly bookmark!


Hey yall!  Happy Sunday!  Tangii here sharing my first bookmark for the year (yeah, I'll make several before the year ends, lol)  I love reading and I love, love, love pretty bookmarks!  For today's bookmark I used the new Valentine stencil and the hearts from the Je t-aime stamp set.
I started off stamping a bunch of hearts in white pigment ink over my black tag.  Then I wanted to stack the letters so they'd fit on my tag better.  So once my stencil was in place and taped down I slathered some pretty pink glittery paste on!  Starting with the "ve" and then adjusting my stencil, etc. and then slathering more on the "lo".  So sparkly and pretty!

I stamped some words from various sets and then crude cut them with scissors (yes, I know the cutting isn't straight, lol) these are popped up on the tag.  Finally I added some pretty ribbons at the top and voila! I'm ready to go buy some new books for my pretty new bookmark! lol

 All of the items I linked in my post are available at The Rabbit Hole Designs.

You can also read about this card on my blog, here with links to the products I used, etc.  Thanks for popping by, come back again soon!

Be My Valentine

 Hello there!

Michelle here, sharing a male inspired Valentine card.


I used the newest stamp set, Je T'amie and the newest stencil, Valentine.

I colored the cute couple with Copic Markers in shades

E40, E41, E42, E43, E44

C00, C2, C4, C6, C9

E30, E31, RV02, RV52


I inked up the stencil with distress oxide ink in shade mermaid lagoon. Than I stamped the extra hearts

onto the background. I hand drew the words 'be my'. 


I fussy cut the bunnies than adhered them to the card base with foam tape.

Thanks for stopping by for a peek!

Michelle

For more inspiration, updates, and news make sure to check out these places


The Rabbit Hole Designs

The Rabbit Hole Designs Instagram

The Rabbit Hole Designs Facebook Page

The Rabbit Hole Designs Pinterest

The Rabbit Hole Designs YouTube


Tacos Don't... a sassy Valentine card with tutorial

Hello my crafty friends! Welcome to The Rabbit Hole Designs blog.  Have you heard... Tacos don't disappoint?  Just providing a little bit of sass to this pretty pink Valentine card.  I used the fun shaving cream technique with a bit of a twist, I used the Valentine stencil as a mask to create the variegated word "Valentine".  I also added the sentiment  from  the Sassy Anti-Valentine stamps set.

Let's take a closer look at the shaving cream tutorial:
A - I added shaving cream foam to a shallow tray and smoothed it out with a palette knife. (like frosting a cake or spreading butter evenly on toast) 
B - I added drops of ink refill. Liquid colors are the best to use with this technique. I chose a Watermelon pink, Eggplant purple, and Aqua Sky blue
C - I used the palette knife to swirl the colors together in the shaving cream.  I took a 4" x 5 1/4" piece of white cardstock.  I gently pressed it on top of the colored shaving cream, just enough pressure for the shaving cream to make contact with the cardstock.  I lifted the cardstock off. You will find some of the shaving cream will pull away with the paper. I used a squeegee to remove the excess shaving cream from the cardstock and discarded it.  The color will have attached to the cardstock creating  swirls of color. Put the cardstock aside to dry.  This paper is considered the 1st pull (I typically get three pulls  from one coloring)

D - I sprayed the reverse side of the Valentine stencil with Pixie Spray (a light tack, repositionable  adhesive). Adding Pixie Spray to the back of a stencil will help the stencil stay in place and secure the smaller sections of the stencil to the paper  
 E - I positioned the stencil on a piece of  4 " x 5 1/4" rose colored cardstock.  I used a rubber brayer to roll over the stencil and cardstock making sure the entire stencil was sticking to the cardstock.  I added purple tape to two sides securing the stencil to the cardstock edge
F - I gently pressed the stencil side down on top of the colored shaving cream, again with just enough pressure for the shaving cream to make contact with the cardstock. I rubbed my fingers over the cardstock to make sure the colored shaving cream made contact with the stencil and paper. I lifted the cardstock off and pulled a the squeegee across to remove the excess shaving cream.  I  gently removed the Valentine stencil revealing the word Valentine in variegated colors. I put the cardstock aside to let it dry
G - After the card stock dried, I cut it out (the valentine image measures 3 3/16" x 3 3/4") and mounted it on a piece of black glossy cardstock

I hope this inspires  you to try the shaving cream technique with a stencil. It is a fun quick way to create,  I cannot promise it  will not be messy, but it will be fun. 


I hope you enjoyed this sassy valentine - Tacos Don't card featuring the Valentine stencil  and the Sassy Anti Valentine stamps set.   I love hearing from you. tell me... What has been the craziest technique you have tried with a stencil?    


Be Creative ~ Stay Inspired

Jenn Gross


Follow me, Journey Coach Jenn, on 

Instagram - https://www.instagram.com/journeycoachjenn/

YouTube - http://www.youtube.com/c/JourneyCoachJenn

Blog - http://www.journeycoachjenn.com/


For more inspiration, updates, and news make sure to check out these places


The Rabbit Hole Designs

The Rabbit Hole Designs Instagram

The Rabbit Hole Designs Facebook Page

The Rabbit Hole Designs Pinterest

The Rabbit Hole Designs YouTube

January 2021 Special Release Inspirational Hop ~ Day 3


Hello and welcome to Day 3, our final day of the Special Release Inspiration Hop. We are so excited for you to join us as we present to you our release. Our fabulous Design Team have been sharing their projects over the last few days, so be sure to visit their blogs and leave them some crafty love.

We are also collaborating with My Sweet Petunia so keep reading to see how you could win some great prizes.


 The 2 new stamps sets , one die set, and 3 new stencils are all available to purchase right now in the shop.


The new stencil being highlighted today is ...

Valentine Stencil

Thank you so much for hopping this weekend our Special Release Inspiration Hop.


Here is the line up for the hop:

______________________


**Giveaway**

To celebrate the Special Release and My Sweet Petunia collaboration, The Rabbit Hole Designs is giving away one $50.00 voucher to a lucky winner and My Sweet Petunia is giving away one MISTI to a lucky winner.  Winners will be chosen at random from the comments left on the INSTAGRAM posts that use the hashtag #TRHDMISTI. So make sure to head on over to INSTAGRAM and look for the projects using #TRHDMISTI. You have until 11:59 p.m. PST 01-10-2021. 
Winner will be announced on The Rabbit Hole Designs blog 01-11-2020.

The comments we are looking for are the ones share to the projects using the hashtag #TRHDMISTI so make sure you comment there.

HAPPY 2nd BIRTHDAY THE RABBIT HOLE DESIGNS!!
___________________


For more inspiration, updates, and news make sure to check out these awesome places! 


Thank you so much for stopping by today!