Pages

Showing posts with label Baby's 1st Christmas. Show all posts

Rainbow Birthday Presents

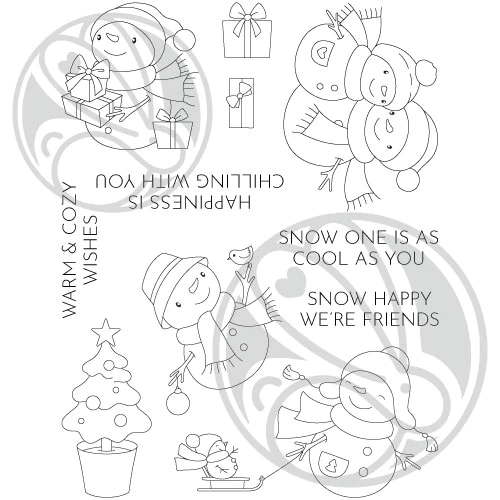
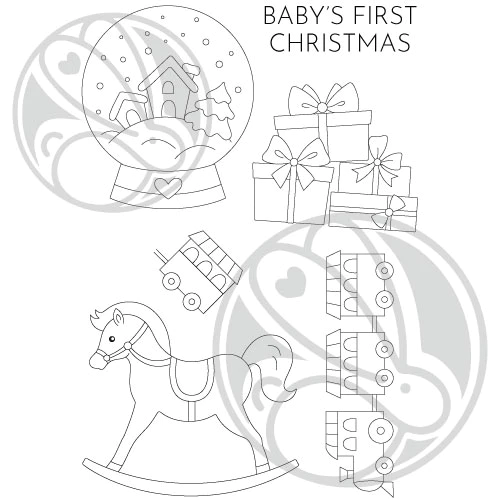
Hello friends! Welcome back to the blog. Today's card features the Baby's 1st Christmas 4x6 stamp set along with its coordinating dies. This set may be called Baby's 1st Christmas but it is really a versatile set that can be used year-round for many occasions. Today I used the presents image from the set to create a birthday card.


Card details:
  • Die-cut the smallest frame from You've Been Framed dies on lime green cardstock. Cut a smaller rectangle (3.5" x 2") from rainbow patterned paper and layer on top of the lime green panel. Cut a larger rectangle from rainbow patterned paper (5.25" x 4") and layer behind the lime green panel. Use foam tape on the lime green panel to add dimension.
  • Stamp the presents image from the Baby's 1st Christmas 4x6 stamp set with an alcohol-friendly black ink on white cardstock and color with alcohol markers. Because I chose a brightly patterned paper for the background, I kept the coloring very simple with only some light gray shading. Die-cut the presents image with the coordinating dies. Adhere with foam tape to add dimension.
  • Stamp the "Happy Birthday" sentiment from the Sentimentally Speaking stamp set and die-cut with its coordinating die. Adhere it on the patterned paper underneath the presents die-cut.
  • Adhere entire panel to an A2 sized card base and add Wink of Stella silver glitter pen highlights to the presents image to finish card.

Thanks for visiting!

Amrita

You can find me on IG @amritapettus

For more inspiration, updates, and news check out these awesome places! 


The RHD Affiliate Disclaimer:

We want to ensure transparency and honesty in our interactions with you, our valued readers. Please be aware that the links provided on The Rabbit Hole Designs Blog may be affiliate links. This means that if you make a purchase through these links, the project designer may earn a small commission at no extra cost to you. Your support means the world to us!


We kindly request that you accept the tracking cookie for the affiliate websites. Rest assured, this will not expose your computer to viruses or compromise your information. It's a necessary step for the company to attribute the sale to the affiliate, ensuring that creators like our creatives receive their rightful commissions.


Your trust and support empower our creators to continue sharing creativity and inspiration through our blog. Thank you for being an integral part of The Rabbit Hole Designs community!


Baby's First Christmas Globe

Hello friends! Welcome back to the blog. Today's card features the Baby's 1st Christmas 4x6 stamp set along with its coordinating dies.


Card details:
  • Cut a pink cardstock panel to 3.75 in by 5 in. Die-cut the rays die from You've Been Framed dies towards the top center of the pink panel. Rotate the rays die 180 degrees (flip it around) and die-cut again (overlapping the ray lines on the flat end of the die with the previous cut lines). Lightly blend pink ink on the bottom of the panel.
  • Stamp the globe image from the Baby's 1st Christmas 4x6 stamp set with an alcohol-friendly black ink on white cardstock and color with alcohol markers. Die-cut the globe image with the coordinating dies.
  • Die-cut the smallest frame from You've Been Framed dies on light green cardstock. Line up the panel again on the short end of the die so that 3 circles overlap and die-cut again. 
  • Stamp the sentiment "Baby's First Christmas" from the same stamp set centered on the light green cardstock panel.
  • Attach the image and sentiment to the pink panel, centering the globe on the rays. Attach the pink panel to a striped patterned paper A2-sized panel and then to a card base.
  • Add gems to finish card.


Thanks for visiting!

Amrita

You can find me on IG @amritapettus

For more inspiration, updates, and news check out these awesome places! 


The RHD Affiliate Disclaimer:

We want to ensure transparency and honesty in our interactions with you, our valued readers. Please be aware that the links provided on The Rabbit Hole Designs Blog may be affiliate links. This means that if you make a purchase through these links, the project designer may earn a small commission at no extra cost to you. Your support means the world to us!


We kindly request that you accept the tracking cookie for the affiliate websites. Rest assured, this will not expose your computer to viruses or compromise your information. It's a necessary step for the company to attribute the sale to the affiliate, ensuring that creators like our creatives receive their rightful commissions.


Your trust and support empower our creators to continue sharing creativity and inspiration through our blog. Thank you for being an integral part of The Rabbit Hole Designs community!


Nothing Like a Rainbow of Presents

 Hello and welcome back to the blog; It's Rick back with you again today and I am sharing one of the first cards that I designed as a member of the Rabbit Hole Designs Design Team.  For this card I created a rainbow wreath of presents using the present image from the Baby's 1st Christmas Stamp Set designed for Agota Pop for the Rabbit Hole Designs.  

rainbow wreath christmas card by rick adkins 2


With this card design I started out my stamping and masking each set of the presents to create the wreath.  And no even with an art degree I can not draw a straight line or a perfect circle without help.  So, circle die to the rescue.  I just traced the outline of the circle to know where to line up each set of the presents.  Then I did some rainbow ink blending over the entire thing and added some shading to each set with coordinating colored pencils.  Then I added a simple outline to the wreath with a cool gray alcohol marker.  Easy peasy!  


rainbow wreath christmas card by rick adkins

To finish off the card i added the sentiment by masking off the christmas from the stamp set and heat embossing it with white embossing powder and added the Happy Scripty Word and Shadow Die to finish it off.  

I hope that you have a wonderful day and a fabulous weekend.  

Happy Stamping and crafting 

Rick 

A Look Back at 2023 - Fun Holiday Birthday Card

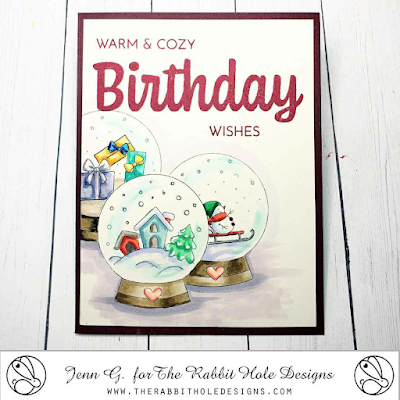
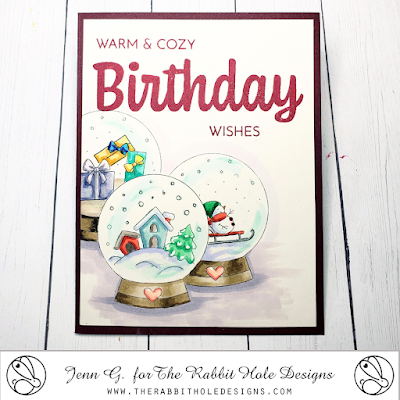
Hello there crafty friends! We are looking back at a sweet winter birthday card create this past summer using two stamps sets from The Rabbit Hole Designs - Christmas In July Release from 2023.

The Rabbit Hole Designs Baby's 1st Birthday stamp set, Warm & Cozy stamp set, and Birthday Scripty stamp set were combined to create this A2 Snowglobe Birthday Wishes card.

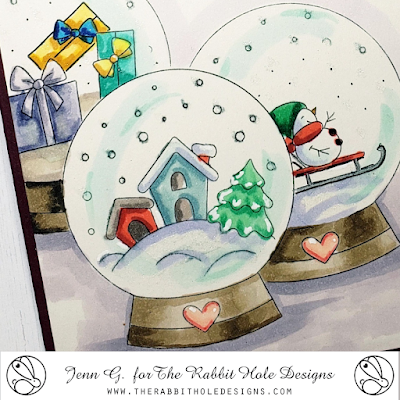
I stamped the snowglobe image on a 4" x 5 1/4" piece of coloring cardstock and masking it off.  I stamped the snowglobe two more times masking the middle of these two globes.  I added the sledding snowman image to the partial snowglobe on the right and the gifts to the partial snowglobe on the left.
I colored each of the snowglobe images and added shading using OLO Markers. A sparkle pen is used to add glitter to the snowglobes.
I positioned and stamped the sentiment in red ink and glued the card front to a dark red A2 card base.


Thank you for stopping by check out today's look back at one of my 2023 The Rabbit Hole Designs card.  I hope you are inspired to create something lovely today!

Be Creative ~ Stay Inspired

Jenn Gross


Follow me, Journey Coach Jenn, on 

Instagram - https://www.instagram.com/journeycoachjenn/

YouTube - http://www.youtube.com/c/JourneyCoachJenn

Blog - http://www.journeycoachjenn.com/


For more inspiration, updates, and news make sure to check out these places


The Rabbit Hole Designs

The Rabbit Hole Designs Instagram

The Rabbit Hole Designs Facebook Page

The Rabbit Hole Designs Pinterest

The Rabbit Hole Designs YouTube 

Create Colorful Christmas Cards in a Flash

Hello and welcome back to the Rabbit Hole Designs Blog; it's Rick back with you today with a fun and festive Christmas Card Idea using the Baby's 1st Christmas Stamp Set.  I know that a lot of you may have your holiday cards all ready to go plus some may have started sending them out.  But if you're like me and in need of another idea that's quick and easy I have you covered.  

Baby's 1st Christmas Stamp Set, Rabbit Hole Designs, Rick Adkins, Train, Ink blended Card

Like I said this card is super easy and actually depending on how you choose to embellish it could be mass produced rather quickly. Okay, so this is the deal. You will need to pick a red blue and yellow ink color that's water reactive. Pull out your CottonTail Blending Brushes or even your Bitty Bunny Blending Brushes and slap down the three primary colors onto your Bristol smooth or watercolor cardstock where you are planning on stamping your focal image. Let the three primary colors overlap a little; but the blending doesn't have to be perfect. So, if you are not the best at ink blending no worries. Make sure you add enough ink to cover your chosen stamped image.

Baby's 1st Christmas Stamp Set, Rabbit Hole Designs, Rick Adkins, Train, Ink blended Card

Now the magic can happen! Spritz the ink with a little water and take a large flat brush and swipe through the ink. This will soften and blend the ink together. You want the ink to run a little that's okay. Next you are going to dry your cardstock panel completely. Once you have the panel dried stamp your focal image in the colored area. I picked the train from the Baby's 1st Christmas Stamp Set and added a few extra cars at the end of mine to extend the train a little. Make sure to stamp the image in a darker ink and something that want smear with your chosen color additive (markers or colored pencils). I stamped mine in Versafine Clair Nocturne Ink but stamped it off once to make it just a little lighter.

Baby's 1st Christmas Stamp Set, Rabbit Hole Designs, Rick Adkins, Train, Ink blended Card

Next I added some slight shading with a warm gray marker to the engine and box cars to give them a little more life. And then added a little glitter to sections of each with a glitter pen. I then added some snow below the train and sprinkled around the sky. All I had to do then was to stamp my sentiment in a coordinating ink color. I picked the Merry Christmas from the Poinsettia & Pinecones Stamp Set for my sentiment today but you can use any of the wonderful sentiments from your collection of Rabbit Hole Designs stamps.

Baby's 1st Christmas Stamp Set, Rabbit Hole Designs, Rick Adkins, Train, Ink blended Card

To finish off the card all I had to do was mat my inked panel with coordinating cardstock (or even pattern paper would work) and added it to my A2 (4 1/4" x 5 1/2" folded) Card Base.

I hope this post has given you another idea to add to your crafty arsenal. Whether you're making cards to brighten someone's day or as a creative outlet for yourself; having a fun technique to use for quick cards is a game changer.

Remember, it's all about experimentation and finding what resonates with you. And don't forget to share your creations on social media and tag The Rabbit Hole Designs to spread the card-making love.

Thanks for dropping by today I hope you have a wonderful day and that you found this post helpful. You can find all the supplies that I used on today's cards on my blog post by clicking here!

You can find me on the following Social Media Channels with more crafty inspiration: 
I hope that you have a crafty day.  For more inspiration, updates, and news make sure to check out these places.  


Have a crafty day!
Rick 

Creating a Snow Globe-themed Card with Baby's 1st Christmas Stamp Set

Hello crafty friends, it's Rick back again with another fun card to share with you for the Rabbit Hole Designs.   Today I have another fun little card to share with you using the Baby's 1st Christmas Stamp Set (designed by Agota Pop exclusively for Rabbit Hole Designs). 

Baby's 1st Christmas Stamp Set, Rabbit Hole Designs, Triangle Mosaic Stencil, Colored Pencils, Diamond Glaze Card by Rick Adkins

To start this card I stamped the snow globe from the Baby's 1st Christmas Stamp Set onto a piece of Kraft colored cardstock in a slightly darker brown ink color.  I then stamped the train and the extra box car to the back of the train along the bottom edge and then flipped the cardstock and repeated that along the top to create a fun little border to frame the snow globe.  I then stamped the sentiment at the bottom of the snow globe to act as an anchor.  

Baby's 1st Christmas Stamp Set, Rabbit Hole Designs, Triangle Mosaic Stencil, Colored Pencils, Diamond Glaze Card by Rick Adkins view 2

Once the stamping was completed I then took some plain old inexpensive Crayola Colored Pencils and started coloring the images.  Yes, I did say Crayola Colored Pencils!  You can get great results with them so don't be afraid to use what you have.  Once all the coloring was completed I then masked off the Snow Globe and sentiment with a simple mask made from Post It Notes and placed the Triangle Mosaic Stencil over the top.  Next I took some White Pigment Ink and a CottonTail Blending Brush (that is designated for White Pigment Ink only) and added the ink over the top of the stencil.  I made sure to not go over the trains at the top and bottom with the white pigment ink.  

Baby's 1st Christmas Stamp Set, Rabbit Hole Designs, Triangle Mosaic Stencil, Colored Pencils, Diamond Glaze Card by Rick Adkins view 3

Once the White Pigment Ink dried I then added a thin layer of Diamond Glaze over the snow globe's glass and the little heart.  When that dried I cut down the panel a little bit and added it to a light blue cardstock mat layer and then to my white card base.  And that my crafty friends finishes my card for today using the Baby's 1st Christmas Stamp Set.  Thanks for dropping by today and I hope that you have a wonderful crafty day! 

For more inspiration news and updates make sure to follow us on Social Media and check out these places as well! 

The Rabbit Hole Designs

The Rabbit Hole Designs Instagram

The Rabbit Hole Designs Facebook Page

The Rabbit Hole Designs Pinterest

The Rabbit Hole Designs YouTube


A Rainbow of Gift Packages Wreath Card

Hey there, card makers! I am Rick and I am brand new to the Rabbit Hole Designs Design Team and I get to share a fun card with you today using the Baby's 1st Christmas Stamp Set (designed by Agota Pop exclusively for Rabbit Hole Designs). I'm thrilled to share with a vibrant and unique Rainbow Gift Package Wreath Card using the adorable Baby's 1st Christmas Stamp Set from Rabbit Hole Designs LLC. This fun and colorful design will surely bring a smile to anyone's face during the holiday season. 


You can create this magical design using the oh-so-adorable Baby's 1st Christmas Stamp Set from Rabbit Hole Designs. This stamp set is a true gem - versatile and perfect for adding that extra special touch to your cards.

I started this card design by ink blending the background in rainbow colors. I mean rainbows are great any time of the year right! Next I stamped stamping each set of presents in a wreath formation making sure to mask each one before stamping the next. I then added some additional colors to each with some colored pencils to create a fun colorful card design.


Next I cut out the word happy using the Happy Scripty Word with Shadow Layer Die from some black cardstock and the coordinating shadow die from some white cardstock.  I then masked off the part of the Christmas sentiment that I didn't want to use on this card with some post it notes before stamping it in embossing ink onto some black cardstock and heat embossing it in white.  I used one of the banner dies from the You've Been Framed Layering Dies to cut it out.  To finish off the design I added a few Clear Enamel Dots to add a little extra touch.

Thanks for dropping by today and checking out my card.  I hope you have a wonderful day!  

Rick

For more inspiration, updates, and news make sure to check out these places!


Baby's First Christmas

  Hi everyone!  Amy here today with this card featuring the Baby's 1st Christmas Stamp Set illustrated by Agota Pop.

Baby's 1st Christmas Stamp and Die Set illustrated by Agota Pop, Mesh - Optical Illusion Stencil, You've Been Framed - Layering Dies by The Rabbit Hole Designs #therabbitholedesignsllc #therabbitholedesigns #trhd

I started this card by die cutting a piece of smooth white cardstock with the second largest die from the You've Been Framed - Layering Dies.  I then used the Mesh - Optical Illusion Stencil with Distress Oxide Inks Kitsch Flamingo and Peacock Feathers to create the background! 

Next, I stamped out these super cute images from the Baby's 1st Christmas Stamp Set, colored them with copic markers, and cut them out using the coordinating die set.

Baby's 1st Christmas Stamp and Die Set illustrated by Agota Pop, Mesh - Optical Illusion Stencil, You've Been Framed - Layering Dies by The Rabbit Hole Designs #therabbitholedesignsllc #therabbitholedesigns #trhd

I stamped the sentiment onto teal cardstock, and white heat embossed. 

I assembled my card using teal cardstock for the base.  I adhered the gifts directly onto the background, and popped up the rocking horse and sentiment with foam tape for some dimension!

Baby's 1st Christmas Stamp and Die Set illustrated by Agota Pop, Mesh - Optical Illusion Stencil, You've Been Framed - Layering Dies by The Rabbit Hole Designs #therabbitholedesignsllc #therabbitholedesigns #trhd

For finishing touches on this card I added accents with a white gel pen, glitter, and a few Clear Sparkle Enamel Dots.  Thank you and I hope you enjoyed my card today!

Snowglobe Birthday Wishes


Hello there crafty friends!  Thank you for stopping by to check out today's fun snowglobe birthday card!

This card is created with two stamps sets from The Rabbit Hole Designs new Christmas In July Release and inspired by the Craft Roulette weekly card challenge. The card needed to includes these parameters:
1) Type of Card - a Birthday card 
2) Colors - picnic colors (red and white)
3) Theme -  a collection (3 snow globes)
4) Random - black dots (snowman buttons)

I am using The Rabbit Hole Designs Baby's 1st Birthday stamp set, Warm & Cozy stamp set, and Birthday Scripty stamp set for this A2 Snowglobe Birthday Wishes card.

I stamped the snowglobe image on a 4" x 5 1/4" piece of coloring cardstock and masking it off.  I stamped the snowglobe two more times masking the middle of these two globes.  I added the sledding snowman image to the partial snowglobe on the right and the gifts to the partial snowglobe on the left.
I colored each of the snowglobe images and added shading using OLO Markers. A sparkle pen is used to add glitter to the snowglobes.
I positioned and stamped the sentiment in red ink and glued the card front to a dark red A2 card base.
 
The Rabbit Hole Designs Products 

Thank you for stopping by The Rabbit Hole Designs Blog to check out today's card.  I hope you are inspired to create something lovely today!

Be Creative ~ Stay Inspired

Jenn Gross


Follow me, Journey Coach Jenn, on 

Instagram - https://www.instagram.com/journeycoachjenn/

YouTube - http://www.youtube.com/c/JourneyCoachJenn

Blog - http://www.journeycoachjenn.com/


For more inspiration, updates, and news make sure to check out these places


The Rabbit Hole Designs

The Rabbit Hole Designs Instagram

The Rabbit Hole Designs Facebook Page

The Rabbit Hole Designs Pinterest

The Rabbit Hole Designs YouTube


July 2023 New Release Day 2

Hello and welcome to day 2 of the inspiration hop. We are excited for you to join us as we present to you our July 2023 release. Our Brand Ambassadors will be sharing their projects over the next few days, so be sure to visit their blogs and leave them some crafty love.

The stamp set & coordinating dies are all available to purchase right now in the shop.

The products being highlighted today are:


Thank you so much for being here for day 2 of our inspiration hop.

Here is the lineup for today:


This is the graphic you are looking for on our IG and FB Fanpage

For more inspiration, updates, and news check out these awesome places! 

Thank you so much for stopping by today!