Pages

Showing posts with label Space Miss You. Show all posts

Mini Slimline Foiled Butterfly Cards!

 Hi everyone! Von Marie here and I am so Happy to be on TRHD Blog today! I have some Mini Slimline Foiled Butterfly Cards that I wanted to share with you using products from the latest Release.


I used the Butterfly 3x4 Stencil for these cards and some Deco Foil Transfer Gel Duo with Purple and Rainbow Deco Foils. I first cut out some Gold Shimmer Paper Cardstock and Laid out my stencil, I then applied the transfer Gel Duo two times using a Metal Spatula. I let my paste dry overnight and ran it through my diecutting machine with the two colored foils.


I cut out my foiled butterflies with Mini Slimline dies and added them to Mini Slimline Card Bases.

I then stamped and heat embossed my sentiment with Versamark ink and White embossing powder using the Space-Miss You Stamp Set. My sentiments were then cut out with a banner die from my stash and added with foam tape. Lastly, I added some sequins to match. I hope you like my cards! Thank you for stopping by!

TRHD Products Used:

Butterfly 3x4 Stencil


Space-Miss You Stamp Set 3x4


For more inspiration, updates, and news make sure to check out these awesome places! 


Thank you so much for stopping by today and Happy Crafting!

Von Marie


You Look Fabulous!


It's Kelly here and I am sharing a card using Rabbit Hole Designs 
new set called "Space-Miss You!"  How cute is this?  

To make this card, I started with a distress ink background of purples and blues that I flicked with water.
I embossed the main image in black glitter powder and then carefully cut out the part behind the astronaut's head.  I used a combination of a craft knife and scissors.  

I then die cut the window for the sentiment.

I took a piece of gray card stock and flicked it with a 
combination of purple ink, liquid pixie dust and water. 

Once dry, I lined up where my sentiment would go and stamped that in black.
I adhered that on my card base and then glued the galaxy panel on top of that. 


Thank for joining me in this journey into outer space. 
Hope you enjoyed my take on this cute new set, "Space- Miss You" 
-Kelly

For more information, news and updates check out these links:


Swinging on the Moon - Double Dial Card

Swinging on the Moon Double Dial Card

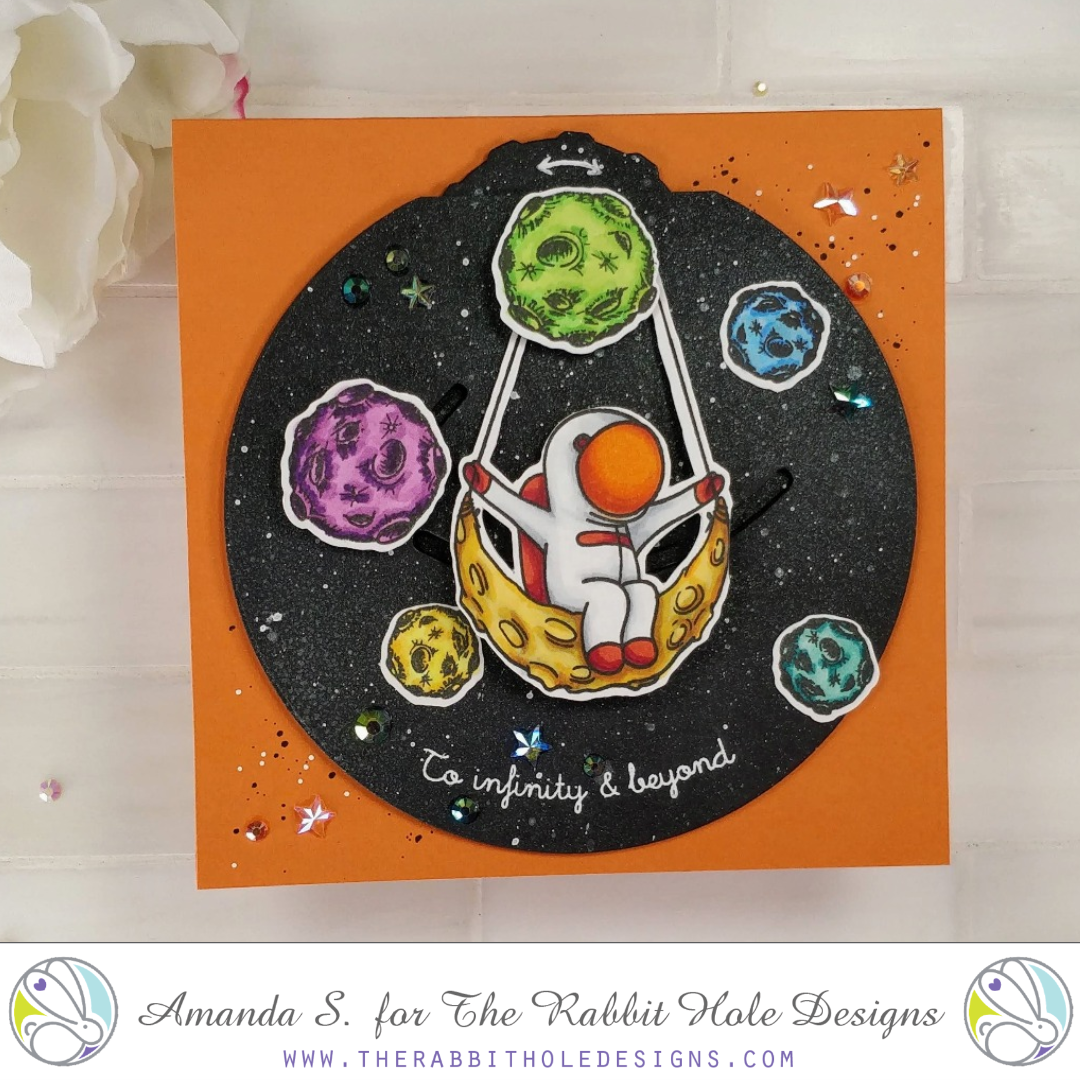
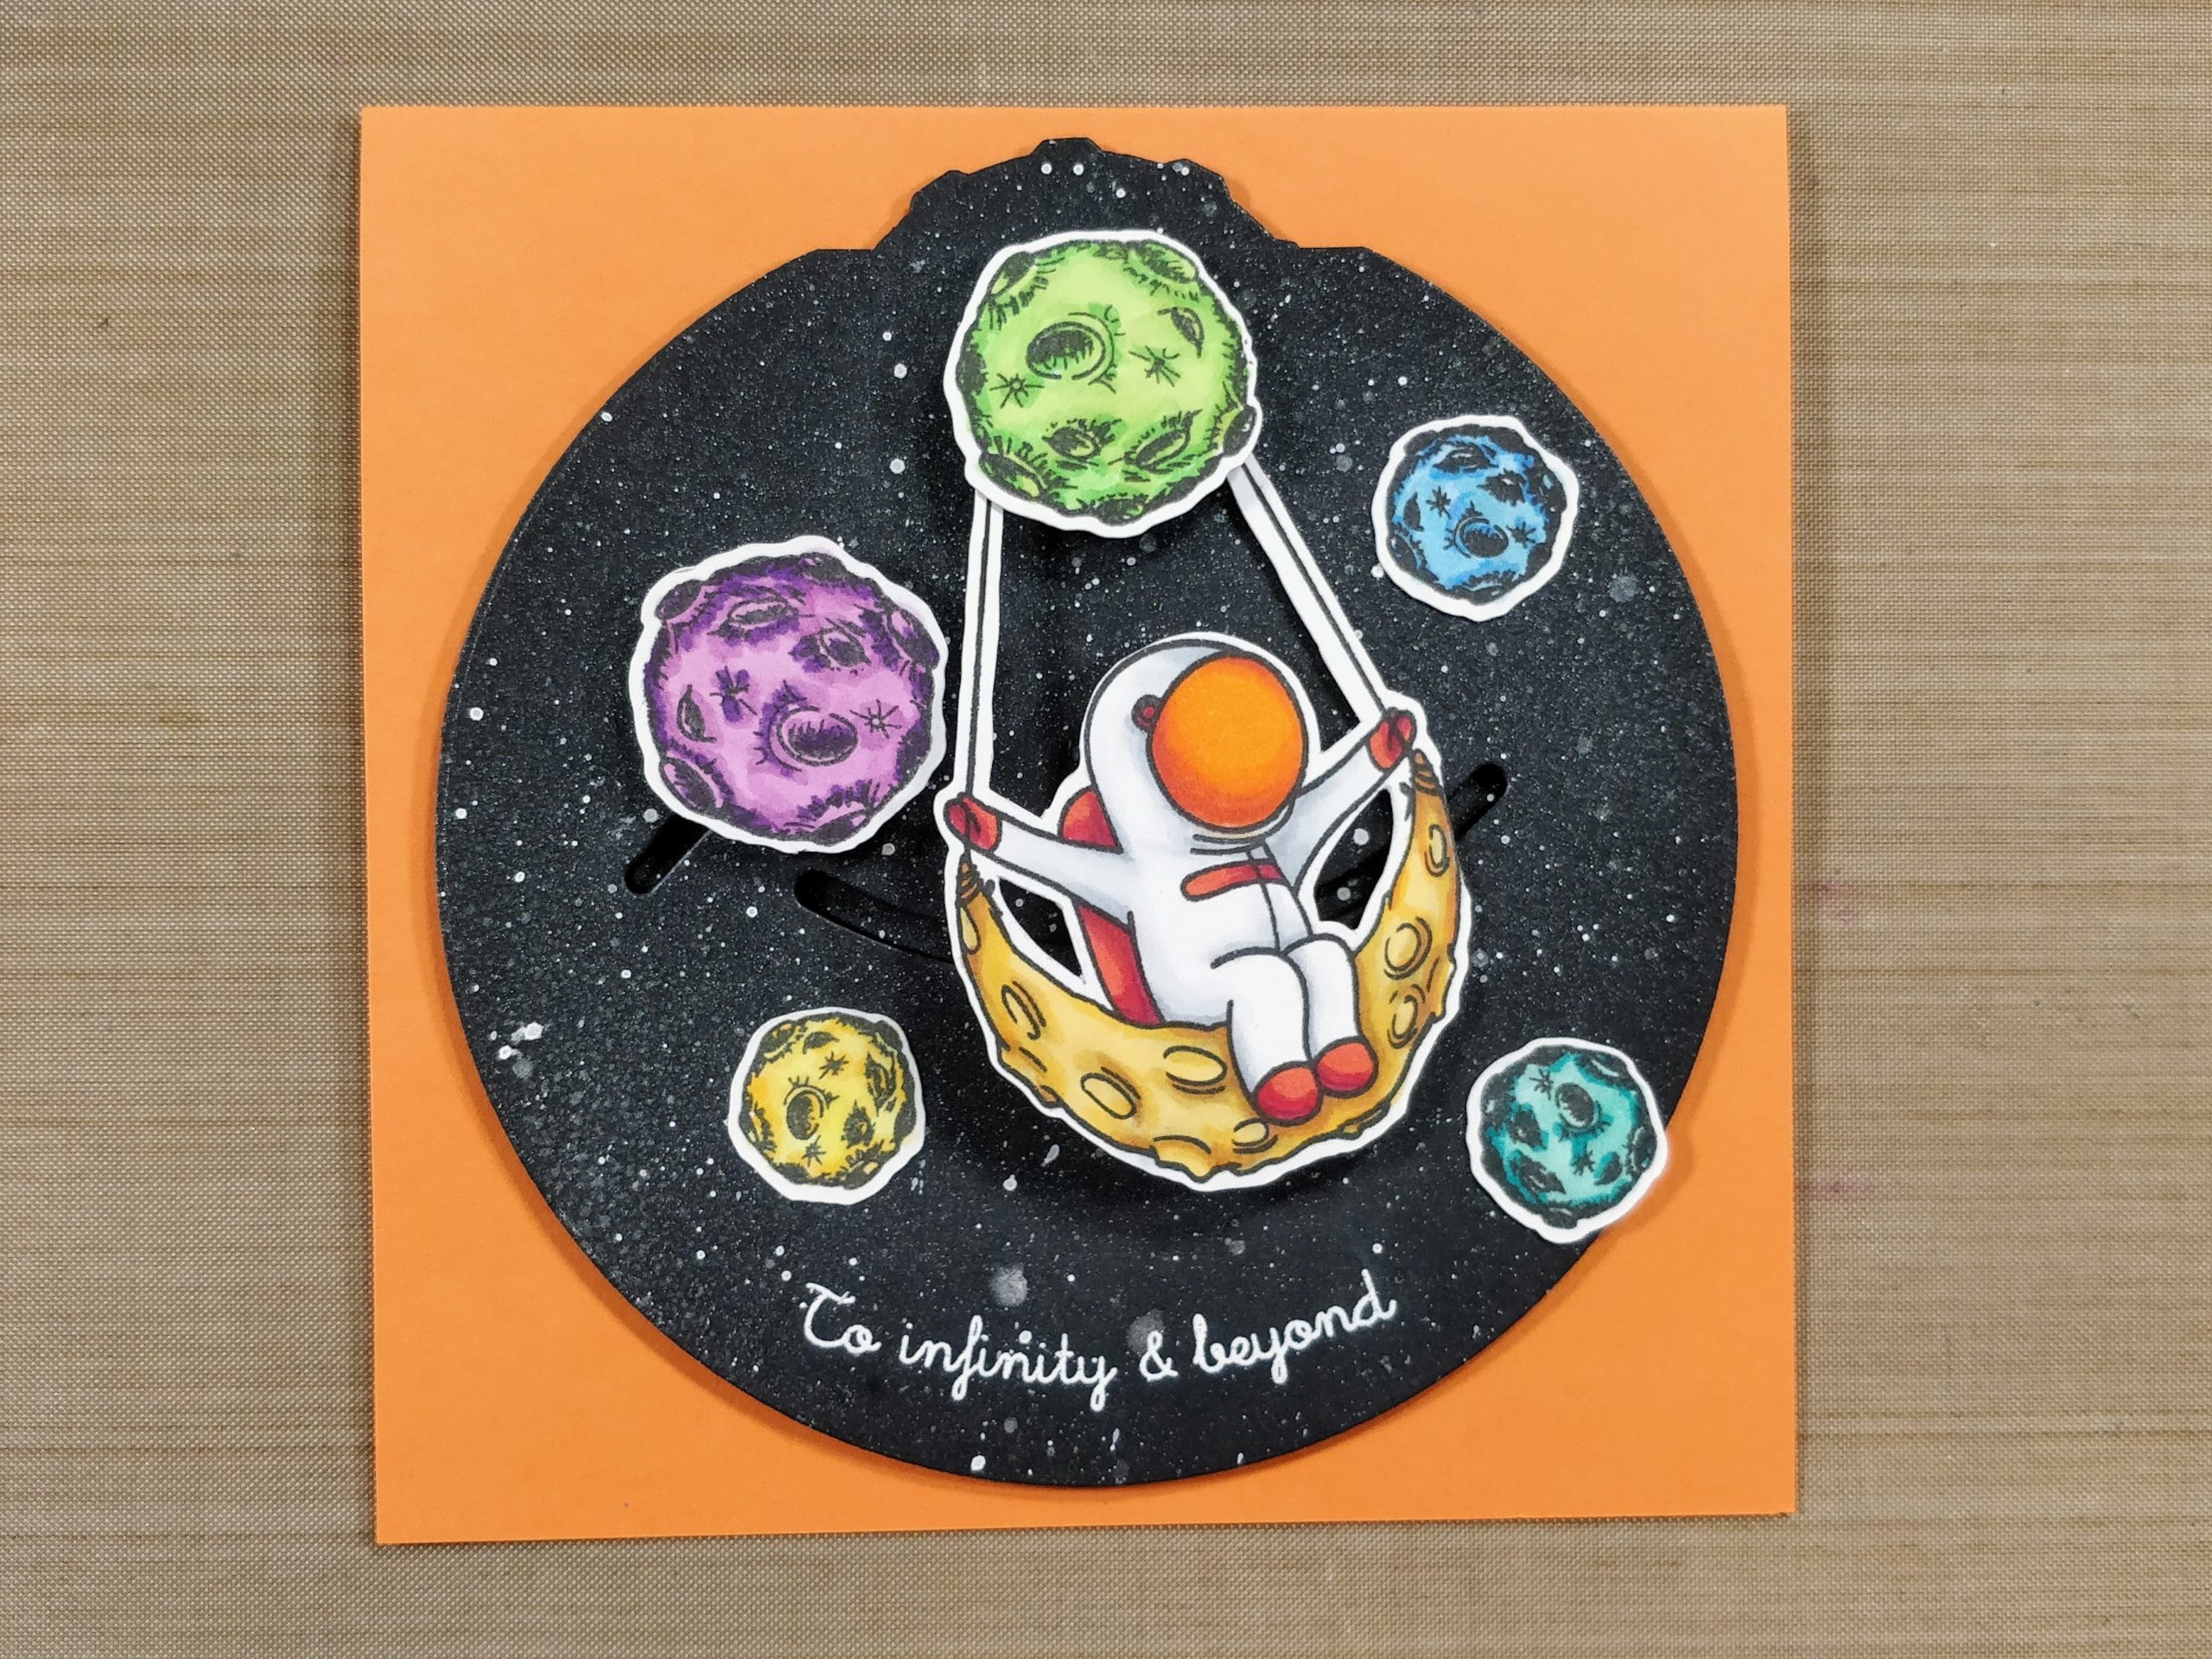
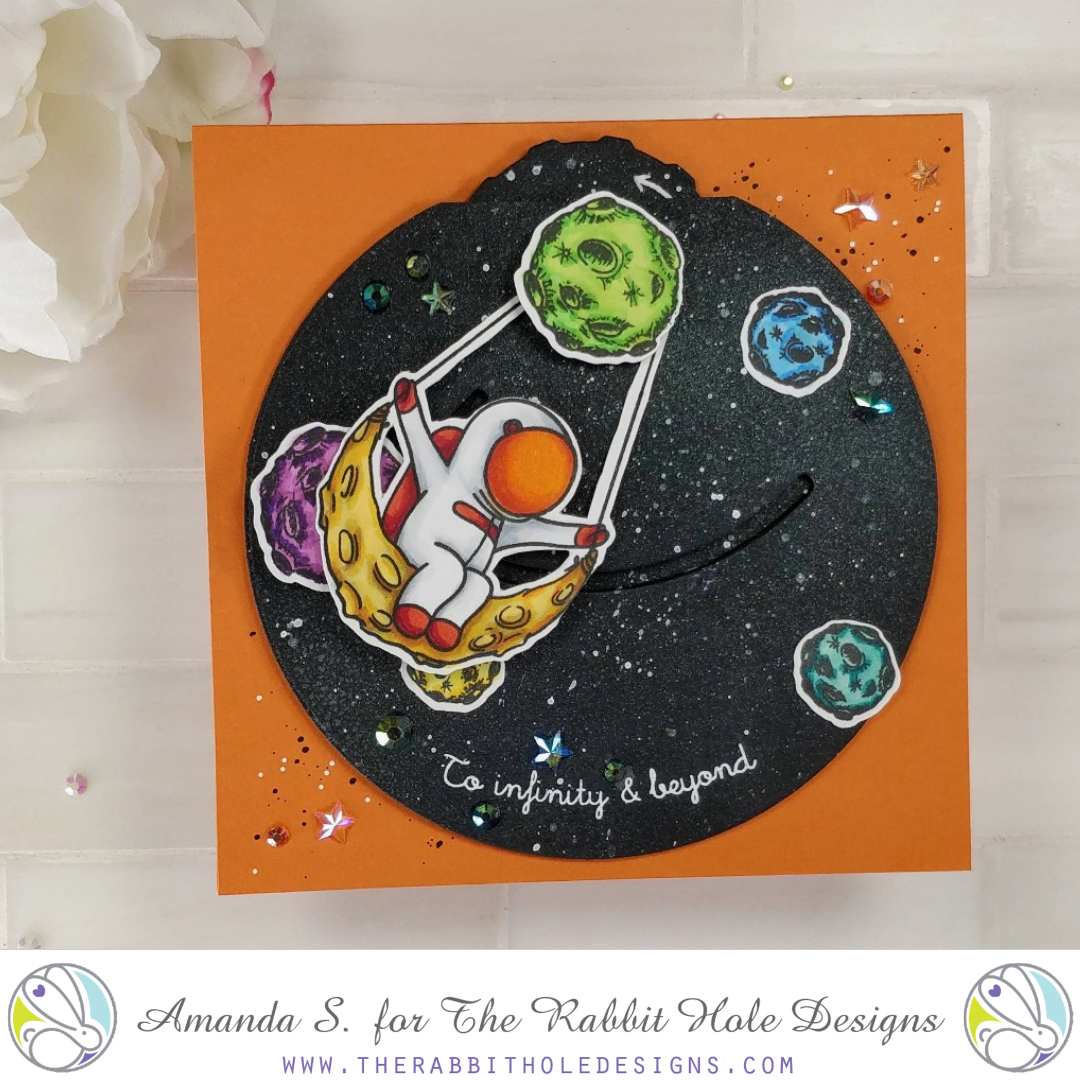
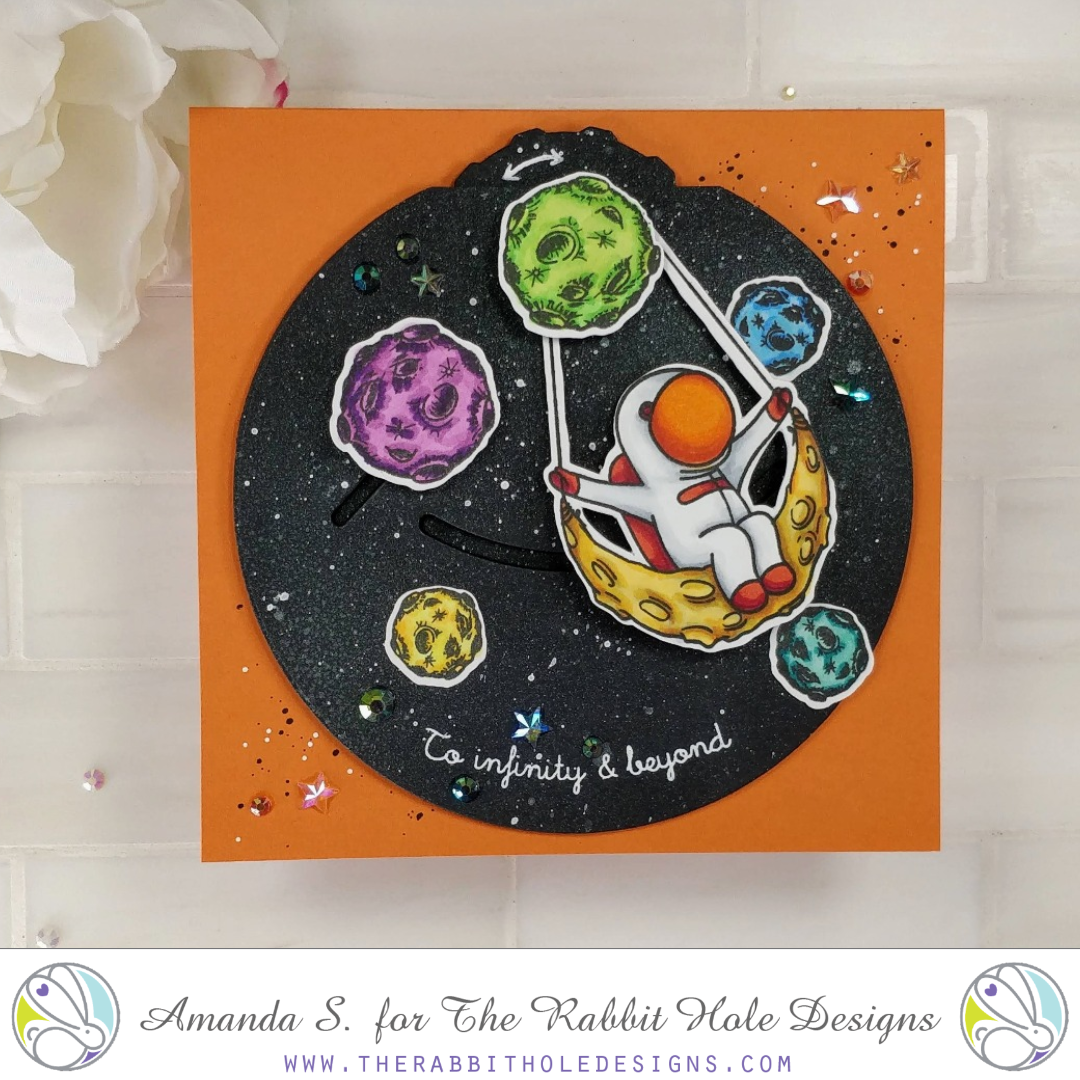
Hey crafty friend, Amanda from Pear Blossom Press here again. I've got an awesome new interactive card for you today! I paired up images from Space - Infinity & Beyond, and Space - Miss You, along with a neat double dial die set, to create a fun swing card. Check it out in action...


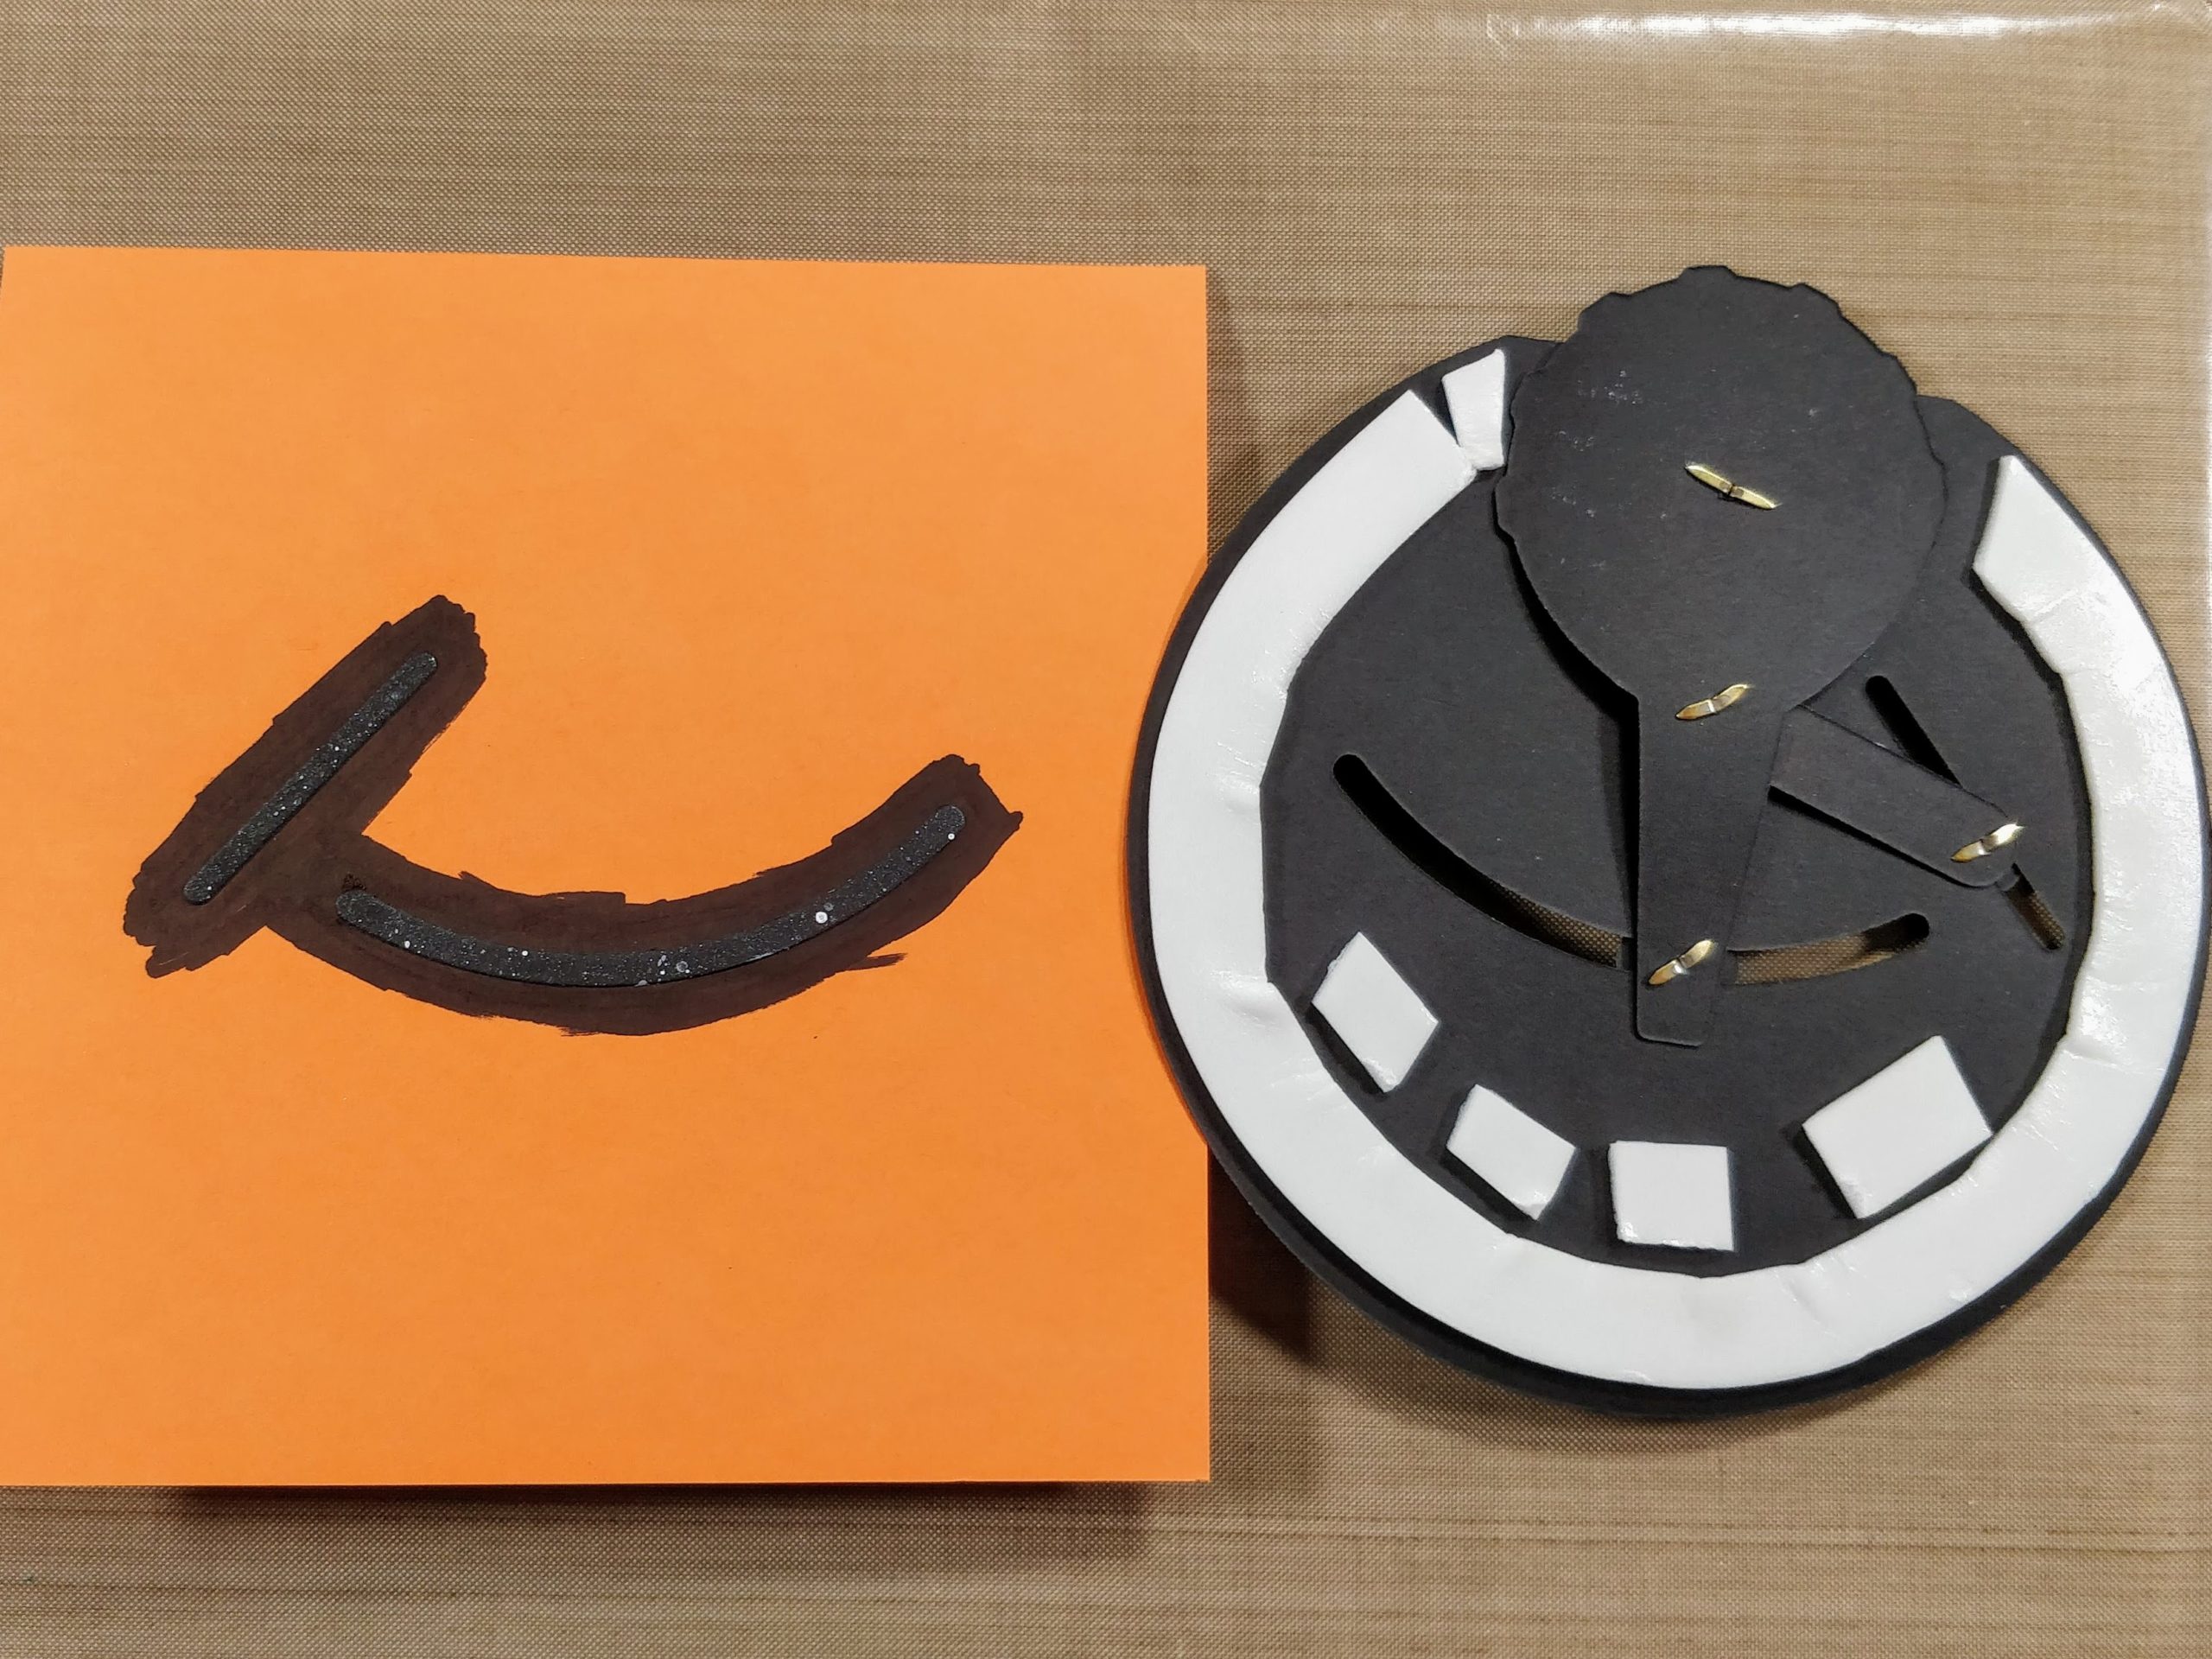
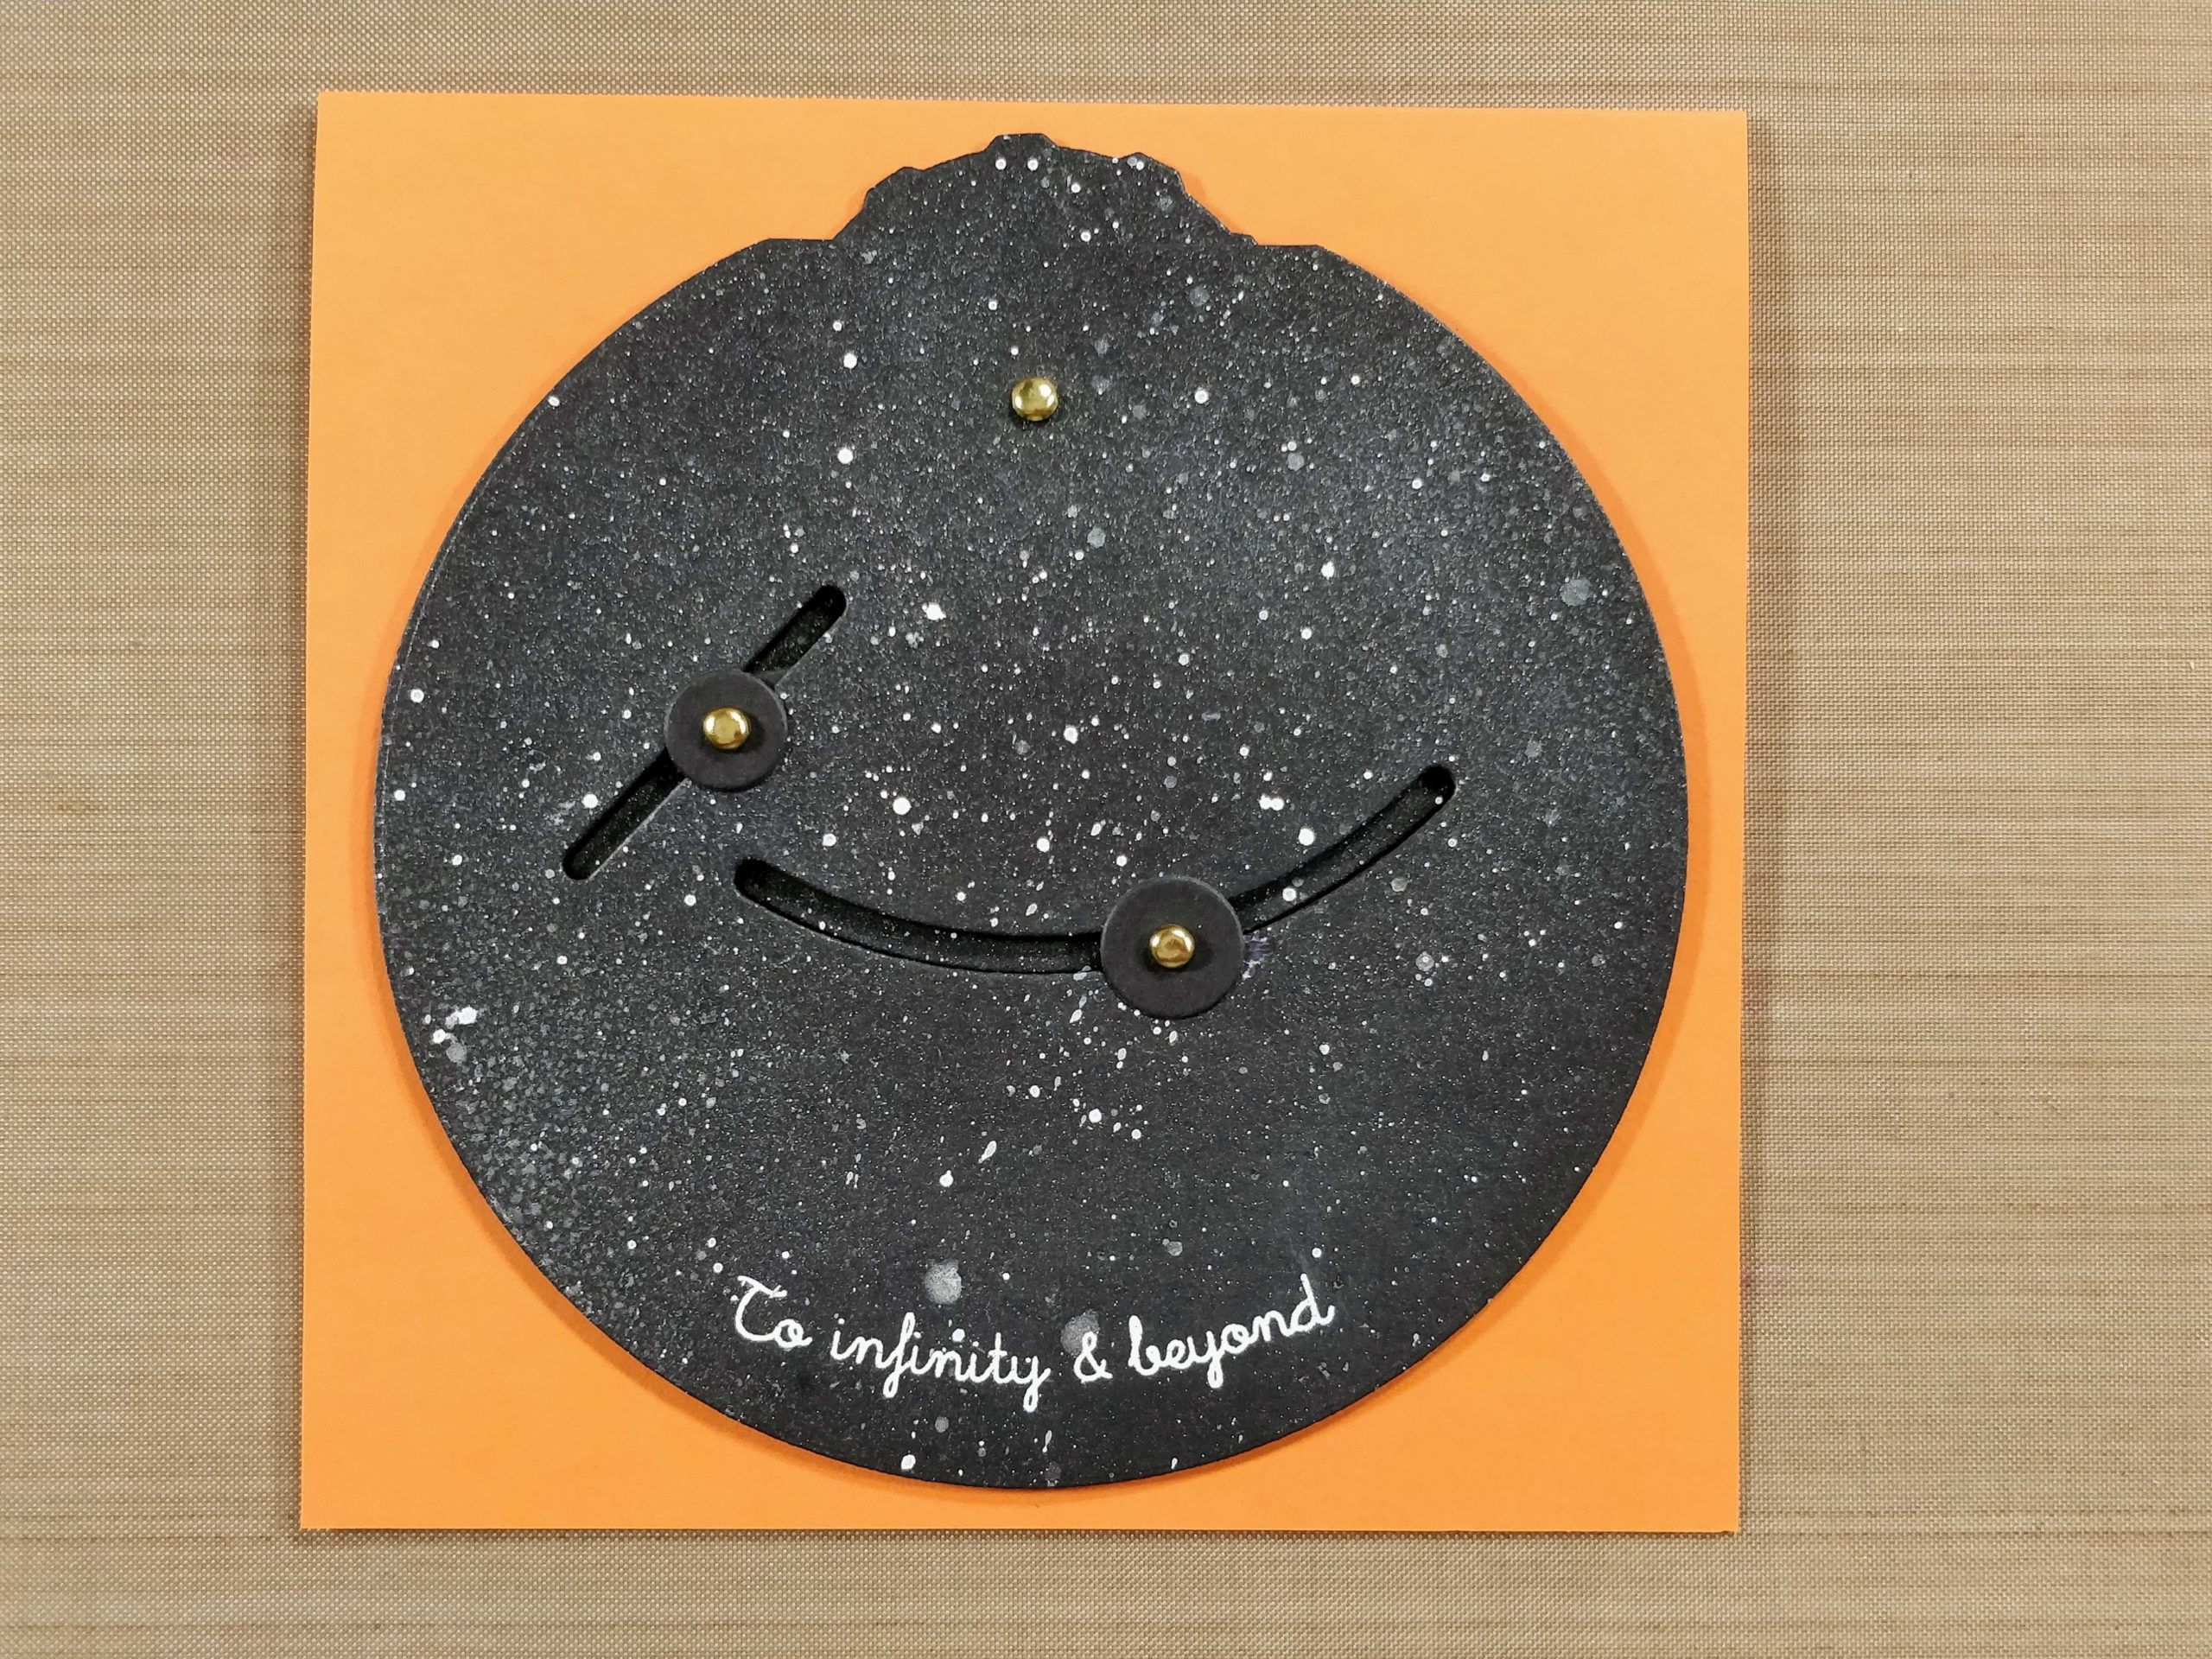
To prep, I stamped my images and Copic colored them. I extended the arms of the astronaut's swing and connected them at the top with a black pen. Then, I cut out all of the images with my ScanNCut. To create the galaxy background, I borrowed a trick from my friend Cassie, and just splattered white paint and shimmer mist onto black cardstock. It's fast and easy. I cut out a 5" circle and trimmed the top off to create the card front. I used the die set to cut the slots from the circle, as well as the dial, link and washers. It may seem complicated, but I promise, this was really easy to put together. Here are step-by-step photo directions to assemble the pieces...

Swinging on the Moon Double Dial Card 
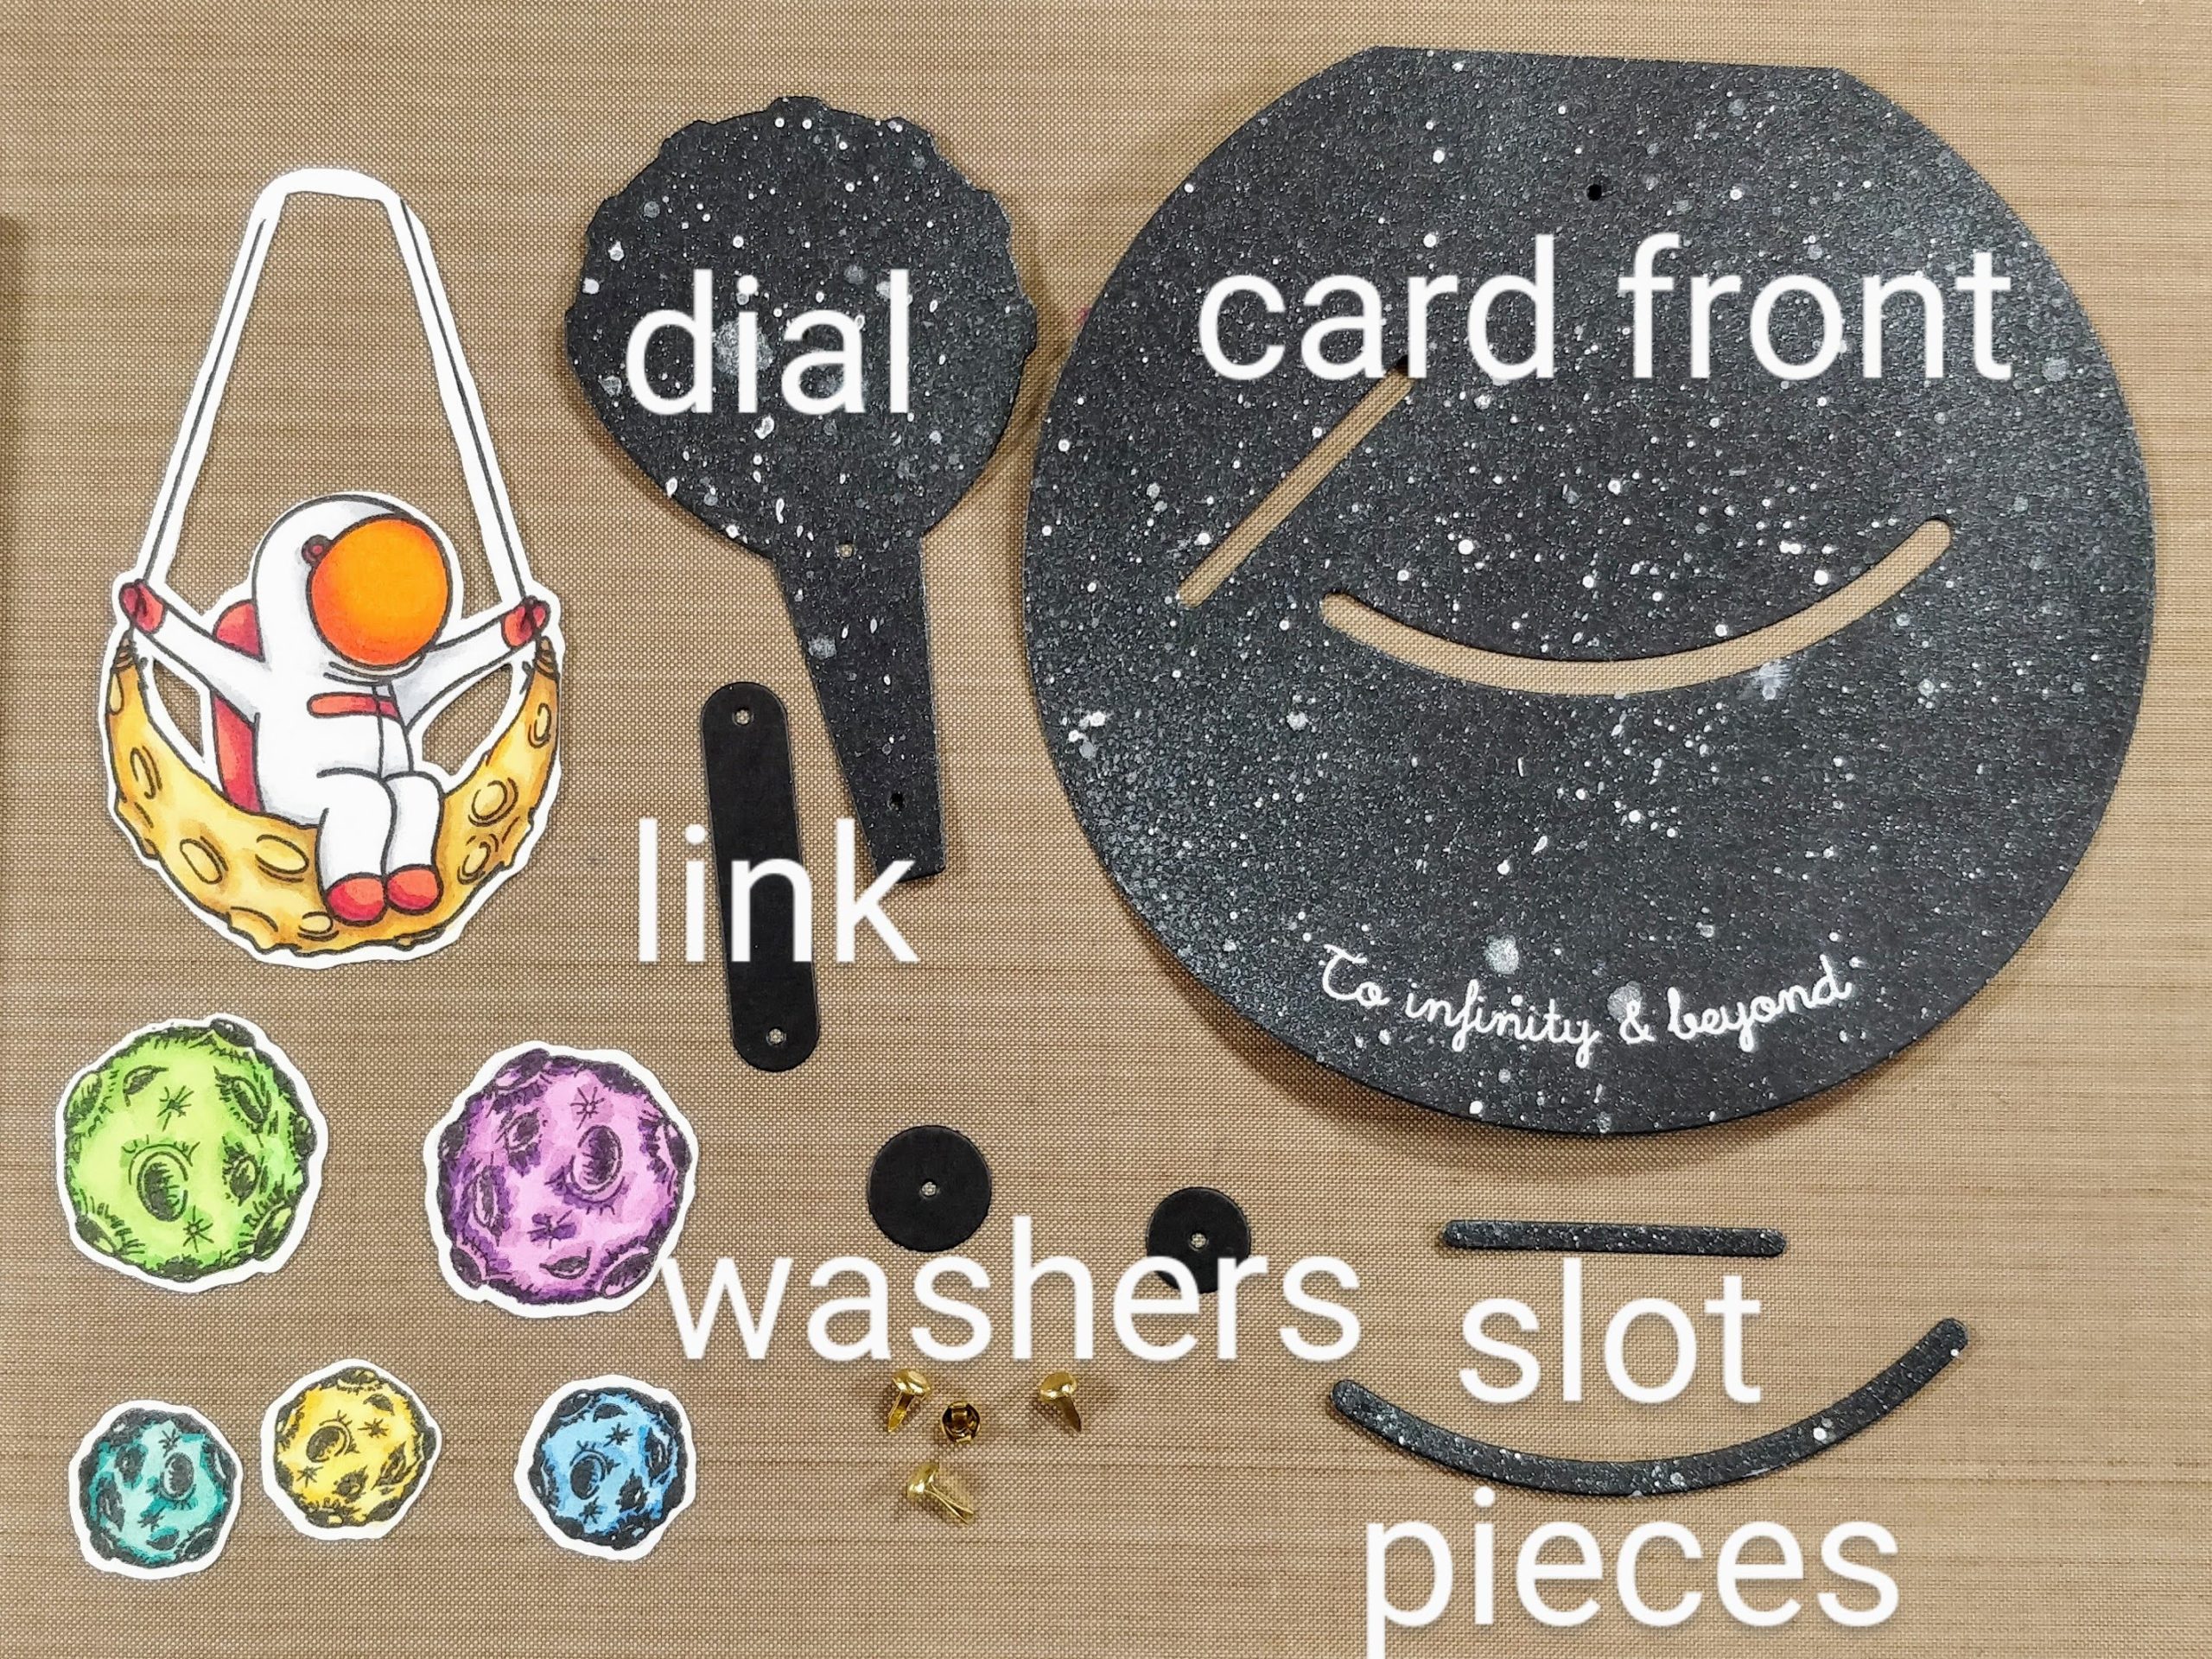
Parts for Swinging on the Moon Double Dial Card.

Swinging on the Moon Double Dial Card 
1. Attach link to dial with brad.

Swinging on the Moon Double Dial Card 
2. Attach dial to card front (narrow tweezers help create extra space when opening brad).

Swinging on the Moon Double Dial Card 
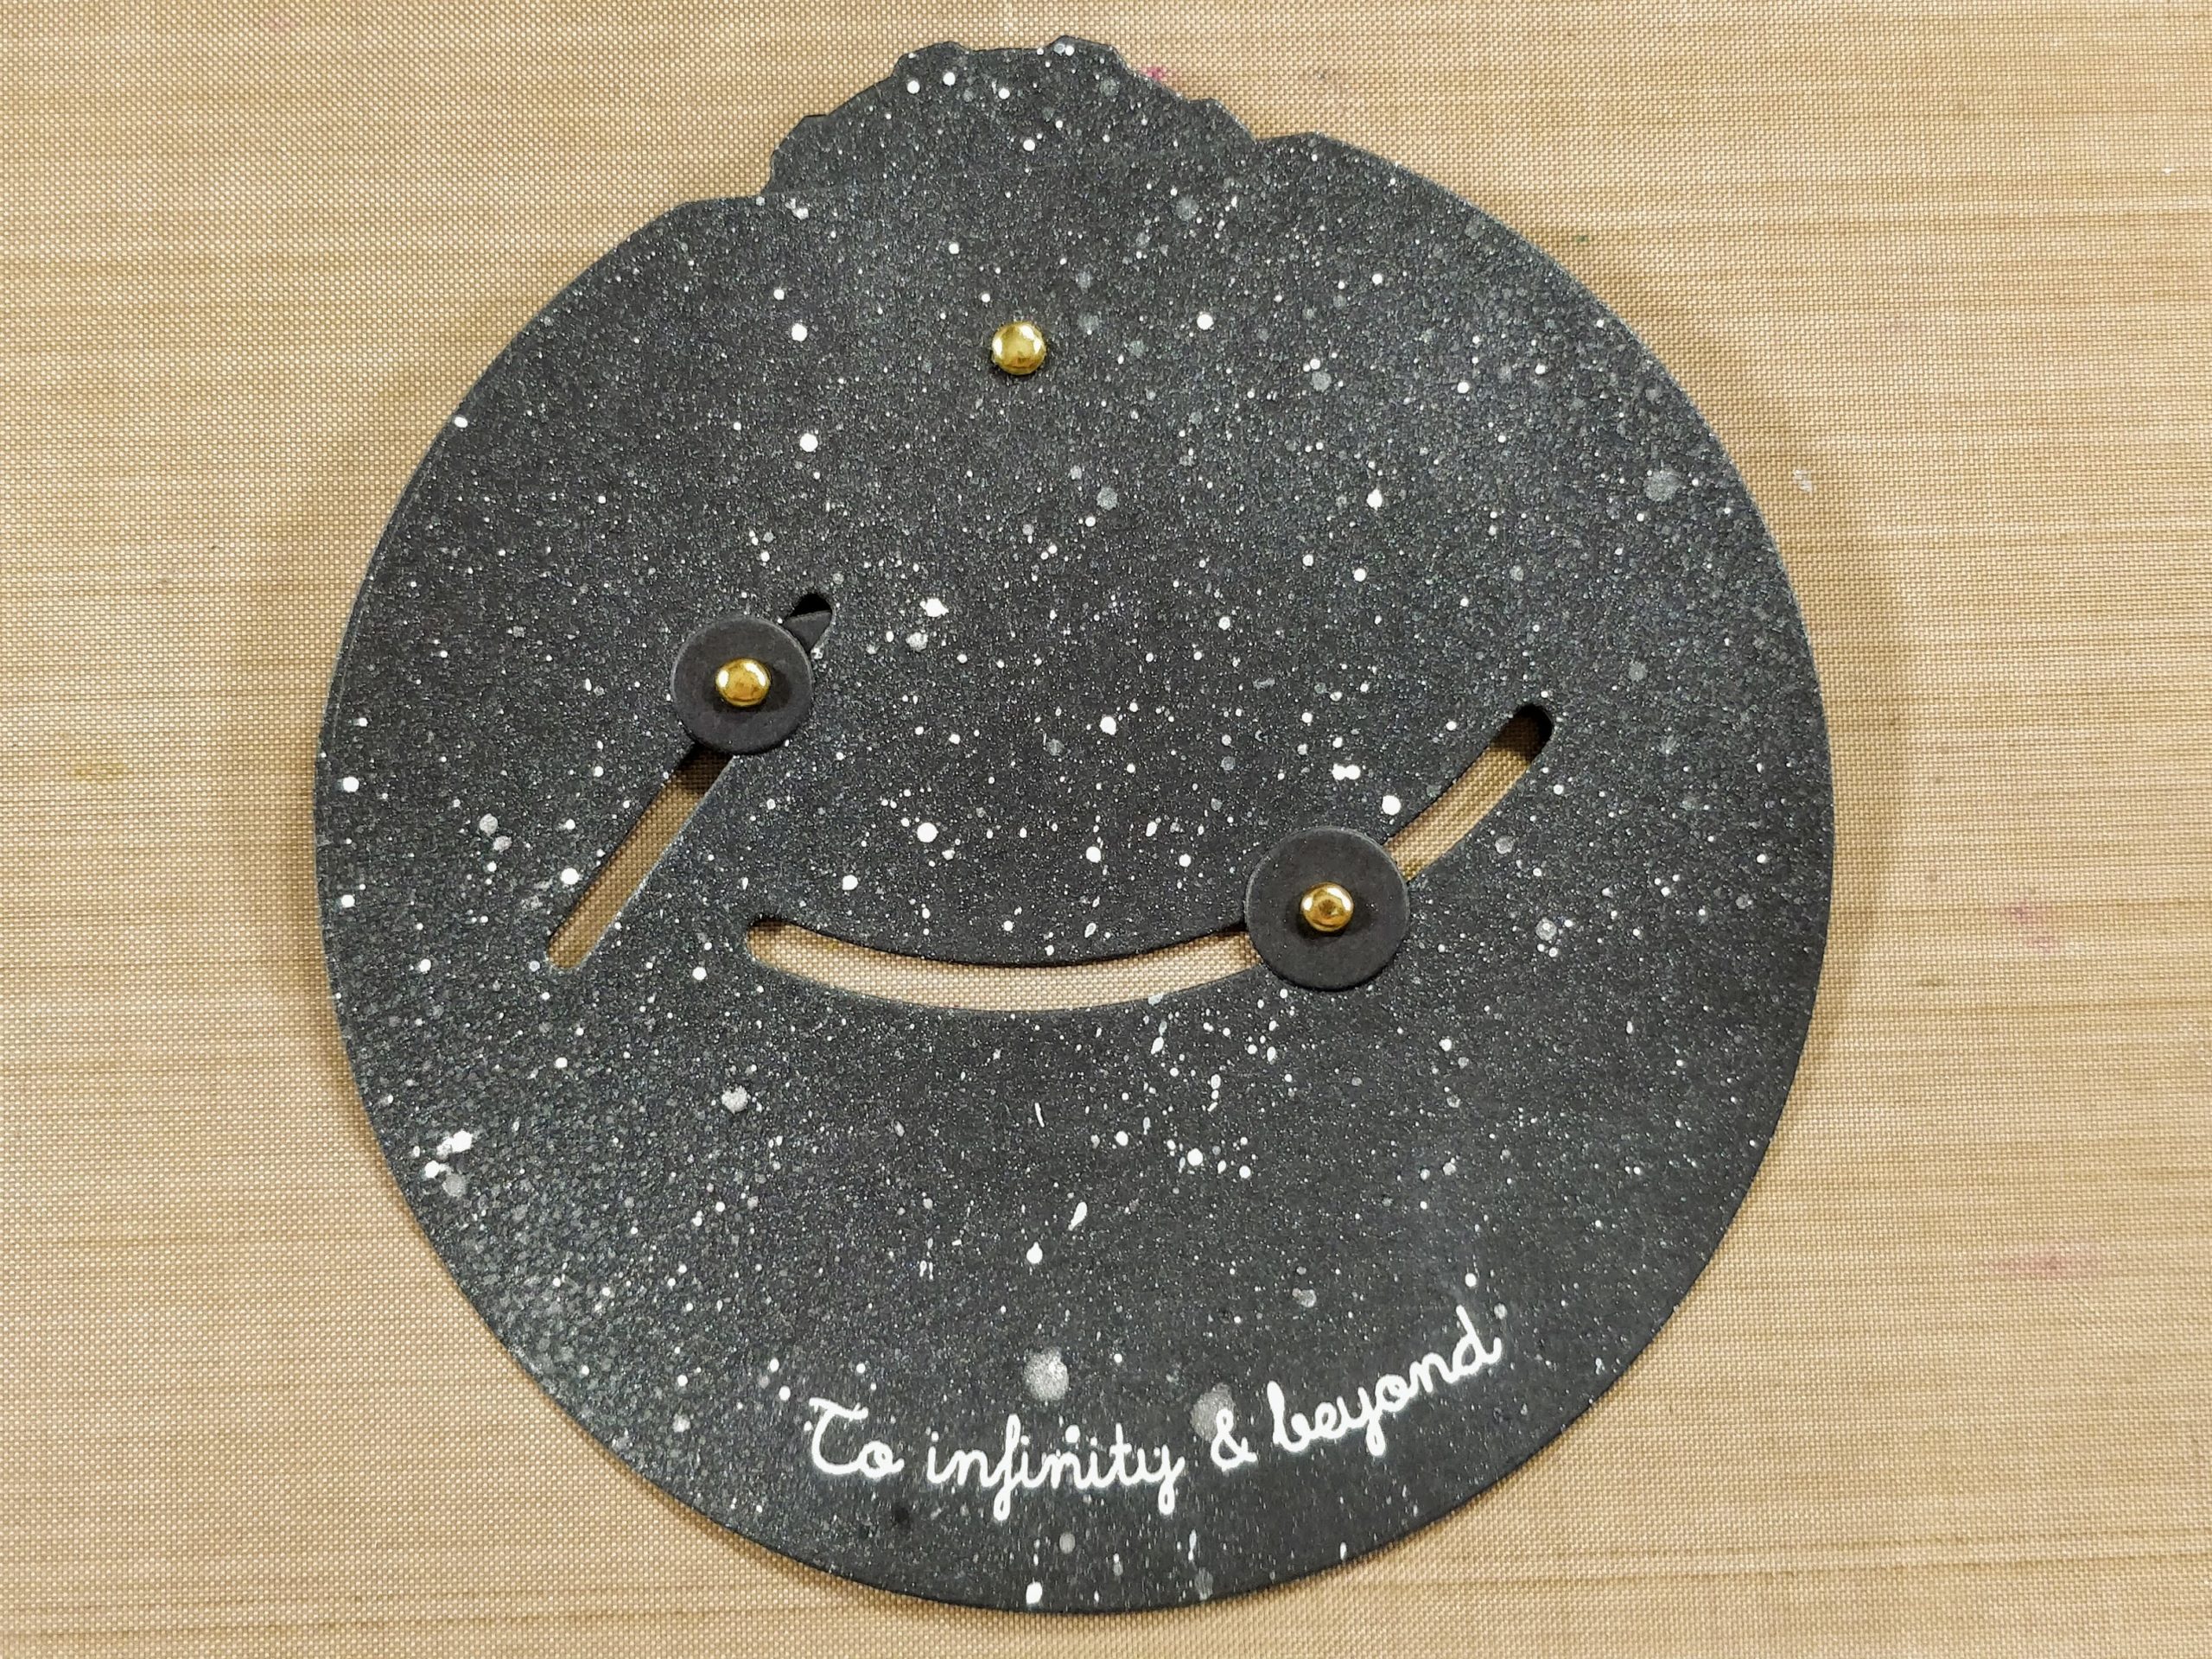
3. Use brads and washers to attach link and dial arm to card front (view from front).

Swinging on the Moon Double Dial Card 
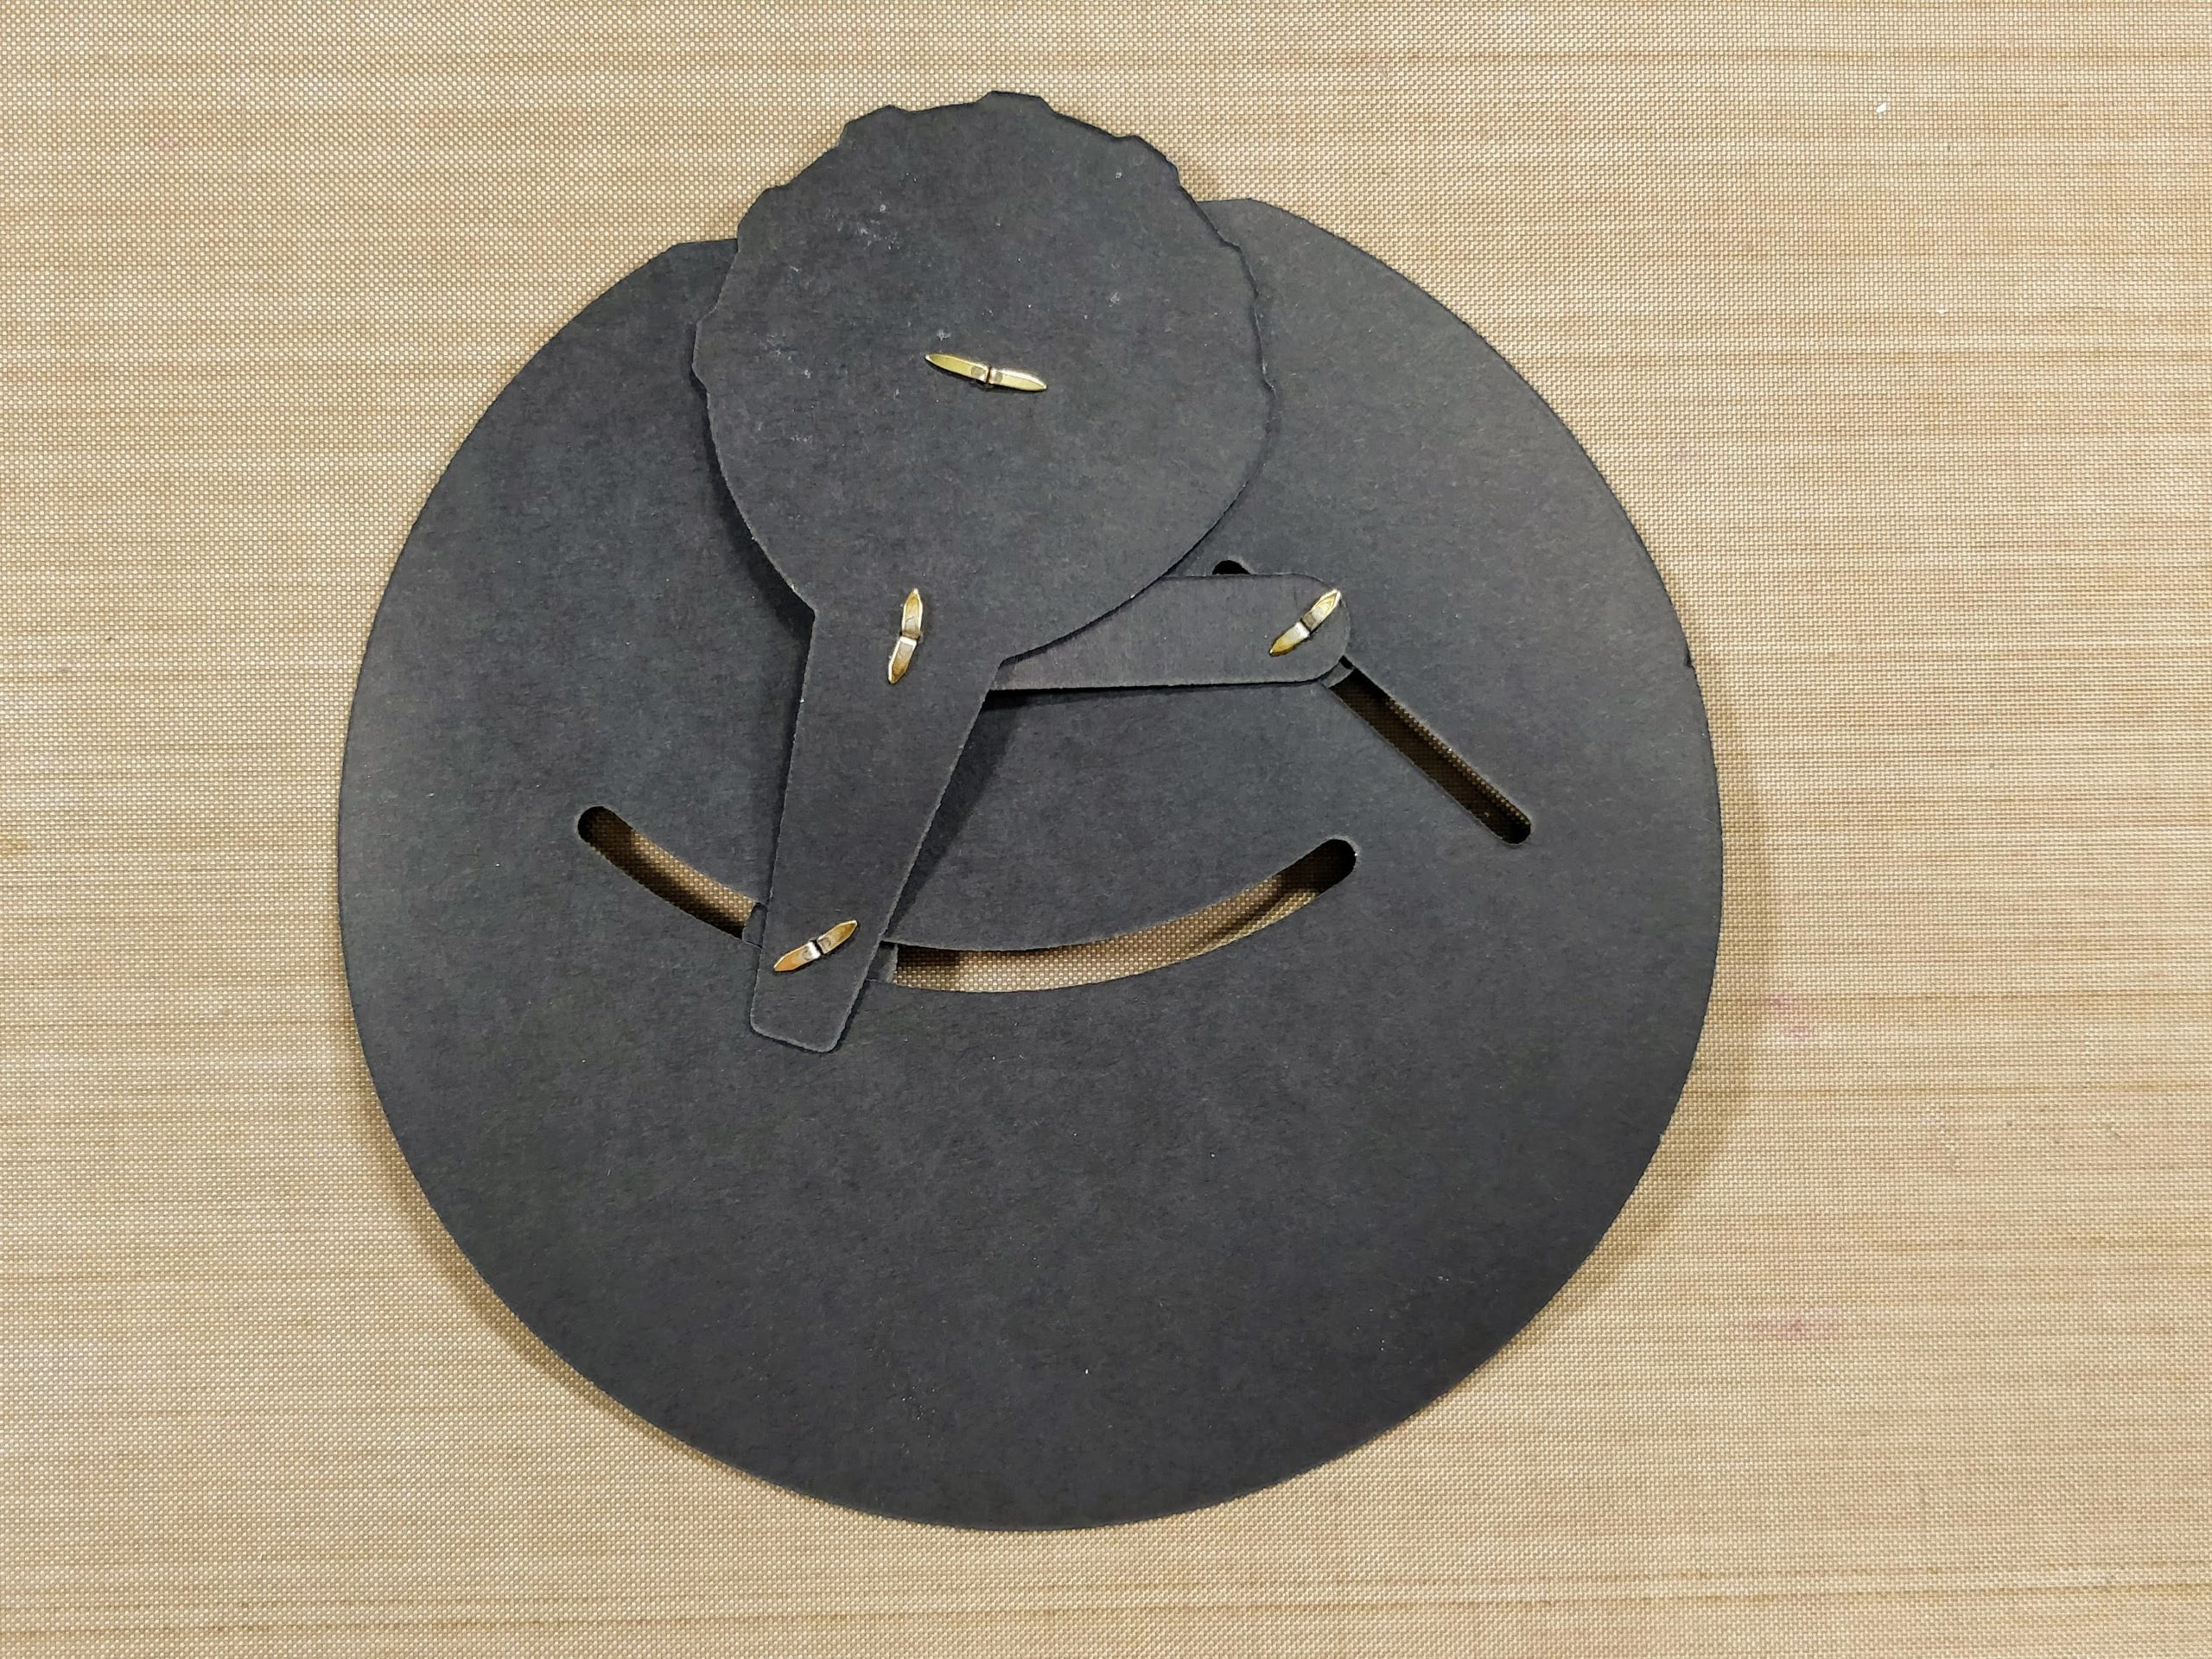
(View from back.)

Swinging on the Moon Double Dial Card 
4. Attach black slot pieces to card base and use marker to darken area around them. Apply foam tape to back of card front, away from moving parts.

Swinging on the Moon Double Dial Card 
5. Attach card front to card base.

Swinging on the Moon Double Dial Card 
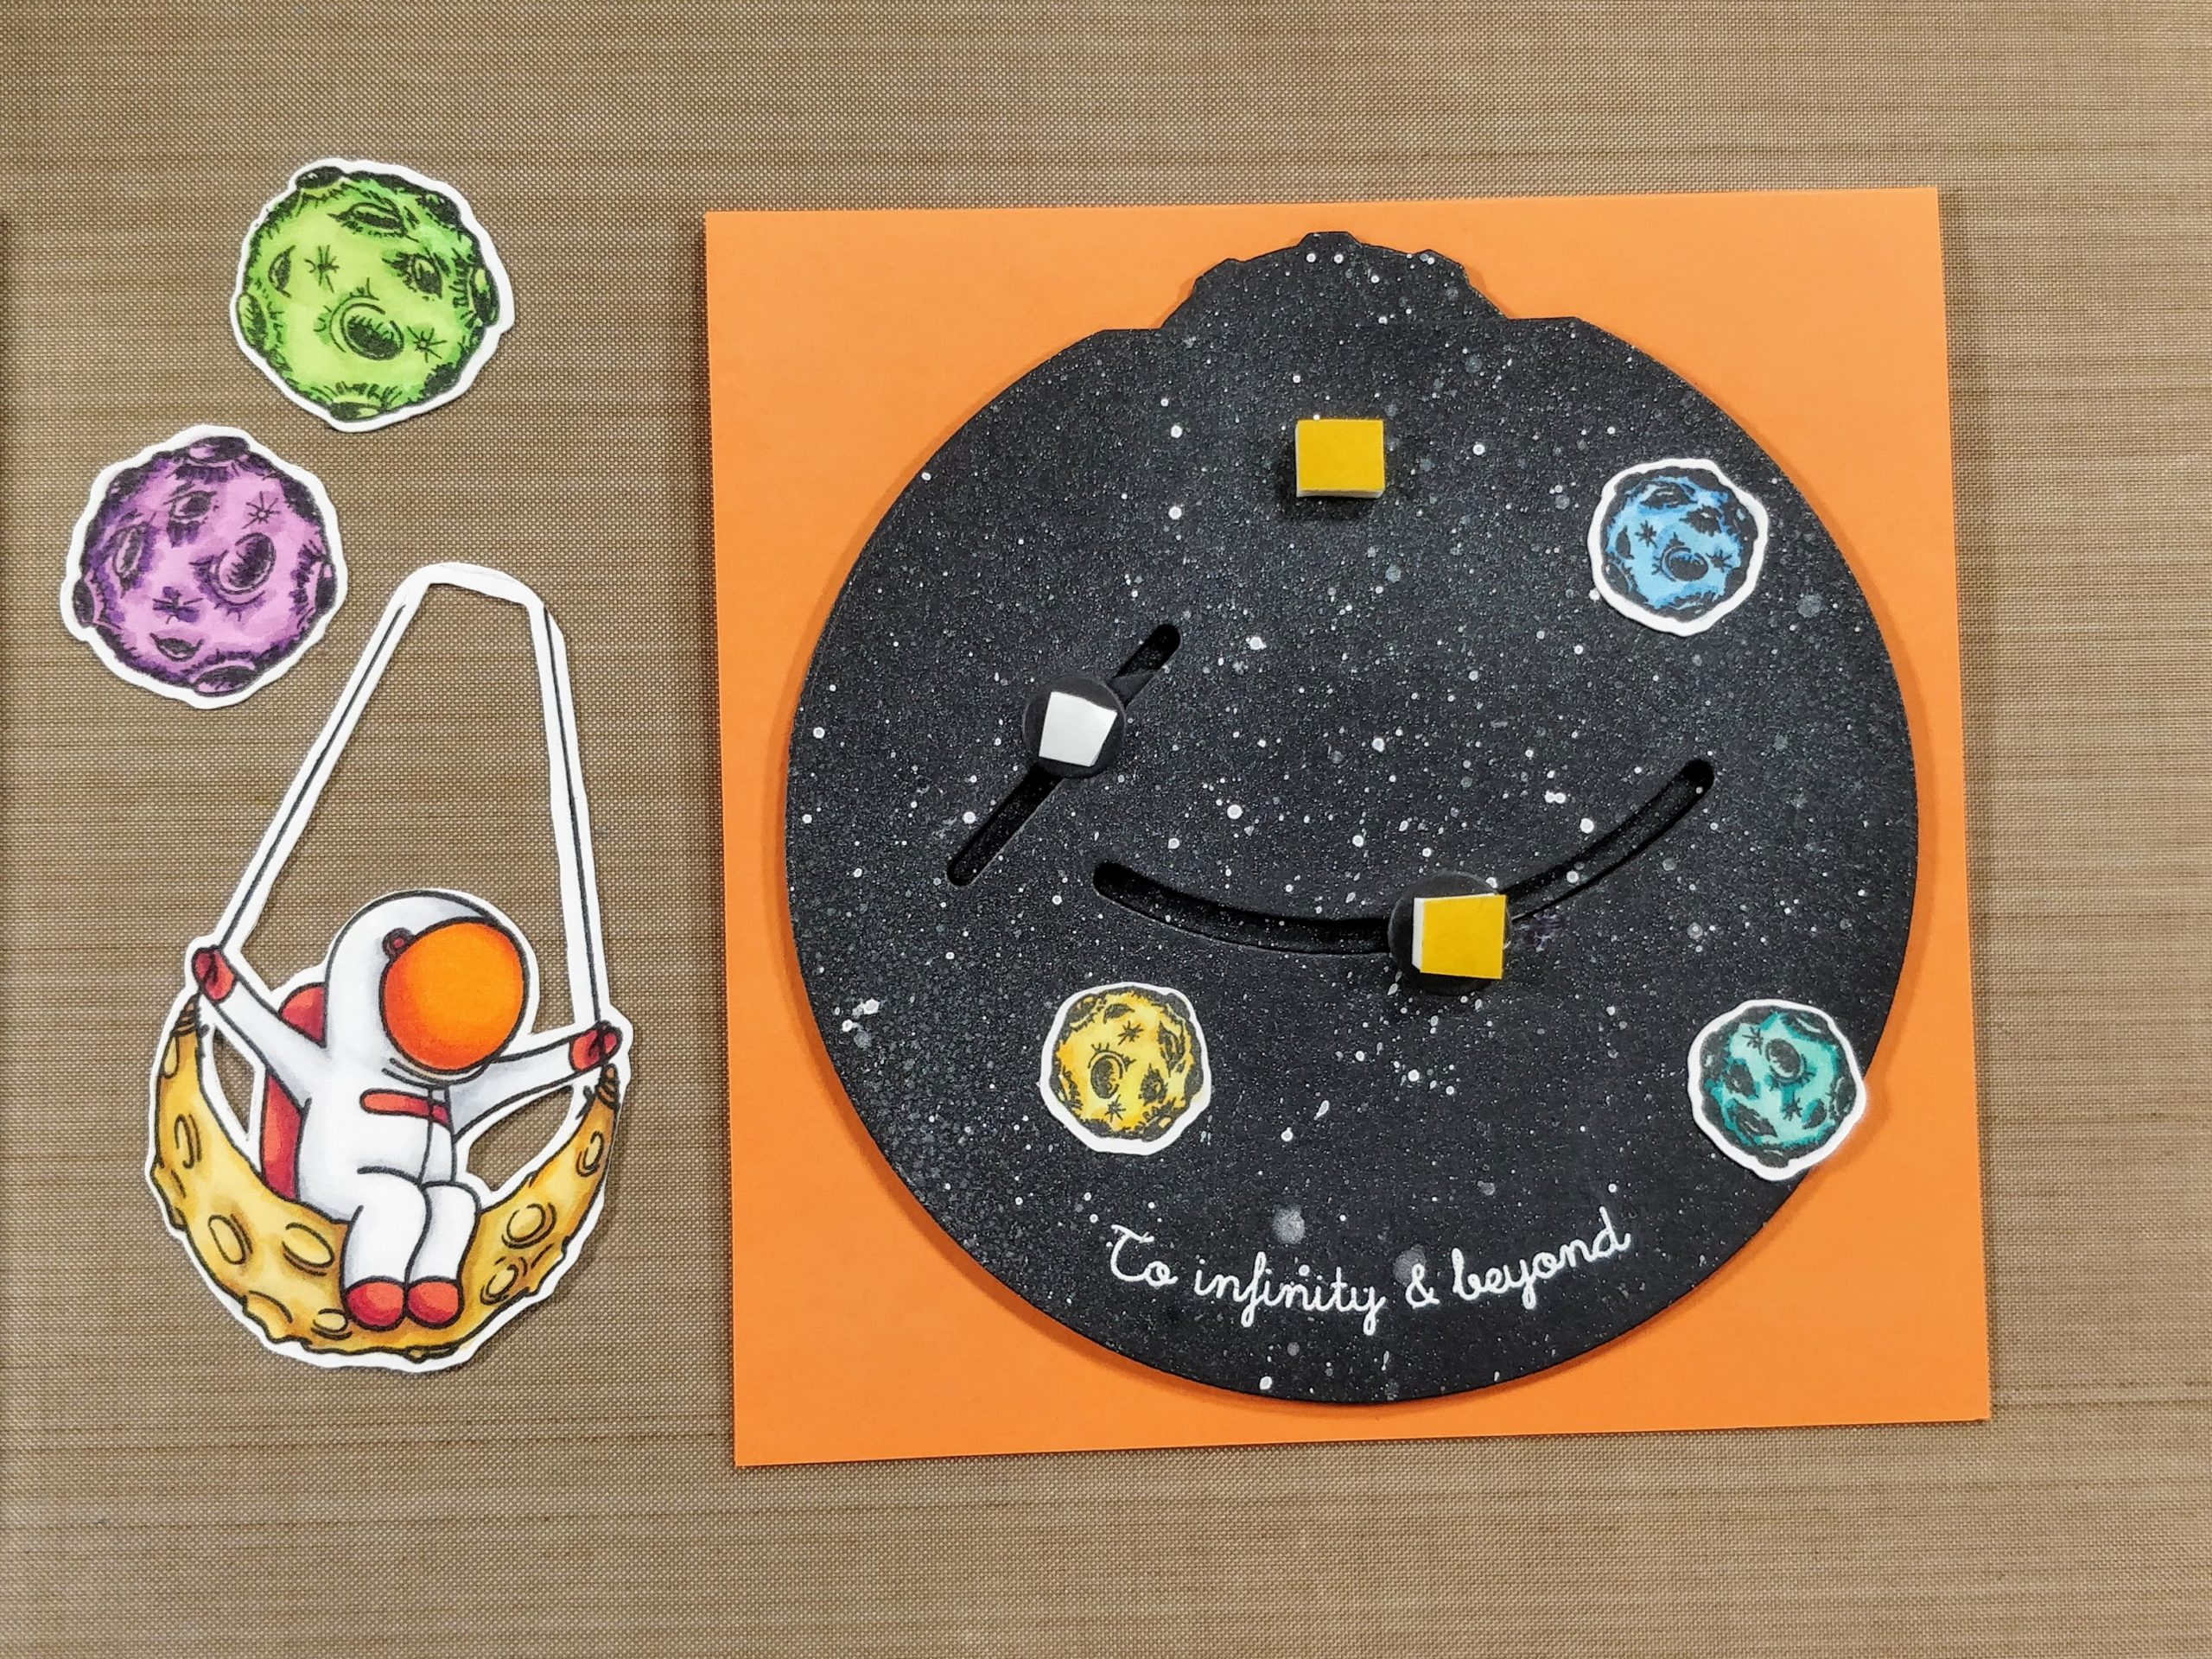
6. Apply double thick foam tape (yellow) on dial brads. Apply regular foam tape (white) on link brad. Glue small moons flat to panel.

Swinging on the Moon Double Dial Card 
7. Attach swing to foam on dial arm. Attach purple moon to foam on link.

Swinging on the Moon Double Dial Card 
8. Attach green moon to top brad.

To finish the card, I added a few dots to the top right, and bottom left corners of the card base with black and white pens. I glued a bunch of round and star shaped gems all over too. And a hand drawn arrow on the dial, lets the recipient know how to operate the mechanism. 

Swinging on the Moon Double Dial Card Swinging on the Moon Double Dial Card Swinging on the Moon Double Dial Card

Thanks for stopping by today. I'd love to know what you think of this one! You can find the sister article to this post on my blog. Head on over for links to the specific products I used. If you'd like to see more cards using these stamp sets, you might like this article, and this one. I'll be back soon with more fun cards to share.

For more inspiration with your The Rabbit Hole Designs Creations, be sure to follow along at these other locations:
The Rabbit Hole Designs BlogThe Rabbit Hole Designs InstagramThe Rabbit Hole Designs Facebook PageThe Rabbit Hole Designs PinterestThe Rabbit Hole Designs YouTube

Space Treats!

Hi everyone! Von Marie here and I'm so happy to be on TRHD Blog today!  I have a fun project to share with you using the New Space-Miss You stamp set.


I decided to make a treat bag and color up some of these planets and put them on my Hershey Kisses.  I first cut out some Canson Cold Press Watercolor paper with my paper trimmer and added some Distress Oxides in Black Soot and Cracked Pistachio.  I then added some Nuvo Shimmer Powder in Violet Brocade and squirted some water.  That powder is so shimmery, I love it. I then heat dried my panel with my heat gun.  I die cut my piece with a stitched scalloped rectangle and stamped and heat embossed my Astronaut image using my Misti.


I then placed my panel aside and put my bag together with black glitter paper.  I attached my panel with foam tape and added some gems.  I stamped the planets on white cardstock and colored them simply with my neon copic markers.  I then used a small circle die to cut them out and attached them to my Hershey Kisses.


 I placed one planet on a clothespin to hold my sentiment banner.  I then added some Hershey Kisses in a clear bag and added it in my glitter bag.  I hope you like what I made today.


The Rabbit Hole Designs Products Used:


For more information, news and updates check out these links:
Thank you for stopping by!


June Release Inspiration Hop ~ Day 3


Hello and welcome to Day 3 of the Inspiration Hop. We are so excited for you to join us as we present to you our June release. Our fabulous Design Team has sharing their projects over the last couple of days, so be sure to visit their blogs and leave them some crafty love.


 The 2 new stamps sets and 2 new stencil are all available to purchase right now in the shop.


The stamp set that is being highlighted today is


Space - Miss You


Thank you so much for hopping along with us and the team for our June Inspiration Hop.


Here is the line up for the hop:

The Rabbit Hole Designs

Tangii
Von Marie
Kelly
Amanda

___________________


**Giveaway**


To celebrate the June release, The Rabbit Hole Designs is giving away two gift certificates; one to a lucky Instagram Follower and one to a lucky Fan Page follower.  Winner will be chosen at random from the comments left on the INSTAGRAM post, and tagging friends, and also from commenting on the Fan Page post.  So make sure to head on over to INSTAGRAM and look for the giveaway post @therabbitholedesignsllc and look for the post at The Rabbit Hole Designs Fan Page by 11:59 p.m. PST 05-28-2020.  Winner will be announced on The Rabbit Hole Designs blog 05-29-2020.

This is the graphic you are looking for on our IG and FB


___________________


For more inspiration, updates, and news make sure to check out these awesome places! 


Thank you so much for stopping by today!