Pages

Showing posts with label Square Card. Show all posts

Have a Very Merry Unbirthday!


Hi everyone! Lauren here with this colorful square card. This month's release is full of whimsy so I wanted to make this card fun and bright. 

I started by stamping the Tea Party 6x6 background stamp onto white cardstock using black ink. I then colored the whole image using colored pencils and trimmed it down to just slightly under 5x5".


I then stamped, colored and die cut the Mad Hatter image from the Wonderland 3 stamp set.


Next, I stamped the sentiment onto the front of the card. I used the heat gun to dry the ink because it takes longer to dry on the colored background.


I adhered the Mad Hatter onto the tabletop and then adhered the panel onto a top folding 5x5" white card base to finish the card.

Thanks for stopping by. I hope this inspires you to pull out your pencils or markers and get coloring! 

Here is a list of the products I used for this card:


Thanks again for visiting. You can follow me here:

YouTube channel: Lauren Z. – Queenlore Creations – YouTube


For more inspiration, updates, and news make sure to check out these places


Past Favorite, Joyful Greetings Times Two!


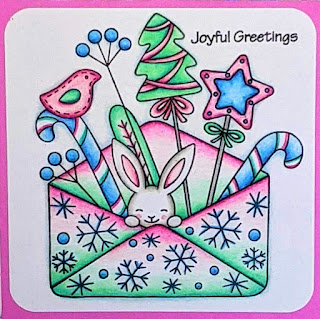
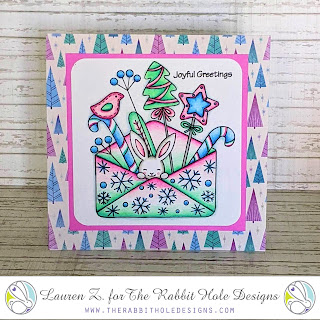
Hi there. It's Lauren sharing another of my favorites from this past year. This one is a two for one! I loved coloring this image so much that I did two color schemes and then couldn't decide which one I preferred! 

Hello and welcome to day 3 of The Rabbit Hole Designs New Release and Inspiration Hop. Today I have this square card featuring the so very adorable Hoppy Holidays stamp set illustrated by Tatsiana Zayats.

This was a super simple card to make. I started out by stamping the image in black onto white cardstock. I then colored the whole image using Prismacolor pencils. I stuck with a traditional Christmas color palette.


I then die cut the image out using a rounded corner square die from my stash and stamped my sentiment in the top right corner. I adhered it onto a square kraft cardstock panel

Next, I found a coordinating patterned paper and trimmed it to 5.5 x 5.5 and adhered it to a top folding card base of the same size. Then I adhered the panel I had created onto the patterned paper.

I enjoyed colouring this image up so much that I decided to make the same card but this time in non-traditional Christmas colours.


I cannot decide which card I prefer! Which one is your favorite?
For more inspiration, updates, and news make sure to check out these awesome places! 


Beach Bunny Shaker


Hello all! Lauren here today sharing my bunny shaker card. I used the Starfish in the Sand stamp set and a sentiment from the Beachin' stamp set. Both are from the April release.

I started out by stamping the bunny image onto white cardstock using Fadeout ink. I then colored the whole image using Prisma color pencils. The colors I used were:
Bunny: 10, 20, 30% French Gray, Eggshell
Ears and cheeks: Hot Pink, Pink
Shells: Lemon Yellow, Canary Yellow, Sunburst Yellow, Cream
Lavender, Mulberry, Violet
Process Red, Hot Pink, Pink
Light Green, True Green, Parrot Green
Starfish necklace: True Blue, Copenhagen Blue
Background: True Blue, White


Next, using a large round die, I cut a circle out of a 5.5x5.5" white cardstock panel. I then stamped and embossed the shells from the stamp around the rim of the circle. I used Versamark and white embossing powder.


Once the shells were embossed, I used a Cotton Tail blending brush to blend Antique Linen Distressed Oxide ink overtop the whole panel. I then wiped the ink off the embossing with a soft paper towel.


Next, I flipped the panel over, and adhered acetate over the circle.


I added double sided foam tape all around the rim of the circle making sure not to leave any gaps that shaker bits could escape from. I also added foam tape all along all sides of the panel. I added my shaker bits inside the circle on top of the acetate.


Then, I removed the backing paper from the tape and carefully placed the colored bunny panel over the top of the foam tape. I flipped the shaker over and adhered it to a 6x6" top folding seafoam card base.


I stamped my sentiment onto white card cardstock using a Versamark ink pad. Then heat embossed it using white embossing powder. I ink blended the Antique Linen over top and wiped away the excess ink off the letters. I trimmed the sentiment using a banner die then adhered it to the front of the card.


I am so delighted how this card turned out! It is such a fun image to color up  create with. Thanks so much for stopping by.


Products used were:


Love by Niccole

Hello everyone!

It's Niccole from Nic & Viv Designs back again to share another card I made using one of The Rabbit Hole Designs new stamp sets. 


For today's card I used the Put A Bow On It stamp set. I love how versatile this stamp set is.

I have a lot of pictures today for you. This way I can show you each card and a close up of the foil on each card.


How to create this card:
  • Square card base that is 4.25"x4.25".
  • Stamp the bows stamp from the Put A Bow On It  stamp set with Versamark Ink on a 3.75"x3.75" square.
  • Add clear embossing powder and heat emboss bow image.
  • Cut a piece of foil to cover embossed image.
  • Run bow image with foil through laminator.
  • Remove foil to reveal foiled image.
  • Frame out square stamped image with coordinating color to frame it.
  • Add image to square card base.
  • Stamp the word LOVE from the Put A Bow On It stamp set in the bottom right corner at an angle coinciding with the heart shape.
  • Add a few black Nuvo Crystal Drops randomly to finish the card.
Here is one more picture of the full cards ...


What do you think of the three foiled Put A Bow On It cards? Which is your favorite I really love how they turned out.

TRHD Products used:

For more inspiration, updates, and news make sure to check out these places

The Rabbit Hole Designs YouTube

I have had so much fun playing with the Put A Bow On It stamp set today.

Thank you so much for stopping by and spending some time with me.

Until next time ... Hugs & inky fingers!   -Nic-