Pages

Showing posts with label Coffee Themed Cards. Show all posts

Nut'n Funny!

 Hi everybody! Lauren here to share my latest card featuring the newly released Clarence Coffee stamp set!  I totally agree with him, there is absolutely nut'n funny about an empty cup of coffee!!


I started out by randomly stamping the peanuts that are included in the stamp set onto kraft cardstock using a brown ink pad. I then die cut an A2 sized panel using a wonky stitch die from my stash.

Next, I stamped Clarence on kraft cardstock with the same brown ink. Then used my Prisma Color pencils to color him up.  


Once he was colored, I used a circle die from my stash to cut him out. I then backed the circle with a white stitched scalloped circle that I had die cut out. I adhered that onto the peanut panel.

Next, I chose and embossed my sentiment. First preparing my cardstock using the Cottontail Embossing Powder tool. This tool deters stray powder from sticking to the paper you are using. I then stamped the sentiment using embossing ink and added my white embossing powder. I returned the excess powder to it's container and heat set the powder.


I used a banner die to cut out my sentiment. I also die cut 3 more banners and adhered them in a stack behind my sentiment to give it some height. Then adhered it below Clarence. 

The last step was adhering the whole panel I had created onto a top folding A2 (4.25x5.5) sized card base.

This stamp set is a real fun one to color and create with. I hope this card inspires you to create something fun as well! Happy crafting!

Here's the link to the stamp set I used: 


For more inspiration, updates, and news make sure to check out these awesome places! 


Thank you so much for stopping by today!


Coffee...I Love You

Hey crafty friends, Michelle here! How's it going in your neck of the woods?
All good I hope❤
I'm just stopping by to share this adorable coffee lovin' pooch!
I used the stamp set Caffeinated Terrier , and some sentiments from
the stamp set Perfectly Blended.

This is going to be me when I can finally step foot inside Starbucks again!
 I miss the smell of their java blends and I can't
wait to inhale a venti mocha!
I used Copic Markers to color this cutie: 
terrier: E42, E47, E49
coffee: E47, E49, E70,E71, E74, E40, E42
hearts: R27, BG13
I added some shimmer with stickles glitter glue.


Perfectly Blended 4x6

Thanks so much for joining us today!
Have a great day!

Michelle

For more information, news and updates check out these links:

C-ant Before Coffee

Hello Rabbit Hole Designs Fans! Alison here! What did you think of the new release? Isn't it fabulous? Today, I have a card that features the ant from the Buggy for Caffeine stamp set. I bet we'll be seeing a lot of these bugs soon, because they are just so funny!
I always start by coloring my character/flower/etc, and then that helps me determine how the rest of the card will go. I colored him with Zig Clean Color Markers.
I found a scrap of an alcohol ink background that I made some time ago, plus some cool brown patterned paper that I thought mimicked the tunnels ants create. The card needed some shine, so I added some fun metallic washi tape as well.
I added a few additional details (of course I needed to add the chemical symbol for caffeine), and this card was done.
These new critters from the Buggy for Caffeine set really crack me up. I love that the ant not only is holding a pot of coffee, but two mugs as well! The new release is up and available at The Rabbit Hole Designs website. Below is the stamp set that I used.
For more details on my card, please visit my blog HEREFor more inspiration, updates, and news, make sure to check out these places...
Thanks so much for stopping by. Have an inspiring day!

OWL-Right, Caffeine Please!!


Hello my crafty friends and welcome to The Rabbit Hole Design blog!  My card creation features this fun 4" x 4" stamp set, OWL-Right!  

I thought it would be such fun to add wacky google eye stickers to each of the owls.  It makes them look like they are  totally jones-ing for their morning cuppa joe!


I started by creating a card front using a 4" x 5 1/4" corrugated cardstock and the Drop It stencil.  I used a prepositional spray adhesive on the back of the stencil to keep it in place on the corrugated texture.  Next I used three Distress Oxide inks to create the background.


I stamped  and colored the parliament of owls with alcohol markers and fussy cut them out. I had these fun monster google eyes and I added them to each owl.  I love the look and I think they look like they "need" caffeine!  The coffee cup is a die in my stash and it is the perfect size to hold the owls, but it does not hold enough coffee to get them through the day.


I stamped out the "OWL-right" part of one of the sentiments from the OWL-Right stamp set and grabbed the Caffeinated Shark stamp set sentiment "We're gonna need a bigger cup!"  I stamped them on a yellow cardstock and cut them in strips.


I rounded the edges of the corrugated card front. I glued the owls and coffee cup to the front of the corrugated card front. I added the sentiments using adhesive foam tape an attached the finished cards front to the printed card base.  I also rounded the corners of the card base completing the card.


Here are the TRHD products used in this project:


I hope this fun OWL-Right card project inspires you in your creations. Thank you so much for stopping by the blog!

Be Creative ~ Stay Inspired
Jenn Gross
@journeycoachjenn

For more inspiration, updates, and news make sure to check out these places


Coffee Lovers Blog Hop

Hello and a well caffeinated welcome...
DT member Jannie here and I am so excited for you to accompany us as we join up with the Coffee Loving Cardmakers  for their Fall/Winter Coffee Lovers Blog Hop. I am joining in as part of The Rabbit Hole Designs. This is our second time joining them and we are happy to announce we are Super Sponsors for this event. For the duration of the Coffee Lovers Blog Hop, The Rabbit Hole Designs will be offering specials ...
We are offering 15% off everything in the Caffeinated section of the shop!
Use Code: FALLBREW at checkout.
You can shop for all of the Caffeinated Critters HERE
So, now I'll show you the caffeinated critter I chose to use.... the BOXER!
His expression just cracks me up so much!  I mean, LOOK at him!  I decided to make him into a Christmas card by coloring heavy on the red and green and changing his sentiment a bit.  I used the script font from the "Love You More" set.  I'm still giggling at this silly pup. 

Make sure you come back tomorrow to see Michelle Bala sharing more Caffeinated Critters. Make sure you also head over to CLC Fall/Winter Blog Hop to link up to win some awesome prizes. The hop goes through November 8th.

See ya all soon! Toodles!

A dose of Reali-tea


Hello everyone! DTM Shanna here today with a card featuring The Rabbit Hole Design‘s New Release for October, Caffeinated Reindeer! All of them new caffeinated critters are so flipping fun to play with, you will want to check them all out here, if you haven’t already.

Moving on to my card for today... I had a lot of fun watercoloring my reindeer, and then was *puzzled* by what to do for a backgound.  Puzzled you say?  My perfect solution was found with TRHD’s Puzzle Box stencil!  I used Nuvo expanding mousse, but chose not to heat set it so it retained more of the metallic finish.  The stencil was applied over a Barn Door distress oxide ink blended card panel. The red and green came together for a fun Christmassy background I think!


I added a bit of interest by die cutting a circle from some metallic gold printed vellum and stamped the caffeine symbol from the stamp set all over it.  The sentiment is from the Perfectly Blended sentiment stamp set, and was stamped on a banner die cut and water colored to match.


Have you started making Christmas cards yet?
That wraps up my post for today, I will be back next week for another trip down The Rabbit Hole!  Until then you can find me over on my blog, Caffeinated Craftiness or over on Instagram!
-Shanna
For even more inspiration, updates, and news make sure to check out these links.
The Rabbit Hole DesignsThe Rabbit Hole Designs InstagramThe Rabbit Hole Designs Facebook PageThe Rabbit Hole Designs PinterestThe Rabbit Hole Designs YouTube

Stalker Alert

Hello TRHD fans! This is Shanna here today to show to a card that has BEEn in my head for a while now! (Sorry!?!) This is a compilation of not one, not two, but THREE different TRHD fabulous stamp sets!  Pretty in Peony, Caffeinated Bee, and Sassy Sentiments .  


I started out by stamping the bee on a Bristol cardstock panel.  I knew that I was going to mask the bee, so while it was still inked I stamped an additional bee on a post-it note and fussy cut it out.  I carefully lined up the mask over my bee and then added my flower and leaves following the same masking technique.  


After all the images were stamped, I watercolored them with my Tombow markers.  A little bit of blue shading around the scene really helped it stand out on the panel. I chose to stamp my sentiment straight on to the panel using a colored ink. My daughter is always saying that the bees in our yard “stalk her” so this sentiment made me literally laugh out loud!  I completed the card with a few scattered sequins in coordinating colors, and I was done! 

Masking is one of my favorite stamping techniques because I really enjoy combining different sets! What is one of your favorite techniques?  

Thanks so much for stopping by, see you all again soon!
-Shanna


Mermaid Kisses


Hello again my crafty friend, it's Amanda from Pear Blossom Press. I am so happy summer is finally here. I love the long, warm days and splashing around in the pool. There are bright colors everywhere and we get to sleep in while school is out. Kelly and I have been hanging out more in the craft room; she's been busy drawing while I've been coloring along with Kathy Racoosin's #thedailymarker30day coloring challenge. In the spirit of summer, I've been coloring everything in rainbow colors.
Mermaid Hair Perfectly Blended

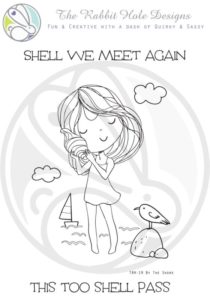
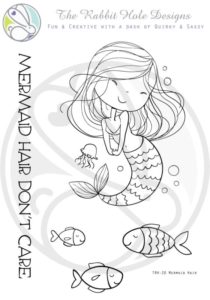
For today's cards, I did some masking and turned the little girl holding a shell in By the Shore into a mermaid. I stamped the top half of her, then stamped the bottom half of the mermaid in Mermaid Hair. It was super simple to do since they both have the same sized waists. I drew in a line to turn her dress into a bikini top and I gave her a little belly button. I considered using a mirror stamp for the tail, so they'd curl in opposite directions, but I wasn't sure I'd be able to get the lines as crisp (sometimes my mirror images end up a little fuzzy). I stamped a pair of mermaids like this. I also stamped out a bunch of fish and a pair of the whole images of the mermaid so I had two different girls (four mermaids in total). I colored them all with Arteza Real Brush pens. I knew I could cover up most of the shell in the first mermaid's hands with the hair of the other mermaid, so I chose to color the shell like it was her hair. It worked out perfectly! Once the images were all colored, I cut them out with my ScanNCut and outlined the cut edges with a black Sharpie. Then it was time to turn them into cards...

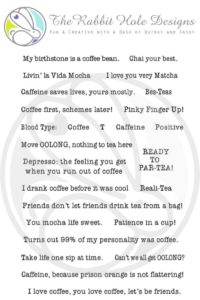
I think I've seen the Starbucks® logo so many times that the idea of combining mermaids with coffee/tea just seemed natural. I decided to put these little cuties into a large teacup, sort of like a hot tub. My ScanNCut has preset designs; one of which is a teacup and saucer set. I scaled it to 4" wide and cut out two sets. I pulled out the Perfectly Blended set for sentiments and got to work...


For the Ready to Par-Tea card, I ink blended Twisted Citron and Peacock Feathers Distress Oxide ink over a mermaid scale stencil onto one teacup and saucer. With the stencil still in place, I applied a thin coat of Vicki Boutin's Iridescent Glitter Paste. This paste is AWESOME! There are big chunks of iridescent glitter in there and it really shimmers. (You can now find it in The Rabbit Hole Designs' shop - woot, woot!) Once I removed the stencil and let the paste dry (on the paper, not the stencil; don't let it dry on the stencil), some of the chunky glitter pieces extended beyond the edges of the teacup. I just flaked those off for a cleaner look. I stamped and embossed the sentiment onto a small square, then chopped off the top corners to look like a tea bag label. I stapled on a piece of twine and tucked it into the top of the cup. I colored the tea with brown markers, then glued the cup parts together. I was going to put the girls into the cup, but I decided to put them in front of it for this card.


To pull the card together, I popped up a jade colored wonky stitched rectangle with a thin piece of fun foam onto a top folding A2 card base. I glued the cup on top of the rectangle, then popped the mermaids on top with foam tape. Since the sentiment is party themed, I decided to give them party hats. I cut out a pair of hats and quickly colored them with the same colors I used for their tails. I glued/foam taped the hats in place and added the fish to the scene. To keep the sentiment from just hanging limply, I secured it with foam tape. I used a combination of tiny rhinestones and sequins to add more sparkle to the card. To help the sequins look more like gems, I coated them with Diamond Glaze after they were glued in place. It's hard to see in the photos, but in person, the extra dimension is really cool.


For my second card, I went with a similar design layout, but I tried a different technique for the teacup. I spread a thin layer of white texture paste over a floral stencil. I removed the stencil and let the cup and saucer dry. Once they were dry, I dropped on Coral, Orange, and Fuchsia Aqua Pigments, along with a few drops of water, and tilted them from side to side so the colors would spread and mix. This is a technique I saw in a video from Pretty Little Button and I just had to try it. I love the way the paste grabbed the colors, but if you want it to resist more and be darker in the grooves, you can add the color while the paste is still wet. To add some sparkle to my teacup, I sprayed it with Glimmer Mist. I really like the way the mist settled into the grooves and bumped up the contrast.

Once the cup was completely dry, I assembled it the same way as the first one, except I tucked the mermaids inside this time. (To be honest, so much of the tails were covered up, I didn't need to alter the girl holding the shell at all.) I chose a sentiment that says Bes-Teas for the label and added a small fish to help fill some of the extra space. I decided on a neutral grey for the background color. It helped all of the other colors pop and, even though I die cut it with a fancy scalloped rectangle, it still has a modern feel. I popped the cup and mermaids in place with foam tape (I was generous with the foam tape since the paper was fairly warped). I added the fish to the scene and this time I used red flat backed gems to finish the card.


I love these cards so much that I'm thinking about making them in different colors for different seasons. Imagine them in reds and burnt oranges for pumpkin spice season (that is an official season now, right?!)... I also had a ton of fun playing with my stencils! I've got a whole list of other techniques to try and a bunch of new pastes too! I've made space on my desk for a glass baking dish that I'll fill with water and a squirt of dish soap to pop the dirty stencils into. #planningahead

What is your favorite stenciling trick or technique? Let me know in the comments below! If you'd like to see more cards made with these stamp sets, check out Watercolor Fun for Beachy Cards. You can find the sister article to this one on my blog too. Feel free to hop on over for even more inspiration and links to the specific products I used! I'll be back soon with another fun card for you...

(de)Caffeinated Cat!


Hello everyone!  Shanna here again with a Caffeinated Cat card, or as I like to call him (de)Caffeinated Cat!  LOL..  He sure looks like someone slipped him the decaf on accident!

It's no secret how big a fan I am of the Caffeinated Critters line...THEY ALL ROCK!  You can check out the line up here if you want to peek at all the different ones.

This cat just cracks me up....I colored him like an orange Tabby cat in my neighborhood. I used Zig markers on Canson cold press watercolor paper and die cut the rectangle out.  


Check out that sentiment!!  Seen it before somewhere??  NOPE!!  It just *might*, maybe, kinda sorta be a sneak of something BIG coming to YOU soon...Be sure to keep checking back for the new release NEXT WEEK!!  You reallllly won't be disappointed!  

Well, that's all today....Thank you so much for stopping by!  A little kitty cat might have told me there is another sneak over on my blog here.  Come by and see!!  See you all again soon
~Shanna


For more inspiration, updates, and news make sure to check out these places


Foxy Dad-isms


Hello again!  Shanna here from Caffeinated Craftiness again to share a fabulous Father's Day card using The Rabbit Hole Design's slightly cranky, under-caffeinated, just waking up Caffeinated Fox! I really wanted to use this guy for a Father's Day card for my husband, and the Sassy Sentiments paired perfectly with him for a "dad-ism" card.  My favorite is "Here, hold my beer".  I picked my favorites and stamped directly onto my coffee sleeve after dry embossing with a striped folder.  Sooo many to pick from, but I narrowed it down to the 4 that reminded me most of him. 


The coffee-shaped card was die-cut, then after fussy cutting my Caffeinated Fox, I mounted him directly onto the sleeve so he can slide off and the card can open.  He was watercolored using my Zig real brush markers on Canson Mixed Media paper. I chose to paper-piece his robe with a small print I had in my scraps though, I like how it looks like a pattered fabric! Add "#1 Dad" to the mug and Voila! I plan on inserting a gift card or two inside for a sweet little gift from me and the kids.  That along with his favorite meal, and we will have a successful Father's Day in the books!

Well, that's all for today.. Guest Designing for The Rabbit Hole Designs has been a ton of fun this month for such a fresh, fun company...Thanks for stopping by!  If you would like to follow along with my caffeinated adventures, stop by my blog here and say hi!

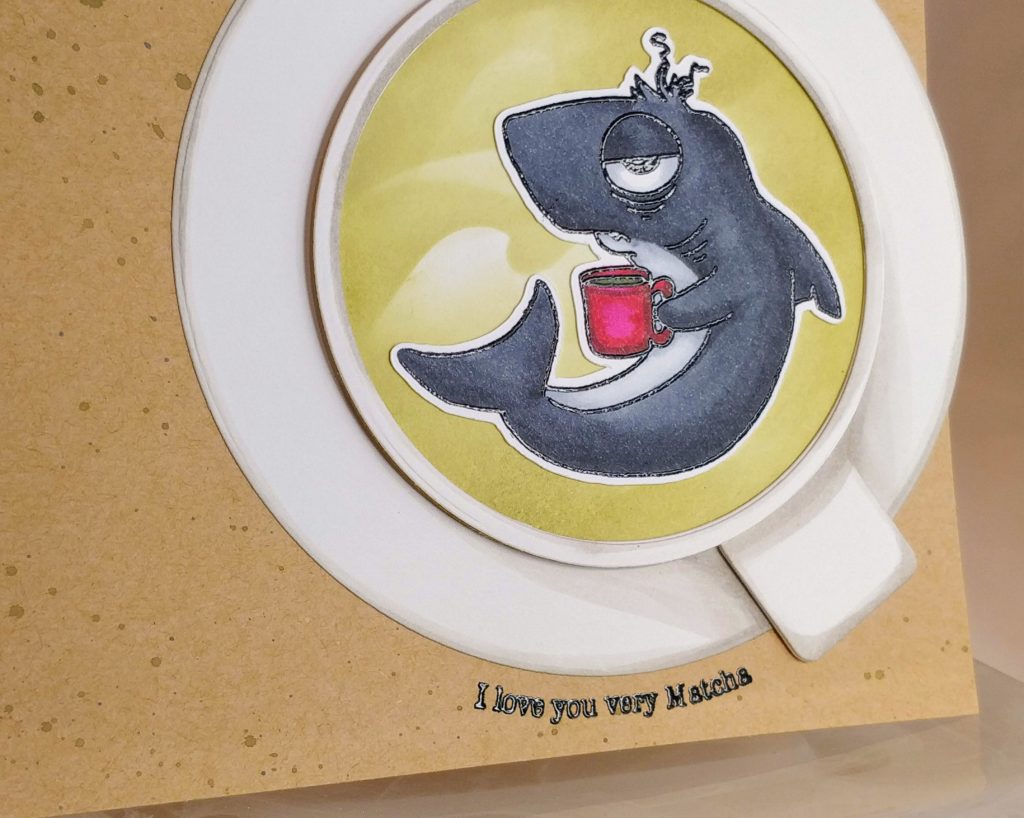
I Love You Very Matcha


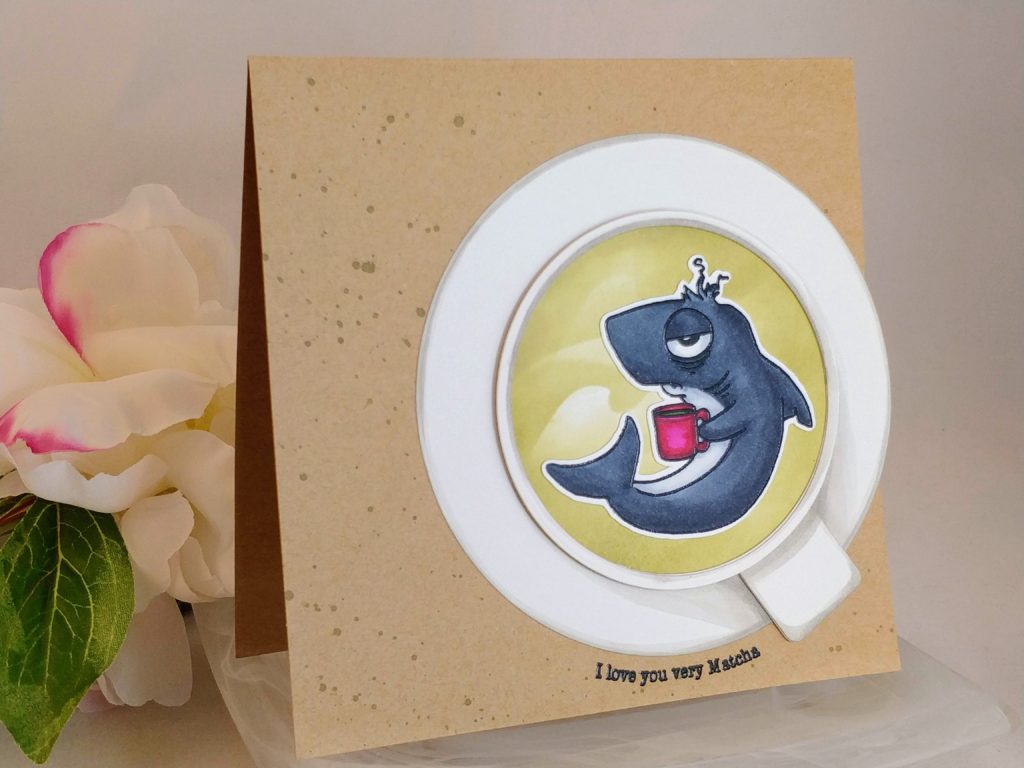
Hello crafty friend, it's Amanda from Pear Blossom Press again! I hope you're still hopping along with the Coffee Loving Cardmakers' Spring/Summer Coffee Lovers Blog Hop! Today, I'm back with another fun card featuring the Caffeinated Shark. This time instead of making a coffee card, I created a tea themed card. I made this card for my sister, and although she loves coffee, she has been on a tea kick lately so I thought it would be appropriate.


This card was really easy to create with the help of a pre-made card base and a few dies. I started by splattering some watered down Forest Moss Distress Oxide ink onto the 5½" kraft card base and set it aside to dry. Next, I die cut a 4½" white circle for the saucer, and a 3¼ white circle for the bottom layer of the mug. I nested together the 3¼" and 3" circle dies and cut three frames to create the rim of the mug. I also die cut a small tag shape to look like the top of the handle.


Before gluing the mug layers together, I ink blended some Forest Moss and Old Paper Distress Oxide waves onto the bottom layer of the mug to look like an ocean of Matcha (green tea). I didn't have a wave stencil, but I did have a set of wave border dies, so I created my own stencil by cutting the borders out of a scrap of cardstock. Then, I used warm grey Copic markers to add some shading to the white cup and saucer layers. To assemble the mug, I glued the tag under the Matcha layer and then popped them up onto the saucer with thin fun foam. I glued the three rim layers on top of the Matcha, making sure the shaded piece was on top.

Next, I stamped and embossed the Caffeinated Shark. I colored him with Copic markers and then cut him out with my ScanNCut. I left a narrow white border so I wouldn't loose the little squiggles of his hair. Then I glued him on top of the Matcha layer of the mug.

To finish up the card, I lined the mug up on top of the card base to figure out the placement for my sentiment. I used my Misti to pick up the sentiment and curved it around the saucer. Then, I stamped and embossed the sentiment onto the card base. Isn't it sweet? It's from the new Perfectly Blended set. After the sentiment was done, I just glued the saucer in place. I love the subtle texture and shine the embossing gives this card.


If you enjoyed today's card and are looking for more caffeinated inspiration, you might like this post. Before you go, let me know which of the caffeinated critters is your favorite. One lucky commenter will win a special prize today! If you'd like links to specific products I used, head over to the sister post for this card on Pear Blossom Press.


SPECIAL OFFERS FOR THE DURATION OF THE HOP

FREE SHIPPING 
on orders of $25 or more before taxes and shipping
(applies to US orders only)
No code necessary, exclusions apply

and

Handmade Brew
FREE WITH QUALIFYING PURCHASE*
*While supplies last all orders placed during the hop spending $35 or more before shipping and tax will receive this 2x3 inch stamp set titled Handmade Brew.
Please Note: A limited number of these stamp sets have been set aside for those wishing to purchase them.

Make sure you come back tomorrow for another caffeinated themed project! Thanks for hopping by...

Buzzed with Maria


Hello The Rabbit Hole Designs fans!  Maria here back on the blog today.  The Rabbit Hole Designs is one of the super sponsors for the Spring/Summer Coffee Lovers Blog hop, you will be seeing A LOT of coffee-themed cards from the design team this week.


For my project today, I am showcasing the Caffeinated Bee stamp set.


Card recipe:
  • stamp the bee image on some Neenah classic crest solar white 110 lb card stock and color him in with alcohol markers (or any medium of your choice).
  • I used my Brother Scan N Cut 2 Machine to die-cut the image.
  • I used my Medallion Coverplate die to die-cut an A2 size panel with some white card stock.  
  • I used a circle die to die-cut the middle piece of this panel and I inked up this small circle with some distress oxide inks and my hexagon stencil.  I adhered this piece on the card stock.
  • I used an alphabet die from my stash to die-cut the words #BUZZED on some black card stock.
  • I adhered the pieces on the card.
  • I used another branch die from my stash to die-cut the branch and leaves, coloring them with my alcohol markers.  I adhered the pieces on my card.
  • Lastly, I used foam adhesive to adhere my Caffeinated Bee.

Here's a little close-up:


Since I have a white-on-white background, I used my Dandelion Yellow Nuvo Crystal Drops to add more pop of color to my card.  If you are looking for further details about my project including supplies used, I would be so grateful if you can stop by my blog today at:


I hope you like my project today.  Happy crafting!

For more inspiration, updates, and news make sure to check out these places.