Pages

Showing posts with label Heat Embossing. Show all posts

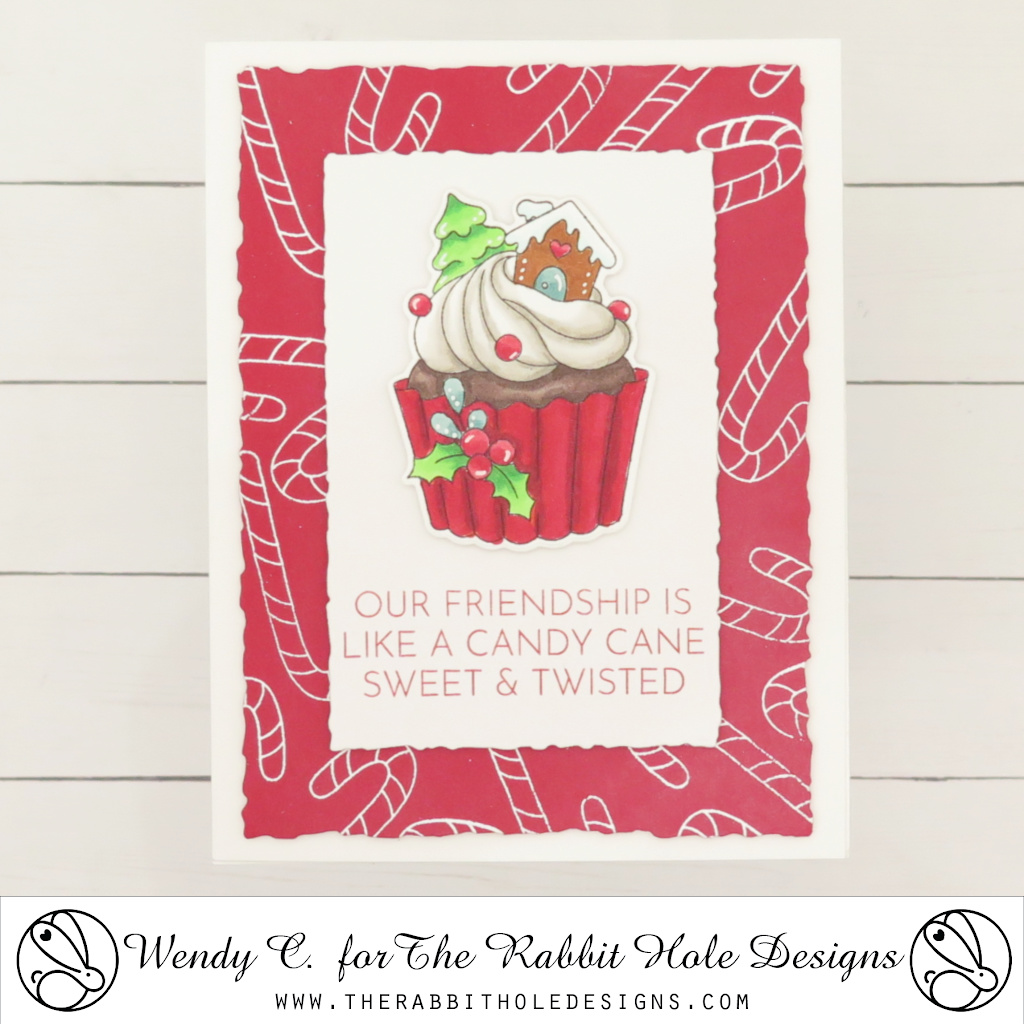
Twisted Friendship Card with Sweet Christmas


 Hello Friends,

Wendy here with a fun cupcake card for you. I made this card specifically for one of my friends that I like to really cut up with.

For the background of this card, I stamped the candy canes from the Sweet Christmas stamp set in VersaMark ink. Then I heat-embossed them with white embossing powder. Don't forget to use the awesome Cottontail Embossing Powder Tool when you heat emboss. 


I colored the cute little cupcake with Copic Markers and die-cut it with the Sweet Christmas coordinating dies.

Thank you for stopping by and hanging out with me for a few minutes.
Wendy


Joy

  Hi everybody!  Amy here with you today sharing this card I created using the beautiful Merry & Bright Stamp Set illustrated by Tatsiana Zayats.

Merry & Bright Stamp Set illustrated by Tatsiana Zayats for The Rabbit Hole Designs #therabbitholedesignsllc #therabbitholedesigns #TRHD

I started this card by die cutting a piece of smooth white cardstock and prepped it with the Cottontail Embossing Powder Tool.  I then stamped the gorgeous wreath and sentiment from the Merry & Bright Stamp Set, and gold heat embossed.

Merry & Bright Stamp Set illustrated by Tatsiana Zayats for The Rabbit Hole Designs #therabbitholedesignsllc #therabbitholedesigns #TRHD

I colored the wreath using my zig markers, then assembled my card using red cardstock for the base.

Merry & Bright Stamp Set illustrated by Tatsiana Zayats for The Rabbit Hole Designs #therabbitholedesignsllc #therabbitholedesigns #TRHD

For finishing touches on this card I added white gel pen accents and a few gold confetti pieces!  Thank you and I hope you enjoyed my card today! 

Quick and Easy Beautiful Christmas Card

 Hi everybody!  Amy here.  Today I wanted to share a card that is quick and easy to make, but very beautiful!  No matter how well we plan, we always have those last minute Christmas cards that we need to make!  I hope this card can help you in those situations!

Merry & Bright Stamp Set illustrated by Tatsiana Zayats for The Rabbit Hole Designs #therabbitholedesignsllc #therabbitholedesigs #trhd

I started this card by die cutting a piece of dark blue cardstock and prepping it with the Cottontail Embossing Powder Tool.  I then stamped this absolutely beautiful wreath image from the Merry & Bright 4x4 Stamp Set, illustrated by Tatsiana Zayats, and gold heat embossed. 

Merry & Bright Stamp Set illustrated by Tatsiana Zayats for The Rabbit Hole Designs #therabbitholedesignsllc #therabbitholedesigs #trhd

Next, I lined up the sentiment, also from the Merry & Bright 4x4 Stamp Set, right where I wanted it, then stamped and gold heat embossed it as well.

I used matte gold paper for the cardbase and added a few gold confetti pieces!

Merry & Bright Stamp Set illustrated by Tatsiana Zayats for The Rabbit Hole Designs #therabbitholedesignsllc #therabbitholedesigs #trhd

Thank you and I hope you enjoyed my quick and easy, but beautiful Christmas card today!

Dream of Happy Accidents - Succulent Life Stamp Showcase


This card was created with the September release from The Rabbit Hole Designs called SUCCULENT LIFE (TRH-182). It’s by the talented Tatsiana Zayats. The set includes two different images of succulent terrariums and 4 sentiments! 

I really wanted to try gold heat embossing on gold mirror cardstock. I decided to give it a go! I started by prepping my gold mirrored cardstock with the Cottontail Embossing Powder Tool. I was really generous with the tool, because mirrored cardstock tends to be full of static. As I was heat embossing I realized my mirrored cardstock turned iridescent when I heat it. WHAT A HAPPY ACCIDENT THAT WAS!!!!!! Here is a close-up of where I could capture that rainbow of colors!

The green alcohol-looking background is from the set Getting Inky Paper from TRHD. The kraft piece is part of my grocery store bag with some ink and colored wax. Remember to play with whatever is close to you on your crafty area and have fun!


The last thing I want to share with you is this month's free with-purchase mini-foil!  Seriously, how adorable is this?!?!

Free with $35 purchase
after discounts, before tax & shipping.
While supplies last

For more inspiration, updates, and news make sure to check out these places:


Classic Merry Christmas


We are celebrating Christmas in July all month long! My first card using the 1 Line Reindeer set was this one. I wanted to create a look of an ornament with the classic red/green combination. 
This is how I created this card: Prepare the card base using the Cottontail Embossing Powder tool, and white heat embossed the 1 Line Reindeer stamp. Stamp the reindeer one more time on masking paper and cut the mask. Apply mask over the embossed image. Cut two more masks, one that goes above the horizontal stamped image and one that goes below it. Remove the top horizontal mask and using a circular motion blend the green ink to create the top of the ornament. Place the mask back on and remove the bottom mask and repeat now with the red ink. Wait for the ink to dry and then remove the reindeer mask. Color nose and add highlights after dried. To finish the card stamp the sentiment and apply golden bling. As a last minute decision, I decided to use a notching tool to create notches on all 4 corners of the card and wrap a red embroidery cord around it.

Plane Awesome!


Hello again! Lauren here today sharing this cute card that features my favorite stamp set, Sail & Soar illustrated by the talented Tatsiana Zayats. This is such a playful set that's full of possible adventures for these sweet bunnies!

I started out by creating my cloud filled background. I prepared an A2 sized (4.25X5.5) blue cardstock panel for heat embossing. To do this, I used the excellent Cottontail Embossing Powder tool. I then stamped clouds randomly over my panel using the included cloud stamp with an embossing ink pad. I then covered the clouds with white embossing powder, tapped off the excess and heat embossed them.


After heat embossing, I colored in the clouds using a white colored pencil. Then I die cut the panel using a scalloped, stitched rectangle die from my stash. I then adhered the panel onto a white A2 sized card base.

Next, I stamped my cute airplane bunny image onto white cardstock in black ink. I used colored pencils for this cute image as well. Once he was all colored up, I used the coordinating die that is available, to die cut him out and also 4 extra blank shapes from blue cardstock. I adhered them all together in a stack with the colored one on top and adhered the stack onto my card.


I prepared a piece of blue cardstock with the Cottontail Embossing Tool to create my sentiment. Then I stamped the sentiment onto blue cardstock using embossing ink, covered it in white embossing powder, tapped off the excess and heat embossed it. I then die cut it out using a banner die from my stash and then also 3 extra blank banners. I adhered them all in a stack with the sentiment on top, then adhered it onto my card, below the plane. 


I think this is a super cute card that would bring a smile to many an adventurer's face! Thanks so much for visiting.

Here are the links for The Rabbit Hole Designs products used for this card:


Sail & Soar Coordinating Die Set: Sail & Soar Dies – The Rabbit Hole Designs


Keep Calm and Carrion - Whimsy Caffeinated Slimline Card

Hello my crafty friends!  You know I love the Rabbit Hole Designs' caffeinated critters and the Caffeinated Vulture does not disapoint.  I gave him an over glazed look, like he is waiting for the caffeine to kick in!

The background is ink blended using Distress Oxide inks; Wilted Violet, Kisch Flamingo and Carved Pumpkin.  The moon was created by masked off an area with piece of masking paper cut into a circle.  The vulture is colored with Copic alcohol markers.
The treeline is created with a stamp set form my stash and black tree ink is blended at the bottom of the slimline.  I gave the background a couple of hours to dry before I used the Cottontail Embossing Powder Tool to treat and prep the bottom of the card.  I stamped the sentiment "keep calm and carrion" with VersaMark Watermark ink and added white heat embossing powder and heat set it.  This backgound layer is attached to a dark purple cardstock layer and then to an Slimline card base measuring 3 1/2" by 8 1/2"  folded.  The Vulture image was adde last using adhesive foam squares.

The Rabbit Hole Designs products used

I hope you enjoyed this whimsy Keep Calm and Carrion slimline card. I think this Vulture is fantastic!  What is your favorite new caffeinated critter?      


Be Creative ~ Stay Inspired

Jenn Gross


Follow me, Journey Coach Jenn, on 

Instagram - https://www.instagram.com/journeycoachjenn/

YouTube - http://www.youtube.com/c/JourneyCoachJenn

Blog - http://www.journeycoachjenn.com/


For more inspiration, updates, and news make sure to check out these places


The Rabbit Hole Designs

The Rabbit Hole Designs Instagram

The Rabbit Hole Designs Facebook Page

The Rabbit Hole Designs Pinterest

The Rabbit Hole Designs YouTube


Joyful Greetings!


Hello! I just cannot get enough of this sweet image from the Hoppy Holidays stamp set. It is so darn cute and fun to color.

For this card, I heat embossed and water colored my image. I started out by stamping my image onto water color paper using an embossing ink pad. I then covered my image with silver embossing powder and heat set it. 

I then colored the whole image using water color brush markers.


Once my image had died completely, I die cut it out using a dotted oval die from my stash. 

Then I added my sentiment under the envelope. I stamped it with the embossing ink and heat set silver embossing powder on top.

I chose a pretty patterned holiday paper that coordinated with my image. Then I trimmed it to 4.25 x 5.5 ( A2 Sized) and adhered it to an A2 card base. I then adhered my oval water colored image onto the card.

To finish off the card, I added some self adhesive silver embellishments to each corner of the card and 3 tiny ones on the oval.

I hope my card inspires you to work on some Christmas in July cards to get a jump on the holidays. Thanks for visiting!


For more inspiration, updates, and news make sure to check out these places:


Here's the link to the Hoppy Holidays stamp set: Hoppy Holidays 4x6 – The Rabbit Hole Designs


.


Wishing you a Merry Christmoose!

Hello crafty friends!!! I love this new The Rabbit Hole designs Christmoose-Moosemas set illustrated by Tatsiana!!! How sweet are these adorable birds that are adorning this festive moose's antlers???!!??? I had so much fun creating with this set this month.


I started out by stamping the snowflake stamp from the Christmoose-Moosemas set all over my white panel with embossing ink. I heat embossed white embossing powder over the ink. Then, I ink blended Twisted Citron Oxide ink and Tumbled Glass Oxide ink through my Splish Splash stencil over the embossed snowflakes. I used a tissue to wipe any excess ink off the snowflakes. Next, I stamped, colored  and cut out the Moose image and glued it to the white stenciled background. 

To finish the card, I stamped the sentiment on a white strip, layered it on a green strip of cardstock and adhered it with foam tape. Then, layered my card front on a green card base. 

Thank you for stopping by! I hope I inspired you to create something today!!
Kimberly
 

Meerkat alibi!

Hello crafty friends! Kimberly here with a fun card using The Rabbit Hole Designs Caffeinated Meerkat stamp set and coordinating die. I had so much fun making this card. 


I started out blending Speckled Egg Distress Oxide over the Clouds in my Coffee Stencil on white cardstock. Then, I wanted some texture so I added some texture paste over the full clouds in the center of the stencil on the ink blended cloud background. I put that to the side to let the paste dry. 

Next, I decided I wanted to make a bush/tree background using the Clouds in my Coffee Stencil, so I blended Gathered Twigs distress oxide ink and alternated it with Rustic Wilderness distress oxide over another piece of white cardstock. I cut the center out with an oval die and added foam tape to the back to pop it up on the blue cloud background. 

Next, I colored in my Caffeinated Meerkat with Copic Markers, die cut it out and added foam tape to adhere it to the card. I did fussy cut the image after die cutting it to remove more of the white border. To finish the card, I stamped two sentiments from Sassy Sentiments on strips of brown cardstock with embossing ink and heat embossed them with white embossing powder. I attached them to the card and adhered the card front to a brown cardstock card base. 

I hope I was able to inspire you to make something crafty today! Thank you so much for stopping by!
Kimberly

For more inspiration, updates, and news make sure to check out these places


The Rabbit Hole Designs

The Rabbit Hole Designs Instagram

The Rabbit Hole Designs Facebook Page

The Rabbit Hole Designs Pinterest

The Rabbit Hole Designs YouTube

Beach Bunny Shaker


Hello all! Lauren here today sharing my bunny shaker card. I used the Starfish in the Sand stamp set and a sentiment from the Beachin' stamp set. Both are from the April release.

I started out by stamping the bunny image onto white cardstock using Fadeout ink. I then colored the whole image using Prisma color pencils. The colors I used were:
Bunny: 10, 20, 30% French Gray, Eggshell
Ears and cheeks: Hot Pink, Pink
Shells: Lemon Yellow, Canary Yellow, Sunburst Yellow, Cream
Lavender, Mulberry, Violet
Process Red, Hot Pink, Pink
Light Green, True Green, Parrot Green
Starfish necklace: True Blue, Copenhagen Blue
Background: True Blue, White


Next, using a large round die, I cut a circle out of a 5.5x5.5" white cardstock panel. I then stamped and embossed the shells from the stamp around the rim of the circle. I used Versamark and white embossing powder.


Once the shells were embossed, I used a Cotton Tail blending brush to blend Antique Linen Distressed Oxide ink overtop the whole panel. I then wiped the ink off the embossing with a soft paper towel.


Next, I flipped the panel over, and adhered acetate over the circle.


I added double sided foam tape all around the rim of the circle making sure not to leave any gaps that shaker bits could escape from. I also added foam tape all along all sides of the panel. I added my shaker bits inside the circle on top of the acetate.


Then, I removed the backing paper from the tape and carefully placed the colored bunny panel over the top of the foam tape. I flipped the shaker over and adhered it to a 6x6" top folding seafoam card base.


I stamped my sentiment onto white card cardstock using a Versamark ink pad. Then heat embossed it using white embossing powder. I ink blended the Antique Linen over top and wiped away the excess ink off the letters. I trimmed the sentiment using a banner die then adhered it to the front of the card.


I am so delighted how this card turned out! It is such a fun image to color up  create with. Thanks so much for stopping by.


Products used were: