Pages

Showing posts with label Sentimentally Speaking. Show all posts

Holly Hugs

 Hello friends! Welcome back to the blog. Today's card features the 1 Line Holly 2x6 stamp set. During the hustle bustle of the holiday season sometimes we just need a kind word of encouragement. I created a "Sending Hugs" card featuring the holly image.


Card details:
  • Stamp the holly image from the 1 Line Holly 2x6 stamp set with an alcohol-friendly black ink on white cardstock. Stamp the image at an angle using a MISTI. Move and rotate the cardstock and stamp the same image 2 more times. Color the holly leaves with alcohol markers. Use red bling for the berries.
  • Adhere green patterned paper to the corner of the cardstock and trim the entire panel to 4"x5.25". 
  • Stamp the "Sending Hugs" and "Just Because" sentiments from the Sentimentally Speaking stamp set and die-cut with their coordinating dies. Adhere sentiments near bottom right corner of card.
  • Adhere entire panel to an A2 sized light blue patterned paper and then to an A2 sized card base.


Thanks for visiting!

Amrita

You can find me on IG @amritapettus

For more inspiration, updates, and news check out these awesome places! 


The RHD Affiliate Disclaimer:

We want to ensure transparency and honesty in our interactions with you, our valued readers. Please be aware that the links provided on The Rabbit Hole Designs Blog may be affiliate links. This means that if you make a purchase through these links, the project designer may earn a small commission at no extra cost to you. Your support means the world to us!


We kindly request that you accept the tracking cookie for the affiliate websites. Rest assured, this will not expose your computer to viruses or compromise your information. It's a necessary step for the company to attribute the sale to the affiliate, ensuring that creators like our creatives receive their rightful commissions.


Your trust and support empower our creators to continue sharing creativity and inspiration through our blog. Thank you for being an integral part of The Rabbit Hole Designs community!


Rainbow Birthday Presents

Hello friends! Welcome back to the blog. Today's card features the Baby's 1st Christmas 4x6 stamp set along with its coordinating dies. This set may be called Baby's 1st Christmas but it is really a versatile set that can be used year-round for many occasions. Today I used the presents image from the set to create a birthday card.


Card details:
  • Die-cut the smallest frame from You've Been Framed dies on lime green cardstock. Cut a smaller rectangle (3.5" x 2") from rainbow patterned paper and layer on top of the lime green panel. Cut a larger rectangle from rainbow patterned paper (5.25" x 4") and layer behind the lime green panel. Use foam tape on the lime green panel to add dimension.
  • Stamp the presents image from the Baby's 1st Christmas 4x6 stamp set with an alcohol-friendly black ink on white cardstock and color with alcohol markers. Because I chose a brightly patterned paper for the background, I kept the coloring very simple with only some light gray shading. Die-cut the presents image with the coordinating dies. Adhere with foam tape to add dimension.
  • Stamp the "Happy Birthday" sentiment from the Sentimentally Speaking stamp set and die-cut with its coordinating die. Adhere it on the patterned paper underneath the presents die-cut.
  • Adhere entire panel to an A2 sized card base and add Wink of Stella silver glitter pen highlights to the presents image to finish card.

Thanks for visiting!

Amrita

You can find me on IG @amritapettus

For more inspiration, updates, and news check out these awesome places! 


The RHD Affiliate Disclaimer:

We want to ensure transparency and honesty in our interactions with you, our valued readers. Please be aware that the links provided on The Rabbit Hole Designs Blog may be affiliate links. This means that if you make a purchase through these links, the project designer may earn a small commission at no extra cost to you. Your support means the world to us!


We kindly request that you accept the tracking cookie for the affiliate websites. Rest assured, this will not expose your computer to viruses or compromise your information. It's a necessary step for the company to attribute the sale to the affiliate, ensuring that creators like our creatives receive their rightful commissions.


Your trust and support empower our creators to continue sharing creativity and inspiration through our blog. Thank you for being an integral part of The Rabbit Hole Designs community!


Poinsettia Birthday

Hello friends! Welcome back to the blog. Today's card features the Poinsettia & Pinecones 6x8 stamp set along with its coordinating dies. I chose non-traditional colors and created a December birthday card rather than a holiday card.


Card details:

  • Cut a blue cardstock panel to 5.25" x 4". Stamp the largest image from the Poinsettia & Pinecones 6x8 stamp set twice with blue ink to cover the entire panel. Add shine with a shimmer spray.
  • Stamp the single poinsettia image from the Poinsettia & Pinecones 6x8 stamp set with an embossing ink on patterned paper and heat emboss with white embossing powder. Cut out the embossed poinsettia image with scissors.
  • Die-cut the coordinating die from silver foil cardstock. Adhere the two poinsettias together, offsetting the foiled one behind the patterned paper one.
  • Stamp the "Happy Birthday" sentiment from the Sentimentally Speaking stamp set and die-cut with its coordinating die. Adhere it on top of the patterned paper poinsettia.
  • Attach the images and sentiment to the blue panel and attach the panel to a white card base.


Thanks for visiting!

Amrita

You can find me on IG @amritapettus

For more inspiration, updates, and news check out these awesome places! 


The RHD Affiliate Disclaimer:

We want to ensure transparency and honesty in our interactions with you, our valued readers. Please be aware that the links provided on The Rabbit Hole Designs Blog may be affiliate links. This means that if you make a purchase through these links, the project designer may earn a small commission at no extra cost to you. Your support means the world to us!


We kindly request that you accept the tracking cookie for the affiliate websites. Rest assured, this will not expose your computer to viruses or compromise your information. It's a necessary step for the company to attribute the sale to the affiliate, ensuring that creators like our creatives receive their rightful commissions.


Your trust and support empower our creators to continue sharing creativity and inspiration through our blog. Thank you for being an integral part of The Rabbit Hole Designs community!


Uplifting Card Design with The Rabbit Hole Designs

Hello, crafty friends! It's Rick here, and I'm thrilled to be sharing a charming project on The Rabbit Hole Designs LLC blog today. This uplifting card features a dynamic background using our Pinwheel 6 x 6 Stencil and a heartfelt sentiment from the Sentimentally Speaking Stamp and Die Sets. This card was such a joy to create, and I'm excited to highlight the beautiful products from The Rabbit Hole Designs that brought this piece to life.


Creating a Vibrant Background

One of the most enjoyable parts of card making is playing with stencils and inks to create unique backgrounds. For this project, I used our Pinwheel 6 x 6 Stencil to craft a vibrant backdrop. I started by ink blending with an orange ink, using my Cotton Tail Blending Brushes to achieve a soft ombre effect. The warm gradient creates a beautiful transition that really catches the eye.

Pro Tip: When working with stencils, securing them with low-tack tape can prevent any unwanted shifting, ensuring crisp and clean lines. For smooth ink blending, start light and gradually build up the intensity—it's easier to add more color than to take it away!


Adding Texture with Dry Embossing

To give the background more dimension, I dry embossed the stenciled panel using the Pinwheel Stencil. This technique involves running the stenciled panel through a die-cutting machine with a tan embossing mat (from my stash). The result is a subtle, raised texture that adds a tactile element to the card.

Aligning the stencil with the previously inked design can be a bit challenging. A handy trick is to use washi tape (from my stash) to hold everything in place, making it easier to achieve perfect alignment.


Assembling the Card

For the card assembly, I trimmed the embossed panel to 3 3/4" x 5" and matted it with a piece of black cardstock (from my stash). This matting layer provides a striking contrast, making the vibrant background pop even more. I adhered the layered piece to a top-folding A2 card base made from white heavyweight cardstock (from my stash), which is perfect for a sturdy base.

Crafting the Sentiment

The sentiment is always a focal point, and for this card, I chose a lovely message from our Sentimentally Speaking Stamp Set. I stamped the sentiment in a rich black ink (from my stash) onto white cardstock. After letting it dry, I used the coordinating die from the Sentimentally Speaking Die Set to cut it out. To give the sentiment dimension, I cut three additional layers from scrap cardstock and adhered them together.

Aligning the sentiment on the card front can be a bit nerve-wracking, but using a T-square (from my stash) helps ensure everything is perfectly straight.


Finishing Touches

To complete the card, I added some White Enamel Dots from our collection. For a cohesive look, I colored them with an orange alcohol marker (from my stash), creating an ombre effect that matches the background. Arranging them in odd numbers around the card adds visual balance and interest.

This card was such a fun project to work on, combining vibrant colors with elegant textures. The products from The Rabbit Hole Designs made it easy to create a design that's both cheerful and heartfelt. I hope this card inspires you to try out new techniques and explore the wonderful possibilities with stencils and dies.

Thank you for joining me on the blog today! If you recreate this card or feel inspired to craft something new, please share your creations. We love seeing what you come up with!


For more inspiration, updates, and news check out these awesome places! 


Affiliate Disclaimer: Some of the links in this post are affiliate links. If you choose to make a purchase through them, I may earn a small commission at no extra cost to you. Thank you for supporting The Rabbit Hole Designs LLC and helping us continue to bring you creative inspiration!

Brighten Someone’s Day: Creating a Get Well Soon Card with The Rabbit Hole Designs

 Hello, crafty friends! Rick here today, writing for The Rabbit Hole Designs blog. I'm thrilled to share a colorful and heartwarming get well soon card using the fabulous Pinwheel Stencil and Sentimentally Speaking Stamp Set & Dies from The Rabbit Hole Designs. This cheerful project is perfect for brightening someone’s day with a burst of vibrant color and heartfelt sentiment.


Let’s start with the background, where the Pinwheel Stencil takes center stage. I began by placing the stencil over a 4 1/4" x 5 1/2" piece of White 80 lbs Cardstock and secured it with low tack tape. This ensures the stencil stays in place while we work on the design.

Here’s a handy trick: lightly trace the stencil pattern with a pencil before adding color. This step makes it easier to stay within the lines. After tracing, I removed the stencil and used my alcohol markers (from my stash) to fill in the traced areas. I chose a range of colors to create a beautiful, blended effect within each section of the pinwheel design.

Pro Tip: For smooth blending, start with the lightest color and gradually add darker shades. This helps create a seamless transition between colors.


To add definition to the design, I placed the stencil back over the colored areas and traced it again with an alcohol safe black pen. This step enhances the detail and makes the pinwheel design pop. After removing the stencil, I trimmed the panel down to 4" x 5 1/4". This slight reduction in size allows for a nice border when mounted on the card base.

Next, I cut a strip of Vellum Cardstock about 1 3/4 to 2 inches wide and wrapped it around the card front, securing it with strong adhesive. The vellum adds a soft, elegant touch without overshadowing the colorful background. I then mounted the entire panel onto a slightly larger piece of black cardstock and adhered it to an A2 top folding card base.

Pro Tip: Use a bone folder to ensure the vellum adheres smoothly and doesn’t create any bubbles or wrinkles.


The Sentimentally Speaking Stamp Set & Dies are perfect for adding a heartfelt message. I stamped the “Get Well Soon” sentiment onto a scrap of  White Cardstock using Versafine Clair Nocturne Ink, which gives a crisp and clear impression. I used the coordinating die to cut out the sentiment and created dimension by cutting three additional layers from scrap cardstock (from my stash). Stacking these behind the stamped sentiment gives it a sturdy, chipboard-like feel, making it stand out beautifully.

To finish off the card, I added some Matte White Enamel Dots around the sentiment for a bit of embellishment. These little dots add a subtle yet impactful detail. Lastly, I used a White Gel Pen (from my stash) to add highlights to the colored pinwheel design, adding a touch of whimsy and bringing the whole design together.

Pro Tip: When adding highlights, think about where the light would naturally hit your design. This small detail can make a big difference in making your card look polished and professional.


I hope you enjoyed learning about this cheerful get well soon card. The combination of the Pinwheel Stencil and the Sentimentally Speaking Stamps & Dies from The Rabbit Hole Designs makes for a delightful project that’s sure to bring a smile to anyone’s face. Don’t forget to experiment with different color combinations and make this design your own.


Happy crafting, everyone!

Rick

For more inspiration, updates, and news check out these awesome places! 


Affiliate Disclosure: Some of the products used in this post were from my stash. I may receive a small commission if you purchase through my affiliate links at no additional cost to you.

Missing You with Candy Twist

Hello friends! Welcome back to the blog. Today's card features the new Candy Twist Stencil and Sentimentally Speaking stamp set and coordinating dies.

I created the background using pink and yellow dye inks and the Candy Twist Stencil on a gelli plate. I trimmed the panel down with the middle frame from the You've Been Framed die set. I cut the Sunshine Die (also from the You've Been Framed die set) into the panel and then "highlighted" the sun by partiallly stenciling with the Candy Twist Stencil in yellow. I blended blue dye ink around the edges of the panel. Before adhering the panel to an A2 card base I lightly blended the Candy Twist Stencil on the card base. The sentiment is from the new Sentimentally Speaking stamp set.

Thanks for visiting!

Amrita

You can find me on IG @amritapettus

For more inspiration, updates, and news check out these awesome places! 


The RHD Affiliate Disclaimer:

We want to ensure transparency and honesty in our interactions with you, our valued readers. Please be aware that the links provided on The Rabbit Hole Designs Blog may be affiliate links. This means that if you make a purchase through these links, the project designer may earn a small commission at no extra cost to you. Your support means the world to us!


We kindly request that you accept the tracking cookie for the affiliate websites. Rest assured, this will not expose your computer to viruses or compromise your information. It's a necessary step for the company to attribute the sale to the affiliate, ensuring that creators like our creatives receive their rightful commissions.


Your trust and support empower our creators to continue sharing creativity and inspiration through our blog. Thank you for being an integral part of The Rabbit Hole Designs community!


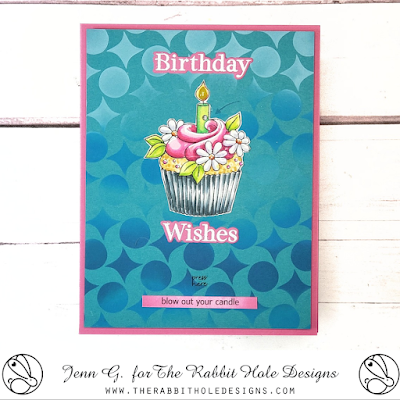
Make a Wish - a new interactive birthday card surprise!

How crafty friends, Jenn here with an bright and cheery interactive birthday card featuring The Rabbit Hole Designs'  Pinwheel stencil and Sentimentaly Speaking stamp set with coordinating dies both from the June Release. I paired it with the Cupcake image from the Year 4 Birthday stamp set.

TRHD Supply List
Year 4 Birthday stamp set 

Other Supplies
Candle Light Pear Blossom Press 
World's Best Foam Tape 
Zero Centered Ruler 
OLO Markers
Distress Oxide inks 
White Embossing Powder
Using the Cottontail Blending Brushes I blended the Pinwheel  background on a piece of 4" x 5 1/4 Oceanside cardstock using Salvaged Patina, Salty Ocean, and Uncharted Mariner Distress Oxide inks.  I am using the new Candle Light interactive blow-out candle by Pear Blossom Press to create the interactive component.  The cupcake image is colored with OLO Markers. The sentiment is created by treating a piece of Sweet Pea cardstock with the Cottontail Embossing Powder Tool. The sentiment is the word Birthday and Wishes is heat embossed with white embossing powder and then die cut with the coordinating dies.
I positioned the cupcake image and Candle Light on the card front to locate the placement. I use a no-photo blue pencil to mark important areas, 1) where the candle flame will light up and 2) the hole needed for the action to blow out the candle flame. I glued the cupcake  onto the card front with liquid glue. I created a die placement template by die cutting the top 1/2 of the small flame (from the PB Press Stamp & Die set) onto a small piece of scrap cardstock This template helps to position the tiny flame die in place. I secure the die with low tack tape and die cut the flame.
 I punched a small hole in the right side of the candle for the small activator to turn off the light. Turning the card front over to the backside, I glue a small piece of yellow vellum over the flame. I lined up the candle light and created a double thick foam channel to slide the light into position. I removed the release paper and cover the channel with a piece of cardstock.  This channel allows the candle to slide into position and helps guide the air you blow at the candle light to extinguish the candle flame.
I framed out the card with The World's Best Foam Tape. I also creating a door opening in the pink card base allowing you to change the battery if needed.  I use a zero centered ruler and the blue pencil to mark the location for the hidden door. 
After die cutting the hidden door, I removed the release paper from the foam tape and centered the card front onto the card base.  I folded a small bit of washi tape over the bottom flap of the door for easy battery changing access.
I stamped the words "press here" in black ink over the candle''s on button.  I typed and printed out the sentiment "blow out your candle". It is ink blended it in pink ink and glued to the card front.

Make sure to visit my Instagram - @journeycoachjenn to see this card in action!

Thank you for stopping by to check out this fun Rabbit Hole Designs interactive blow out candle Birthday card. I hope you are inspired to create something lovely today!

Be Creative ~ Stay Inspired

Jenn Gross


Follow me, Journey Coach Jenn, on 

Instagram - https://www.instagram.com/journeycoachjenn/

YouTube - http://www.youtube.com/c/JourneyCoachJenn

Blog - https://journeycoachjenn.blogspot.com/  


For more inspiration, updates, and news make sure to check out these places


The Rabbit Hole Designs

The Rabbit Hole Designs Instagram

The Rabbit Hole Designs Facebook Page

The Rabbit Hole Designs Pinterest

The Rabbit Hole Designs YouTube


Candy Twist on a Gelli Plate

Hello friends! Welcome back to the blog. Today's card features the new Candy Twist Stencil and Sentimentally Speaking stamp set and coordinating dies.
I created this soft background using dye inks and the Candy Twist Stencil on a gelli plate. First, I swiped the pink and yellow ink pads directly across the gelli plate. I used a brayer on the plate to smooth out the inks. I pressed a smooth white typing paper onto the press to create a solid print. Then I repeated the inking process but placed the Candy Twist Stencil on the gelli plate before pressing the same solid print onto the plate. I trimmed the print down and adhered it to an A2 card base. The sentiment is from the new Sentimentally Speaking stamp set. To ground the sentiment I cut a strip from the You've Been Framed die set.

Thanks for visiting!

Amrita

You can find me on IG @amritapettus

For more inspiration, updates, and news check out these awesome places! 


The RHD Affiliate Disclaimer:

We want to ensure transparency and honesty in our interactions with you, our valued readers. Please be aware that the links provided on The Rabbit Hole Designs Blog may be affiliate links. This means that if you make a purchase through these links, the project designer may earn a small commission at no extra cost to you. Your support means the world to us!


We kindly request that you accept the tracking cookie for the affiliate websites. Rest assured, this will not expose your computer to viruses or compromise your information. It's a necessary step for the company to attribute the sale to the affiliate, ensuring that creators like our creatives receive their rightful commissions.


Your trust and support empower our creators to continue sharing creativity and inspiration through our blog. Thank you for being an integral part of The Rabbit Hole Designs community!


Birthday Twist Card - Sentimentally Speaking Stamp set


Hello crafty friends! Welcome to today's blog featuring The Rabbit Hole Designs New Paisley Bandana 2 Layer stencil paired with the Sentimentaly Speaking stamp set with coordinating dies. I had a funny little crafty mishap when I was creating this card and took a photo of it to share with you.  It was a good laugh out loud moment.

The new Sentimentally Speaking stamp set with coordinatind dies is a card makers "must have"! The set contains 14 everyday sentiments and the coordianting dies frame them beautifully.  This set has quickly become one of my favorites!  I am using the Happy Birthday stamp and matching die for today's Birthday twist card.

I used  Creamsicle, Watermelon and Wildberry inks to stencil the first layer, stencil #1, of the Paisley Bandana stencil. For second layer, stencil #2, I used Grasshopper, Eucalyptus and Rainforest inks.

A - I decided to stamp the main sentiment Happy Birthday in a dark purple ink in the middle of the card using the Stampwheel. Keeping the sentiment in place on the stamping platfoem, I cleaned it off the ink and  I rotated the stamp platform counter clockwise one notch. I masked off the word Birthday and injked only the word Happy in Wildberry ink to stamp it four times rotating the stamp platform one notch  to stamp the sentiment four times the around the top of the card.

B & C - You can see I accidentally inked the wrong side of the stamp platform.  Oooops no stamp there, it was on the other side.  That was a great laugh and easily fixed by whiping off the ink and flipping over the platform to try again. 

I cleaned off the stamp and rotated the stamping platform to place the sentiment one notch rotation below the main Happy Birthday sentiment.  I masked off the Happy portion of the word while inking only the word Birthday. This is stamped in Rainforest ink four times rotating the stamping platform clockwise one additional notch rotation each time.  

D -  I was not excited about the look of the main dark purple Happy Birthday sentiment so I pivoted.  I die cut the purple sentiment out of the card front.   I lined up the card front over an A2 card base and   re-stamped the sentiment with Rainforest ink on a light peach A2 card base.  The card front is attached using adhesive foam squares and the Happy Birthday sentiment show as a recessed sentiment.  A much better results in my opinion.
Supply List 

Thank you, I appreciate you taking time from your day to stop by and check out today’s The Rabbit Hole Design project.  I hope you are inspired to create something lovely today!


Be Creative ~ Stay Inspired

Jenn Gross


Follow me, Journey Coach Jenn, on 

Instagram - https://www.instagram.com/journeycoachjenn/

YouTube - http://www.youtube.com/c/JourneyCoachJenn

Blog - https://journeycoachjenn.blogspot.com/  


For more inspiration, updates, and news make sure to check out these places


The Rabbit Hole Designs

The Rabbit Hole Designs Instagram

The Rabbit Hole Designs Facebook Page

The Rabbit Hole Designs Pinterest

The Rabbit Hole Designs YouTube