Pages

Showing posts with label Caffeinated Unicorn. Show all posts

Watch out Monday, I'm comin' for ya!

Hi crafty friends! Thanks for stopping by today. Today's card is all about the grumpy and sassy Caffeinated Unicorn! Isn't she the best? This feels so relatable to me most mornings, not just Mondays!! 


This card is pretty clean and simple but it packs a sassy punch. I started by ink blending directly onto an A2 size card base. I ink blended through the Aim for the Stars Stencil also from TRHD.

I set that aside and stamped and colored in the hilarious Caffeinated Unicorn with my alcohol markers. I did fussy cut her out but there are coordinating dies available. 


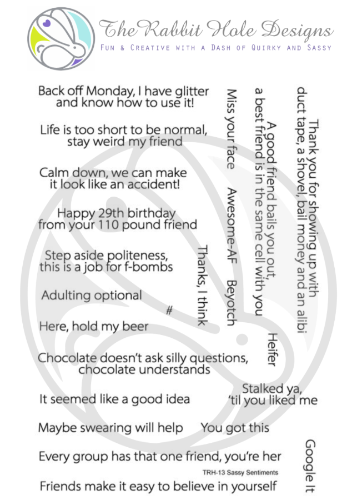
For the sentiment, I chose one from the amazing Sassy Sentiments stamp set from The Rabbit Hole Designs. This is one of my most beloved and most used stamp sets. There are just so many good sentiments on that one!  


All that was left was to assemble the pieces. I popped the sentiment and the unicorn up on the ink blended card base. I used a corner chomper on the card base (and the sentiment) for continuity and to add a little extra interest. 


I hope that you enjoyed the card today! Wishing you an amazingly caffeinated day! Be sure to check out all the fabulous products and other caffeinated critters that The Rabbit Hole Designs carries. You can follow this link HERE to see their whole product line. 


Thanks for stopping by!
If you want to check out additional information on the products that I used to create this card you can visit my blog at amyswares.com 

-Amy


For more inspiration, updates, and news make sure to check out these places.


Caffeinated Goodness!

 Hi everyone! Von Marie here and I am happy to be on the blog today. I have a Slimline Card to share using some products from the most recent Release.


On my card I used the New Caffeinated Rhino, Splish Splash Stencil, Cotton Tail Blender Brushes, and Caffeinated Unicorn, and Caffeinated Unicorn Die. I first started out with a sheet of Neenah Solar White cardstock with the Splish Splash Stencil and Cotton Tail Blender Brushes. I used Rainbow Distress Oxide inks and started blending. This stencil is made to connect so it is perfect for a Slimline. I rotated my stencil and began blending until I had the look I was happy with. When I was done I sprayed some water and dried the excess with a microfiber towel. I then splattered some purple paint onto my panel and when that was dry I cut it out with a Wonky stitched slimline die.


I stamped my caffeinated critters with Memento Black tuxedo ink and colored them in with my Copic Markers. I fussy cut my Rhino and cut my unicorn out with the coordinating die. I thought it would be a funny to have a conversation about what coffee does for them. I stamped the sentiments with a black ink and matted them with black cardstock. I then glued my critters and sentiments with Nuvo Deluxe Adhesive onto my panel. I added white Gel Accents, sequins, and sparkle with my clear glitter pen. Lastly, I added my panel to a slimline card base. I hope you like my card for today. Thank you for stopping by!


TRHD Products Used:

                                                                 Caffeinated Rhino


                                                                     Splish Splash Stencil


For more inspiration, updates, and news make sure to check out these awesome places! 


Thank you so much for stopping by today!

Crafty Hugs

~Von Marie~

Under The Stars


Hi Everyone! Amy here and I’m excited to share with you a card that I made using the Aim for the Stars Stencil from the June 2020 Release! 


For this card I wanted to do something really special with the brand new Aim for the Stars 6x6 Stencil. So I made the stars GLOW IN THE DARK! I started by ink  blending deep blue colors to look like a night sky. Then, I used clear embossing ink through the new stencil. You can do this with the pad directly or with a blending tool. I then heat embossed some glow in the dark embossing powder to really bring this scene to life. I stamped and cut out the hilarious Caffeinated Dragon and used some pattern paper and a paper piecing technique to give him  some extra flair. I then selected one of the sentiments from the Caffeinated Unicorn stamp set and completed the scene. I just love how the different TRHD products work so well with each other, and you can mix and match so many of the items. 


You can find these items and much more here


Thanks for checking out my project and have a great day!
Amy


For more inspiration, updates, and news make sure to check out these places.


Coffee is the new Black


Hello and welcome TRHD fans!  Shanna here today to share another adorable  card featuring the caffeinated critters from The Rabbit Hole Designs
The critter line is my favorite (no big secret there!!!) and I had so much fun combining a few trouble makers for this card!

I started by coloringstamping the Caffeinated Rabbit, Caffeinated Unicorn, and Caffeinated Dino in Versa Clair Nocturne ink on a 5x7 panel of bristol cardstock
Next I watercolored them all using my Zig Real Brush pens...I especially had fun individualizing their mugs!  That volcano still makes me giggle!!


Next I drew a light pencil line to guide my floor coloring, and watercolored it as well.
For the background I wanted a "line up" look, so I got handy with my ruler and drew lines every 1/4 inch.  Every fourth line I made slightly larger, and added height measurements.  Bring up the question...

"How tall are the critters!?!"

Lastly I added my sentiment.  I had a couple I liked, but decided to go with "Caffeine, because prison orange is not flattering" from the Perfectly Blended sentiment set.  It seemed all to appropriate for the scene!  I heat embossed it on black cardstock with white embossing powder.

That wraps up todays card, hope you all enjoyed it!

As always, thanks so much for stopping by! You can see more of my creations on my blog Caffeinated Craftiness, or be sure and follow my crafty adventures over on Instagram!
 See you all soon!
~Shanna

For even more inspiration, updates, and news make sure to check out these links.

DIY Pop-Up Rainbow Slider


Hey crafty friends! It's Amanda from Pear Blossom Press again, and today I've got another fun interactive card for you! Have you seen the Rainbow Slider die set yet? I must've been hiding under a rock, because I missed it when it came out, but now I'm slightly obsessed! The super talented Ardyth Percy-Robb has a few videos featuring it, and now I #totallyneedit!

Since I don't have the set yet, I decided to piece one together using supplies I have on hand. (Still gettin' the die set though, just sayin' ;) ) And what goes better with rainbows than unicorns, right? So of course, the Caffeinated Unicorn is right there under the rainbow, along with a sassy sentiment. Let me show you how I put this card together...


What do you think; fun, right? Can you see why I couldn't wait to make one? In addition to the Caffeinated Unicorn, I also used the cloud stamps from the Love You More stamp set. If you'd like links to any of the other specific products I used, you can find them in the sister post to this article on my blog.


I love the way this card turned out. All of the sparkly details are really pretty and the pop-up rainbow is an unexpected element that adds a lot of wow. This would be a great card to send to a friend, just to make them laugh. Or tuck a coffee gift card inside, and you've got a fun birthday card/gift! Who would you send this card to? Let me know in the comments below. Thanks for swinging by today. I'll be back soon with another card to share...


Coffee & Donuts


Hello crafty friends, it's Amanda from Pear Blossom Press again and today I've got a fun shaped card for you featuring the Caffeinated Unicorn! I don't know about you, but the caffeinated critter series is one of my favorite collections to play with. The unicorn is just too hilarious; she even has little narwhal slippers! I thought she'd pair well with a donut shaped card covered in lots of sprinkles.

I started by stamping and embossing my Caffeinated Unicorn, then coloring it with Copic markers. Then I fussy cut her with my ScanNCut. Using some of the same markers, I colored scraps of white cardstock in coordinating colors. I stamped and embossed caffeine makes me sparkle, then die cut it with a fishtail banner die. I also die cut the word yippee three times, once from the scrap I colored blue. I glued the three layers together, with the blue layer on top. I glued a thin strip of silver glitter paper to the bottom of the fishtail banner.

To make the card, I grabbed my nesting circle dies and found a set that looked like a good size donut and appropriate hole. I used a 4 1/2" circle for the outer cut, and a 1 1/4" circle for the inner cut. I cut a pair of blush colored circles for the card base. I trimmed about 1/8" from the bottom edge of the back circle. Then I lined it up in my Scor Pal and scored 1/2" from the top to form a hinge. I glued the two pieces together at the hinge. The tiny cut across the bottom of the back piece allows the card to stand up when it's open. I sponged on a little brown ink to add shading to the inner and outer edges of the donut. That makes it look like it's been cooked to a golden brown.


For the frosting, I cut a third circle from pink stock and increased the inner die to a 1 1/2" circle, so that some of the center of the blush circles would be visible when stacked. I used scissors to freehand a wavy cut around the outer edge of the pink circle. Then I stamped and embossed it with sprinkles. To add a little more dimension, I sponged on a little pink ink around the inner and outer edges and glued it onto the donut.

To finish the card, I lined everything up and trimmed the fishtail banner to end behind the unicorn's legs. I glued the banner in place and glued the word yippee above it. I popped the Caffeinated Unicorn up with foam tape to give the card a little more dimension. For a final touch, I added shimmer pen to the unicorn's mug and horn. Then, I coated the horn, mug, her eye, and the word yippee with a layer of Diamond Glaze. I think it gives the card just the right amount of sparkle and shine!

Now don't tell anyone, but I've got a little secret to share. Even though I love to make cards, I always draw a blank when it comes to writing the sentiment inside. A card like this doesn't have a lot of room to write a long message and that suits me just fine. If you'd like a bigger area to write inside, you can omit cutting the center holes from the card base. In that case, I'd cut the base from white cardstock and layer on a blush layer and a pink layer onto the top of the card. You might consider adding a white doily to the back of the card, so it looks like a donut on a doily.

So that's my card for today, another fun shaped card. Do you prefer shaped cards or traditional rectangles? Let me know in the comments below. Is your caffeinated critter collection complete? If not, head on over to the shop and fill up your cart today! And don't forget the new release comes out next week! I can't wait to show you what I've been working on with those sets! (Hint, hint, even if you think your caffeinated critter collection is complete, it's probably not ;) See you soon my crafty friend!

Magical AF


Hello there, The Rabbit Hole Designs fans!  Maria here on the blog with you today.  I guess I am on a roll because I just finished this cute shaker card to share with you today by The Rabbit Hole Designs.  

For my project, I am showcasing the Caffeinated Unicorn 3x4 stamp set.


Here's how I made the card:
  • Stamp the image on smooth white card stock and color the image in with Copic markers (or any coloring medium of your choice).
  • Die-cut the image with an electronic die-cutting machine or fussy cut with scissors.
  • Stamp the unicorn image again on patterned paper and fussy-cut the robe to paper-piece on the image.
  • On an A2 size of Bristol smooth white card stock, ink up the background using the mini ink blending tool and spun sugar distress oxide with the sunburst stencil by Tim Holtz.
  • Use a die o die-cut the frame and the window.
  • Cut an acetate sheet and run it through your die-cutting machine with a snow embossing folder. Adhere this acetate sheet on your frame.
  • Add foam adhesive to create the well.
  • Add confetti or sequins as the shaker element.
  • Adhere this piece on the colored background for a seamless look.
  • Die-cut the clouds twice using a clouds die.
  • Stamp the sentiment on the clouds with gray ink.
  • Adhere the Unicorn on the card.
  • Add stardust stickles on the unicorn's hair to finish the design.

This stamp set also makes me giggle because the unicorn's hair is so frizzy, it reminds me of my big frizzy hair during summertime in Florida.  I swear my hair gets so big, it's the size of Texas!  Thank God for flat irons and anti-frizz magical potions because without them, I would look like a cave woman!  Here's a closer look:


Fussy-cutting the patterned paper to paper-piece the robe made it look more realistic and added some nice touch to the overall card design.  Can you also just admire the glitter on the unicorn's hair?  She is so stylish and is indeed magical AF!  Haha!  Here's another look:


For more inspiration, updates, and news make sure to check out these places.


If you are looking for further details about my project including supplies used, I would be so grateful if you can stop by my blog today at:


I hope you like my shaker card today.  Have a wonderful day and happy crafting!


Day 2 Collaboration Blog Hop


Hello and welcome back to The Rabbit Hole Designs blog!
 Today is day 2 of our Collaboration Blog Hop.

We are so thrilled to have the amazing talents of the Coffee Loving Cardmaker's Design Team to help us in our Grand Opening/Launch of The Rabbit Hole Designs


FREE SHIPPING 
on orders of $15 before taxes and shipping
(applies to US orders only)
No code necessary, exclusions apply


Today we are showcasing Caffeinated Octopus and Caffeinated Unicorn

Giveaway
Leave a comment by 11:59pm PST on 01-18-2019 for your chance to win. Winner will be chosen at random from the comments left on participating blogs, so make sure to visit each stop and leave a comment.  Winner will be announced on The Rabbit Hole Designs blog & the Coffee Loving Cardmaker's blog on 01-21-2019 
Prize


Prize
1 full set of Caffeinated Stamps 
(1 Caffeinated Cat, 1 Caffeinated Dino, 1 Caffeinated Octopus, 1 Caffeinated Unicorn)
and
 1 Tim Holtz Stamping Platform

Here is the line up for today:


The Rabbit Hole Designs wishes to thank The Coffee Loving Cardmaker's Design Team for all their time and inspiration.

For more inspiration, updates, and news make sure to check out these awesome places! 
The Rabbit Hole Designs 

Thank you so much for stopping by today!