Pages

Showing posts with label Candy Twist stencil. Show all posts

Merry Snowperson

Hello friends! Welcome back to the blog. Today's card features the 1 Line Snowperson 2x6 stamp set along with a sentiment from Poinsettia & Pinecones 6x8 stamp set.


Card details:
  • Stamp the image from the 1 Line Snowperson 2x6 stamp set with an alcohol-friendly black ink on a white cardstock. Die-cut with a circle die.
  • Create a snowperson mask. I stamped the image on masking paper and fussy cut the snowperson out. I didn't worry about masking the twig arms. 
  • Mask the snowperson and the area below the snowperson. I used Post-It tape for the area below. Blend light purple around the snowman to create a halo effect.
  • Remove masks and color image with alcohol markers.
  • Die-cut the largest frame from You've Been Framed dies on blue cardstock. Blend the blue panel with Candy Twist Stencil with light purple ink.
  • Trim a half-inch strip from light purple cardstock. Line up the strip with the "groundline" on the stamped image. Attach both to the blue panel.
  • Stamp the "Merry Christmas" sentiment from Poinsettia & Pinecones 6x8 stamp set with navy ink on light purple cardstock and die-cut with its coordinating dies. Adhere sentiment underneath the snowperson circle.
  • Adhere the panel to an A2 vertical card base.
  • Add bling to finish off the card.


Thanks for visiting!

Amrita

You can find me on IG @amritapettus

For more inspiration, updates, and news check out these awesome places! 


The RHD Affiliate Disclaimer:

We want to ensure transparency and honesty in our interactions with you, our valued readers. Please be aware that the links provided on The Rabbit Hole Designs Blog may be affiliate links. This means that if you make a purchase through these links, the project designer may earn a small commission at no extra cost to you. Your support means the world to us!


We kindly request that you accept the tracking cookie for the affiliate websites. Rest assured, this will not expose your computer to viruses or compromise your information. It's a necessary step for the company to attribute the sale to the affiliate, ensuring that creators like our creatives receive their rightful commissions.


Your trust and support empower our creators to continue sharing creativity and inspiration through our blog. Thank you for being an integral part of The Rabbit Hole Designs community!



Cute Christmas Waddling Penguin Trio


It's beginning to look a lot like Christmas now that December is here! I used the adorable Penguining stamp set along with the Candy Twist stencil to create a trio of waddling penguins. I popped the front penguin onto a wobbler for extra wobbling action. 

You can watch me create my card in this short on my YT channel: 


I've linked products I used, below.

*Disclosure: I use affiliate links where I can. This does not add any extra cost to you, but I do receive a small amount which helps keep me crafting. Thank You*

Penguining Stamp Set: https://shrsl.com/44m4g Candy Twist Stencil: https://shrsl.com/4lw4t You've Been Framed Layering Die Set: https://shrsl.com/3xto5


Bright and Joyful Christmas Tree


Hello my crafty friends, Jenn here with a Bright and Joyful Christmas tree card featuring The Rabbit Hole Designs Warm and Cozy stamp set (illustrated by Agota Pop). I wanted to create and easy card, but som,ething that is a little bit elegant too. I hope you enjoy this twist on a traditional Christmas card.

Supply List

Other supplies (from your stash)
Paint brushes
Metalic watercolors
Bearly Arts Craft Glue
White ink
VersaMark Watermark ink
Gold Embossing Powder
Let's take a look at this simple step tutorial:
A - Use either a Bitty Blending Brush or Cottontail Blending Brush with white ink to stencil the Candy Twist stencil design in an oval shape in the center of a piece of 4' x 5 1/4" black cardstock

B - Use a paint bush and gold watercolor to add gold splatters the card front and set it aside to dry

C & D - Use the white ink and lightly stamp the Christmas tree image (from the Warm and Cozy stamp set) onto a piece of black coloring cardstock.  Watercolor the image with green, gold, red, and brown metalic and/or shift watercolors
E - Fussy cut or die cut the colored Christmas tree 

F -  Use the Cottontail Embossing Powder Tool to treat a piece of black cardstock. Stamp the Merry Christmas sentiment (from the Poinsettia and Pinecone stamp set) with VersaMark Watermark ink.  Dust it with gold embossing powder and heat set the sentiment. Use the coordinating dies to die cut the sentiment

G & H - Glue the stenciled card front on a green A2 cardbase.  Use adhesive foam squares to attach the painted Christmas tree to the center of the stenciled Candy Twist oval. Glue on the Merry Christmas sentiment above and below the tree as shown
Thank you for taking time  to visit today's blog and check out this Bright and Joyful Christmas Tree card created with The Rabbit Hole Designs' Warm and Cozy stamp set, Poinsettia and Pinecone stamp and die set, and Candy Twist stencil. I hope you are inspired to create something lovely today!

Be Creative ~ Stay Inspired

Jenn Gross


Follow me, Journey Coach Jenn, on 

Instagram - https://www.instagram.com/journeycoachjenn/

YouTube - http://www.youtube.com/c/JourneyCoachJenn

Blog - https://journeycoachjenn.blogspot.com


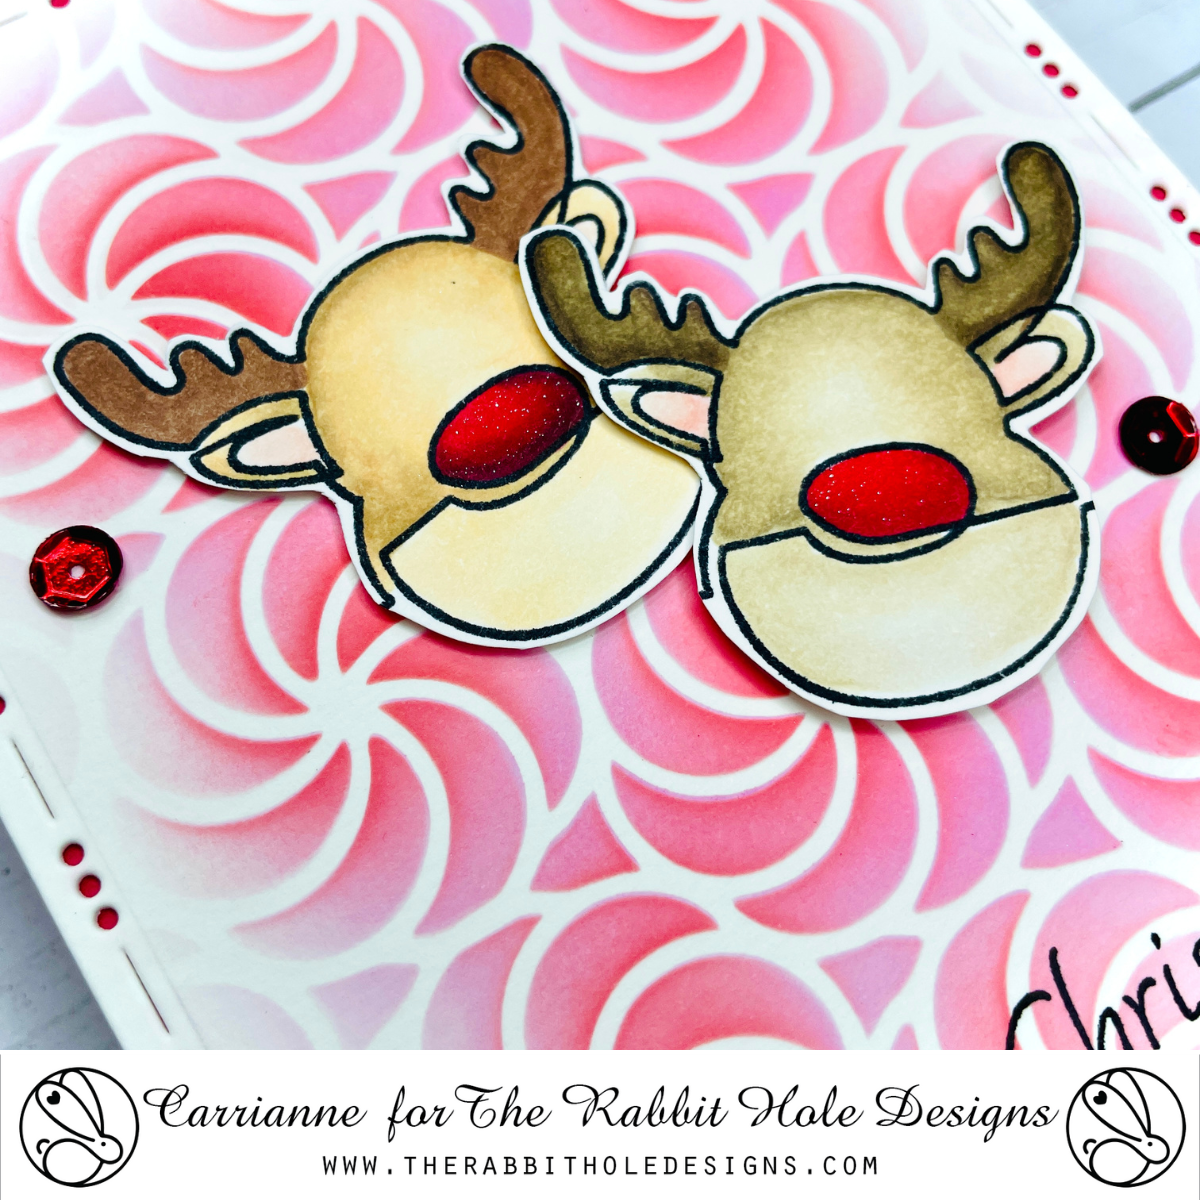
Merry Christmas, Reindeer Style!

Hi friends! Carrianne here sharing a festive duo, lighting up the night with holiday spirit featuring The Rabbit Hole Designs 1 Line Reindeer Stamp Set.


I began with a panel of white cardstock, placed the Candy Twist Stencil, and secured it with masking tape. I blended Picked Raspberry Distress Oxide ink then cut it with the largest frame from the You've Been Framed Layering Dies. It was then attached to a red card base.


I then stamped the images from the 1 Line Reindeer Stamp Set and colored them with alcohol markers. I fussy cut the images and adhered them to the panel with foam tape for dimension. The sentiment is from the same set and was directly stamped onto the panel with black ink. I finished the card by adding a few red sequins. 


Thank you for stopping by and have a DEER-lightful day!

~ Carrianne ~


For more inspiration, news, and updates, make sure to check out these places.


DISCLOSURE: THIS POST CONTAINS AFFILIATE LINKS, MEANING I GET A SMALL COMMISSION WHEN A PURCHASE IS MADE THROUGH THAT LINK AT NO ADDITIONAL COST TO YOU. THANK YOU FOR SUPPORTING ME SO THAT I MAY CONTINUE TO SHARE MY CREATIONS WITH YOU!


Golden Poinsettia Christmas

Hello friends! Welcome back to the blog. Today's card features the Poinsettia & Pinecones 6x8 stamp set along with its coordinating dies.


Card details:

  • Start with an A2 dark purple card base. Stamp the largest image from Poinsettia & Pinecones 6x8 stamp set with an embossing ink along the open edge of the card. Heat emboss with gold embossing powder.
  • Using a partial die-cutting technique, die-cut the bottom edge of the embossed image with the coordinating die. Make sure the top edge of the image doesn't get cut and remains connected to the card base.
  • Die-cut the largest frame from You've Been Framed dies on light pink cardstock. Blend the panel with the Candy Twist Stencil with light pink ink for a tone-on-tone effect. Adhere the panel to the inside of the dark purple card base.
  • Stamp the sentiment "Merry Christmas" on light pink cardstock from the same stamp set and die-cut with coordinating dies. For added dimension, die-cut the sentiment dies on blank white cardstock and stack the die-cuts. Attach sentiment near top right of card.
  • Add a gold cord bow and gold glitter pen details to finish card.


Thanks for visiting!

Amrita

You can find me on IG @amritapettus

For more inspiration, updates, and news check out these awesome places! 


The RHD Affiliate Disclaimer:

We want to ensure transparency and honesty in our interactions with you, our valued readers. Please be aware that the links provided on The Rabbit Hole Designs Blog may be affiliate links. This means that if you make a purchase through these links, the project designer may earn a small commission at no extra cost to you. Your support means the world to us!


We kindly request that you accept the tracking cookie for the affiliate websites. Rest assured, this will not expose your computer to viruses or compromise your information. It's a necessary step for the company to attribute the sale to the affiliate, ensuring that creators like our creatives receive their rightful commissions.


Your trust and support empower our creators to continue sharing creativity and inspiration through our blog. Thank you for being an integral part of The Rabbit Hole Designs community!


Christmas Poinsettia and Pinecones

Hello friends! Welcome back to the blog. Today's card features the Poinsettia & Pinecones 6x8 stamp set along with its coordinating dies.


Card details:

  • Die-cut the middle frame from You've Been Framed dies on light pink cardstock. Blend the panel with the Candy Twist Stencil with light pink ink for a tone-on-tone effect.
  • Stamp the images from the Poinsettia & Pinecones 6x8 stamp set with an alcohol-friendly black ink on white cardstock and color with alcohol markers. Die-cut the images with the coordinating dies.
  • Stamp the sentiment "Merry Christmas" from the same stamp set and die-cut with coordinating dies. For added dimension, die-cut the sentiment on blank white cardstock and stack the die-cuts.
  • Attach the images and sentiment to the light pink panel and attach the panel to a white card base.
  • Add gems to finish card.


Thanks for visiting!

Amrita

You can find me on IG @amritapettus

For more inspiration, updates, and news check out these awesome places! 


The RHD Affiliate Disclaimer:

We want to ensure transparency and honesty in our interactions with you, our valued readers. Please be aware that the links provided on The Rabbit Hole Designs Blog may be affiliate links. This means that if you make a purchase through these links, the project designer may earn a small commission at no extra cost to you. Your support means the world to us!


We kindly request that you accept the tracking cookie for the affiliate websites. Rest assured, this will not expose your computer to viruses or compromise your information. It's a necessary step for the company to attribute the sale to the affiliate, ensuring that creators like our creatives receive their rightful commissions.


Your trust and support empower our creators to continue sharing creativity and inspiration through our blog. Thank you for being an integral part of The Rabbit Hole Designs community!


Balloon Animals #2 - Pink Octopus

Hello friends! Welcome back to the blog. Today's card features the new Balloon Animals #2 stamp set and coordinating dies.


Card details:

  • Cut the largest frame from You've Been Framed dies from pink cardstock. Create a tone-on-tone background by blending the Candy Twist stencil with pink ink on the pink cardstock panel.
  • Cut the smallest frame from You've Been Framed dies from peach cardstock. Realign the die-cut piece on one end of the same die taking care to line up the holes. Cut again to create a strip peach die-cut. Repeat 2 more times to create 3 peach strips.
  • Stamp the sentiment (also from Balloon Animals #2) on one of the peach strips and attach all 3 to the pink cardstock panel.
  • Stamp and die-cut the octopus image from Balloon Animals #2. Color with alcohol markers and add white gel pen details. Attach to card.
  • Attach the pink A2 panel to a card base. Add googly eyes to finish off the card.

Have you heard about the Tic-Craft-Toe monthly challenge? My card fits the challenge with these 3 elements: Tone on Tone, A2 and Stencil. Check out this IG post for more info. There's a prize up for grabs!

Thanks for visiting!

Amrita

You can find me on IG @amritapettus

For more inspiration, updates, and news check out these awesome places! 


The RHD Affiliate Disclaimer:

We want to ensure transparency and honesty in our interactions with you, our valued readers. Please be aware that the links provided on The Rabbit Hole Designs Blog may be affiliate links. This means that if you make a purchase through these links, the project designer may earn a small commission at no extra cost to you. Your support means the world to us!


We kindly request that you accept the tracking cookie for the affiliate websites. Rest assured, this will not expose your computer to viruses or compromise your information. It's a necessary step for the company to attribute the sale to the affiliate, ensuring that creators like our creatives receive their rightful commissions.


Your trust and support empower our creators to continue sharing creativity and inspiration through our blog. Thank you for being an integral part of The Rabbit Hole Designs community!


How Air You?

Hello Crafty Friends. How air you today? Carrianne here sharing more inspiration to get your crafty day started!

My card  features the adorable Balloon Animals 1 Stamp Set and Balloon Animals 1 Dies, illustrated by Dustin Pike. How cute is this balloon dog? I just love him!


I began by creating a vibrant backdrop using the Candy Twist Stencil. I used The Rabbit Hole Designs Cottontail Embossing Powder Tool to blend distress oxide inks. I then die cut the panel using the largest of the dies from the You've Been Framed Layering Dies, and then again on a white panel using the smallest die. I used a circle punch to create the circle. I then assembled it and adhered it to an A2 card base.


I then used Versamark ink to stamp the image on black cardstock and heat embossed it with white embossing powder. I used Prismacolor pencils to color it, and then used the coordinating die to cut it out. I adhered it to the panel with foam strips for dimension. 

The sentiment is also from the same set and was heat embossed and adhered with foam strips as well. I finished the card with different shades of purple sequins to add some interest and sparkle.


Thank you so much for dropping in with me today. Have a Fantastic day!!

Carrianne

SUPPLIES USED:


DISCLOSURE: THIS POST CONTAINS AFFILIATE LINKS, MEANING I GET A SMALL COMMISSION WHEN A PURCHASE IS MADE THROUGH THAT LINK AT NO ADDITIONAL COST TO YOU. THANK YOU FOR SUPPORTING ME SO THAT I MAY CONTINUE TO SHARE MY CREATIONS WITH YOU!


Birthday Twist - Interactive Pinwheel Card

Hello crafty friends!  Jenn here with a sassy and fun interactive birthday card. This one you can actually blow and spin the pinwheel! 

I am using the balloon dog image included on the Balloon Animals #1 stamp set and the coordinating die set. They are from The Rabbit Hole Designs' new August Release. These whimsical balloon animals ar illustrated by Dustin Pike.  I paired it up with the Candy Twist stencil, Balloon Animals #2 stamp set and the Everyday Sentiments stamp set.

Supply List 

Supplies from my stash
Pastel pink, blue and green ink
Red cardstock (for balloon dog)
Mylar or light weight paper for the pinwheel 
Long brad for the pinwheel 

Here are the photo steps to make the Pinwheel from a 2 3/4" square piece of lightweight paper
By adding the small cardstock square with a piece of double sided adhesive tape facing away form the pinwheel, you have created a spacer between the pinwheel and the card.  This allows the pinwheel to spin when you blow on it even after you stick it to the project.

Thank you, I appreciate you taking time from your day to stop by and check out today’s The Rabbit Hole Design project.  I hope you are inspired to create something lovely today!


Be Creative ~ Stay Inspired

Jenn Gross


Follow me, Journey Coach Jenn, on 

Instagram - https://www.instagram.com/journeycoachjenn/

YouTube - http://www.youtube.com/c/JourneyCoachJenn

Blog - https://journeycoachjenn.blogspot.com/  


For more inspiration, updates, and news make sure to check out these places


The Rabbit Hole Designs

The Rabbit Hole Designs Instagram

The Rabbit Hole Designs Facebook Page

The Rabbit Hole Designs Pinterest

The Rabbit Hole Designs YouTube