Pages

Showing posts with label Tangii Crain. Show all posts

Adventure


Happy, Wednesday!!!!  Tangii here with a quick and fun card using a few goodies from the August Wonderland release.  For this card I used the Wonderland 3 set & dies and paired them  up with the Adventure Hot Foil plate and it's silhouette die.


I Will Sit With You in the Dark


Happy, Sunday!!!!  Tangii here, and I'm inking up some more Wonderland fun!  For my card today I used the, Wonderland 3 set & dies and Heard it in Wonderland sentiment setBefore stamping my background, I went over my black cs base with the Cottontail Embossing Tool, then stamped the Mad Hatter & the Dodo on it with embossing ink.  Because I used the MISTI, I was able to stamp a couple of times with the embossing ink to be sure I had really great coverage.  I poured some White embossing powder over both images and heat embossed. Next I die cut the heart from the middle, then set the black cs aside.

My card base is red (the folding part), but I wanted the sentiment embossed in red, so I added a little white cs to show through the heart.  I stamped the sentiment with Embossing ink, some red glitter ep and then heat set.  I adhered the white sentiment piece in place on the red base, then centered my black postage stamp cs piece over it, the black is popped up with foam tape.  Before adding the final elements I splattered some white "paint" on top. Finally I added some iridescent baubles and some red glitter die cut x's o's and "hearts".

Joy to the Squirrel


Happy Friday yall!!!!  Tangii here, and I'm playing with some goodies from the July Release.  I inked up one of the images from Clarence Christmas and paired it up with the Mid Century Modern #2 stencil!

First off, I stamped Clarence, colored him with Copics and cut him out by hand.  Once done, I set him aside. Next up, I did some ink blending on my main panel with some red and green Oxide ink, using the Cotton Tail Blending Brushes.!

 I used my heat gun to go over this panel to make sure those Oxides were good and dry then went over it with the Cottontail Embossing Powder Tool so that my embossing powder would only stick where I wanted it! I first used Layer 1 of the Mid Century Modern #2 stencil, I layed it over my panel in a wonky angle (not square) and went over it with an Embossing ink dauber and heat embossed with some clear ep. Then I layed down Layer 3 of the stencil set (the smaller dots) and placed it at a different wonky angle, I wanted these dots in random places and not lined up with the first layer.  I went over this with the Embossing dauber and added some silver ep.  Finally I adhered Clarence and my sentiment
 with foam.

You can also read about this card on my blog, here with links to the products I used, etc.  Thanks for popping by, come back again soon!

Rock Garden

Happy weekend yall!!!!  Tangii here with another card using the Desert Background set, just showing you how awesome this background set is even if you don't enjoy coloring or sometimes don't have time to color!
So first off, I die cut some chat bubbles on masking paper, then placed the masks on my card base.  Once they were in place, I grabbed a few Distress Oxide inks and my Bitty Bunny Blending brushes and got inky!  Then removed the masking paper.  I went over this whole thing with a heat gun a little just to dry out those Oxides.  Next you're going to want to go over the whole piece with the Cottontail Embossing Powder Tool, just to be sure none of your EP sticks to that Oxide Ink! 

Next up, I stamped my Desert Background image with some embossing ink and some Rose Gold EP.  I just LOVE the look of the Rose Gold!  Finally I stamped my sentiments from the SXS Life set in the "chat bubbles". 

You can also read about this card on my blog, here with links to the products I used, etc.  Thanks for popping by, come back again soon!

That'll Buff Right Out


Happy Friday-eve!!!!  Tangii here with another easy and fun card that could be great for a masculine card!  A little ink blending here, a little heat embossing there and a smidge of patterned paper and voila!

So first off, I stamped my SXS Life image with some embossing ink and some ultra fine black EP.  After heat embossing the image I got my Up in Flames stencil in place and grabbed a few Distress Oxide inks and my Bitty Bunny Blending brushes and got to work. The Getting Inky papers are perfect for paper piecing or in this case adding some texture elements... tell me that blue ink paper doesn't make the coolest clouds!  The clouds and the sentiment are all popped up with foam tape.

You can also read about this card on my blog, here with links to the products I used, etc.  Thanks for popping by, come back again soon!

Good friends & dayrides!


Happy Friday!!!!  Tangii here with an easy and fun card that could be great for a masculine card!  Not everyone has "mad coloring skills" and even if you do, you don't always feel like coloring.  For this card I used a lot of ink blending and a little coloring.

So first off I stamped Desert Background image on my panel, I did tape off the edges to keep them crisp and white.  It kind of adds a border while keeping the card "simple". I grabbed a few Distress Oxide inks and my Bitty Bunny Blending brushes and got to work, I blended the whole image.  Next I grabbed some Copics and colored in the main images (snake, skull, boulder and cacti).  I really just focused on laying on some color here, not alot of coloring technique! lol  Once it was all colored, I stamped the image again, just to make the image pop some... it was kind of muted with all of that Oxide ink on it (using the Misti, of course!).  Finally I added the sentiment and voila!  Easy peasy, pumpkin squeezy! 

You can also read about this card on my blog, here with links to the products I used, etc.  Thanks for popping by, come back again soon!

Adventure is Calling, Clarence is answering!


Happy Friday!!!!  First off, give yourself a pat on the back and a gold star for surviving the week! lol  I am kicking off the new release review with this fun card using Clarence Skydiving.  I've paired him up with the Clouds in my Coffee stencil and the Adventure Scripty Word die & stamp set, and the Getting Inky paper pad.
So first off I stamped Clarence where I wanted him to be, then I used the Clouds stencil and some Oxide Inks to create the sky.  I was lazy and didn't even bother masking Clarence off, I just made sure I placed the stencil so the bumps in the clouds covered any image parts (sneaky ;-) ).  Next I colored up Clarence with some Copics.  Finally I used the Adventure Scripty Word die with the Getting Inky paper pad and stamped the sentiment in red below.  Voila!  

You can also read about this card on my blog, here with links to the products I used, etc.  Thanks for popping by, come back again soon!

Congratulations!


Happy weekend!!!!  Hope you are having a wonderful Saturday!  Tangii here with another fun card using Congratulations from the May release.  A little embossing here, a little ink blending there and voila!  While this image is fantastic to color, I just can't help but embossing it!  And not just embossing, but embossing in metal (Gold, Silver, etc.)

I also used the Mesh Optical Illusion stencil and some Oxide Ink to add a little something to the upper corner... my card went from "simple" to "woohoo" just by adding that stenciled piece!  I LOVE the final look!

You can also read about this card on my blog, here with links to the products I used, etc.  Thanks for popping by, come back again soon!

Come & Share a pot of tea...


Happy weekend!!!!  Hope you are having a wonderful weekend!  Tangii here with another fun card using Bunny Brew from the April release.  Coordinating dies made this card quick to put together!

This is normally such a great image to paper piece, but today I colored up my tea pot and then used the coordinating die to cut it out. To give the coloring a little more POP, I added some teeny heart foil confetti pieces.  After adhering the tea pot to the card front using foam tape, I stamped the sentiment on a tag and used some foam tape on it as well.  Love the color palette on this!  Thanks for stopping by, be sure to tune in on Monday for the NEW Release! 

You can also read about this card on my blog, here with links to the products I used, etc.  Thanks for popping by, come back again soon!

A tea-riffic tag!


Happy Sunday!!!!  Hope you had/are having a wonderful weekend!  Tangii here with a tag using Bunny Brew from the NEW April release.  Coordinating dies make it so easy to use stamp sets on tags!  Today I stamped my image, colored it up then used the coordinating die.

Once cut out, I popped it up with some foam tape and attached it to my tag.  I added a heart on my sentiment tab, popped them both up with foam tape and voila!  Easy peasy pumpkin squeezy! 

You can also read about this card on my blog, here with links to the products I used, etc.  Thanks for popping by, come back again soon!

Bee Happy & Smile


Happy Sunday!!!!  Hope you had/are having a wonderful weekend!  Tangii here with another card using Hello Friend from the NEW March release.  For the card, I simply colored up my image and cut it out (yep, cut out by hand because I forgot to get the coordinating dies, drat! Not the end of the world, but I did put myself in a time out for forgetting, lol).  

Once cut out, I popped it up with some foam tape and attached it to my sunburst panel.  I die cut a couple of small banners to fit my sentiments, stamped and popped up with foam tape. I finished it off with a few colored baubles and voila!

You can also read about this card on my blog, here with links to the products I used, etc.  Thanks for popping by, come back again soon!

Hello Friend


Happy Friday!!!!  Hope you have some fun plans for your weekend, maybe a little creative therapy?  For my fun little tag, I inked up the NEW Sail & Soar set and paired it up with a piece from the Getting Inky paper pack.
I paper pieced his little boat and colored the rest with Copics.  The sentiment is from the NEW Hello Friend set and I finished it off with a few sprinkles of the free Sequin pack that comes with your orders.

You can also read about this card on my blog, here with links to the products I used, etc.  Thanks for popping by, come back again soon!

You're Just Plane Awesome!


Happy Sunday!!!!  Hope you're having a wonderful weekend, Tangii here sharing a card using the Sail & Soar set from  the NEW March release.  While the card itself is simple in design, I had some fun creating it! I stamped my scene and colored the bunny & clouds with Copics.

When it came to coloring up the airplane I decided to do a little experimenting.  I colored in the darker areas with a copic marker and left the rest white.  Then I went over the white areas of the plane with an brush embossing pen and then added some Embossing Glaze... WOWZA!  Did it ever have a fun effect!  The plane has this great watercolor/glazed look to it!  Such a fun and easy way to add a little dimension to a simple card.

You can also read about this card on my blog, here with links to the products I used, etc.  Thanks for popping by, come back again soon!

Lucky Friend


Happy Friday!!!!  Tangii here, today I'm mixing up some "new" with some "not so new" goodies.  I've used the new Scripty Friend stamp set & coordinating dies, the Clover Bunny stamp set & coordinating dies and finally our Spring Floral #2 paper pack.
Coordinating dies make this card quick to make! I stamped the bunny and colored just the bunny and the clover stem.  All of the green pieces (clovers, tags, shadow) are patterned paper, so I just stamped and die cut (or in the case of the shadow just cut!).  The Scripty Friend word die is cut from the same red cs as my card base... easy peasy!

You can also read about this card on my blog, here with links to the products I used, etc.  Thanks for popping by, come back again soon!

Surprise! Clarice is ready to party


Happy Sunday!!!  Tangii here again with one last share from the Birthday release, before we kick off the February release tomorrow (Monday)!.  I whipped up a quickie card with Clarice (coordinating dies help soooooo much!!!).


I stamped Clarice, colored her up with Copics then ran her through the die machine with her coordinating die.  I just set her in place and then stamped those candles around her.  I popped her up  with some foam tape, stamped my sentiment and popped it up with some foam tape...Voila!  A few sprinkles of confetti sequins and it's done.

You can also read about this card on my blog, here with links to the products I used, etc.  Thanks for popping by, come back again soon!

Love is in the air...


Hey yall, happy Friday-eve!!  Tangii here sharing a sweet card using the Clarence & Clarice: Love set from the NEW Birthday release.  I paired up the new set with the Coordinating dies and the Scripty Love word & shadow dies.
Aren't those two just sweet as can be?!?  I stamped them and then used the coordinating dies to cut them out.  Once done I colored them up with Copics.  I layed them on my Red Postage stamp layer to place them, then taped my Scripty Love Shadow die where I wanted it.  Now I set the squirrels aside and die cut the shadow from the Red Postage stamp layer. Next I adhered the squirrels using foam tape.


The entire Red Postage stamp piece is also adhered with foam tape.  Before attaching it though, I stuck a piece of pink heart patterned paper where the shadow was cut out.  Once the Red Postage piece was in place, I glued in my Scripty Love word die pieces (in gray) and added some fluttery hearts.  Swoon!  I just love the way this turned out!!

You can also read about this card on my blog, here with links to the products I used, etc.  Thanks for popping by, come back again soon!

Last fave of 2021... Hugs are the Cure


Hey yall, happy Thursday!!  Tangii here, I'm back with my final fave from 2021... 

I had some fun with Washi, Foil & the Hugs Scripty set & dies!  I know the above photo is awful for lighting, BUT I wanted you to be able to see all of the shimmery goodness!  The photo below was taken in natural lighting and it just doesn't show the shimmery at all.  I started off with 2 different Rose Gold Washi Tapes and alternated them on my main panel, then using a die to get the scalloped edges.  
  Next up die cut my shadow on some Midnight Blue cs.  For the "hugs" I used the die cute word on white cs, then I foiled the letters.  Stamped the sentiment in Midnight Blue ink and finally stamped, colored up then cut out the envelope.  Both the envelope and the "Hugs" are popped up with foam tape!

You can also read about this card on my blog, here with links to the products I used, etc.  Thanks for popping by, come back again soon!

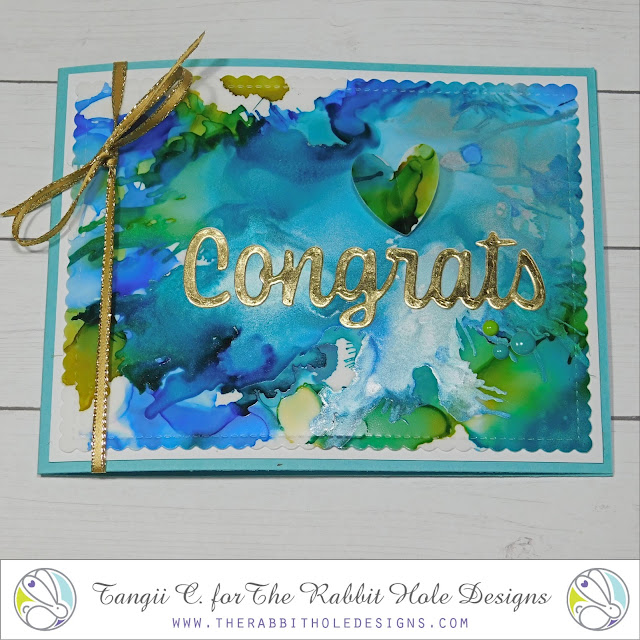
Favorite from 2021: Hot Foil Plates & Alcohol Inks


Happy, happy Holidays!!  Tangii here again with another one of my faves from 2021.  Hot Foil plates are another one of the really fantastic things TRHD introduced this past year...  I had some serious fun playing with our new Hot Foil Plates.  For this card I used the Congrats Hot Foil Plate and then used the Scripty Congrats die (the word die, not the shadow).


First I ran the foil plate through, then I placed the word die over it and ran it through again.  My eyesight isn't excellent, but I didn't have a hard time making sure it was lined up.  I adhered it to my Alcohol Ink panel and added a gold ribbon, a heart and a few enamel dots...voila!  Easy peasy and I love how it turned out!

You can also read about this card on my blog, here with links to the products I used, etc.  Thanks for popping by, come back again soon!