Pages

Fluttering Butterflies, My Final Favorite from 2021

Happy New Year! Lauren here ending the year with this last favorite of mine from 2021. A beautiful rainbow of butterflies flutter up this slimline card. I hope you like it too! Best wishes for a happy, healthy and crafty 2022!  

Hello friends, Lauren here today sharing this rainbow of butterflies using the new Butterfly stencil. This small stencil is so versatile! I used it to create a repeating pattern of butterflies flying up my slimline card.

This was quite simple to do. I started with a white slimline sized cardstock panel. I placed the stencil on the bottom and then ink blended Candied Apple and Ripe Persimmon Distressed oxide inks. 


Then, after cleaning my stencil, I positioned it above yet slightly overlapping my previous butterfly. I ink blended Squeezed Lemonade and Mowed Lawn D.O. inks over it making sure not to blend over the orange of my first butterfly.


Again, after cleaning my stencil, I positioned it above and overlapping again my previous butterfly. This time I blended Salty Ocean and Wilted Violet D.O. 


For my sentiments, I grabbed some of my other Rabbit Hole Designs stamp sets and stamped out the words you, are and beautiful onto white cardstock. I trimmed them down, mounted them onto black cardstock and adhered them onto the butterfly panel. 

Next, I trimmed the panel down using a scalloped slimline die from my stash. I added a black slimline cardstock panel to my slimline card base then adhered the rainbow of butterflies panel to the card base.

To finish off the card, I adhered some clear acrylic bubbles from my stash.

I am so happy with how quick and easy this pretty card came together. I hope this inspires you to try this technique out! Thanks for visiting!

For more inspiration, updates, and news make sure to check out these awesome places! 

The Rabbit Hole Designs 

The Rabbit Hole Designs Instagram

The Rabbit Hole Designs Facebook Fan Page

The Rabbit Hole Designs Pinterest

The Rabbit Hole Designs YouTube


Here's the link to the Butterfly stencil: 

Butterfly - 3x4 Stencil – The Rabbit Hole Designs


Looking back at a Butterfly Kiss

Hello my crafty friends!  I hope you had a relaxing holiday with family and friends.  Today I am revisiting another of my favorite cards from 2021.  I created this Whisper - i love you... card for The Rabbit Hole Designs' June 2021 Release.  

When I saw this sweet bunny image (illustrated by Tatsiana Zayat), I knew I wanted him laying in the grass to whisper to this butterfly. You can re-visit my May 24th blog here.
Thank you for stopping by and revisiting The Rabbit Hole Designs Brand Ambassadors' favorite creations of 2021.  Wishing you a very crafty 2022!

Creative ~ Stay Inspired

Jenn Gross


Follow me, Journey Coach Jenn, on 

Instagram - https://www.instagram.com/journeycoachjenn/ 

YouTube - http://www.youtube.com/c/JourneyCoachJenn

Blog - http://www.journeycoachjenn.com/ 


For more inspiration, updates, and news make sure to check out these places


The Rabbit Hole Designs

The Rabbit Hole Designs Instagram

The Rabbit Hole Designs Facebook Page

The Rabbit Hole Designs Pinterest

The Rabbit Hole Designs YouTube


Thanks!


 I hope you all had a wonderful Holiday, if you celebrate!  Vanessa here today sharing my post from September 2021. Now that the holiday is over and you received some wonderful gifts or want to appreciate a friend or family member, a thank you card is what you need!  HAPPY, HEALTHY WISHES TO YOU ALL FOR THE NEW YEAR! 

Repost:

Hello! Vanessa here today to share with you a quick and easy card to make using the newly released items,  overlapping circles stencil and the Thanks word die and stamp set.  

On smooth white paper,  I used the overlapping circle stencil with three ink colors (the bitty blending brushes work extra wonderful for small spots), and then I used a big brush and blended over with a white ink,  muting the brightness and blending out some color along the edges. I used a heart die to cut out the stenciled part I liked best to attach to a white card front. 

The Thanks word die has a shadow die, but I used only the word; die cut and glued on overlapping onto the heart and the card front. I chose "for everything" from the stamp set and stamped it directly onto the cardstock front under the thanks. Adding a little bling, the card is ready to give. Thank you cards are always nice to have on hand. 

Have a great day, and thanks for stopping by!


For more inspiration, updates, and news make sure to check out these places.

Favorite from 2021: Hot Foil Plates & Alcohol Inks


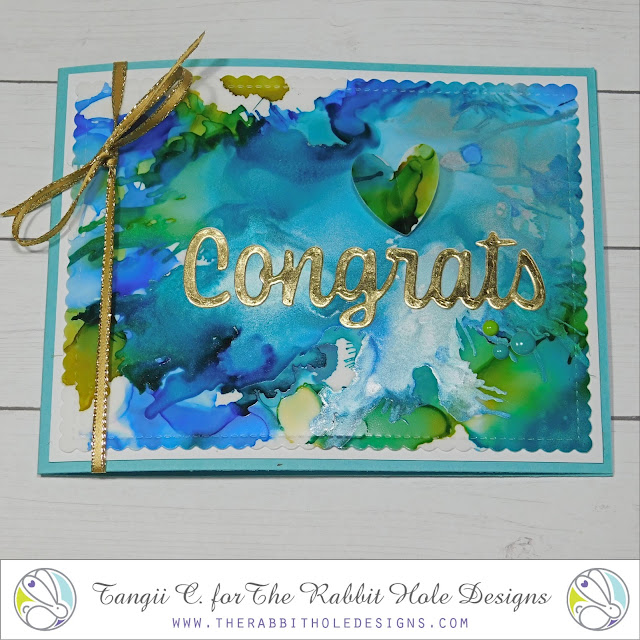
Happy, happy Holidays!!  Tangii here again with another one of my faves from 2021.  Hot Foil plates are another one of the really fantastic things TRHD introduced this past year...  I had some serious fun playing with our new Hot Foil Plates.  For this card I used the Congrats Hot Foil Plate and then used the Scripty Congrats die (the word die, not the shadow).


First I ran the foil plate through, then I placed the word die over it and ran it through again.  My eyesight isn't excellent, but I didn't have a hard time making sure it was lined up.  I adhered it to my Alcohol Ink panel and added a gold ribbon, a heart and a few enamel dots...voila!  Easy peasy and I love how it turned out!

You can also read about this card on my blog, here with links to the products I used, etc.  Thanks for popping by, come back again soon!

Let's Twist Again - Revisiting a Hula -Hooping Hippo

Hello my crafty friends!  As we continuse down memory lane this month, I am sharing this fun interactive slimline card created with the Lazy Summer stamps set!.  I love this whimsy hippo and she had to hula-hoop on the beach!  
Check out the original blog here!


To see this hippo hula-hoop, head over to Instagram.  Please feel free to leave a comment or ask a question.    


Be Creative ~ Stay Inspired

Jenn Gross


Follow me, Journey Coach Jenn, on 

Instagram - https://www.instagram.com/journeycoachjenn/

YouTube - http://www.youtube.com/c/JourneyCoachJenn

Blog - http://www.journeycoachjenn.com/


For more inspiration, updates, and news make sure to check out these places


The Rabbit Hole Designs

The Rabbit Hole Designs Instagram

The Rabbit Hole Designs Facebook Page

The Rabbit Hole Designs Pinterest

The Rabbit Hole Designs YouTube


Look back on joyful greetings


I hope you were all able to get your holiday cards made in time this year.  It's just a few more days until Christmas Eve/Christmas. I chose to repost this card because the Hoppy Holidays stamp set illustrated by Tatsiana Zayats is the perfect opportunity to wish you all a Merry Christmas!  I really loved creating this card by making the other stamps in the set shine, since the bunny is the main attraction. I think it turned out pretty.

Repost:

Hello! July is a great time to get those Christmas cards started, and the newly released Tatsiana Zayats Hoppy Holidays stamp set will inspire you to do so!

Although the bunny is the CUTEST, I wanted to create a card that showed some versatility with the set.  

This is a mini slimline card. I created the background paper by stamping a border along the left side and along the bottom of the paper with the holly stamp.  I then stamped/cut out masks for them using masking paper.  I used the Back Alley stencil in a grey ink color.  I removed the masks and colored in the holly with alcohol inks, shimmer pen, and some dimensional glaze on the berries.  On a piece of white card stock, I stamped the large envelope of goodies, colored the tree, star, and bird and then fussy cut them out; I attached them to the lower left corner with dimensional foam.  I stamped Joyful greetings to the side of the bird in black.  I always feel like Christmas cards need a little sparkle, so I added some bling to the tree and some pretty gold confetti to the rest of the card.  

Six months to Christmas! 

Cheers,

Vanessa

For more inspiration, updates, and news make sure to check out these places.

Mixed Media Buzzed, A Fun Favorite!


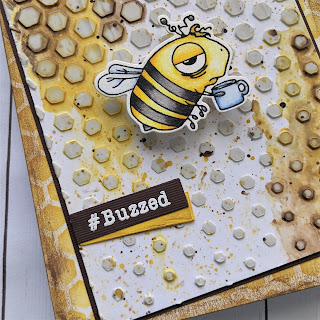
Hi again! Lauren here sharing another favorite of this past year. This card is a favorite of mine because it is one of my first mixed media cards. I had been wanting to try mixed media for some time and this year I finally was able to give it a whirl! I am so glad I did because it was so fun creating this card. Here's how I did it!

Hi friends! I have been dabbling in mixed media a bit lately and am thoroughly enjoying it. I thought I would make a drippy honey/caffeine inspired card that included this fabulous Caffeinated Bee from The Rabbit Hole Designs.

I started out with a 4.25x5.5" panel which I primed with collage medium then quickly blow dried.

Then I used the Tastes Like Honey stencil, also from The Rabbit Hole Designs. I placed the stencil over my prepared panel and spread a generous amount of modeling paste over the stencil. I set it aside to dry completely (I started in the evening, so mine dried overnight).

Next, I added color to the dry panel using Fossilized Amber and Ground Espresso. I smooshed the ink pads on my glass mat and spritzed with water. I also sprayed my panel with water. Then using a paint brush, applied the color to the top and let the flow by tipping the panel.
When the ink had dried, I rotated the panel and did the same technique to the "bottom" of the panel.


While the panel way drying, I stamped my bee onto white cardstock and colored her using Prisma Color pencils. Then die cut her out.
The colors were:
Bee: Lemon Yellow, Canary Yellow, Spanish Orange, Yellowed Orange, 30%,50%,70%, 90% Warm Greys
Wings: Sky Blue Light, Caribbean Sea
Mug: Sky Blue Light, Caribbean Sea, Light Cerulean Blue

After that, I went back and splattered my panel with Ground Espresso and Fossilized Amber Distress Oxide inks. I set it aside to dry.
Then, I ink blended the Fossilized Amber through the stencil onto a 4.25x5.5" white cardstock panel. Using Gathered Twig Distress Oxide ink on a finger, I rubbed/distressed all around the edges of the panel. Then I adhered it to my top folding card base (same measurements).

Next, I trimmed down my "drippy honey" panel and bordered it with brown cardstock. Then I adhered it to my card base on an angle.
I stamped the sentiment onto brown cardstock using an embossing ink pad and heat embossed in white. I used a sentiment die from my stash to trim it down. I die cut a second sentiment strip of the same size in yellow and distressed it with some Gathered Twig D.O. I adhered those onto the card then added an action wobble to my bee and put her on too!
I hope you enjoy this mixed media card. I had a ton of fun making it and it was much easier than I had thought it was going to be. I hope it inspires you to give it a try as well! Thanks for visiting!

Another Fave from 2021: At Your Age...

Happy Thursday!  Tangii here and I'm back with another one of my favorite cards from 2021!!

I had this fantastic glittery, shimmery paper and it was perfect for this festive card!  I die-cut the Congrats word from my base, and the shadow in black cs.  The shadow covers the the negative from my die-cutting and now my word has the same colors/gradient as the background.  My sentiment is from the Sassy Birthday 2 set, I stamped it on a white die cut piece and then blended some Oxide ink on the edges.  Finally I stamped, colored and then die cut some candles from the Just Cake stamp set & coordinating dies.  The candles are floating under the sentiment and popped up with pop dots.

The lighting on this pic stinks, but it shows the shimmery-goodness! Lookie at all of those layers & all of that texture! Swoon! 

 All of the items I linked in my post are available at The Rabbit Hole Designs.

You can also read about this card on my blog, here with links to the products I used, etc.  Thanks for popping by, come back again soon!

Back to the Beach

Hello my crafty friends!  Shall we go back to the beach today?  This month, The Rabbit Hole Designs' Brand Ambassadors are re-sharing some of our favorite cards from the past year.  This card will provide you with your daily Dose of Vitamin Sea!

It is created with the Starfish in the Sand stamp set from the April 2021 release.  The illustrations is by Tatsiana Zayats.  I love how this sun bunny is soaking up rays in the sand.

Revisit the blog here

Be Creative ~ Stay Inspired

Jenn Gross


Follow me, Journey Coach Jenn, on 

Instagram - https://www.instagram.com/journeycoachjenn/

YouTube - http://www.youtube.com/c/JourneyCoachJenn

Blog - http://www.journeycoachjenn.com/


For more inspiration, updates, and news make sure to check out these places


The Rabbit Hole Designs

The Rabbit Hole Designs Instagram

The Rabbit Hole Designs Facebook Page
The Rabbit Hole Designs Pinterest
The Rabbit Hole Designs YouTube


Everything *STILL* is going to be walright


 Hello, hello!  It's Vanessa here. I'm taking you all back, today, to my post for this cute walrus card from the Lazy Summer stamp set illustrated by Tatsiana Zayats. He's so cute, how could you not smile?  Close your eyes and picture yourself on the beach listening to the waves crashing in...  better?  Wishing you all a happy day!

July 2021

Hi Everyone!  Vanessa here to bring you a summery, uplifting card. I used the new Tatsiana Zayats Lazy Summer stamp set from the July release.

For this card, I used the lounging walrus as my focal point, along with the puny sayings to go with it.  It's sure to brighten anyone's day.  

I created my own background paper by stamping the two sentiments (Beach therapy is a shore cure, everything's gonna be walright) over repeatedly with a yellow on yellow with the exception of once in purple to stand out as the main sentiment. I lightly inked around the edges in a yellow ink. I layered it onto a glitter paper that was layered onto the purple card front. I quickly inked a little beach scene on an oval die cut, layered onto another slightly larger oval die cut. The walrus was stamped onto white cardstock and colored with alcohol inks and colored pencils with Gamsol; cut out. Slightly off center to the left, I mounted the ovals with dimensional foam to the card front, then attached the walrus with dimensional foam as well.  I then added a few colored confetti pieces to embellish the card.

Happy cardmaking!

For more inspiration, updates, and news make sure to check out these places.

Past Favorite, Joyful Greetings Times Two!


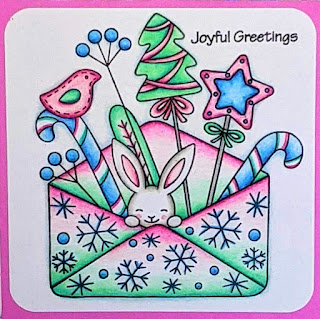
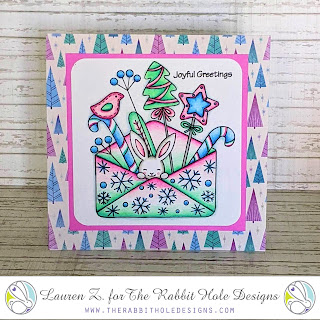
Hi there. It's Lauren sharing another of my favorites from this past year. This one is a two for one! I loved coloring this image so much that I did two color schemes and then couldn't decide which one I preferred! 

Hello and welcome to day 3 of The Rabbit Hole Designs New Release and Inspiration Hop. Today I have this square card featuring the so very adorable Hoppy Holidays stamp set illustrated by Tatsiana Zayats.

This was a super simple card to make. I started out by stamping the image in black onto white cardstock. I then colored the whole image using Prismacolor pencils. I stuck with a traditional Christmas color palette.


I then die cut the image out using a rounded corner square die from my stash and stamped my sentiment in the top right corner. I adhered it onto a square kraft cardstock panel

Next, I found a coordinating patterned paper and trimmed it to 5.5 x 5.5 and adhered it to a top folding card base of the same size. Then I adhered the panel I had created onto the patterned paper.

I enjoyed colouring this image up so much that I decided to make the same card but this time in non-traditional Christmas colours.


I cannot decide which card I prefer! Which one is your favorite?
For more inspiration, updates, and news make sure to check out these awesome places!