Pages

Have A Cherry Good New Year!


Happy New Year! Today I am sharing my last favorite creation of this past year. I hope everyone has a happy and safe New Year's Eve!
 
 Hello! It's Lauren here today with a sweet card that is sure to cheer anyone up. I used the yummy new Cherry On Top stamp set, illustrated by Agota Pop to create my card. I also used The Garden Trellis hot foil plate to emboss a background that I feel gives the card a old timey ice cream parlor vibe. 


More details can be found on my blog here: 
https://laurenzrdh.wixsite.com/queenlorecreations/post/cherry-good-day


Merry & Bright New Year

 Hello and welcome back to the blog; it's Rick back with you again today sharing another card for a little festive inspiration.  Since the New Year is only a few days away I wanted to share an idea with you using a holiday stamp set that I am sure many of you have picked up from the Rabbit Hole this year.    Today my card features the Poinsettia & Pinecones Stamp Set designed by Kelly Taylor.  


Poinsettia & Pinecone New Year Card by Rick Adkins

I wanted to take the poinsettia from the stamp set and add a little glamor to it by using some Pearl White Stencil Butter that can be picked up right here on the website.  I ran it through the Cat Eye Stencil on a piece of black cardstock.   I then added it to a silver cardstock mat and to the card base.  This dresses up the card base and makes it more of a new year card than a holiday card.  I then stamped and heat embossed the large poinsettia also on black cardstock; and colored it in different shades of blue colored pencils.  

Poinsettia & Pinecones New Year Card by Rick Adkins

By doing these few simple things I took the Christmas card and make it into a new year card.  The sentiment Merry and bright can totally go for not only Christmas but also new year as well.  Just make sure you add a fabulous new year sentiment to the inside in your personal message and your golden.  By changing up your color scheme and adding a little more glitz to your cards you can totally take a holiday set and make it into a new year set or change up the sentiment and make it a birthday card as well.  Thanks for dropping by today I hope that you all have a safe and happy new year.  And I will see you again real soon. 

Stay Crafty 

Rick 

Made for Each Otter

 Hi everyone!  Amy here today sharing a shaker card I created using two gorgeous stamp sets, Otterly Adore and Sea-ing is Believing, illustrated by Agota Pop!  This card also features the fun and super easy to use A2 Shaker Acetate Sheets!

Otterly Adore Stamp and Die Set illustrated by Agota Pop, Sea-ing is Believing Stamp and Die Set illustrated by Agota Pop, A2 Shaker Acetate Sheets by The Rabbit Hole Designs #therabbitholedesignsllc #therabbitholedesigns #trhd

I started this card by cutting a piece of smooth white cardstock just under A2 size so it would fit perfectly in the Shaker Acetate Sheet!  I then blended on Distress Oxide Inks Salvaged Patina, Tumbled Glass, and Salty Ocean to create a beautiful background!

I stamped out these super cute otter images from the Otterly Adore Stamp Set, colored them with copic markers, and cut them out using the coordinating die set.  I then stamped the awesome fish images from the Sea-ing is Believing Stamp Set, colored them, and cut them out using the coordinating die set.

Otterly Adore Stamp and Die Set illustrated by Agota Pop, Sea-ing is Believing Stamp and Die Set illustrated by Agota Pop, A2 Shaker Acetate Sheets by The Rabbit Hole Designs #therabbitholedesignsllc #therabbitholedesigns #trhd

Next, I stamped the sentiment, which is from the Otterly Adore Stamp Set, directly onto the background in black pigment ink, and clear heat embossed.

I assembled my card adhering the images directly onto the background.  I put my card in the Shaker Acetate Sheet, added embellishments, sealed the Shaker Acetate Sheet, and adhered my card to a dark gray card base. 

Otterly Adore Stamp and Die Set illustrated by Agota Pop, Sea-ing is Believing Stamp and Die Set illustrated by Agota Pop, A2 Shaker Acetate Sheets by The Rabbit Hole Designs #therabbitholedesignsllc #therabbitholedesigns #trhd

 Thank you and I hope you enjoyed my card today!

For more inspiration, updates, and news make sure to check out these places:

Lovely Lilies To Start The Year

Today’s card is super special. First, I made it using my friend Kelly Taylor’s first ever stamp set that she released with The Rabbit Hole Designs. Second, she helped me color it. We will get more into that in the video, so make sure to watch. CLICK HERE to watch my video.

This card is revisited from earlier this year but it's one of my very favorites since I got help coloring it from the original artist.


I used the Tastes Like Honey stencil to create some texture to the background and then colored and stamped this card to finish it off.


A Happy Hello

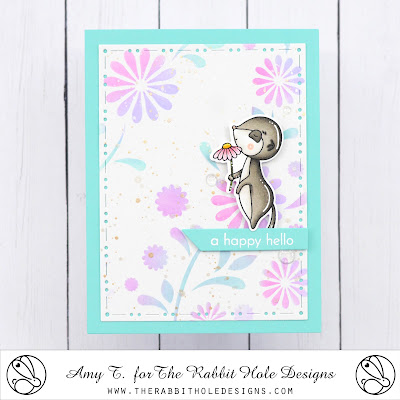
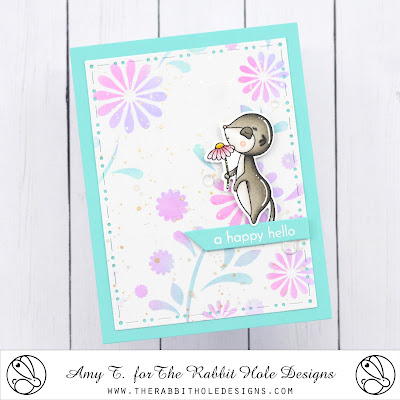
 Hi everyone!  Amy here with you today sharing a card I created featuring the super cute I Really Dig You Stamp Set illustrated by Agota Pop, and the Build Your Garden Stencil.

I Really Dig You Stamp and Die Set illustrated by Agota Pop, Build Your Garden Stencil, You've Been Framed - Layering Dies, Clear Sparkle Enamel Dots by The Rabbit Hole Designs #therabbitholedesignsllc #therabbitholedesigns #trhd

I started this card by die cutting a piece of smooth white cardstock with the second largest die from the You've Been Framed - Layering Dies.  I then used the Build Your Garden Stencil with Distress Oxide Inks Salvaged Patina, Kitsch Flamingo, and Shaded Lilac to create a gorgeous, colorful background!  I splattered the background with watercolor paint and set it aside to dry.

I stamped out this adorable meerkat image from the I Really Dig You Stamp Set, colored it with copic markers, and cut it out using the coordinating die set 

I Really Dig You Stamp and Die Set illustrated by Agota Pop, Build Your Garden Stencil, You've Been Framed - Layering Dies, Clear Sparkle Enamel Dots by The Rabbit Hole Designs #therabbitholedesignsllc #therabbitholedesigns #trhd

Next, I die cut a teal banner using the You've Been Framed Die Set.  I stamped the sentiment from the I Really Dig You Stamp Set and white heat embossed.

I assembled my card using teal cardstock for the base.  I used foam tape to pop up the image and sentiment banner for some dimension!

I Really Dig You Stamp and Die Set illustrated by Agota Pop, Build Your Garden Stencil, You've Been Framed - Layering Dies, Clear Sparkle Enamel Dots by The Rabbit Hole Designs #therabbitholedesignsllc #therabbitholedesigns #trhd

For finishing touches on this card I added white gel pen accents, glitter, glossy accents, and a few Clear Sparkle Enamel Dots!  Thank you and I hope you enjoyed my card today!

For more inspiration, updates, and news make sure to check out these places:

One Layer Scene: Penguining

I love making a one layer scene card but they take some thinking. For today’s card I’ll show you how I came up with the little scene and I share how I could have done better as well.


The Penguining stamp set from The Rabbit Hole Designs is so stinking cute! I just love it. Who doesn’t love penguins?


Snowy Night Scene - Penguining Stamp Set

Hello crafty friends and welcome back to the blog; it's Rick back with you again today to share a little more inspiration with you.  Today I am sharing a fun night scene card that I created using the Penguining Stamp Set illustrated by Tatsiana Zayats for the Rabbit Hole Designs.  I started this snowy night scene out by stamping the adorable penguins in embossing ink onto a piece of black cardstock.  I then covered them in white embossing powder and heat set.  After that was done I cut masks for each penguin and masked them off.   

Night Scene Card with the Penguining Stamp Set by Rick Adkins

I then took the Cat Eye Stencil and turned it on it's side and die a little ink blending with a hybrid ink in three or four different colors.  I did the ink blending very lightly so that it would look like the northern lights.  I then colored my penguins with some colored pencils and added some snow mounds in the background along with some snow falling and some trees covered in snow. 


Night Scene Card with the Penguining Stamp Set by Rick Adkins

 Remember when you are adding snow to your cards make sure to go over your stamped designs.  Snow in nature doesn't fall around things so you have to go over them to make it look realistic.  I hope that you have a wonderful day and I will see you soon. 

Stay Crafty 

Rick 

Revisiting Our Favorites From This Past Year: Peace and Love


All this month we are revisiting our personal favorite cards we've created this past year. Here is another of mine!

 Hello! Today I have a card that is full of golden shine! I used the new Peaceful Bee foil plate set along with the Love-N-Heart die set from The Rabbit Hole Designs to create this pretty card.

I started by hot foiling the flower peace sign onto bristol smooth cardstock. Then coloring the image using Lindy's Gang Magicals in Nuneka's Purple Popsicle, High Maintenance Magenta, Prima Donna Purple, Sea Mint Green and Ponderosa Pines Olive. I then added splatters to the cardstock panel in the same colors I used for the peace sign.


Once it was dry, I adhered on the gold LOVE letters that I had saved from a previous project.


I then trimmed my panel to 4.20x5.45, adhered it to gold mirror cardstock measuring 4.23x5.48. Then adhered that onto a white top folding A2 sized card base. 

Here are the links to The Rabbit Hole Designs Products I used to create this card:

https://therabbitholedesigns.com/collections/dies-stencils/products/peaceful-bee-hot-foil-plates

https://therabbitholedesigns.com/collections/dies-stencils/products/love-n-heart-die

Thanks for visiting! 


A Gingerbread House or a Penguin House

Today's card is a fun unique shaped card featuring the Sweet Christmas stamp set and Peguining stamp set form The Rabbit Hole Designs. 


The background of this card was ink blended and then stenciled with the Tastes Like Honey Stencil.


Mahalo

  Hi everyone!  Amy here with you today sharing this card featuring the Aloha - Pineapple Stamp Set illustrated by Agota Pop.

Aloha - Pineapple Stamp and Die Set, Spring Floral #1 Paper Pack, You've Been Framed - Layering Dies by The Rabbit Hole Designs #therabbitholedesignsllc #therabbitholedesigns #trhd

I started this card by die cutting a piece of patterned paper from the Spring Floral #1 Paper Pack with the largest die from the You've Been Framed - Layering Dies.  I then used the smallest frame die from the same set to die cut a piece of white cardstock on which I wanted to place the images.

Next, I stamped out these awesome pineapple images from the Aloha - Pineapple Stamp Set.  I colored the images with copic markers, and cut them out using the coordinating die set.

Aloha - Pineapple Stamp and Die Set, Spring Floral #1 Paper Pack, You've Been Framed - Layering Dies by The Rabbit Hole Designs #therabbitholedesignsllc #therabbitholedesigns #trhd

I stamped the sentiment, which is from the Aloha - Pineapple Stamp Set, directly onto the white cardstock with black pigment ink, and clear heat embossed for some shine!

I assembled my card using metallic gold cardstock for the base under the patterned paper so it can be seen through the die cut frame.  I used foam tape to pop up the images for some dimension!

Aloha - Pineapple Stamp and Die Set, Spring Floral #1 Paper Pack, You've Been Framed - Layering Dies by The Rabbit Hole Designs #therabbitholedesignsllc #therabbitholedesigns #trhd

For finishing touches on this card I added accents with a white gel pen, glitter, glossy accents, and a few Clear Sparkle Enamel Dots.  Thank you and I hope you enjoyed my card today!

For more inspiration, updates, and news make sure to check out these places:

Easy Happy Anniversary Card

 Hello and welcome back to the blog; it's Rick and I am back to share another one of my favorite cards with you from this year.  Today I am sharing one of my favorite stamp sets from the Rabbit Hole Designs illustrated by Kelly Taylor.  If you don't know I am a big fan of her work.  My card today is an anniversary card that I created using her first stamp set; Lovely Lilies.  It was a must have for me as I am sure most of you feel the same way.  

Lovely Lilies Anniversary Card by Rick Adkins


For my card I actually die cut glitter cardstock using the Falling Leaves Dies and pressed them into the background cardstock using my die cutting machine.  I then stamped and colored the liles and cut them out with the coordinating Lovely Lilies Dies before attaching the bouquet to the card base.  I then simply added the Happy Scripty Word Die and a sentiment from the Happy Scripty Stamp Set to finish off the card.


Lovely Lilies Anniversary Card by Rick Adkins

Thanks for dropping by today I hope that you have a wonderful day!  

Stay Crafty 

Rick 

A Favorite From 2023!


Hi! This month we are revisiting our favorite creations of this past year. One of my favorites is this cute card I created using the Sea-ing is Believing stamp set and Making Waves stencil! 

Below you will find the link to my original blog post showing exactly how I created it! 

https://laurenzrdh.wixsite.com/queenlorecreations/post/sea-ing-is-believing


Here are the links to The Rabbit Hole Designs Products I used to create this card:

https://therabbitholedesigns.com/collections/stamps/products/sea-ing-is-believing-4x6

https://therabbitholedesigns.com/collections/dies-stencils/products/making-waves-6x6-stencil

https://therabbitholedesigns.com/collections/crafters-essentials/products/bitty-bunny-blending-brushes


Thanks for visiting! 


Nothing Like a Rainbow of Presents

 Hello and welcome back to the blog; It's Rick back with you again today and I am sharing one of the first cards that I designed as a member of the Rabbit Hole Designs Design Team.  For this card I created a rainbow wreath of presents using the present image from the Baby's 1st Christmas Stamp Set designed for Agota Pop for the Rabbit Hole Designs.  

rainbow wreath christmas card by rick adkins 2


With this card design I started out my stamping and masking each set of the presents to create the wreath.  And no even with an art degree I can not draw a straight line or a perfect circle without help.  So, circle die to the rescue.  I just traced the outline of the circle to know where to line up each set of the presents.  Then I did some rainbow ink blending over the entire thing and added some shading to each set with coordinating colored pencils.  Then I added a simple outline to the wreath with a cool gray alcohol marker.  Easy peasy!  


rainbow wreath christmas card by rick adkins

To finish off the card i added the sentiment by masking off the christmas from the stamp set and heat embossing it with white embossing powder and added the Happy Scripty Word and Shadow Die to finish it off.  

I hope that you have a wonderful day and a fabulous weekend.  

Happy Stamping and crafting 

Rick 

A Sweet Cupcake

This card was one of my favorites that I made during the year. I realized that I started with The Rabbit Hole Designs Design Team in May of this year and I've made a lot of fun cards. 

What a fun card to give to a friend. 


I stamped the background of this cardstock with a candy cane and white heat embossed. 
The cupcake was colored with copic markers.