Pages

Showing posts with label Watercolor Background. Show all posts

Create Colorful Christmas Cards in a Flash

Hello and welcome back to the Rabbit Hole Designs Blog; it's Rick back with you today with a fun and festive Christmas Card Idea using the Baby's 1st Christmas Stamp Set.  I know that a lot of you may have your holiday cards all ready to go plus some may have started sending them out.  But if you're like me and in need of another idea that's quick and easy I have you covered.  

Baby's 1st Christmas Stamp Set, Rabbit Hole Designs, Rick Adkins, Train, Ink blended Card

Like I said this card is super easy and actually depending on how you choose to embellish it could be mass produced rather quickly. Okay, so this is the deal. You will need to pick a red blue and yellow ink color that's water reactive. Pull out your CottonTail Blending Brushes or even your Bitty Bunny Blending Brushes and slap down the three primary colors onto your Bristol smooth or watercolor cardstock where you are planning on stamping your focal image. Let the three primary colors overlap a little; but the blending doesn't have to be perfect. So, if you are not the best at ink blending no worries. Make sure you add enough ink to cover your chosen stamped image.

Baby's 1st Christmas Stamp Set, Rabbit Hole Designs, Rick Adkins, Train, Ink blended Card

Now the magic can happen! Spritz the ink with a little water and take a large flat brush and swipe through the ink. This will soften and blend the ink together. You want the ink to run a little that's okay. Next you are going to dry your cardstock panel completely. Once you have the panel dried stamp your focal image in the colored area. I picked the train from the Baby's 1st Christmas Stamp Set and added a few extra cars at the end of mine to extend the train a little. Make sure to stamp the image in a darker ink and something that want smear with your chosen color additive (markers or colored pencils). I stamped mine in Versafine Clair Nocturne Ink but stamped it off once to make it just a little lighter.

Baby's 1st Christmas Stamp Set, Rabbit Hole Designs, Rick Adkins, Train, Ink blended Card

Next I added some slight shading with a warm gray marker to the engine and box cars to give them a little more life. And then added a little glitter to sections of each with a glitter pen. I then added some snow below the train and sprinkled around the sky. All I had to do then was to stamp my sentiment in a coordinating ink color. I picked the Merry Christmas from the Poinsettia & Pinecones Stamp Set for my sentiment today but you can use any of the wonderful sentiments from your collection of Rabbit Hole Designs stamps.

Baby's 1st Christmas Stamp Set, Rabbit Hole Designs, Rick Adkins, Train, Ink blended Card

To finish off the card all I had to do was mat my inked panel with coordinating cardstock (or even pattern paper would work) and added it to my A2 (4 1/4" x 5 1/2" folded) Card Base.

I hope this post has given you another idea to add to your crafty arsenal. Whether you're making cards to brighten someone's day or as a creative outlet for yourself; having a fun technique to use for quick cards is a game changer.

Remember, it's all about experimentation and finding what resonates with you. And don't forget to share your creations on social media and tag The Rabbit Hole Designs to spread the card-making love.

Thanks for dropping by today I hope you have a wonderful day and that you found this post helpful. You can find all the supplies that I used on today's cards on my blog post by clicking here!

You can find me on the following Social Media Channels with more crafty inspiration: 
I hope that you have a crafty day.  For more inspiration, updates, and news make sure to check out these places.  


Have a crafty day!
Rick 
Quick Watercolor Backgrounds

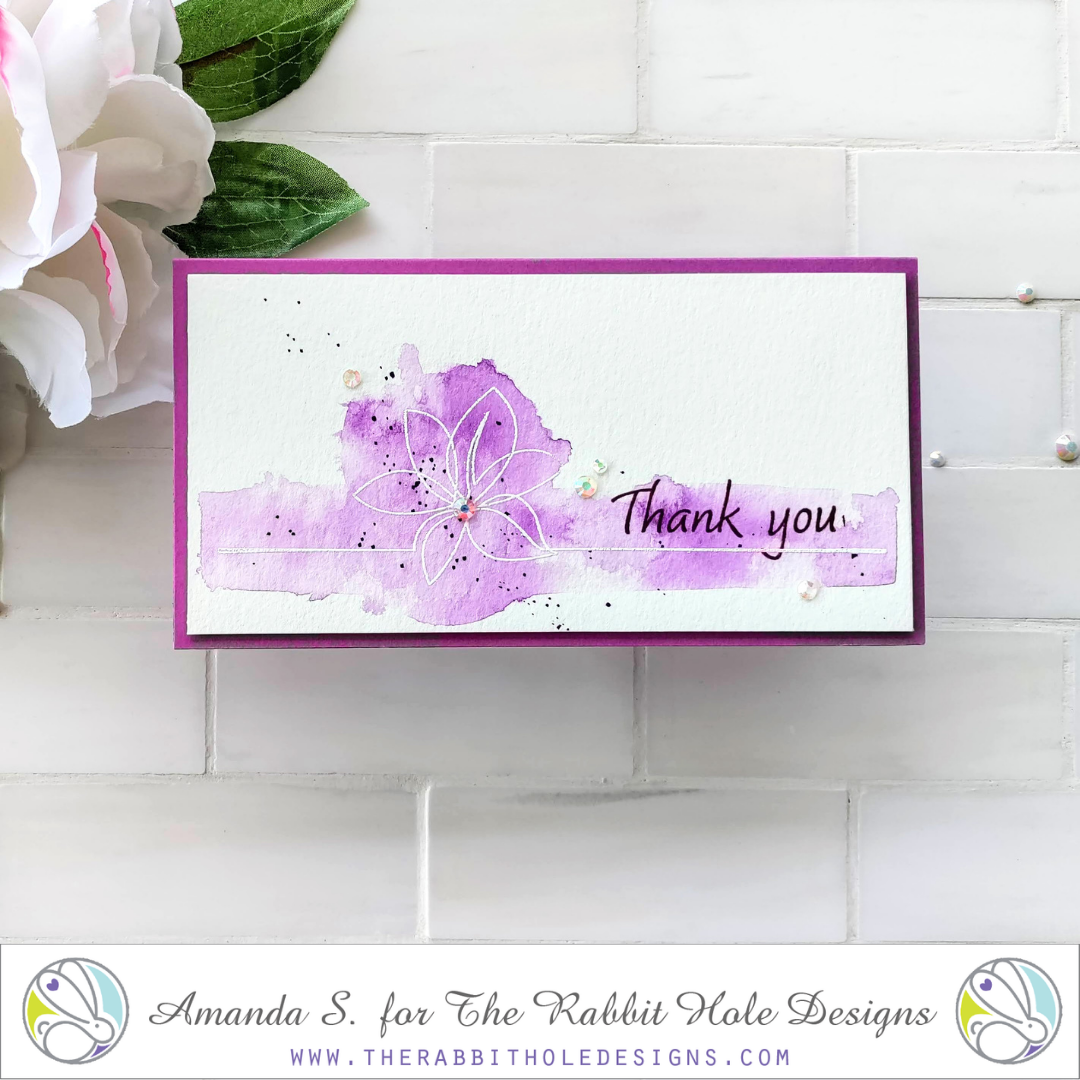
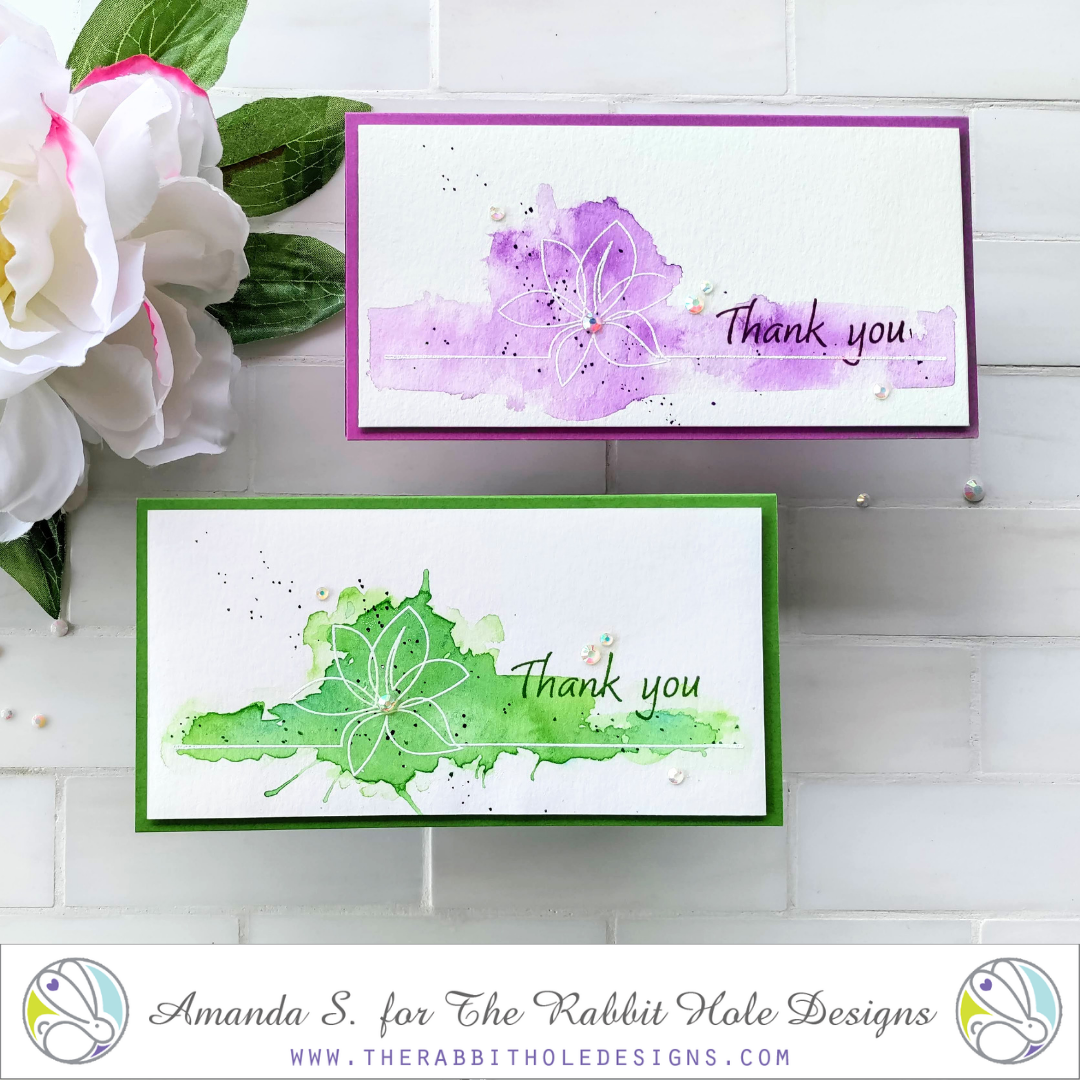
Hey crafty friend, it's Amanda from Pear Blossom Press again. Do you have any stamps in your collection that you just don't know how to color? Or maybe you're looking for an easy way to add color to a card, without actually having to color? Try this!

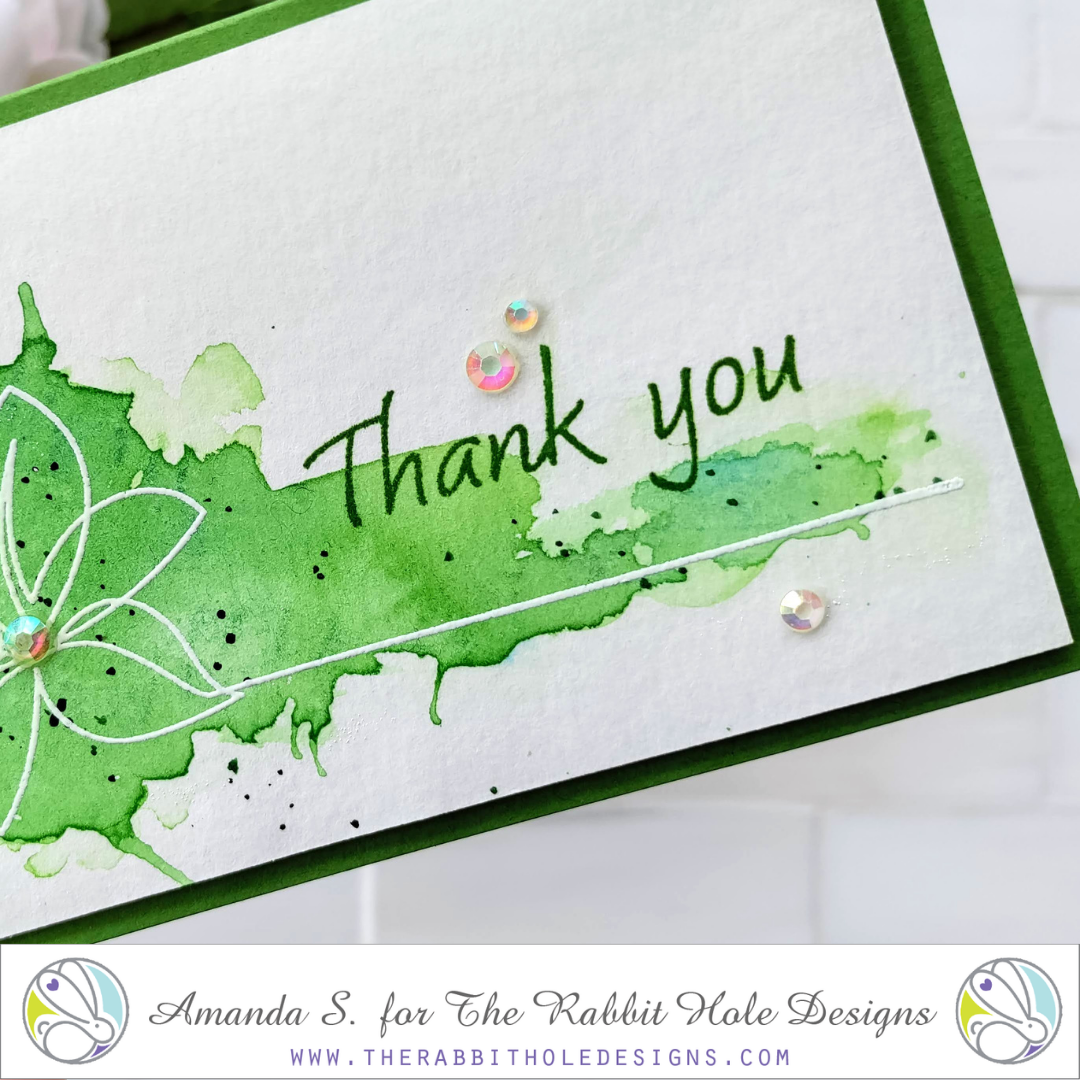
Simply paint a little watercolor onto a panel in roughly the same size and shape as your stamp. If you paint on clear water first, you can achieve a nice wispy look. I like to add concentrated splatter for more interest. After it dries, stamp your image on top and emboss it with white powder. If your sentiment will stand out enough, you can emboss it too. Or you can stamp it in coordinating dye ink like I did with these panels.

This is a great way to create quick and easy cards, without having to actually color. It works for clean and elegant images like the 1 Line Flower I used in today's cards, as well as intricate images (that would take hours to color). Once your panels are dry, turning them into cards only takes a few minutes. Simply trim them down and pop them up on coordinating card bases with foam tape. Add a few gems for sparkle. I love the way these mini-slimlines turned out, and I always need thank you cards, so these are great to have on hand.

Thanks so much for stopping by today. Head on over to my blog for more photos and links to all of the supplies I used in these cards... pearblossompress.com And make sure to swing by tomorrow for the new release celebration! See you then!

For more inspiration you can go to these places:

Extra Bouncy Today

Hello everyone!


It's Niccole from Nic & Viv Designs back again to share a card I made using one of my favorite stamp sets from The Rabbit Hole Designs.

For today's card I used the 


How to create this card:
  • Water colored my Back Alley Stencil onto my card base
  • Stamped my sentiment from Caffeinated Kangaroo
  • Splattered some more water color onto my background for added texture
  • Stamped and water colored my Kangaroo and fussy cut him out
  • Glued him to my card front
  • Applied my enamel dots


Here is one more picture of the full card ...


TRHD products used:


For more inspiration, updates, and news make sure to check out these places:


I have had so much fun playing with the Caffeinated Kangaroo Stamp Set and Back Alley Stencil.

Thank you so much for stopping by and spending some time with me.

Until next time ... Hugs & inky fingers! -Nic-

My Magical Elixir


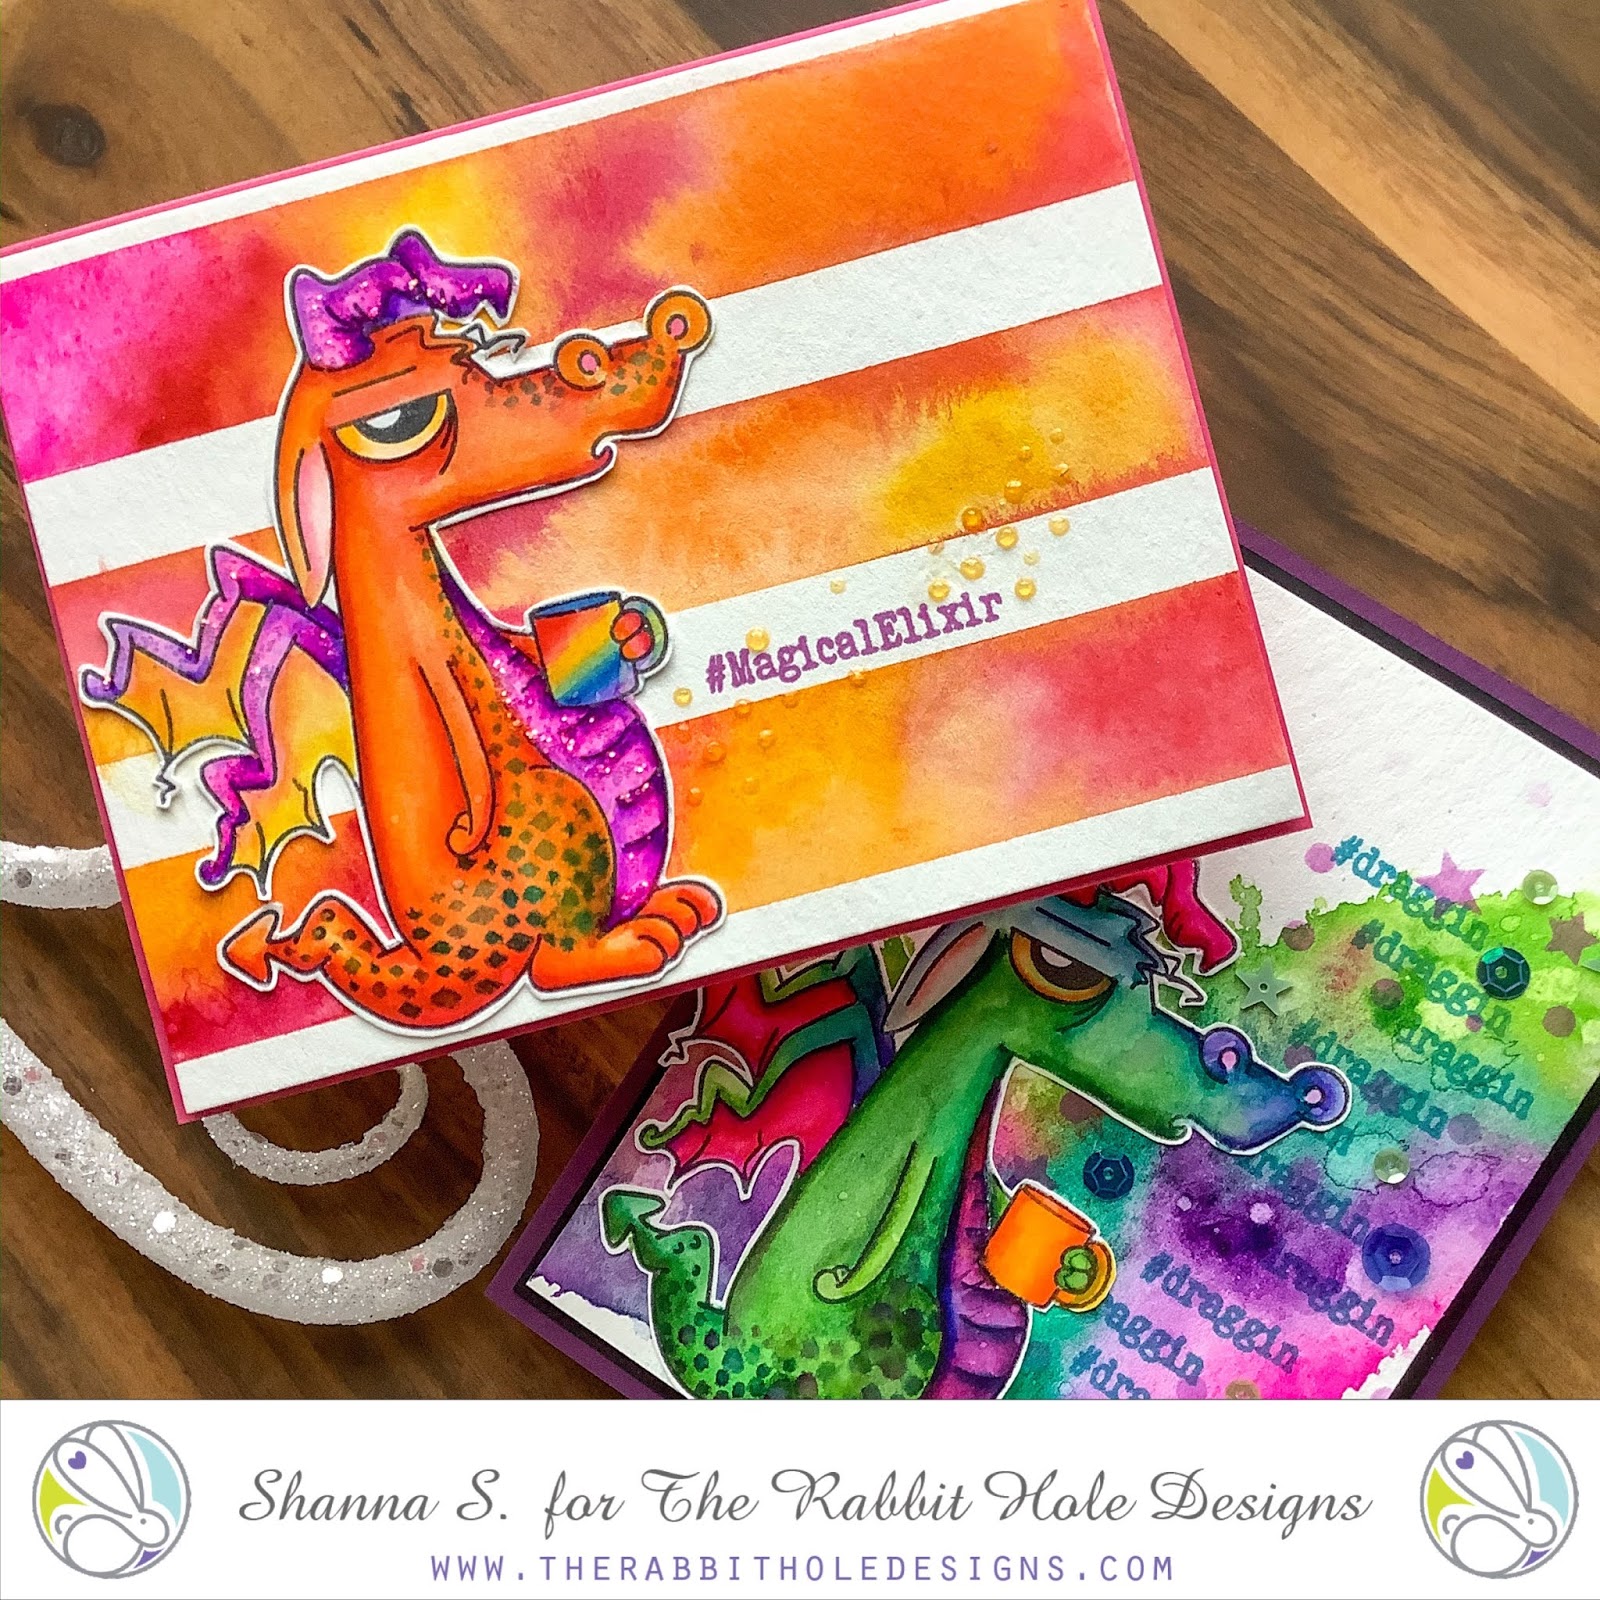
Hello Rabbit Hole Designs Fans!! DTM Shanna here today with another caffeinated card featuring my new favorite Caffeinated Critter, Caffeinated Dragon!  
I can't seem to stop coloring this guy!  He is so fun to color up in ANY color combo!  I have 2 cards here today that I watercolored with my Zig Real Brush pens. 


My first card was colored in dark, rich jewel tones for a fun and dramatic effect.  I added extra scaly-esque detailing to the belly and underside for a bit of texture.  The background was watercolored onto an A2 panel of cold press watercolor paper using my Jane Davenport pan watercolors.  Such vibrant colors! LOVE!


My second card I flipped from cool-tones to warm-tones and reached for my oranges and reds.  I still added some scaly type texture, but chose more of a diamond shape to repeat this time. 


I think I love this one even more, which is hard for me to say!  The background was watercolored similarly to the first card's...but I first masked off stripes to create a patterned paper.


Which one is your favorite!?!  Any color combo you want me to do next??  I will ask in the Facebook group, and be sure to let me know!  


That wraps up my post for today, I will be back soon for another trip down The Rabbit Hole!  Until then you can find me over on my blog, Caffeinated Craftiness or over on Instagram-Shanna

For even more inspiration, updates, and news make sure to check out these links.

Born to be a Unicorn!


Hello and welcome TRHD fans!  Shanna here today to share another fun card using one of The Rabbit Hole Designs newest releases, Sassy!

I have a soft spot for Unicorns...Fun fact: I used to collect unicorns as a child!!  I have been coloring up these Sassy unicorns like crazy!  They are addictive!


I wanted to play around with my metallic watercolors, so I created a shimmery background for my unicorn.  I love the glimmer it came out with!
To ground my image some, I pulled out the new Candy Twist stencil and some opaque matte distress paste from Ranger.  That paste gives a slight peek of background color through it, but still dries fairly white.  I just stenciled a small area on the bottom right corner, adding some interest.  
I wanted a soft look to my unicorn, so I opted for no line coloring and some muted watercolor tones using my Zig markers.  Just dreamy!
I opted to heat embossed my sentiment in gold, but embossed “unicorn” 3 times to give a really smooth and raised appearance.


This week has been full of AMAZING projects with the new release!  Have you had a moment to hop yet??  If not, there is still time!  Here are some links to get you started!


Or just visit The Rabbit Hole Designs blog and check it all out there too!!
You have until 11:59 PST TONIGHT to hop for a chance at the prizes! Good luck!!

As always, thanks so much for stopping by!  See you all soon!
~Shanna

For even more inspiration, updates, and news make sure to check out these links.

Shell We Meet Again by Niccole


Hello everyone!!! It's Niccole from Nic & Viv Designs back again to share another card I made using one of The Rabbit Hole Designs stamp sets. Have I told you how much I love love their stamps??  LOL - I know I say it all the time, but it's true! I LOVE their stamps! I still pinch myself knowing I am a guest designer for them this month.  

For today's card I used the By The Shore stamp set.  It is one of the newly released sets for June. 


How to create this card:
  • White A2 card base
  • Watercolor background, glue to card base
  • Die Cut circles in white card stock
  • Stamp mini clouds and sentiment to white card stock
  • Attach white card stock to water-colored background with foam tape
  • Add die cut clouds to white card stock
  • Water color stamped image
  • Fussy cut stamped image
  • Attach water-colored girl to card front with foam tape


TRHD Products Used:


For more inspiration, updates, and news make sure to check out these places

The Rabbit Hole Designs YouTube

I have had so much fun playing with the By The Shore stamp set this month. Thank you so much for stopping by and letting me guest design. I hope our paths cross again soon!

Until next time ... Hugs & inky fingers!   -Nic-


Never Enough Glitter...


Hey crafty friends, it's Amanda from Pear Blossom Press again! So how much bling is too much for a card? Lol, I'm the wrong person to ask ;) This card is completely covered in shimmer and shine and I love it!

To create this card, I started by stamping, embossing, and watercoloring the images in the Mermaid Hair stamp set. Then I cut them out with my ScanNCut, leaving a narrow white border. After they were cut out, I added a healthy coat of Aqua Shimmer to the images.

For the background pieces, I sprayed heavyweight watercolor paper with Glimmer Mist, then sprinkled on Color Burst watercolor powders. It's easier to gauge how much powder to apply if you sprinkle it onto wet paper and you will also get a grittier look because the powders don't dissolve and mix as much. I made sheets in yellow, green, purple, red, and a blue/green/purple mix. You could use water for this instead, but the Glimmer Mist leaves a nice shimmery finish.


Once the pieces were dry, I used dies to cut out the castle pieces and a pair of stitched hillsides from the yellow. I cut the word thanks and a bunch of seaweed pieces from the green. I cut the flags, starfish, and shells from the red and purple sheets. I used a wonky stitched rectangle die to cut the blue/green/purple background piece. I also used it to cut the sand and castle pieces where they touched the edges so they'd have the same stitched details. I added another layer of sparkle by applying green glitter paste to all of the green pieces, including the mermaid's tail.


While the paste was drying, I die cut a wavy banner and an A2 sized stitched rectangle from blue cardstock. I also cut two more layers of the word thanks from scrap cardstock. I stamped a sentiment from the Sassy Sentiments stamp set onto the banner and embossed it with white powder. I glued the green word thanks to one of the scrap ones, and then glued it to the banner. I glued the third layer of thanks to the back, sandwiching in the banner where it overlapped. This gave me a stronger finished element.


I used a combination of glue and foam to layer the sand, castle, and seaweed to the background. I added the sentiment, starfish, and shells to the scene, then popped the mermaid and fish up with foam tape. I glued the blue rectangle to an A2 card base, then glued the scene to the card with a thin layer of foam sandwiched in between. To add even more bling, I glued on a few sequins and then covered them with Diamond Glaze. I added more Diamond Glaze to the mermaid's tail, the bubbles next to her, and all of the fish.


Every layer of this card has shimmer, glitter, or shine. I think it's pretty fabulous too. So what do you think, too much? Not enough? Let me know in the comments below. If you'd like links to the specific products I used, head on over to my blog for the sister article.

Thanks for stopping by today; I'll be back soon with another fun card!

What does the Fox say??


Hello everyone! My name is Shanna from Caffeinated Craftiness....and I am a lucky girl to be guest designing this month for  The Rabbit Hole Designs....and can I just say how FUN this company's stamp sets are!!  Holy moly, I can't get enough of their Caffeinated Critters line for sure, they are my newest addiction!

In the newest release, this adorable under-caffeinated fox was released, and he quickly became a favorite of mine.  So few stamps for me come across as both masculine and feminine, but I think this fox slides right in!

TRHD Fox GD-4


I have been totally inspired recently by all of the hand drawn backgrounds/scenes by all the fabulous designers in the card making community, I wanted to try my hand at it too!  I am by no means a technically trained artist, but I love trying new things, and ended up having a fantastic time with this card!

I used my Zig Real Brush markers for the entire card, I love how easily they blend and move on the paper when working them with a small round watercolor brush. it's almost magical.

TRHD Fox GD-5

My Fox is just waking up to a glorious sunny morning, but he isn't quite feeling it yet...he needs COFFEE!!  I used the perfect sentiment from the newly released Perfectly Blended sentiment set....Foxes are always scheming, but this guy requires some caffeine first!  (I am right there with him every morning!)

Here are the stamp sets I used:

    Image may contain: text


For more inspiration, updates, and news make sure to check out these places.


As always, thanks for stopping by!! See you all again soon!!
~Shanna


So-fishticated Stamp Set

Hi there, Martha Lucia with  you today!
I’m back highlighting the So-fishticated stamp set, one of my favorites sets for this season.


The base and second layers of the card are whisper white card stock. I just cut the second layer a little small.

Directions:
1. Cut the card base using whisper white card stock. The size of my card is 4-1/4" x 11" with score in 5-1/2".
2. Cut the second layer. The size that I used is 4"x5-1/4".
3. Splatter the second layer with Fireworks. I used the colors Bahama Blue and Paris Dusk. If you are not familiar with the Fireworks, they are the same quality of the memento ink but liquid and with shimmer touch.
4. Let the paper dry or speed the process with a heat tool.
5. Stamp the sea horse included on the Sofishticated stamp set using Memento Tuxedo Black Ink.
6. Color the image with Alcohol Markers and fussy cut it with the scissors.
7. Cut a circle border using Violet /Gold Glossy Rinea Foiled Paper.
8. Paste the circle over the sprayed area and stamp a sentiment inside of the border with Memento Tuxedo Black Ink.
9. Paste the main image using double sided foam tape.
10. Finalize the decoration adding some aqua sequins.


Check out my Stampartpapel Blog to see more inspiration using these fabulous stamps from The Rabbit Hole Designs. Thanks so much for stopping by!

So-Fishticated Nuvo Shimmer Powder Background


Hi, everyone! It's Lynnea Hollendonner and I have a video showing how to create a simple shimmery background with Nuvo Shimmer Powders! I used a heat embossed image from the So-Fishticated stamp set and a resist technique!


How - To

  • Heat emboss jellyfish image from the So-Fishticated stamp set. 
  • Apply water and Nuvo Shimmer Powders to build up the color in the background - drying with a heat tool in between layers to prevent muddled colors. 
  • Stamp and white heat emboss sentiment on strip of black cardstock and adhere with foam tape. 


Products Used


For more inspiration, updates, and news make sure to check out these places


Thanks for hanging out with me today! I hope you enjoyed this video tutorial! 

So Jelly it's your Birthday with Katie

Hello!  Katie here and I am thrilled that this is my first post as part of The Rabbit Hole Designs!

I have a bright and colorful card today featuring the Sofishticated stamp set.


To make this card, I started with a piece of 4 X 5.25 watercolor paper.  I stamped the jellyfish imaged multiple times on the sheet using Versamark and then used white embossing powder and heat set them.  Next, I added a variety of Lindy's Magicals over the paper and then spritzed the paper with water.  I frequently dried the wet sheet with my heat gun and added more until I achieved the colors and look I wanted.  


Next, I added the black bubbles and sentiment to the card front.   the sentiment.  I mounted the card onto a sheet of white cardstock just 1/8 of an inch larger on the two sides.  This I mounted onto a black A2 sized card, to draw pull out the black of the bubbles and sentiment. 


Supplies Used: 

Sofishticated 


For more inspiration, updates, and news make sure to check out these places:

Thanks for visiting me for my inaugural post, I hope you enjoyed it!  Feel free to visit my blog as well.  ~Katie