Pages

Showing posts with label Pull Tab. Show all posts

Inking of You Pull-Tab Card

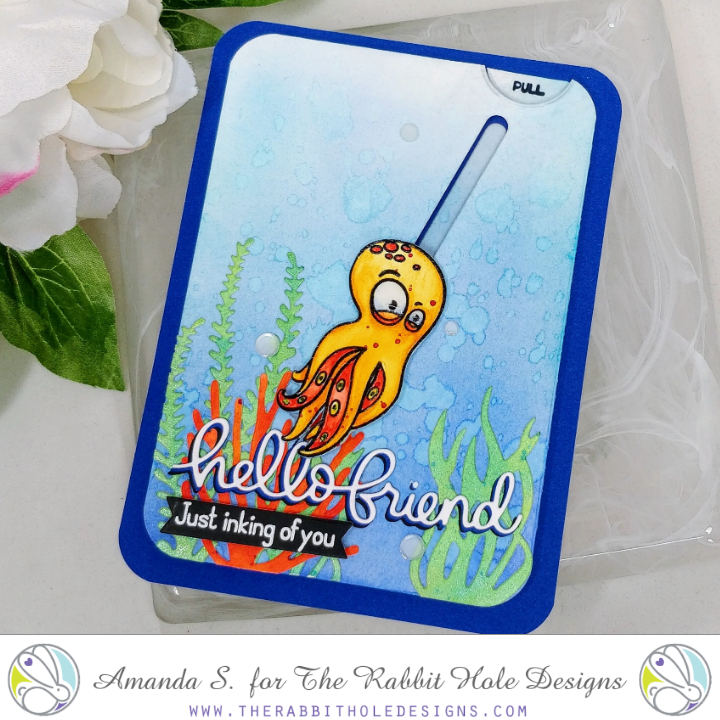
Hey crafty friend, it's Amanda from Pear Blossom Press back with another fun, interactive card! I've wanted to make this card since I first saw the new Inky stamp set. The set has three adorable octopi, several punny sentiments, and a pair of ink blots. I thought it would be really fun to have an octopus on a pull-tab, and have an ink blot under him, that only becomes visible as it swims away.
See what I mean? Isn't it cute?! I love the punny sentiment, combined with the ink blot. This card was pretty simple to make too. To start, I created an A6 card base from white cardstock. I cut blue and white panels to layer on top. I ink blended Chipped Sapphire and Mermaid Lagoon Distress Oxide Inks onto the white panel with a makeup brush, fading the color out almost to white at the top. I splattered on water to lift some color, then trimmed ½" from the top and side. I used a corner rounder to shape the edges of all three pieces.

Next, I stamped, embossed and watercolored my octopus. Then I cut him out with my ScanNCut. I painted a large scrap of watercolor paper with green and orange watercolor and die cut several pieces of seaweed from the green, and a piece of coral from the orange. I stamped and embossed my sentiment onto black cardstock and die cut it with a fishtail banner. I also die cut "hello friend" from white, blue, and black cardstock, gluing them together slightly offset.
Once I had my embellishment pieces cut out, I laid them out onto the ink blended panel and decided on placement for my slider track. I used a small slider die and a circle die to cut the track and finger notch into the panel, reserving both pieces that I cut out. Before I assembled the sliding mechanism, I stamped and embossed the ink blot onto the panel. Then, I glued the seaweed, coral and hello friend sentiment flat to the panel. At this point, I glued the solid blue panel to the card base, then lined up the ink blended panel and used it as a guide to glue the reserved piece cut out with the slider die. (That way the track would have the ink blended piece behind it, and you wouldn't see a big dark blue line.)

To assemble the sliding mechanism, or pull tab, I flipped the ink blended panel over and added double thick foam tape around the edges and inside, leaving a gap for a 1" x 4" strip of acetate over the track. (I left the release paper on the outer layer of foam tape because I wasn't ready to stick it to the card yet.) I used a powder tool on the sides of the track and the foam near the acetate strip, so it would be able to glide freely. I glued the reserved finger notch piece to the top of the acetate, making sure it lined up evenly with the top of the inked panel. I stamped and embossed "pull" on it. With the acetate strip slid down the track, and the pull tab lined up with the edge of the panel, I glued a Slider Element (looks like a plastic Tic Tac) to the acetate at the very bottom of the track. Then I glued the top of the octopus' head to the element. This locks the octopus to the front of the panel, and the acetate strip to the back, so I could remove the release paper from the foam tape and stick the panel to the card. I made sure to line it up so the track was right over the piece I'd already glued down. To finish the card, I popped the banner sentiment up with foam tape and glued on a few white sequins. To add a little more shine to the card, I covered the eyes and sequins with a coat of Diamond Glaze.


So what do you think? Pretty cute, right? I hope you love the new Inky set as much as I do because I have a bunch more ideas for it! If you'd like to see another set of fun cards I made with this set, check out Liquid Shaker Cards. You can also find the sister post to this on my blog today with links to the specific products I used to create this card. Hop on over for more inspiration! I'll be back soon with another fun card.


Adding Motion to the Caffeinated Flamingo

Hello crafty friend! It's Amanda again and today I've got a quick and easy way to add some movement to your cards with a simple lever. This is one of those techniques that is much easier to watch than explain, so I've put together a video for you here...

In the video, you saw me stamp out the Caffeinated Flamingo and use her for my focal point. I also used the back of the Caffeinated Crab for the island on my ink blended background. I chose Copic markers to color the flamingo, as well as the tropical die cut pieces used to build the scene; I like the vibrant colors and blendability I get with them. To help the sentiment stand out, I embossed it on a black strip with white powder.

My card front was cut out with a stitched rectangle die and I added a thumb notch to it, as well as the A2 card base, with a stitched circle die. I cut the pull tab and sentiment strip with stitched dies to carry the theme through on all of my pieces. I used a clear piece of acetate to make the second part of the lever so it would blend into the background as much as possible. My ScanNCut is my favorite tool for fussy cutting, but before I could cut out the flamingo and arm, I needed to make sure I prepped my images by adding lines with a Copic Liner (0.3) and whiting out unwanted areas with a paint pen.

To attach the lever pieces together, I used mini brads. You can make thin fasteners from paper, but brads are fast and easier. In order to accommodate the thickness of the brads, I popped my card front and flamingo body up with foam tape. To finish the card, I added some shimmer and shine with several glitter products, and a clear glaze on her eye.

So what do you think of her? Do you have any stamps you can add motion to? Is the Caffeinated Flamingo in your stash yet?! I'd love to know how you add interactive elements to your cards. Be sure to tell me in the comments below...And until next time my friend, stay crafty!