Pages

Sofishticated Window card with MaryAnn


Good Morning

Today I am up on the blog and I want to share a semi easy to make card with you that features the newest images from
The Rabbit Hole Designs set So-Fishticated

This is another card technique straight from Jennifer McGuire it is a technique to create an acetate window card.


Card Recipe
  • While I would love to give a tutorial and instructions I suggest you really watch Jennifer McGuire's video in the link above. I will list the items I used to make the card below
  • Distress Oxide ink in Abandoned Coral, Tattered Rose, Hickory Smoke, and Spun Sugar for the stencil and coloring of the fish and stamping of the coral on the inside of the card.
  • Versafine Clair in Morning Mist for the sentiment and the Fish with clear embossing powder applied heat set.
  • Acetate from my stash for the clear panel
  • Neenah Classic Crest Solar white in 110lb (card base) and 80lb for the stenciled panel and fish.
  • Tiny foam dots to pop up fish on front panel.
  • Iridescent dots from my stash for bubbles
For more inspiration, updates, and news make sure to check out these places.

That is all for me today.  I hope I have inspired you to maybe give this technique a go and create some fast and easy cards.
~
Thank you for falling down The Rabbit Hole for a few minutes!
MaryAnn
~

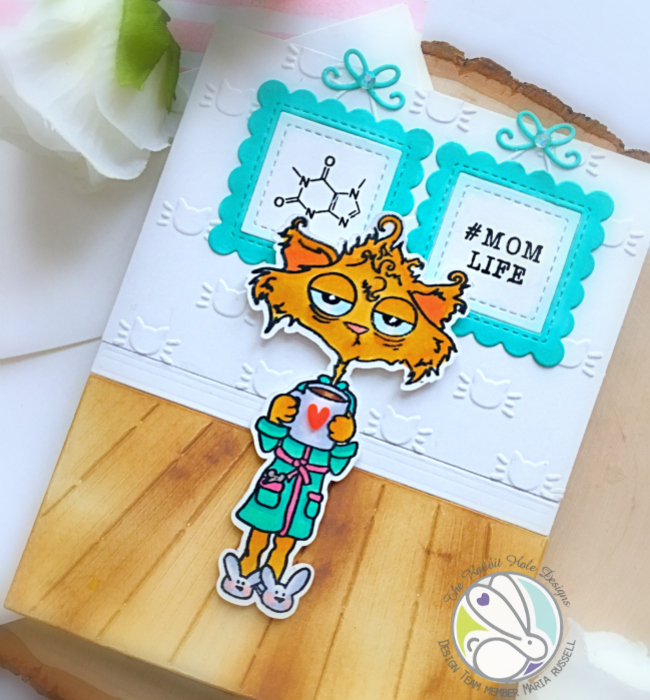
Caffeinated Cat with Maria


Good morning my crafty peeps!  Maria here on the blog with you today.  I am so excited to share with you my very first post as a design team member of the The Rabbit Hole Designs.  They have recently launched a couple of stamp sets and I ordered a few of them because I fell in love with the design.  

For my project today, I am showcasing the Caffeinated Cat 3x4 stamp set.   When I saw this stamp, I knew I just had to have it.  Honestly, what is not to love?  I adore cats, I love coffee and I love being a mom!  Okay to be honest I used to feel like this cat when my kids were little, haha! and I had a full-time job too!  I don't even know how I survived those days; I guess I had lots and lots of coffee!
Here's how I made the card:
  • Stamp the image on Neenah solar white card stock (or any card stock you have in  stock) with alcohol friendly ink.
  • Color the image with alcohol markers (or any coloring medium of your choice).
  • Either fussy-cut or die-cut the image using an electronic die-cutting machine. For mine, I used my Scan N Cut 2.
  • Die-cut a piece of Neenah solar white card stock using the wood/floors dies and ink it up with gathered twigs distress oxide ink to make it look like wooden panels.
  • Cut another piece of white card stock and use embossing folder to create the "wallpaper".
  • Adhere the floor, the moulding and the "wallpaper" on an A2 size card base.  Cut the excess.
  • Die-cut the little decorative frame and little bows on some colored card stock and stamp the sentiment and image on both. Adhere the frames with liquid glue.
  • Adhere the Caffeinated Cat image (ahem, star of the show!) in the middle of the card with foam adhesive to give it dimension.
  • Add the heart embellishment on the coffee cup.
  • Add Sparkling clear jewels and bow on the decorative frame to finish the design.

Everything about this cat just makes me giggle!   The tired look on her face, the bunny slippers and the robe!   I think we can all relate.  Here's a closer look:

trhdcaffeinatedcat1b

That cat wallpaper just added more cuteness to the whole design, don't you agree?  The mom cat looked tired but her house is spotless!

trhdcaffeinatedcat1c

What do you think of my card?  Does it make you want to have a cup of coffee?   You guys really need to grab this stamp set while you can.


For more inspiration, updates, and news make sure to check out these places.


If you are looking for further details about my project including supplies used, I would be so grateful if you can stop by my blog today at:


I hope I have given you some inspiration to create something beautiful today.  Have a wonderful day and happy crafting!


Winners and Thank You


Winners and Thank You

We want to say thank you to everyone who joined us for the second half of our launch; it was another success. Again, we are so touched by how you all embraced us, welcoming us into your crafty world, we are filled with gratitude. 

February brings exciting things for you and us. The Design Team will start sharing inspiration with you; we can't wait to see what they have up their crafty sleeves. We do have a new release, and we will be announcing the dates for that very soon. 

 We always love seeing your post's of happy mail and projects, so please, keep sharing with us. Be sure to tag us with #therabbitholedesigns @therabbitholedesignsllc on Instagram.

Now onto our winners for Preview Day 1, Day 2, and the Blog Hop.


Preview Day 1 Winner

Peacetokengy


Preview Day 2 Winner

So-fishticated Stamp Set

Shanna Slater


Blog Hop Winner 

Love You More Stamp Set, So-fishticated Stamp Set, and Tim Holtz Stamping Platform.


TrainwithMeghan


Winners email to info@therabbitholedesigns.com to claim your prize.

Again, thank you for the warm welcome!


Heather, and MaryAnn

Love is in the air ~ MaryAnn's project


MaryAnn, from PaperDreamz here to share a really easy to make card with you that features the newest images from
The Rabbit Hole Designs set Love You More

This is a card technique straight from Jennifer McGuire (who does not love themselves some Jennifer McGuire, right!?) When she says in her blog post "I want to make a million of these" she is not lying.  These backgrounds and layout come together so fast and easy that before you know it you have created many.

Card Recipe
  • Create a stamped with versamark watermark ink and clear powder heat embossed background on Neenah Classic Crest White 80lb cardstock using the smaller elements from the stamp set "Don't forget to use your anti-static powder on the panel before stamping" 
  • Grab your favorite blending tools and some inks and set about blending them on the panel any way you wish.  Honestly there is no wrong way here, just go with it!
  • I then stamped the couple with a Copic friendly ink and die cut the panel on a slant.  I found it really easy to do with rectangle dies so I could have a nice finished edge. 
  • I am no pro at Copic coloring of people so I quickly grabbed some markers and gave the stamped image a quick pass with some color. 
  • I thought the couple needed something so I quickly grabbed the sentiments lined them up and gave them a stamp and I was happy.  Now to assembly.
  • To adhere the ink blended panel to the 110lb card base I used Tombow Multi glue in the green bottle. For the couple panel I added 3D mounting foam to the back of the panel and attached to the top left edge flush top and left of the ink blended panel.  To finish off this card some pink confetti sequins and a clear heart shaped drop  that I used some pink glitter glue to adhere to the front, give the card a nice pop of sparkle and shine.
For more inspiration, updates, and news make sure to check out these places.

That is all for me today.  I hope I have inspired you to maybe give this technique a go and create some fast and easy cards.
If you are looking for further details about my project including links to instruction and products not listed please feel free to drop on by my blog
PaperDreamz
Thank you for falling down The Rabbit Hole for a few minutes!
MaryAnn

Design Team Announcement ~ March thru August 2019


Good Morning and welcome to The Rabbit Hole Designs Blog.

Today we have the extreme pleasure of announcing our incredibly talented Design Team for the March 2019 thru August 2019 term. These ladies have a very diverse and creative style that aligns perfectly with the current and forthcoming stamp sets The Rabbit Hole Designs has in the works.

We hope you will take a minute and visit their blogs and give them a follow.
~


Heather ~ Owner at The Rabbit Hole Designs
MaryAnn ~ Owner at The Rabbit Hole Designs
~
Maria ~ Design Team Member at The Rabbit Hole Designs
Amanda ~ Design Team Member at The Rabbit Hole Designs
Lynnea ~ Design Team Member at The Rabbit Hole Designs
Martha ~ Design Team Member at The Rabbit Hole Designs
Katie ~ Design Team Member at The Rabbit Hole Designs
~


For more inspiration, updates, and news
 make sure to check out these places.