Pages

Guest DT Marcia

We are pleased to bring you a 2nd project from our April 2019 Guest Design Team member Marcia Caradinta aka TheFrolickingFairy

We sent Marcia the Caffeinated Crab and think she nailed it with her project.


This post wraps up Marcia's Guest Design team with us! 

Until next month when we welcome another Guest DT. Make sure to check out these awesome places for more inspiration, updates, and news

Thank you so much for stopping by today!

Grateful for Family


Welcome back to the The Rabbit Hole Designs blog!
It's Lisa here with you today and I have a 
sweet card to share with you using the We Are Family stamp set.
I've been loving what the design team has been doing with this
stamp set by using both the mom and dad on a card at the same time.
I thought I'd give it a go for this card.
I'm so glad I did because they are just darling together!

I started out by making a rainbow blended background through
a fun stencil.  I used a black scalloped heart to break up the busy pattern
and to really make the colors pop.
The sentiment from the stamp set "So grateful you are my"
was almost perfect for this card but since I wanted a family
themed card, I searched through my stash of sentiment stamps
until I found the word family.  It was the perfect addition!
 I stamped it on white paper and matted it in black.
I popped the family and sentiment up on foam tape over the heart
and my sweet card was done.
I love how it came out and I hope you do too!


For more inspiration, updates, and news make sure to check out these links.

Have a great day, I already am!
❤️Lisa ❤️

Under the sea card by Martha Lucia

Hi friends, Martha Lucia with you today! I am featuring the stamp set So-Fishticated from The Rabbit Hole Designs and I created an under the sea stamped card. Take a look at my card:


The base if my card is Rain Bazzil Basics card stock a great textured card stock. I cut a second layer using whisper white card stock a little smaller. I inked an acrylic blog to stamp with Pool Party Classic Ink and placed it centered over the whisper white layer to have the inked background. I also stamped some of the plants included on the So-Fishticated stamp set on the lower part of the inked area. I masked the area to keep all the stamped images inside of the inked box.


Then using the Ruffle Dynamic Embossing Folder, I created the waves and pasted the decorated layer directly over the card base. In a separate piece of whisper white card stock I stamped one of the fish include on the stamp set So-fishticated with Memento Tuxedo Black Ink and colored it with alcohol markers Studio 71 and copics. I fussy cut the image with my scissors and pasted it over the decorated layer with double sided foam tape.


As final touch, I added some aqua sequins from the Sparking Wintergreen Mix sequins from Kat Scrappiness.

Thank you for joining me today and let me share my under the sea stamped card with the one of the stamp sets available in The Rabbit Hole Designs.

If you want to see more details about my card and the products that I used you can find them all HERE in my Stampartpapel blog.

SoFishticated Zentangle


Hey crafty friends, it's Amanda with Pear Blossom Press again! Today, I've got a fun zentangle card for you. If you're not familiar with the term, let me explain. It's the art of doodling, or drawing tiny repetitive patterns within the lines of a bigger image or scene. For those of us who love to doodle, but wouldn't consider ourselves great artists, the Sofishticated stamp set is the perfect way to get started! It is full of gorgeous underwater creatures drawn in zentangle fashion. (And some great sentiments too.) You can use these images as focal points for your own zentangle scenes, like I did.

For this card, I started by stamping my images with black ink, then I used my stitched hillside dies as guides to draw in the wave lines around the images with a Copic liner. You can freehand that part, but I wanted to make sure my lines curved in the same places. Next, I filled in the waves with little doodles and patterns. (Don't be intimidated by this; think dots, scallops, Vs, swirls, and crosshatched lines. This is the fun part!)
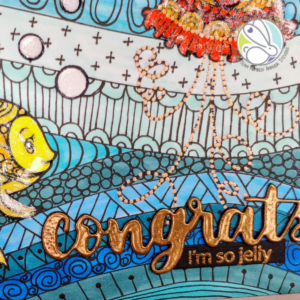
Once the patterns were all filled in, I used Copic markers to color the waves and images. Then I glued the scene onto a blue A2 card base. For the sentiment, I stacked the die cut word, Congrats, several times and added a layer of copper embossing powder on top. I stamped the smaller sentiment onto a strip and embossed it with the same powder, then glued them in place. Details on the fish were added with white, gold, and copper gel pens. I try to save anything with a long dry time as the last thing I add to a card, so I'm less likely to smear it. So for my final touch, the fish and bubbles got some extra pizzazz with an Aqua Shimmer pen and a coat of Diamond Glaze (the most challenging of all things to photograph).

Are you a doodler? Have you tried any zentangle art yet? This card was a ton of fun to create, but I never would have given it a try without the Sofishticated stamp set to get me started. I have several more ideas for different scenes that I can't wait to try! I hope you'll give it a try too and let me know what you think.

If you'd like links to other specific products I used for this card, you can find them on the sister post here. I'll be back soon with another fun card. Until then my friend, thanks for swimming by and I'll SEA you soon!

Best Day Ever


Hello The Rabbit Hole Designs fans!  Maria here on the blog with you with you today!  I am so looking forward to seeing my children next month and be able to spend some quality time with them.  This is my inspiration for today to create this card, showcasing the We are Family stamp set.


CARD RECIPE:
  • Stamp the images on smooth white card stock and color the images in with Copic markers (or any coloring medium of your choice).
  • Die-cut the image with an electronic die-cutting machine or fussy cut with scissors.  I used my Brother Scan N Cut 2.
  • Cut an A2 size piece of Bristol smooth white card stock and use the Drifts and Hills stencil to create the grassy hills with Mowed Lawn distress oxide ink.
  • Use the Winter Wonder background stencil to create the mountain with Pumice stone distress oxide ink.  Cover this with painter's tape to mask the background.
  • Use the Ray of Light stencil to add the sunrays with Fossilized Amber and Spiced Marmalade distress oxide inks.

  • Here's what it looks like when the background is completely finished:

  • Use the distress sprayer to spritz some water on the colored background and dab it dry with some paper towel.
  • Adhere the colored background on an A2 size side-fold card base.
  • Adhere the colored images on the card with Nuvo liquid adhesive and some foam adhesive.
  • Die-cut the sentiment using the Best Day Ever fri-dies and adhere to the foreground with liquid glue.

Here's a little close-up:


I absolutely ADORE this stamp set.  


If you are looking for further details about my project including supplies used, I would be so grateful if you can stop by my blog today at:


I hope you like my card today.  Happy crafting!

For more inspiration, updates, and news make sure to check out these places.