Pages

Let's Get Twisted with Frames

Hello friends! Welcome back to the blog. Today's card features the new Balloon Animals #2 stamp set and coordinating dies.

Card details:

  • Cut two black frames with the You've Been Framed dies. Nest the middle and smallest rectangle dies together to create a frame.
  • Use the frames as a guide to mask off two tilted rectangular areas on an A2-sized white panel. Blend the Pinwheel stencil in both areas in light pink and blue inks. Attach the black frames to outline the blended areas and trim off excess frames.
  • Stamp and die-cut the image from Balloon Animals #2. Color with alcohol markers and add white gel pen details. Attach to card.
  • Stamp sentiment along the edge of one of the frames. Attach A2 panel to a card base. Add sequins to finish off the card.


Thanks for visiting!

Amrita

You can find me on IG @amritapettus

For more inspiration, updates, and news check out these awesome places! 


The RHD Affiliate Disclaimer:

We want to ensure transparency and honesty in our interactions with you, our valued readers. Please be aware that the links provided on The Rabbit Hole Designs Blog may be affiliate links. This means that if you make a purchase through these links, the project designer may earn a small commission at no extra cost to you. Your support means the world to us!


We kindly request that you accept the tracking cookie for the affiliate websites. Rest assured, this will not expose your computer to viruses or compromise your information. It's a necessary step for the company to attribute the sale to the affiliate, ensuring that creators like our creatives receive their rightful commissions.


Your trust and support empower our creators to continue sharing creativity and inspiration through our blog. Thank you for being an integral part of The Rabbit Hole Designs community!


August 2024 Release Hop


Hello and welcome to the Inspiration Hop. We are excited for you to join us as we present to you our August 2024 release. Our Brand Ambassadors and Special Guests will be sharing their projects, so be sure to visit their blogs and leave them some crafty love.

In this fantastic release we have 2 stamp set (Balloon Animals 1 & Balloon Animals 2 Stamp Sets) with coordinating dies (Balloon Animals 1 Dies & Balloon Animals 2 Dies)! All of which are available to purchase right now in the shop.

The products being highlighted today are:


Thank you so much for being here for our inspiration hop.

You're Amazing!


 Howdy! Lauren here today sharing this quick and easy ombre card! I've been inspired by watching the Olympics to create this red and white (GO CANADA!) card celebrating how amazing the athletes are! 

I started with the Candy Twist stencil and inked blended an ombre effect in shades of red.


I then stamped the sentiment from the new Sentimentally Speaking ink the darked red I used and then die cut it out. 


I added double sided foam tape to the back and adhered it to the ombre panel.


I then added 7clear enamel dots and adhered the panel to a white top folding A2 sized card base to finish my card!


Below you will find links to the products I used, below. Thanks for visiting!


I use affiliate links when I can. This does not add any extra cost to you, but I do receive a small commission which helps keep me creating.
Thank you for visiting!

Candy Twist Stencil: https://shrsl.com/4lw4t

Cottontail Blending Brush: https://shrsl.com/3htkd

Sentimentally Speaking Stamp Set: https://shrsl.com/4lmc6

Sentimentally Speaking Coordinating Dies, The Rabbit Hole Designs: https://shrsl.com/4mpzg


 Howdy! Lauren here today sharing this quick and easy ombre card! I've been inspired by watching the Olympics to create this red and white (GO CANADA!) card celebrating how amazing the athletes are! 

I started with the Candy Twist stencil and inked blended an ombre effect in shades of red.


I then stamped the sentiment from the new Sentimentally Speaking ink the darked red I used and then die cut it out. 


I added double sided foam tape to the back and adhered it to the ombre panel.


I then added 7clear enamel dots and adhered the panel to a white top folding A2 sized card base to finish my card!


Below you will find links to the products I used, below. Thanks for visiting!


I use affiliate links when I can. This does not add any extra cost to you, but I do receive a small commission which helps keep me creating.
Thank you for visiting!

Candy Twist Stencil: https://shrsl.com/4lw4t

Sentimentally Speaking Stamp Set: https://shrsl.com/4lmc6

Sentimentally Speaking Coordinating Dies, The Rabbit Hole Designs

Under Your Spell - Halloween Shaker Card

Hello crafty friends!  Jenn here, follow mw on social media @journeycoachjenn  Today I am sharing this fun interactive halloween card created using five products from The Rabbit Hole Designs. 

I started out with the newly released Pinwheel stencil, an A2 Shaker Acetate Sheet for the infinity shaker, the patented Cotton Tail  Embossing Powder Tool to treat the gray cardstock before heat embossing white cobweb images in the background and the sentiment on the black pumpkin, and images from the Meowgical stamp set. 

Supplies include:

Other  Supplies
OLO Markers
Chunky upper case alphabet letters to spell out "BOO" (from my stash)
Small Pumpkin die (from my stash) 
Purple and Orange sequins (from my stash)
Distress Oxide inks - Villianous Purple and Carved Pumpkin
VersaMark Clear Watermark Ink
White Embossing Powder
Bearly Arts Craft Glue
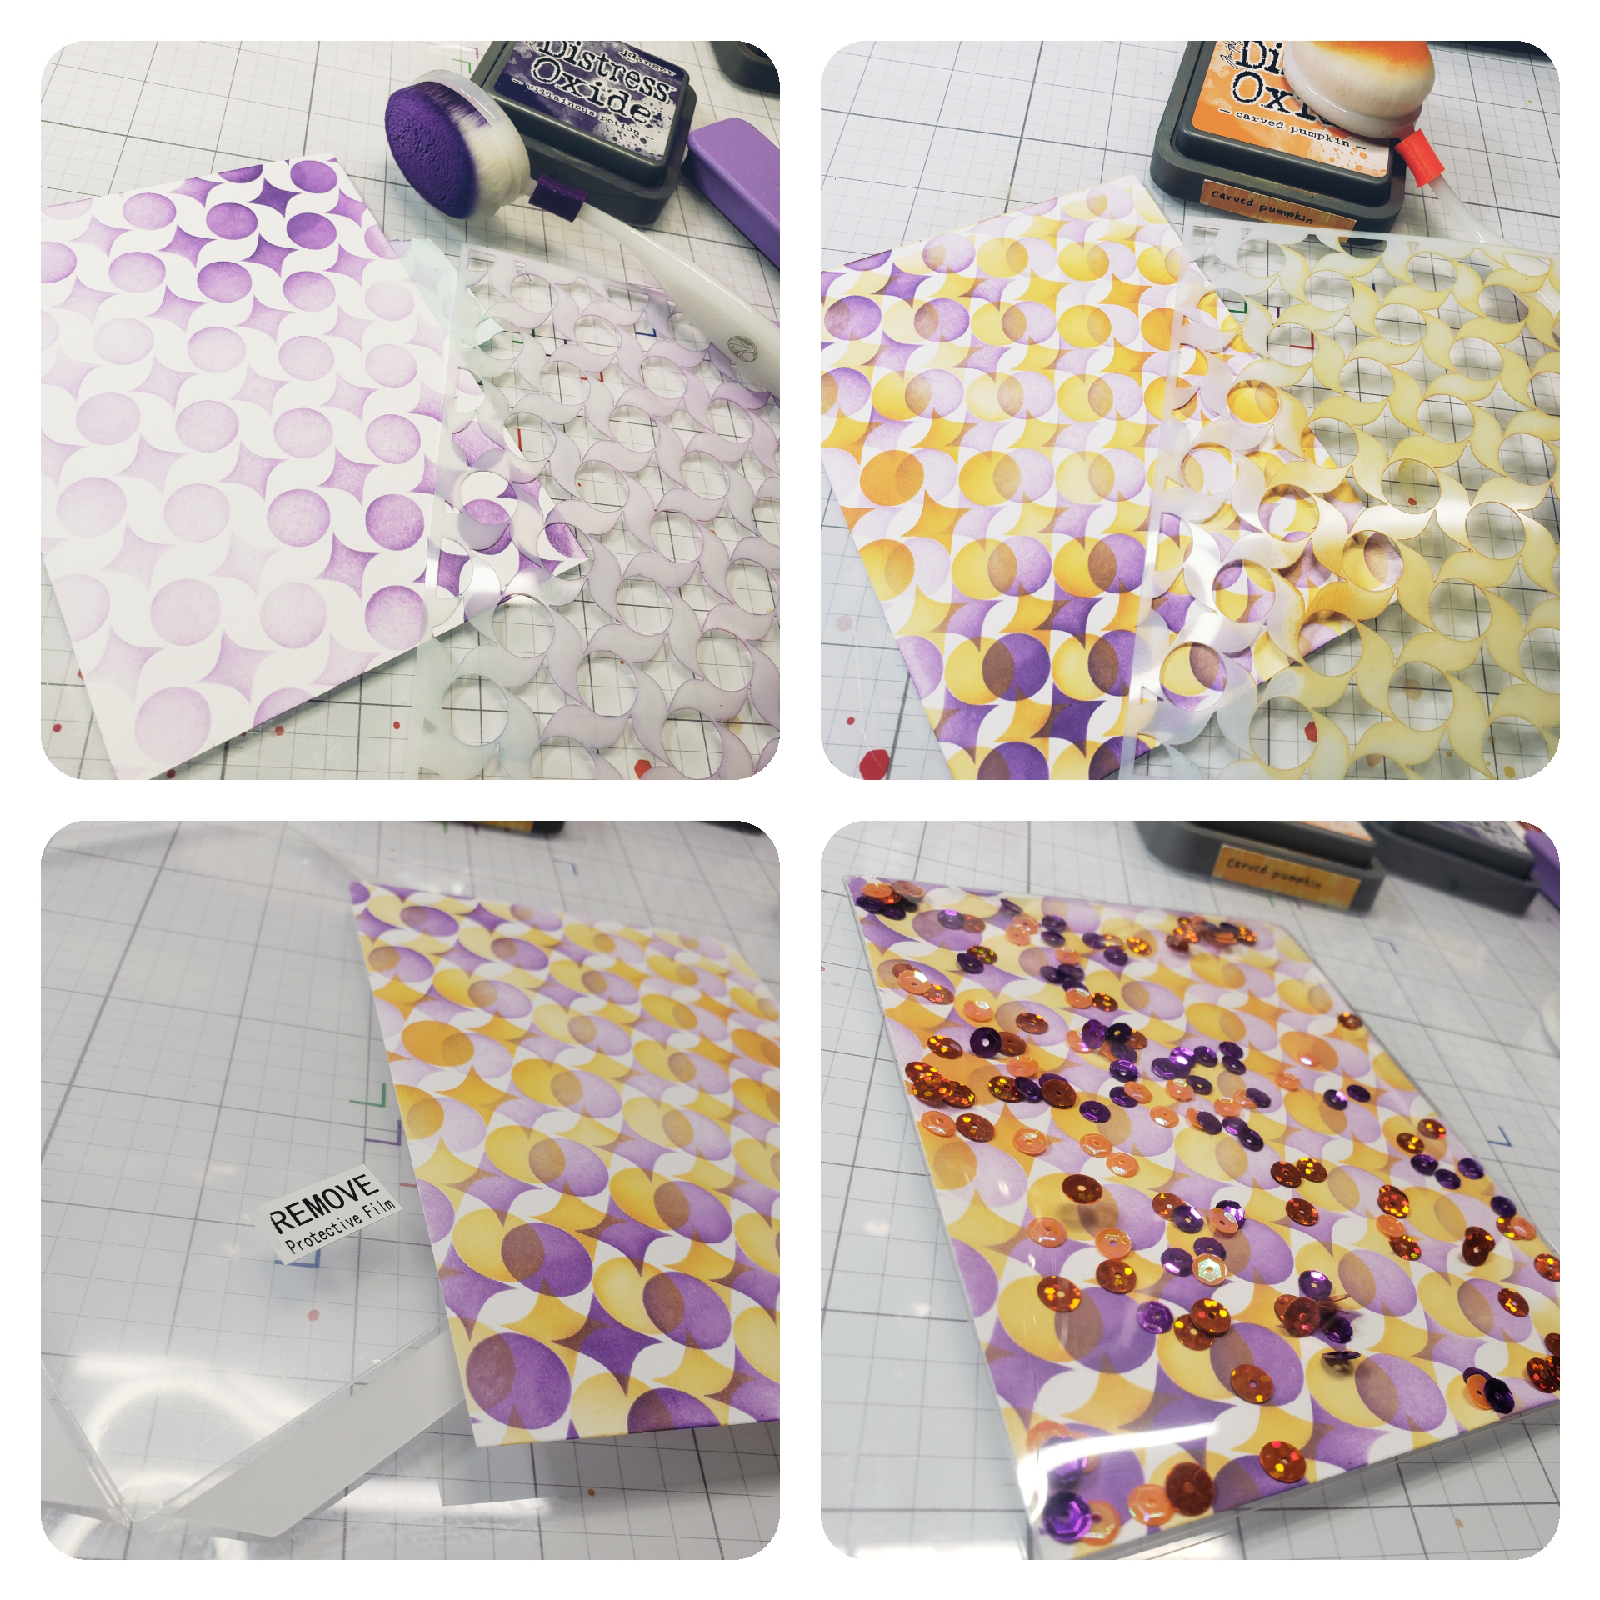
I stenciled a piece of 4 1/8" x 5 3/8" white cardstock using the Pinwheel stencil with Villanous Purple Distress Oxide ink. Clean the stencil and place it over the purple Pinwheels shifting it slightly catching the curve of the stencil circle in the curve of the purple stencil pin wheel.  Stencil it with Carved Pumpkin Distress Oxide ink.

Use one of the A2 Shaker Acetate Sheets and adhere it to three of the four sides of the Pinwheel stenciled background card. Add some purple and orange sequin shaker bits in the pocket and seal the remaining shaker window opening.
Using the Meowgical stamp set (illustrated by Agota Pop), stamp the spiderweb four times on gray cardstock. Heat emboss with white embossing powder. Use die cut alphabet letters from your stash to die cut the word "boo" from the embossd spiderweb cardstock and die cut a second set from black cardstock. Glue the spiderweb letters on top of the black letters off setting them slightly to create a black shadow. Set them aside.

Stamp the cat in the pumpkin.  I colored him with OLO markers using the Orange, Blue Green markers and cut out the image.
I stamped and heat embossed the sentiment  "I purred a spell on you" onto a piece of black cardstock treated with the Cottontail Embossing Powder Tool.   It is stamped with VersaMark Watermark ink and heat set with white embossing powder.  I used a pumpkin die from my stash to cut out the sentiment. Glue on the BOO at the top left side of the shaker card and glue the black  pumpkin sentiment with the kitty in the pumpkin image to the lower right side of the shaker card.  Attach the card to a whit A2 card base to complete the card.

Thank you, I appreciate you taking time from your day to stop by and check out today’s The Rabbit Hole Design project.  I enjoyed sharing the steps to recreate this fun halloween shaker card.  I hope it inspires you to create something lovely today!


Be Creative ~ Stay Inspired

Jenn Gross


Follow me, Journey Coach Jenn, on 

Instagram - https://www.instagram.com/journeycoachjenn/

YouTube - http://www.youtube.com/c/JourneyCoachJenn

Blog - https://journeycoachjenn.blogspot.com/  


For more inspiration, updates, and news make sure to check out these places


The Rabbit Hole Designs

The Rabbit Hole Designs Instagram

The Rabbit Hole Designs Facebook Page

The Rabbit Hole Designs Pinterest

The Rabbit Hole Designs YouTube 

Uplifting Card Design with The Rabbit Hole Designs

Hello, crafty friends! It's Rick here, and I'm thrilled to be sharing a charming project on The Rabbit Hole Designs LLC blog today. This uplifting card features a dynamic background using our Pinwheel 6 x 6 Stencil and a heartfelt sentiment from the Sentimentally Speaking Stamp and Die Sets. This card was such a joy to create, and I'm excited to highlight the beautiful products from The Rabbit Hole Designs that brought this piece to life.


Creating a Vibrant Background

One of the most enjoyable parts of card making is playing with stencils and inks to create unique backgrounds. For this project, I used our Pinwheel 6 x 6 Stencil to craft a vibrant backdrop. I started by ink blending with an orange ink, using my Cotton Tail Blending Brushes to achieve a soft ombre effect. The warm gradient creates a beautiful transition that really catches the eye.

Pro Tip: When working with stencils, securing them with low-tack tape can prevent any unwanted shifting, ensuring crisp and clean lines. For smooth ink blending, start light and gradually build up the intensity—it's easier to add more color than to take it away!


Adding Texture with Dry Embossing

To give the background more dimension, I dry embossed the stenciled panel using the Pinwheel Stencil. This technique involves running the stenciled panel through a die-cutting machine with a tan embossing mat (from my stash). The result is a subtle, raised texture that adds a tactile element to the card.

Aligning the stencil with the previously inked design can be a bit challenging. A handy trick is to use washi tape (from my stash) to hold everything in place, making it easier to achieve perfect alignment.


Assembling the Card

For the card assembly, I trimmed the embossed panel to 3 3/4" x 5" and matted it with a piece of black cardstock (from my stash). This matting layer provides a striking contrast, making the vibrant background pop even more. I adhered the layered piece to a top-folding A2 card base made from white heavyweight cardstock (from my stash), which is perfect for a sturdy base.

Crafting the Sentiment

The sentiment is always a focal point, and for this card, I chose a lovely message from our Sentimentally Speaking Stamp Set. I stamped the sentiment in a rich black ink (from my stash) onto white cardstock. After letting it dry, I used the coordinating die from the Sentimentally Speaking Die Set to cut it out. To give the sentiment dimension, I cut three additional layers from scrap cardstock and adhered them together.

Aligning the sentiment on the card front can be a bit nerve-wracking, but using a T-square (from my stash) helps ensure everything is perfectly straight.


Finishing Touches

To complete the card, I added some White Enamel Dots from our collection. For a cohesive look, I colored them with an orange alcohol marker (from my stash), creating an ombre effect that matches the background. Arranging them in odd numbers around the card adds visual balance and interest.

This card was such a fun project to work on, combining vibrant colors with elegant textures. The products from The Rabbit Hole Designs made it easy to create a design that's both cheerful and heartfelt. I hope this card inspires you to try out new techniques and explore the wonderful possibilities with stencils and dies.

Thank you for joining me on the blog today! If you recreate this card or feel inspired to craft something new, please share your creations. We love seeing what you come up with!


For more inspiration, updates, and news check out these awesome places! 


Affiliate Disclaimer: Some of the links in this post are affiliate links. If you choose to make a purchase through them, I may earn a small commission at no extra cost to you. Thank you for supporting The Rabbit Hole Designs LLC and helping us continue to bring you creative inspiration!