Pages

Galentine's Day Candy Box Card - Step tutoral and pattern


Hello crafty friends!  Jenn here with a fun and sassy Galentine's Day Box Card. I designed and created this book fold box card and have provided the details below.  Each side holds 3 smarties candy rolls. I share the dimensions,  score lines, and details below.

The Rabbit Hole Designs Supplies 
 

Let's get started on the box card
I am using white cardstock to show the details, but I use a pink cardstock to create the actual box. It is cut from a piece of sturdy cardstock to measure 11" long x 4 3/4" wide.

 I scored the short side all the way down the length of the panel at 1/4", 3/4", 4" and 4 1/2"

Turn the cardstock to the long side and score down the width at 1/2", 1", 2 3/4", 3 1/4", 5", 6 1/8", 7 7/8", 8 3/8", 10 1/8" and 10 5/8"
A - The scored piece of 11" x 4 3/4" cardstock will look like this.

B & C - We are creating two boxes, one on each side, so you need  to leave (on the 11" length of the cardstock) two box lids (both on top and bottom) and four side flaps on each side as well. I shaded the areas of the box that need to be removed and cut them out (see photos above). Once the panel is trimmed fold the box and flaps on the score lines.
D & E - To create the box panels inserts,  cut a long strip of printed cardstock 3" wide and 10" long. Cut the following pieces from the strip.
  • Two 1"x 3" panels
  • Four 3/8" x 3" panels 
  • Four 1 1/2" x 3" panels
Lay the panel inserts out on the box. Do NOT add glue yet.  Be sure to leave each far side flap empty as these will be glued to create each box.
Note the placement of the two magnets. They are located on the third panel from each box edge with the magnets in the middle closest to the middle of the box pattern.

F & G - Add a strong piece of double-sided tape 1/2" in from the edge of the third panel and adhere the mini magnet.  Repeat this step on the opposite sides third panel. Use Bearly Arts Craft Glue to glue down the panel insert on this side of the box.  The 1" x 3 " panel inserts are for the middle of the box card and one is for the reverse side.

H & I - Fold one side of the box in on itself and glue the side tab to the inside is the box as show (I).

J - Repeat these steps with the opposite side of the box card.  

K & L - Fold each box lid and box bottom to close the box.  You will have two box side that fold in like a book and are secured with the craft magnets.  Now you can add the card details.
I stamped out two dog images from the Year 5 Birthday stamp set. One is created using mirror stamping technique on a blank red rubber stamp and restamped on coloring cardstock.  Both images are colored with OLO markers creating a brown dog and a gray dog.  I used the Cottontail Embossing Powder Tool to treat red cardstock before stamping the Happy Galentine's Day and Cupid is Stupid sentiments with VersaMark Watermark ink and heat set them with white embossing powder. I cut them into strips. I glued one dog and Happy Galentine's Day to the outside of the closed box card.
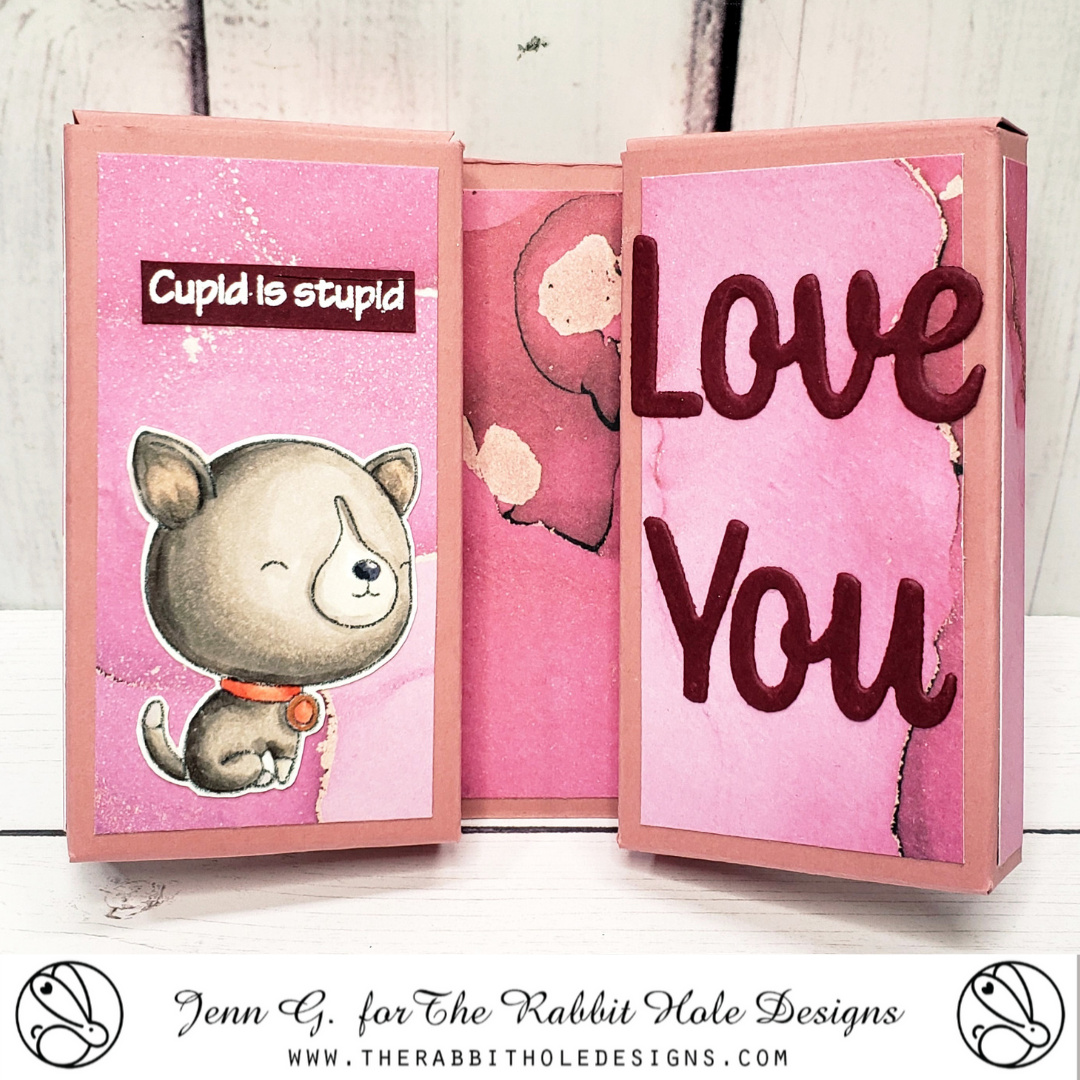
I added the second dog and Cupid Is Stupid sentiment on the left inside panel of the box card.  I die cut the words Love and You and glued them to the inside right card panel.  You can fill each box side with Smartie Candy Rolls, money, or any thing that will fit in a box opening measuring 1 5/8" x 31/8" x 3/8".

Thank you, I appreciate you taking time from your day to stop by and check out this Galentine's Day Candy Box Card.  I hope you are inspired to create something lovely today!


Be Creative ~ Stay Inspired

Jenn Gross


Follow me, Journey Coach Jenn, on 

Instagram - https://www.instagram.com/journeycoachjenn/

YouTube - http://www.youtube.com/c/JourneyCoachJenn

Blog - http://www.journeycoachjenn.com/


For more inspiration, updates, and news make sure to check out these places


The Rabbit Hole Designs

The Rabbit Hole Designs Instagram

The Rabbit Hole Designs Facebook Page

The Rabbit Hole Designs Pinterest

The Rabbit Hole Designs YouTube

Dreamy Little Pup


 Hi! It's Lauren here today sharing this sweet little card featuring the new Naps stamp set illustrated by Agota Pop. 

I used an embossing ink pad to stamp the image onto black cardstock. Then I used the Clouds in My Coffee stencil as a template to help me create puffy clouds.


I then used my colored pencils to color my pup and the clouds.


Once everything was coloured up, I added "stars" using a white acrylic paint pen.


I trimmed my panel to 4.23x5.48 and then adhered it to a white, top folding A2 sized (4.25x5x5) card base. Then I adhered some small star bling from my stash to finish off this cute card.


I had tons of fun creating this card and I hope it inspires you to get coloring! I've linked the products I used below. Thanks for visiting! 


How about an 80's vibe?


Hello crafty friends! 

I am so glad you are here today!  Today I have a throwback vibe for you.  I used colors that made me think of the 1980's.  You know what I'm talking about.  That teal and purple everyone was wearing.  And who didn't have a Charlotte Hornet's jacket for that very same reason?  Isn't it funny how even colors can represent an era?  

I created this card with the set called Naps from TRHD.  I have made and sent so many cards with this adorable set and get compliments on it every time.  I am not the only that loves it apparently.  I used the die "you've been framed" to start off my card then I used the Beam of Light stencil to create this background. Then I stamped the image onto a circle punched cardstock piece.  This allows me to showcase the pup and allow the background to shine.  I finished it off by placing several enamel dots on the card.

Thanks for stopping by today!

 I challenge you to recreate this. Make sure to tag me @craftwithme101 and The Rabbit Hole Designs on Instagram if you do. 

For more inspiration, updates, and news make sure to check out these awesome places! 


Sending Some Love Your Way

 Hello crafty friends it's Rick back with you again today sharing another love themed card idea with you using the Cupid Clarence Stamp Set.  Today's card features the left over foil from the last card that I shared with you.  I ran the foil with the stamped outline of Clarence through my laminator with a toner sheet and attached it to a mat layer.  

Cupid Clarence Foiled Card by Rick Adkins

To finish off the card I simply picked one of the beautiful sentiments from the Cupid Clarence Stamp Set and heat embossed it from a heart die cut I had in my stash.  I then finished it off by adding a few of the Matte White Enamel Dots.  

Cupid Clarence Foiled Card by Rick Adkins

There's nothing like a super easy shiny clean and simple card design.  You could totally do this same design by changing out the foiled background and using just a piece of the Spring Floral #1 or Getting Inky Pattern Papers both from the Rabbit Hole Designs.  I encourage you to think outside the box and recreate a version of this card.  

Thanks for dropping by today I hope you have a wonderful day.  

Happy Crafting 

Rick

Head in the Clouds - Interactive Valentine Swing Card


Hello crafty friends!  Jenn Gross here, with and interactive card using stamps and stencils from The Rabbit Hole Designs, You can also find my projects on IG under @journeycoachjenn.  It seems that love is in the air and in the clouds!

Today I am sharing aninteractive Valentine card.  This swinging cupid card is created with The Rabbit Hole Designs' Cupid Clarence stamp set (a Dusting Pike illustration) I used Cottontail Blending Brushes,  Clouds in my Coffee stencil paired with the radiant die from the You've Been Framed die set for the background.

Let's take a look at how this card is created:
A - I stamp the Cupid Clarence image twice.  I colored the head of one of the images  and the body of the other image using blue violet (BV) Olo Markers.   I fussy cut the colored head and body, leaving about 1/2" of paper above the neck of the body piece to attach Clarence's head with a foam square.  I angle the head at a slight upward angle and secured it to the body.

B - I randomly ink blended a cloud background with the Clouds In My Coffee stencil using Cotton Tail Blending Brushes. and Victorian Velvet, Spun Sugar, Kitsch Flamingo and Wilted Violet Distress Oxide ink on a 4" x 5 1/4' piece of white cardstock.

C & D - Using a standard hole punch, I added a hole 5/8" below the top center of the card front.  I positioned the radiant die from the You've been Framed die set about 1/2' below the hole and die cut the design. 
E - I used the standard hole punch to add a hole on each end of a 2' x 1/2" strip of clear acetate. This will be used for an interactive swing bar.

F - I added small jump rings to  the back of  Clarence's envelope and on the bottom of Clarence's shorts to add a small bit of weight for balance. The jump rings are attached with redline tape and a small piece of paper is glued over the top to secure the jumb rings into place.  I used Gem-Tack adhesive to attach a slider snap on side of the back of Clarence's arrow hand. 

G & H - I let the snap dry in place and attached one hole at the end of the acetate strip over the snap on Clarence's hand and snapped it in place. I snapped the other end of the acetate to the hole on the top of the card and tested the swing movement.  I removed the snap and acetate from the top card hole so I could stamp the sentiment at the bottom of the card.
I & J - I snapped the acetate swing bar to the top of the card front  I used a small cloud die cut from my stash to die cut a cloud to hide the snap attachment at the top of the card.  The cloud is placed over the snap with thick double-sided adhesive foam tape on each side of the cloud.  This space allows the acetate bar to swing freely.

K - I attached the card front to a lilac A2 card base using  double-sided adhesive foam tape completing this fun interactive card. 

Products Used

Thank you, I appreciate you taking time from your day to stop by and check out today’s interactive Valentine card featuring The Rabbit Hole Designs' new Cupid Clarence stamp set.  I hope you are inspired to create something lovely today!


Be Creative ~ Stay Inspired

Jenn Gross


Follow me, Journey Coach Jenn, on 

Instagram - https://www.instagram.com/journeycoachjenn/

YouTube - http://www.youtube.com/c/JourneyCoachJenn

Blog - http://www.journeycoachjenn.com/


For more inspiration, updates, and news make sure to check out these places


The Rabbit Hole Designs

The Rabbit Hole Designs Instagram

The Rabbit Hole Designs Facebook Page

The Rabbit Hole Designs Pinterest

The Rabbit Hole Designs YouTube


Periodic Naps


Hi! It's Lauren here today sharing my card featuring the sweet new Naps stamp set illustrated by Agota Pop Illustration. I just love coloring up this cute pup!

I started by stamping the pup image onto cardstock then coloring him using colored pencils.  


I then trimmed the cardstock using the You've Been Framed Layering Die Set and stamped on the sentiments.


Next, I pulled cardstock from my stash to match the color of the pillow and used the largest die from the set to trim it to A2 (4.45x5.5") size.


I adhered the pup panel onto the colored cardstock then adhered that onto a white, top folding A2 sized card base to finish the card. 


I just love how this card turned out! I hope my card has inspired you to get crafty! I've linked the products I used, below. Thanks for visiting! 


Sending Some Love - Cupid Clarence

Hello and welcome to the blog; it's Rick back with you today to share a super cute little Sending Some Love card using the Cupid Clarence Stamp Set.  Cupid Clarence is a 4 x 4 stamp set designed by Dustin Pike for the Rabbit Hole Designs.  It's a fun little set that you can color up Clarence in any media you would like, and has some sweet sentiments as well.  Some of the sentiments include "love" (which we used on today's card), "Happy Galentine's Day",  "Happy Valentine's Day", " sending some love your way", and the sentiment that I used on my last card "You are a little quirky, but that's why I love you".  So, you can see you can pretty much hit up any occasion with this little love themed stamp set.   Here's a look at the card I designed to share with you today.  

Sending Some Love Cupid Clarence Card by Rick Adkins

For my card today I took and stamped Clarence in his little cupid outfit randomly all over the background in a clear sticky ink and covered it in clear embossing powder.  I then heat set the embossing powder and ran the background through my laminator with heat transfer foil in a nice dark pink color.  I then cut out the panel and matted it onto a piece of black cardstock and placed it on my card base.  I then stamped Clarence onto some alcohol marker friendly paper and stamped him in an alcohol marker friendly coloring ink.  I used my alcohol markers to color him in and bring this cute little cupid to life.  

Sending Some Love Cupid Clarence Card by Rick Adkins

Once I had him all colored up I added some white highlights with my white gel pen and cut him out.  There is the coordinating Cupid Clarence Die available to cut him out I didn't have it when I designed today's card so I had to fussy cut him out.  Which wasn't to bad but if I had to do it over I would use the die instead.  To finish off the card I added my sentiment on a strip of white cardstock and popped both him and the sentiment up.  I then added a small heart die cut from my stash with one of the Clear Sparkle Enamel Dots added to it for a little bling.  

Thanks for dropping by today I hope you have a wonderful day and that you found this post helpful. You can find all the supplies that I used on today's cards on my blog post by clicking here!

You can find me on the following Social Media Channels with more crafty inspiration: 
I hope that you have a crafty day.  For more inspiration, updates, and news make sure to check out these places.  

Monochromatic Card with a very cute little guy


Hello crafty friends!  Happy Saturday!  Today I am sharing a new TRHD new set called "naps".
When creating a color pallet for this card, I wanted to go monochromatic, using inspiration from the old black and white TVs our grandparents had.  I had recently watched a couple black and white movies and appreciated how simple they were.  I used several TRHD to make this card, including the border dies called "you've been framed".  This little guy sleeping on his pillow will always put a smile on my face, every time I see it. I hope you enjoyed this card friends.  It was super easy to put together and I encourage you to try it out for yourself. 

Thanks for stopping by today!
 I challenge you to recreate this. Make sure to tag me @craftwithme101 and The Rabbit Hole Designs on Instagram if you do. 

For more inspiration, updates, and news make sure to check out these awesome places! 


Yappy Birthday! - The Rabbit Hole Designs 5 Year Celebration!


Hello my crafty friend!  Hope your new year is off wonderful start. The Rabbit Hole Designs is celebrating 5 years, Happy Birthday!


Let's get this pawty started and take a closer look at how I created this card!
I started with a piece of 4" x 5 1/4" premium coloring cardtock.  I stamped the image of the dog with balloons in the center using a stamp positioner.  I stamped a second image on a piece of Masking Magic. This is a reusable delicate tack adhesive backed paper used to block of areas on a project. You can either fussy cut the mask image or die cut it using the coordinating dies. I placed over the stamped image on the cardfront.  

I used a low tack sticky mat under the card front to hold it while I ink blended the background with pink and purple Distress Oxide inks.  I placed the Mid-Century Modern #2 layering stencil, the starburst layer, over the top of the ink blended card front.  It is a 6x6 stencil and grips to the sticky mat over the A2 card front.  For this technique you can use a damp baby wipe or damp paper towel to daub over the starburst openings.  Daubing the slightly damp cloth will lift off some of the ink color on the blended background.  When you remove the stencil, you will see the starburst shapes show up lighter on the background.
I moved the card front from the sticky mat to a splatter box and a proceeded to add splatters of white ink using a paint brush and slightly diluted white liquid ink.
I pealed off the Masking Magic and colored the birthday balloon dog image with OLO Alcohol Markers.
I die cut the Happy, Birthday, and You Scripty Word and Shadow Layer dies from pale pink cardstock. I used the "Y" from You to replace the "H" in Happy making it read "Yappy Birthday" for the sentiment. I glued the sentiment into place and added Clear Sparkle Enamel Dots to the front of the card.  The finished card front is attached to an light pink A2 card base.

The Rabbit Hole Designs Products

Thank you, I appreciate you taking time from your day to stop by to celebrate 5 year with The Rabbit Hole Designs.  I hope you are inspired to create something lovely today!


Be Creative ~ Stay Inspired

Jenn Gross


Follow me, Journey Coach Jenn, on 

Instagram - https://www.instagram.com/journeycoachjenn/

YouTube - http://www.youtube.com/c/JourneyCoachJenn

Blog - http://www.journeycoachjenn.com/


For more inspiration, updates, and news make sure to check out these places


The Rabbit Hole Designs

The Rabbit Hole Designs Instagram

The Rabbit Hole Designs Facebook Page

The Rabbit Hole Designs Pinterest

The Rabbit Hole Designs YouTube