Pages

Showing posts with label Cardmaking. Show all posts

Whimsical Camping Adventure Card: Glamping with Tailette & Tenting with Tailette Stamp Sets

Hello, fellow card makers! Rick here, bringing you another whimsical project for The Rabbit Hole Designs Blog. Today, I’m excited to share a fun and unique card design that combines the charming Tenting with Tailette and Glamping with Tailette Stamp Sets. This project is perfect for those who love a bit of adventure and whimsy in their card making. The process involves some delightful masking techniques to make our focal images pop, and I have a few pro tips to help you along the way! 

Tenting with Tailette & Glamping with Tailette Card by Rick Adkins flat lay view


The Inspiration Behind the Card

I’ve always enjoyed the idea of combining different stamp sets to create a cohesive scene. The Tailette character is irresistibly cute, especially when she's roasting an acorn by the campfire or peeking from behind a stack of logs. This card design was inspired by a recent camping trip, where we spent our evenings around the fire, sharing stories and roasting marshmallows. I wanted to capture that cozy, adventurous spirit in a card that could be perfect for any occasion.

Tenting with Tailette & Glamping with Tailette Card by Rick Adkins

Stamping and Coloring:

I began by stamping the adorable Tailette characters and the campfire on alcohol marker friendly cardstock using alcohol marker friendly ink from my stash. Coloring these images with my favorite alcohol brush markers was such a relaxing experience! 

Pro Tip: Always stamp your images first and then color them. It’s easier to correct any stamping mistakes on a blank piece of cardstock rather than one you’ve already spent time coloring.

Tenting with Tailette & Glamping with Tailette Card by Rick Adkins Front View

Building the Background: 

For the background, I used the a set of nesting arches dies from my stash to create a mask with masking paper. This allowed me to do some ink blending within a specific area of the cardstock, giving it a defined and clean look. Using two different muted blue inks from my stash created a soft, dreamy sky.

Next, I added some texture and depth with the Falling Leaves Stencil. Blending a lighter and darker green ink over the stencil gave a lovely leafy pattern that complemented the outdoor theme perfectly.  I then took the Falling Leaves 6 x 6 Stamp and stamped over the ink blended background to add a details to the leaves.

Pro Tip: When ink blending, start with lighter colors and gradually build up to the darker shades. This helps in creating a smooth transition and avoids harsh lines.

Tenting with Tailette & Glamping with Tailette Card by Rick Adkins Side View

Creating the Card Base: 

I dry embossed a piece of ivory cardstock using a leaf embossing folder from my stash. To add a bit of definition, I brushed the edges with one of the green inks I used for the ink blending. This panel was then adhered to a top-folding A2 card base.

Pro Tip: Dry embossing adds a beautiful texture to your cards without much effort. If you don’t have an embossing folder, you can achieve a similar effect with stencils and an embossing pad.

Tenting with Tailette & Glamping with Tailette Card by Rick Adkins Over Head View

Layering the Elements: 

Once my ink-blended panel was dry, I attached it to a piece of green cardstock for a nice contrast.  The fun part was arranging the focal images. The campfire went in the background with liquid glue, while the Tailette images were popped up with Foam Adhesive for a bit of dimension.

Finishing Touches: 

The sentiment “I’d be lost without you” was heat embossed on a scrap of the same green cardstock. Adding a subtle shimmer to certain parts of the stamped images so that they would catch the light beautifully.

Tenting with Tailette & Glamping with Tailette Card by Rick Adkins

Creating this card was such a joy, and I hope it inspires you to combine different stamp sets and techniques in your own projects. Masking and layering can seem a bit daunting at first, but with a bit of practice, it opens up so many creative possibilities.

Don’t forget to share your creations and tag us at The Rabbit Hole Designs—we love seeing what you come up with! Until next time, happy crafting and enjoy every creative moment.

Warmly, Rick

For more inspiration, updates, and news check out these awesome places! 


The RHD Affiliate Disclaimer:

We want to ensure transparency and honesty in our interactions with you, our valued readers. Please be aware that the links provided on The Rabbit Hole Designs Blog may be affiliate links. This means that if you make a purchase through these links, the project designer may earn a small commission at no extra cost to you. Your support means the world to us!


We kindly request that you accept the tracking cookie for the affiliate websites. Rest assured, this will not expose your computer to viruses or compromise your information. It's a necessary step for the company to attribute the sale to the affiliate, ensuring that creators like our creatives receive their rightful commissions.


Your trust and support empower our creators to continue sharing creativity and inspiration through our blog. Thank you for being an integral part of The Rabbit Hole Designs community!

Crafting Adventures: Glamping with Tailette Stamp Set & Dies

Hey there, Rabbit Hole Designs family! Rick here, thrilled to bring you another charming project today. We’re diving into the wonderful world of crafting with The Rabbit Hole DesignsGlamping with Tailette Stamp Set & Dies. If you’re a fan of the great outdoors, you’re in for a treat. So grab your favorite beverage, settle in, and let’s get started!  

Glamping with Tailette Camping Card by Rick Adkins Over Head View

Creating a Whimsical Glamping Scene: 

I’ve always found solace in combining my love for crafting with the beauty of nature. The Glamping with Tailette Stamp Set & Dies offers the perfect opportunity to blend these two passions. Let’s embark on a crafting journey that captures the essence of the great outdoors.

Glamping with Tailette Camping Card by Rick Adkins Side View

Stamping and Coloring Techniques: 

Using The Rabbit Hole Designs’ Glamping with Tailette Stamp Set, I stamped out the adorable Tailette image and charming pine trees. Coloring these images was a breeze with alcohol markers from my stash. 

Pro tip: When coloring, start with light layers and build up for depth and dimension.

Die-Cutting for Precision: 

Thanks to The Rabbit Hole Designs’ Glamping with Tailette Dies, cutting out our stamped images was a breeze. These dies ensure clean, precise cuts every time, elevating the overall look of our project.

Glamping with Tailette Camping Card by Rick Adkins Front View

Background Blending: 

To create a dreamy backdrop for our glamping scene, I turned to my stash of inks. Blending soft clouds and lush grass with my chosen ink colors; which will added depth and dimension to our card.

Layering Patterns and Textures: 

Choosing the right pattern papers is key to creating a cohesive look. I reached for a camping themed paper pad from my stash to add texture and interest to our card front. The layering of patterns brings our glamping scene to life.

Glamping with Tailette Camping Card by Rick Adkins Close Up View

Assembling the Card: 

With all the elements in place, it’s time to assemble our card. Adhering Tailette and the pine trees with foam adhesive adds dimension and visual interest. A final touch of stamped images on the inside completes the look.

Finishing Touches and Final Thoughts: 

And there you have it—a charming glamping-themed card that’s perfect for any outdoor enthusiast. I hope this project inspires you to get creative and capture your own outdoor adventures in card form. Until next time, happy crafting!

Glamping with Tailette Camping Card by Rick Adkins

Thank you for joining me on this crafting adventure! Don’t forget to share your creations and tag us on social media. And if you haven’t already, be sure to check out The Rabbit Hole Designs for more amazing crafting supplies. You can find a full list of supplies on my blog Happy crafting!

Rick

The RHD Affiliate Disclaimer:

We want to ensure transparency and honesty in our interactions with you, our valued readers. Please be aware that the links provided on The Rabbit Hole Designs Blog may be affiliate links. This means that if you make a purchase through these links, the project designer may earn a small commission at no extra cost to you. Your support means the world to us!


We kindly request that you accept the tracking cookie for the affiliate websites. Rest assured, this will not expose your computer to viruses or compromise your information. It's a necessary step for the company to attribute the sale to the affiliate, ensuring that creators like our creatives receive their rightful commissions.


Your trust and support empower our creators to continue sharing creativity and inspiration through our blog. Thank you for being an integral part of The Rabbit Hole Designs community!

Flower Whale Greeting Card

Saving the best for last!  My absolute favorite project of the year: 

Good day friends!  I am here to share a card featuring several products from The Rabbit Hole Designs, but the one that definitely takes center stage in this project is the Flower Whale stamp set.

Timeless Holiday Greeting Card

I am bringing back most recent creation for you this week ;)  

                 Hello friends, I am here to share a classy Christmas card using this timeless image from 
                               the Merry & Bright stamp set from The Rabbit Hole Designs.

Aloe You Doin? A2 Card


For my final project this month, I am again using the Succulent Life Stamp Set from The Rabbit Hole Designs, but I am also letting the Triangle Mosaic Stencil shine too!

I colored the Succulent image with my Copic markers, but then I took a scrap of watercolor paper and traced the Triangle Mosaic Stencil with a gold gel pen.  I wanted a geometric background and decided against black because it would have been too bold.  The gold really stands out and pairs nicely with the succulents.  I layered both the image and the panel on dimensional adhesive onto some patterned paper, added the sentiment from the stamp set and some tiny bling to finish it off :)


Free with Purchase
Free with minimum $35 purchase
After discounts, before tax and shipping
While supplies last
___________________________

For more inspiration, updates, and news make sure to check out these places:


Let's Shell-Ebrate! A2 Card


For my second post this month, I have colored the stunning Shell-Ebrate clear stamp from The Rabbit Hole Designs.  I colored this image using my Copic markers and then decided an epic stamp needs an epic background...am I right?  All I had to do after that was stamp the sentiment included in the set and add some clear bling!


Free with Purchase
Free with purchase
Free with minimum $35 purchase
After discounts, before tax and shipping
While supplies last
___________________________

For more inspiration, updates, and news make sure to check out these places:


Versatility on Your Stamps


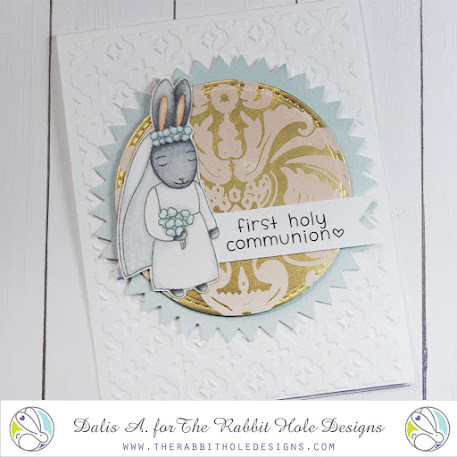
Looking at your stamps in a different way is always the best part of getting a new stamp set. The "Happily Ever After" is a sweet wedding stamp set, but what else can it be? If you mask the groom bunny out of the picture you get this adorable girl bunny that is perfect for a First Holy Communion card. What else do you see when you look at the Happily Ever After couple? Maybe a PROM card, if you mask the veil of the bride? 
After coloring the bunny with alcohol markers, I decided to create the golden backdrop with some stickers to convey the idea of the osties. The embossed folder used even though does not have a cross image, it does bring an idea of a cross, helping bring the theme and the card all together.


For more inspiration, updates, and news make sure to check out these places:

Golden Spring Floral Kitty

Hi Friends! Kelly here. Today I am using Spring Kitty illustrated by Tatsiana Zayats. for The Rabbit Hole Designs.
 I wanted to try something different so I stamped the image in Versamark ink & I used Gold Embossing powder on Neenah Desert storm cardstock BUT USED MY Cottontail Embossing tool 1ST of course! 
I took out my Sakura Moonlight Gelly Roll Pens. At 1st it looked streaky but then as it dried it smoothed out & looks incredible in person. So smooth & silky.
The pens I used were #444, #423,#424,#421,#424,#429 & #428.
These pens are opaque and so fun to use. 
After coloring I stamped my sentiment crooked so I re-stamped it on matching cardstock, die cut it out & I used a Gold Deco pen along the edges a d covered it up, lol.  I liked this look better anyway so it worked out. 
Then I die cut it with a stitched die and made a few mats with white & Desert Storm & mounted it all on top of the gold card base (which is poster board, lol) Hey, why not? Its gorgeous.  
I added some white gel pen and some baubles & done. 
I made this card in advance to send to my mom. She's moving soon & I have so much going on that unfortunately this will be my last blog with TRHD. I have enjoyed my time but unfortunately I've gotten hit with a few life struggles & im unable to have as much craft time as I did. 
Thank you so much to TRHD for having me & for all the kindness & support Ive received.  
Remember....its ok to go down the crafty....Rabbit hole🐇🎨🖌 

Clarence Good Egg Easter Card

Hi Friends! Kelly here & for todays card I used the newly released Clarence Good Egg.
To start off I stamped my image in Memento Tuxedo black ink & colored it with copics in a Warm gray & rainbow theme. 
I used a wonky circle die to cut him out,  cut a hole with a hoke punch & added mint colored velvet trim & then added foam tape to the back of it. 
I used SSS mint cardstock & embossed it with an Embossing Folder for some texture. I added a white & mint mat onto a white card base. 
Next I stamped all my sentiments & cut them apart to create a label look and added a black marker on the edges.
I added some white gel pen & shimmer pen to my image
To finish it off I added some iridescent gems and that's it. 
Thanks so much for stopping by!

Flower Whale/You Make Life Fun card

Hi Friends! Kelly here with another card using the beautiful Flower Whale stamp illustrated by Tatsiana Zayats paired with the You stamp & Garden Trellis stencil.
To start off I grabbed a piece of 80lb Neenah cardstock & masked off the panel leaving about 2" gap. I then laid my Garden Trellis stencil across and then I used my Distress Oxides in Kitsch Flamingo, Salvaged Patina & Twisted Citron. 
After Ink Blending I stamped my Whale onto the same 80lb Neenah cardstock with Memento Tuxedo black ink. I colored them with copic markers to match my background. I used light grays for the whales body & fussy cut him out.
I added some shimmer (hard to see in pics) and added foam tape to the back of the whale. Then I stamped my Sentiment once i figured out my placement.  
Once I did that I used a stitched die & coordinating mat dies to die cut the white & teal cardstock. 
I glued & adhered it all down & I added some iridescent gems for some extra sparkle. 
I hope you like it. Thanks for stopping by & dont forget to fall down the crafty rabbit hole,lol💗 its fun!


Its All About Love AND stencils!

 Hello crafty people! Thanks for stopping by today to take a look. Todays card is all about love! 
I wanted to create a nice clean and simple card with the Open Heart stencil. I started out by applying a tiny bit of bright pink ink and then spread on some Faber Castell glass bead glitter gel. I let the panel dry over night to let it get completely dry. I didn't want to be tempted to touch it before it was totally dry.


After the panel was completely dry I added a frame around the panel. 
 Next I stamped the sentiment from the Je t'aime stamp set on a die cut heart and added a bit of silver thread behind it for a little touch of fancy.
I hope I was able to provide some inspiration today! Stop by The Rabbit Hole Designs to check out all the amazing products in the January new release.
Thanks so much!

For more inspiration, updates, and news make sure to check out these places.

Art Gallery, Coffee Collection


Hello, it's Lauren here sharing this kangaroo's visit to an art gallery opening. This art gallery idea came about after using the awesome Weird Science stencil. I was looking at the molecules and I thought..."This looks like a piece of art" and then the lightbulb lit and this card was born! As I was creating this card, my next thought was " who says card making is not art"?!

To start this creation, I stamped the Caffeinated Kangaroo onto Copic friendly card stock and coloured her in using Copic markers. Then I fussy cut her out.


After that, I dry embossed the stencil on a white piece of cardstock. Then I lined up the stencil and blended Gathered Twigs distress oxide ink over the raised molecules. This gives awesome added dimension. I then trimmed it down and framed it in pink (to match the coffee cup) using dies from my stash.


To create the other art piece, I water coloured Antique Linen, Gathered Twigs and Espresso distress oxide onto water colour paper. Once dry, I stamped the coffee chemical make up stamp onto it then framed it in black.


Next, I made the name placards for the art pieces using my computer. I also made the collection sign then bordered that in black.


Finally I assembled the card by adhering all the components onto a top folding A2 card base.

Now if anyone ever tell you that card making is not art, you can tell them that they are totally wrong!

Here are the links:

https://therabbitholedesigns.com/collections/stamps/products/caffeinated-kangaroo-4x4


https://therabbitholedesigns.com/collections/dies-stencils/products/weird-science-6x6-stencil


For more inspiration, updates, and news, be sure to check out these awesome places!