Pages

Showing posts with label Christmas Cards. Show all posts

Bright and Joyful Christmas Tree


Hello my crafty friends, Jenn here with a Bright and Joyful Christmas tree card featuring The Rabbit Hole Designs Warm and Cozy stamp set (illustrated by Agota Pop). I wanted to create and easy card, but som,ething that is a little bit elegant too. I hope you enjoy this twist on a traditional Christmas card.

Supply List

Other supplies (from your stash)
Paint brushes
Metalic watercolors
Bearly Arts Craft Glue
White ink
VersaMark Watermark ink
Gold Embossing Powder
Let's take a look at this simple step tutorial:
A - Use either a Bitty Blending Brush or Cottontail Blending Brush with white ink to stencil the Candy Twist stencil design in an oval shape in the center of a piece of 4' x 5 1/4" black cardstock

B - Use a paint bush and gold watercolor to add gold splatters the card front and set it aside to dry

C & D - Use the white ink and lightly stamp the Christmas tree image (from the Warm and Cozy stamp set) onto a piece of black coloring cardstock.  Watercolor the image with green, gold, red, and brown metalic and/or shift watercolors
E - Fussy cut or die cut the colored Christmas tree 

F -  Use the Cottontail Embossing Powder Tool to treat a piece of black cardstock. Stamp the Merry Christmas sentiment (from the Poinsettia and Pinecone stamp set) with VersaMark Watermark ink.  Dust it with gold embossing powder and heat set the sentiment. Use the coordinating dies to die cut the sentiment

G & H - Glue the stenciled card front on a green A2 cardbase.  Use adhesive foam squares to attach the painted Christmas tree to the center of the stenciled Candy Twist oval. Glue on the Merry Christmas sentiment above and below the tree as shown
Thank you for taking time  to visit today's blog and check out this Bright and Joyful Christmas Tree card created with The Rabbit Hole Designs' Warm and Cozy stamp set, Poinsettia and Pinecone stamp and die set, and Candy Twist stencil. I hope you are inspired to create something lovely today!

Be Creative ~ Stay Inspired

Jenn Gross


Follow me, Journey Coach Jenn, on 

Instagram - https://www.instagram.com/journeycoachjenn/

YouTube - http://www.youtube.com/c/JourneyCoachJenn

Blog - https://journeycoachjenn.blogspot.com


White Christmas


Hello! It's Lauren here on the blog with this pretty, white poinsettia Christmas card I created using the Poinsettia & Pinecones stamp set.

I started out by stamping the poinsettia image a few times in fade out ink onto kraft cardstock measuring 4 x 5.5". Then coloring them up using my colored pencils.

Next, I Added some white splatter using Titanium White Acrylic paint that I thinned a bit with water. 

While my splatters were drying, I stamped (in white ink) and die cut my sentiment from the same stamp set. I also die cut a sentiment blank from white cardstock and adhered it (offset) to the stamped sentiment.

I adhered my sentiment to my colored panel then adhered the panel to a white, Top Folding A2 sized (4.25x5.5) card base to finish my card. 


I hope I've given you some holiday crafting inspiration today. Thanks for visiting!

*Disclosure: I use affiliate links where I can. This does not add any extra cost to you, but I do receive a small amount which helps keep me creating. Thank You*

Here's my links to the set
I used to create this card:

Poinsettia & Pinecones Stamp Set: https://shrsl.com/47y0j

Poinsettia & Pinecones Die Set: https://shrsl.com/47y0l

Past Favorite, Joyful Greetings Times Two!


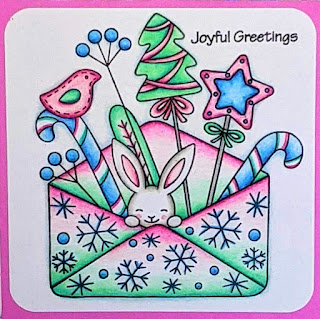
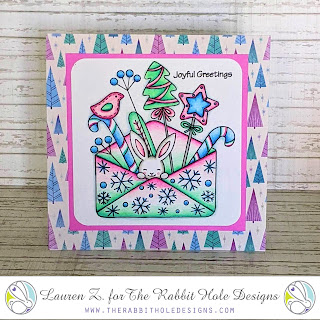
Hi there. It's Lauren sharing another of my favorites from this past year. This one is a two for one! I loved coloring this image so much that I did two color schemes and then couldn't decide which one I preferred! 

Hello and welcome to day 3 of The Rabbit Hole Designs New Release and Inspiration Hop. Today I have this square card featuring the so very adorable Hoppy Holidays stamp set illustrated by Tatsiana Zayats.

This was a super simple card to make. I started out by stamping the image in black onto white cardstock. I then colored the whole image using Prismacolor pencils. I stuck with a traditional Christmas color palette.


I then die cut the image out using a rounded corner square die from my stash and stamped my sentiment in the top right corner. I adhered it onto a square kraft cardstock panel

Next, I found a coordinating patterned paper and trimmed it to 5.5 x 5.5 and adhered it to a top folding card base of the same size. Then I adhered the panel I had created onto the patterned paper.

I enjoyed colouring this image up so much that I decided to make the same card but this time in non-traditional Christmas colours.


I cannot decide which card I prefer! Which one is your favorite?
For more inspiration, updates, and news make sure to check out these awesome places! 


Caffeinated Jingles


Welcome! Lauren here today sharing this holiday card featuring the new Caffeinated Vulture stamp. This guy has his coffee and his Santa hat so he's all set. Bring on the holidays!!

I started by stamping the vulture image onto white cardstock. Then I colored him up using Prismacolor Premier pencils and die cut him out using the coordinating Caffeinated Vulture die. I then stamped, colored and fussy cut the Santa hat from the Merry Pigmas stamp set. Then, I adhered the hat onto my vulture cutting off his top feather.


Next, I ink blended my background on an A2 (4.25x5.5) sized white cardstock panel. The Distress Oxide colors I used were: Mermaid Lagoon, Prize Ribbon and Faded Jeans.


I then die cut a snowy white fir tree window panel using a die from my stash and adhered that onto my ink blended background. I stamped the sentiment from the Caffeinated Reindeer stamp set in black below the window on the white panel. 


After that, I die cut 3 more vulture shapes and adhered them to the back of my colored vulture. I then adhered him to my background panel and the panel onto an A2 sized card base.

I loved giving this Caffeinated Vulture a holiday twist. I hope this inspires you to add some fun details to your creations! Happy crafting!

Here are TRHD products I used to create this card:

Caffeinated Vulture Die – The Rabbit Hole Designs

Caffeinated - Reindeer 3x4 – The Rabbit Hole Designs

Bundle - Merry Pigmas – The Rabbit Hole Designs


For more inspiration, updates, and news make sure to check out these awesome places! 


Thank you so much for stopping by today!