Pages

Showing posts with label Glitter. Show all posts

Poinsettia Holiday Decor and More


Hello my crafty friends! It is time to take a look back at a lovely 3D paper project I made using the Poinsettia and Pinecone stamp set from The Rabbit Hole Designs. 

The Poinsettia and Pinecone stamp set is illustrated exclusively by Kelly Taylor for The Rabbit Hole Designs. It is large 6 x 8 stamp set with a gorgeous main image using both Poinsettia and pines along with individual images of both and sentiments. The coordinating die set cuts the images beautifully.

It is easy to adapt your stamping and praper crafting to something more than a card.  Here we have used the Poinsettia and Pinecone stamp set to create a 3D wreath. 

I stamped and colored seven of the single Poinsettia images and six of the pine boughs images with OLO Markers. They are die cut with the coordinating die set.

I cut a large circle from a cardboard box and cut out a smaller center circle creating a donut or hoop shape to support the wreath. I tied a length of red ribbon around the wreath (adding a bow at the top) creating a way to hang it when finished.

I arranged the flowers on the wreath base and filled in the extra openings with the pine sprigs. The pine sprigs are cut into two pieces to use as filler.

Once I had an arrangement I liked, I attached the pieces in place with a combination of liquid glue and foam squares. 
I used white gold water color and gently added a bit of splatter to the wreath. The wreath can be hung on a door or even used flat for a holiday center piece. Just add a candle or other deco to the center with the floral wreath surrounding it. 

Products Used


Thank you, I appreciate you taking time from your day to stop by and check out this Holiday Wreath using The Rabbit Hole Designs' Poinsettia and Pinecone stamp and coordinating dies. I hope you are inspired to create something lovely today! 


Be Creative ~ Stay Inspired

Jenn Gross


Follow me, Journey Coach Jenn, on 

Instagram - https://www.instagram.com/journeycoachjenn/

YouTube - http://www.youtube.com/c/JourneyCoachJenn

Blog - http://www.journeycoachjenn.com/


For more inspiration, updates, and news make sure to check out these places


The Rabbit Hole Designs

The Rabbit Hole Designs Instagram

The Rabbit Hole Designs Facebook Page

The Rabbit Hole Designs Pinterest

The Rabbit Hole Designs YouTube

Easy 3D Poinsettia Wreath and Centerpiece

Hello crafty friend!  This 3D holiday wreath is super easy to make.  Use it as a wreath to display on a door or wall or perhaps you prefer to use it as a table centerpiece by adding a bowl or candle in the middle of the wreath.  There are plenty of possibilities!

I am using The Rabbit Hole Designs' new Poinsettia & Pinecone stamp set with the coordinating dies to create this lovely holiday wreath. The images are beautifully designed by Kelly Taylor Cards.

Step Tutorial -
Stamp and color 7 Poinsettias and 5 pine boughs (I colored the images with OLO Markers).  Die cut the images with coordinating dies.
Cut apart two of the pine boughs to create smaller images.  Add a few lines of liquid glue to the lenghth of the pine needles and dust with fine white glitter. Set aside to dry.

Gently shape each Poinsettia flowers to add dimension. 

Using two large circle dies (or a compass) to create a ring base for the wreath (120lb cardstock works well).
Arrange the Poinsettia flowers and pine boughs over the ring base. Once you like the placement, glue the pieces into place on the ring base with liquid glue and foam squares.
Add splatters of metalic white gold paint to the Poinsettia wreath.  Tie a ribbon to the ring (optional) and display for a holiday decoration.


Product Used


Thank you, I appreciate you taking time from your day to stop by and check out this holiday wreath using The Rabbit Hole Designs' Poinsettia and Pinecone stamp and coordinating dies. I hope you are inspired to create something lovely today! 


Be Creative ~ Stay Inspired

Jenn Gross


Follow me, Journey Coach Jenn, on 

Instagram - https://www.instagram.com/journeycoachjenn/

YouTube - http://www.youtube.com/c/JourneyCoachJenn

Blog - http://www.journeycoachjenn.com/


For more inspiration, updates, and news make sure to check out these places


The Rabbit Hole Designs

The Rabbit Hole Designs Instagram

The Rabbit Hole Designs Facebook Page

The Rabbit Hole Designs Pinterest

The Rabbit Hole Designs YouTube


From Your Flaky Friend


Center stage for this adorable snowman! The line that creates this 1 Line Snowperson can be positioned so it looks like he is on a hill of snow. This little guy was colored with a no-line watercoloring technique. The background was created by blending 2 different Distress Oxide inks and stenciling the Mid-century Modern #2 stencil. Stenciled only 2 of the 4 layers of the stencil set and offset them. 


For more inspiration, updates, and news make sure to check out these places:

Glitzy Butterfly

 Hello, my crafty friends! Today I have paired 2 of my most loved stencils to create this glitzy card.


This card was inspired by 2 of my most used stencils. I paired the Butterfly 3x4 Stencil with the Clouds in my Coffee 6x6 Stencil. For the Butterfly stencil, I first did an ink blend of picked raspberry, shaded lilac, and wilted violet. I knew I wanted to add texture so I grabbed some of my favorite fine glitter and transparent paste. I waited for everything to dry before I fussy cut out the butterfly, which I popped up with the Double Thick Crystal Clear Foam Tape - 5mm wide.


For the background, I used the Clouds in my Coffee stencil using distress ink to create a different color palette, but I knew I wanted it to be just as glitzy as my butterfly so I had glitter ink in an extra spray bottle and did a couple of sprays with it. 


For more inspiration, updates, and news make sure to check out these places.

The Rabbit Hole Designs

The Rabbit Hole Designs Instagram

The Rabbit Hole Designs Facebook Page

The Rabbit Hole Designs Pinterest

The Rabbit Hole Designs YouTube


Cupid -FND a slimline card


Hello my crafty friends!  Welcome to today's The Rabbit Hole Designs blog!  So a question for you...  Is it Galantine's or Valentine's Day?  Well, either way you look at it, that little cherub is so FND. That is Fat, Naked and Dangerous! So let's put him on a slimline card, right?

My Cupid -FND slimline card features The Rabbit Hole Designs' new Valentine stencil, the Sassy Anti Valentine stamp set and the soon to be retired Marquee Words stamps set

This is one of those cards where you see it in your mind, try it out, change your mind midway thought, and start over.  Sometimes this is the process when you create - trying by trying and learning as we makers make! 
  

I started off with a piece of 3 1/4" x 8 1/4" pink cardstock.  I stamped the word LOVE, from the Marquee Words stamp set in clear pigment ink 7 times  straight down the card front.  This gives the large letters a subtle shadow of the sentiment for the background.  I placed the three striped hearts on the Valentine stencil on the front of the card front about 1/2' below the top of the card front.  Using a Cotton Tail Blending Brush, I started to stencil it with Honeysuckle Ink.  Once I removed the stencil to reveal the image, I found it to be far too much pink.  I used my heat gun to make sure the ink was dry.  I replaced the stencil over the pink heart stripes and re-stenciled the three hearts in Black Soot Distress Oxide ink.   


Much better!  I needed one more black striped heart, so I positioned the striped heart stencil to add a 4th small striped heart at the bottom of the slimline card front. 


 Chubby cupid, from the Sassy Anti Valentine stamp set, is stamped on white cardstock with Versa Mark clear pigment ink and heat embossed with red glittery Oriental Fire embossing powder.  He is fussy cut and added to the card front. I layered the card front on a piece of red cardstock and tied it with some black twine.


I stamped and added the Fat, Naked and Dangerous  sentiment from the Sassy Anti Valentine stamps set and  attached it to the black twine. I mounted the card front on a dark grey slimline card base and added three black gemstone to finish the card.


Thanks you so much for stopping by today.  I hope you enjoyed this Cupid -FND slimline card featuring The Rabbit Hole Designs' new Valentine stencil, the Sassy Anti Valentine stamp set and the soon to be retired Marquee Words stamps set.  Feel free to ask any question or leave a comment below.


Be Creative ~ Stay Inspired

Jenn Gross


Follow me, Journey Coach Jenn, on 

Instagram - https://www.instagram.com/journeycoachjenn/

YouTube - http://www.youtube.com/c/JourneyCoachJenn

Blog - http://www.journeycoachjenn.com/


For more inspiration, updates, and news make sure to check out these places


The Rabbit Hole Designs

The Rabbit Hole Designs Instagram

The Rabbit Hole Designs Facebook Page

The Rabbit Hole Designs Pinterest

The Rabbit Hole Designs YouTube


Don't Bug the Beetle Card

Hey Everyone! Justin here and today I am sharing a project using the new Buggy for Caffeine set! This adorable beetle was the last bug in the set I wanted to make sure I used, and I wanted to take a different approach to this one. My last 2 bug cards were more earthier tones, so I decided that, for the beetle, I would go in a vibrant color direction!

For this card, I didn't do my coloring first. I took a scrap piece of white cardstock with the Candy Twist stencil and applied a thin layer of an electric purple glitter gel. I removed my stencil immediately to be cleaned, and then set my piece aside to dry.

I colored up my beetle with Copic markers and fussy cut them out. Next, I took an A2-sized piece of white cardstock and placed the Square Illusion stencil on top. I blended a red-to-pink-to-purple ombré using dye inks, since I knew they would give me more of that vibrant look I was going for! While the stencil was still on my panel, I spritzed it with some water to get that dappled effect, along with helping the colors blend together more.

Next, I took out some nesting square dies and cut a diamond directly from the upper middle part of the panel. Then, I cut out a diamond frame using the nesting dies from a purple glitter cardstock. I adhered this frame directly over my main panel diamond cut out.

I stamped the sentiment "Don't bug me I haven't had my coffee yet" from the Buggy for Caffeine set in red ink on white cardstock, cut it into a box, and framed it in that same purple glitter cardstock. I wanted to make this into a band, and I used the leftover scrap die cut from my diamond window. I cut it into 2 pieces, adhered them to my card, and adhered my actual sentiment over the top.

All I had left to do was some adhering, and my project was done. I took some clear acrylic bubble embellishments and adhered them to my project. I then took an A2-sized card base, and found where my diamond cut out window would be, and adhered my purple glittery Candy Twist piece directly behind it. I took some foam tape and adhered my main panel onto the card base to give the cut out window some depth. To finish my card, I used foam tape to adhered my beetle to the front of my card, and I was done!

I used the following products in this card:


For more inspiration with your The Rabbit Hole Designs Creations, be sure to follow along at these other locations:


For more details about products used in this post, you may also follow along at my personal blog, Just a Note by Justin, as well!

I hope you enjoyed my project and that it sparks some buggy inspiration for your next creation!

Happy Crafting!

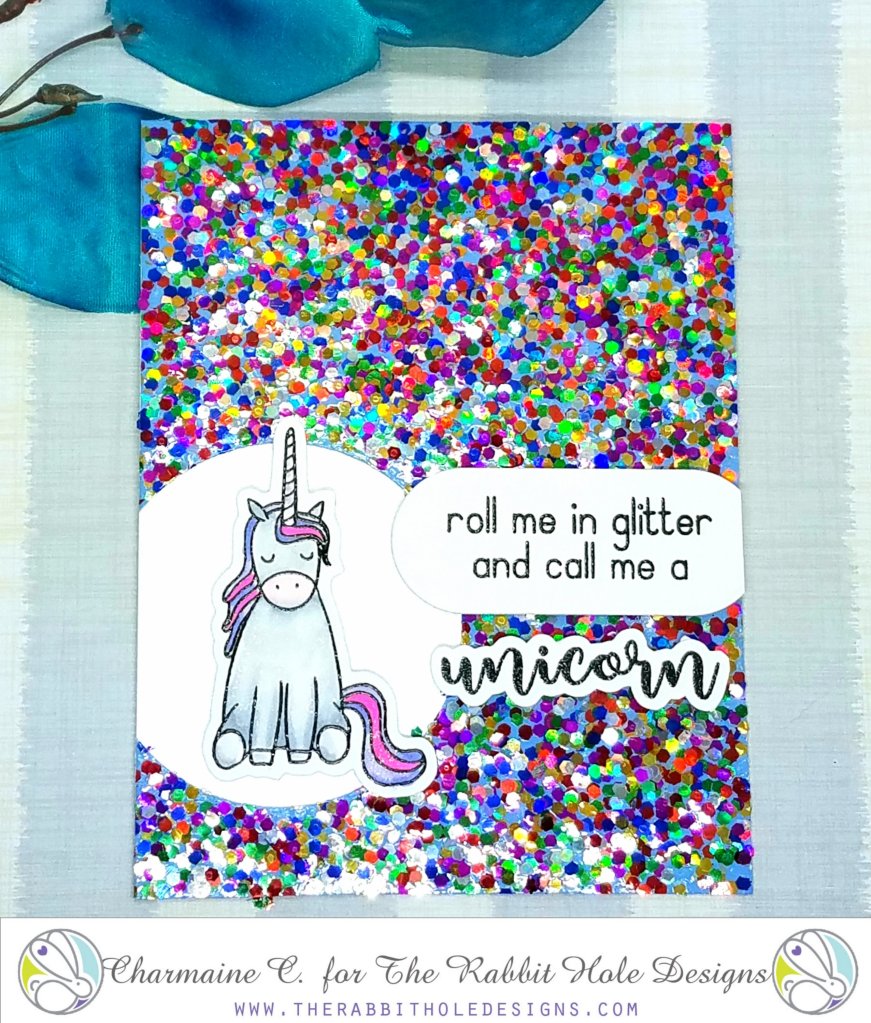
Roll me in Glitter!


After a very rough week and illness we shared liked M&M's in my house, nothing makes me happier than making a card. And my subject? Our trusty sassy unicorn!


This stamp is available at The Rabbit Hole Designs and at Simon Says Stamp.


Here is what I did:
1. I have had this fabulous glitter cardstock for years and decided today was the day to use it. I die cut a circle off center from the left corner.
2. Add silver vellum in the open circle spot.
3. Stamp, cut and color the unicorn.
4. I used my Brother Scan N Cut to cut the unicorn and the word unicorn.
5. This is a top folding card, 4.25 x 5.5.


I hope you can make this easy card that will make a friend's day brighter!
Unicorn kisses,
Charmaine
www.facebook.com/charcards2017

Putting On My Hat

Hello everyone! Shanna here today with another Halloween card featuring Hex Yeah!

  
I have been bitten by the stencil bug recently, and have been playing around with different techniques and stumbled upon a fun one!  I used Distress Oxides on black cardstock for my background with the Puzzle Box stencil from The Rabbit Hole Designs.  The opaque nature of the oxides gives almost a foggy look to the colors when applied on black, and I really like how it blended out!  I used Seedless preserves, Carved Pumpkin, and Mustard Seed oxide inks in random areas over the puzzle box stencil to create my background.  For a bit of glitz, I pulled a spiderweb stencil from my stash and used to Gina K Glitz glitter gel in black for another layer of interest. 


My witch hat was a long forgotten extra I found tucked away in my fall embellishments and I couldn’t resist pairing it with the sassy sentiment from the Hex Yeah stamp set!  I heat embossed the sentiment in gold on the same black cardstock I had used for my base panel.  Last touches were a couple strips of Washi tape from my stash and I was all done.

This card came together fairly easily, and I am in love with the end result.  What is your favorite stenciling technique?  The Rabbit Hole Designs has some pretty neat stencils, if you haven’t seen them yet check them out here.

That wraps up my post for today, I will be back next week for another trip down The Rabbit Hole!  Until then you can find me over on my blog, Caffeinated Craftiness or over on Instagram!  
-Shanna

For even more inspiration, updates, and news make sure to check out these links.

Never Enough Glitter...


Hey crafty friends, it's Amanda from Pear Blossom Press again! So how much bling is too much for a card? Lol, I'm the wrong person to ask ;) This card is completely covered in shimmer and shine and I love it!

To create this card, I started by stamping, embossing, and watercoloring the images in the Mermaid Hair stamp set. Then I cut them out with my ScanNCut, leaving a narrow white border. After they were cut out, I added a healthy coat of Aqua Shimmer to the images.

For the background pieces, I sprayed heavyweight watercolor paper with Glimmer Mist, then sprinkled on Color Burst watercolor powders. It's easier to gauge how much powder to apply if you sprinkle it onto wet paper and you will also get a grittier look because the powders don't dissolve and mix as much. I made sheets in yellow, green, purple, red, and a blue/green/purple mix. You could use water for this instead, but the Glimmer Mist leaves a nice shimmery finish.


Once the pieces were dry, I used dies to cut out the castle pieces and a pair of stitched hillsides from the yellow. I cut the word thanks and a bunch of seaweed pieces from the green. I cut the flags, starfish, and shells from the red and purple sheets. I used a wonky stitched rectangle die to cut the blue/green/purple background piece. I also used it to cut the sand and castle pieces where they touched the edges so they'd have the same stitched details. I added another layer of sparkle by applying green glitter paste to all of the green pieces, including the mermaid's tail.


While the paste was drying, I die cut a wavy banner and an A2 sized stitched rectangle from blue cardstock. I also cut two more layers of the word thanks from scrap cardstock. I stamped a sentiment from the Sassy Sentiments stamp set onto the banner and embossed it with white powder. I glued the green word thanks to one of the scrap ones, and then glued it to the banner. I glued the third layer of thanks to the back, sandwiching in the banner where it overlapped. This gave me a stronger finished element.


I used a combination of glue and foam to layer the sand, castle, and seaweed to the background. I added the sentiment, starfish, and shells to the scene, then popped the mermaid and fish up with foam tape. I glued the blue rectangle to an A2 card base, then glued the scene to the card with a thin layer of foam sandwiched in between. To add even more bling, I glued on a few sequins and then covered them with Diamond Glaze. I added more Diamond Glaze to the mermaid's tail, the bubbles next to her, and all of the fish.


Every layer of this card has shimmer, glitter, or shine. I think it's pretty fabulous too. So what do you think, too much? Not enough? Let me know in the comments below. If you'd like links to the specific products I used, head on over to my blog for the sister article.

Thanks for stopping by today; I'll be back soon with another fun card!