Pages

Showing posts with label Colored Pencils. Show all posts

Camping Adventure

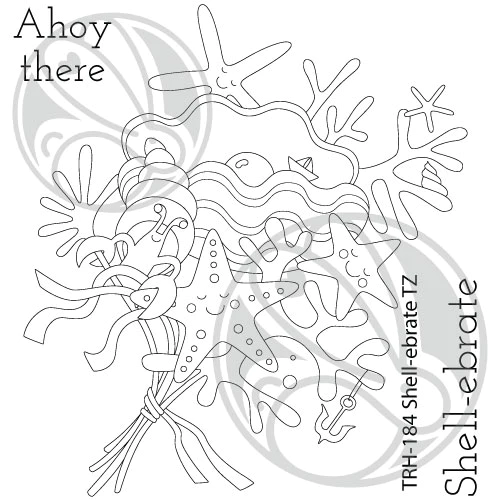
Hello crafty friends! Jenn Gross here sharing an adventure card today, you can also follow me on Social media @journeycoachjenn. I love this vibrant card.  I pulled out my colored pencils for a coloring adventure. The images are from The Rabbit Hole Designs New June Release. The three stamp sets; Glamping with Tailette, Tenting with Tailette, and Let's Wander are all illustrated by Agota Pop.

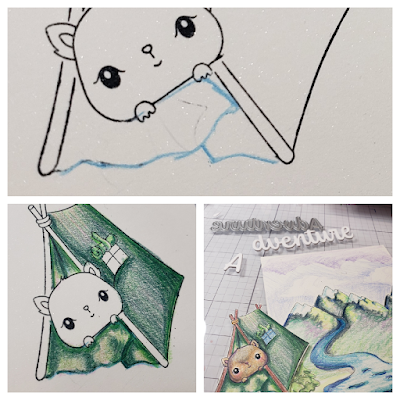
I masked off the cute squirrel head from the Glamping with Tailette stamp set and put her inside the tent from the Tenting with Tailette stamp set.  You can see how I drew the tent flap to place it in Tailette hands.  She is taking a look outside to appreciate her surrounding.  

The background is created by extending the Let's Wander stamp set by masling and stamping an extra mountain. 

The sky is  created with color pencils and the Clouds in My Coffee stencil.  I die cut the word "Adventure" from the Adventure Word with Shadow Layer die glueing three word layers together.  The "awaits" sentiment is from the Adventure Word stamp set.  The sentiment is glued to the top of the card front following the mountain's ascent.
I added the Tented Tailette to the bottom right of the card front using foam squares.

Supplies List
Liquid glue 
Colored pencils 

Thank you for taking the te to checkout  today's vibrant card camping adventure with Tailette.  I hope you are inspired to create something lovely today!

Be Creative ~ Stay Inspired

Jenn Gross


Follow me, Journey Coach Jenn, on 

Instagram - https://www.instagram.com/journeycoachjenn/

YouTube - http://www.youtube.com/c/JourneyCoachJenn

Blog - https://journeycoachjenn.blogspot.com/  


For more inspiration, updates, and news make sure to check out these places


The Rabbit Hole Designs

The Rabbit Hole Designs Instagram

The Rabbit Hole Designs Facebook Page

The Rabbit Hole Designs Pinterest

The Rabbit Hole Designs YouTube


Blue is My Boyfriend...Poinsettia & Pinecones Stamps & Dies

 Hello and welcome back to The Rabbit Hole Designs Blog; It's Rick back to share another fun card design with you today.  This time I am sharing a card using the Poinsettia & Pinecones Stamp Set and the coordinating dies.  The stamp set was designed by Kelly Taylor (hence the name of my blog post today).  She, says this all the time on her videos; so I thought it was only appropriate with my card design today. Speaking of which here's a look at my card.  

Poinsettia & Pinecones Card by Rick Adkins


For this card I started out by adding the Cat Eye Stencil and some Stencil Butter to create a shinny backdrop for the white heat embossed poinsettia swag.  I colored the poinsettia with a few different shades of blue colored pencils.  The sentiment was heat embossed with silver embossing powder to tie in with the shinny background. 

Poinsettia & Pinecones Card by Rick Adkins


Thanks for dropping by today and I hope that you found a little bit of inspiration with my card today.  

You can find me on the following Social Media Channels with more crafty inspiration: 
I hope that you have a crafty day.  For more inspiration, updates, and news make sure to check out these places.  

Have a crafty day!
Rick 


Creating a Snow Globe-themed Card with Baby's 1st Christmas Stamp Set

Hello crafty friends, it's Rick back again with another fun card to share with you for the Rabbit Hole Designs.   Today I have another fun little card to share with you using the Baby's 1st Christmas Stamp Set (designed by Agota Pop exclusively for Rabbit Hole Designs). 

Baby's 1st Christmas Stamp Set, Rabbit Hole Designs, Triangle Mosaic Stencil, Colored Pencils, Diamond Glaze Card by Rick Adkins

To start this card I stamped the snow globe from the Baby's 1st Christmas Stamp Set onto a piece of Kraft colored cardstock in a slightly darker brown ink color.  I then stamped the train and the extra box car to the back of the train along the bottom edge and then flipped the cardstock and repeated that along the top to create a fun little border to frame the snow globe.  I then stamped the sentiment at the bottom of the snow globe to act as an anchor.  

Baby's 1st Christmas Stamp Set, Rabbit Hole Designs, Triangle Mosaic Stencil, Colored Pencils, Diamond Glaze Card by Rick Adkins view 2

Once the stamping was completed I then took some plain old inexpensive Crayola Colored Pencils and started coloring the images.  Yes, I did say Crayola Colored Pencils!  You can get great results with them so don't be afraid to use what you have.  Once all the coloring was completed I then masked off the Snow Globe and sentiment with a simple mask made from Post It Notes and placed the Triangle Mosaic Stencil over the top.  Next I took some White Pigment Ink and a CottonTail Blending Brush (that is designated for White Pigment Ink only) and added the ink over the top of the stencil.  I made sure to not go over the trains at the top and bottom with the white pigment ink.  

Baby's 1st Christmas Stamp Set, Rabbit Hole Designs, Triangle Mosaic Stencil, Colored Pencils, Diamond Glaze Card by Rick Adkins view 3

Once the White Pigment Ink dried I then added a thin layer of Diamond Glaze over the snow globe's glass and the little heart.  When that dried I cut down the panel a little bit and added it to a light blue cardstock mat layer and then to my white card base.  And that my crafty friends finishes my card for today using the Baby's 1st Christmas Stamp Set.  Thanks for dropping by today and I hope that you have a wonderful crafty day! 

For more inspiration news and updates make sure to follow us on Social Media and check out these places as well! 

The Rabbit Hole Designs

The Rabbit Hole Designs Instagram

The Rabbit Hole Designs Facebook Page

The Rabbit Hole Designs Pinterest

The Rabbit Hole Designs YouTube


Wintery Night Scene Card with the Penguining Stamp Set

Hello crafty friends it's Rick again for the Rabbit Hole Designs and I have another fun holiday card to share with you today.  Today I am used the Penguining Stamp Set from the Rabbit Hole Designs LLC to along with a few other products to create a fun wintery night sky scene card.  


The super cute penguins in the Penguining Stamp Set were illustrated exclusively by Tatsiana Zayats for the Rabbit Hole Designs LLC.  And I am just going to tell you that they were so easy to stamp and color!  To create the night scene I started out by cutting a piece of black cardstock with the largest die from the You've Been Framed Dies.  I then took the Cat Eye 6 x 6 Stencil and turned it on it's side and used some Distress Oxide inks to blend through in different colors.  I then took the same colors and softened the stenciling by going back over it again while the ink was still wet.  This helped to create the aurora borealis in the night sky.  


To finish off the card I added some snow banks with my colored pencils for the penguins to stand on and added a few trees in the background to complete the scene.  I then added it to a top folding card base made of heavy weight white cardstock.  And for that little extra touch I added in some snow with a white gel pen and some of the Clear Sparkle Enamel Dots before adding my sentiment.  

Thanks for dropping by today and checking out my card.  I hope that you have a wonderful day.  

Rick 

Ahoy There!


Ahoy there! It's Lauren here today to share my fun and beachy card! The new Shell-ebrate stamp set, illustrated by Tatsiana Zayats, is a great all occasion stamp set. As summer comes to a close, I wanted to create a final, beachy, hello card.

I started by using some magical pigment powders to create a watery background. I used a dry brush to tap some powder onto my glass mat, spritzed it with water and "smooshed" my cardstock over top to pick up the color. Adding more water or powder and repeating, as needed, to get the look I wanted. I then set it aside to dry.

While my panel was drying, I stamped my image in black ink onto white cardstock. Then I colored the image using my colored pencils and fussy cut it out. 


Once my background panel was dry, I used an A2 sized (4.24x5.5") wonky stitched rectangle die from my stash to trim it down. I then stamped the "Ahoy there" sentiment in the bottom right-hand corner of the background panel.


I then adhered my background panel onto a top folding A2 sized white card base. I didn't want my bouquet just sitting on the background, so I used a net die from my stash to die cut a beige colored fish net for it to rest on. 


Next, I placed my bouquet on the fishnet and put some of its pieces under the net. This gives it a more "caught in the net" look that I was trying to achieve. Then I applied liquid adhesive to the back of the fish net bouquet and adhered it onto the card. I did not adhere the whole net down. 


I think this is a fun twist on the usual Hello or all occasion, card. I hope you are enjoying the beautiful release this month and that I've inspired you to get crafting! Thanks for visiting!

Here's a link to the stamp set I used for this card: 

https://therabbitholedesigns.com/collections/stamps/products/shell-ebrate-4x4


Thanks again for visiting. You can follow me here:

Have a Very Merry Unbirthday!


Hi everyone! Lauren here with this colorful square card. This month's release is full of whimsy so I wanted to make this card fun and bright. 

I started by stamping the Tea Party 6x6 background stamp onto white cardstock using black ink. I then colored the whole image using colored pencils and trimmed it down to just slightly under 5x5".


I then stamped, colored and die cut the Mad Hatter image from the Wonderland 3 stamp set.


Next, I stamped the sentiment onto the front of the card. I used the heat gun to dry the ink because it takes longer to dry on the colored background.


I adhered the Mad Hatter onto the tabletop and then adhered the panel onto a top folding 5x5" white card base to finish the card.

Thanks for stopping by. I hope this inspires you to pull out your pencils or markers and get coloring! 

Here is a list of the products I used for this card:


Thanks again for visiting. You can follow me here:

YouTube channel: Lauren Z. – Queenlore Creations – YouTube


For more inspiration, updates, and news make sure to check out these places


All Mad in Wonderland - The Rabbit Hole Designs August Release


Hello there crafty friends. I am so glad you were able to stop by for  today's The Rabbit Hole Designs blog!  This week has been just plain bonkers,  but thank goodness it's Friday!

This crazy cat with a big broad grin is the inspiration for this mixed media card.  I am using the Wonderland 2 and Wonderland 3 stamp and coordinating die sets along with the Heard in Wonderland sentiment stamp set and the Rhombus/Diamond Hot Foil Coverplate.
I colored the images with colored pencil and die cut them out. The background for this card includes two stencils from my stash. They create an optical illusion, almost like a multiverse opening up to a new dimension. I brought in some numbers to represent a clock and the passing of time.
I foiled book pages with the Rhombus/Diamond Hot Foil Coverplate and red foil.  The edges are curled up and the piece is glued to the card. I attached the cat, caterpillar, and numbers using double sided adhesive foam tape.  I added some clay playing card pieces to and embellishments without the blink.


Thank you again for stopping by to check out the blog.  I hope you enjoyed the super creative multimedia card and are inspired to create something lovely today!

Be Creative ~ Stay Inspired

Jenn Gross


Follow me, Journey Coach Jenn, on 

Instagram - https://www.instagram.com/journeycoachjenn/

YouTube - http://www.youtube.com/c/JourneyCoachJenn

Blog - http://www.journeycoachjenn.com/


For more inspiration, updates, and news make sure to check out these places


The Rabbit Hole Designs

The Rabbit Hole Designs Instagram

The Rabbit Hole Designs Facebook Page

The Rabbit Hole Designs Pinterest

The Rabbit Hole Designs YouTube

Off Roading Fun


Hi, Lauren here sharing this fun off roading card. I used one of the vehicles from the special new SXS Life stamp set to create my card. These vehicles are so much fun to color! 

I started out by stamping the vehicle onto a white 4.25x5.5" cardstock panel. 

Then I colored the vehicle, dirt and sky background using colored pencils.


After coloring, I stamped both sentiments onto the panel in black ink. I waited for the ink to dry before I trimmed the panel using a wonky stitched rectangle die from my stash. Then I backed the panel with black cardstock 1/8" smaller than 4.25x5.5 then adhered it onto an A2 (4.25x5.5") white, top folding card base.

I loved coloring this scene and creating this fun off roading card. Thank you for visiting!


*Did you know that 100% of the profits for this set are being donated to organizations who help those families affected by injury or the loss of a loved one in the off roading community? 

The Rabbit Hole Designs products used: 

SXS Life 6x8 – The Rabbit Hole Designs


For more inspiration, updates, and news make sure to check out these places:


Breakfast in the Clouds


Hello! It's Lauren here on the blog today. Do you ever dream of waking up to enjoy a beautiful breakfast on a big, fluffy, soft cloud? That is exactly what I envisioned for this sweet little bunny.

To create this dreamy card, I stamped the image onto white cardstock using black ink. I knew I wanted to paper piece the pillow and bed comforter, so I picked a paper from my stash that I thought would work well with my cloud vision. I stamped the bunny in bed image onto the patterned paper as well. 

Next, I colored the areas of the image on the white cardstock that were not going to be paper pieced using colored pencils.


Then, I fussy cut out the colored image and also the patterned paper pieces for the pillow and the comforter. With everything cut out, I adhered the patterned paper pieces onto the colored image. 

To create my cloud background, I used the Clouds in my Coffee stencil with blue Distress oxide ink that was left on my blender brush. I blended clouds all over a white A2 (4.24x5.5") cardstock panel. I then trimmed it using an A2 sized stitched rectangle die from my stash. 


I adhered my cloud background panel onto a white, top folding, A2 card base. Then adhered my bunny in bed image onto the card. The final step was to stamp the sentiment in black below the image directly onto the background. 

That completes my card for today. I hope this inspires you to create a fun setting for this bunny to enjoy breakfast! Thanks for visiting!

Below are The Rabbit Hole Designs products used to create this card: 


For more inspiration, updates, and news make sure to check out these places