Hello my crafty friend, it's Amanda from
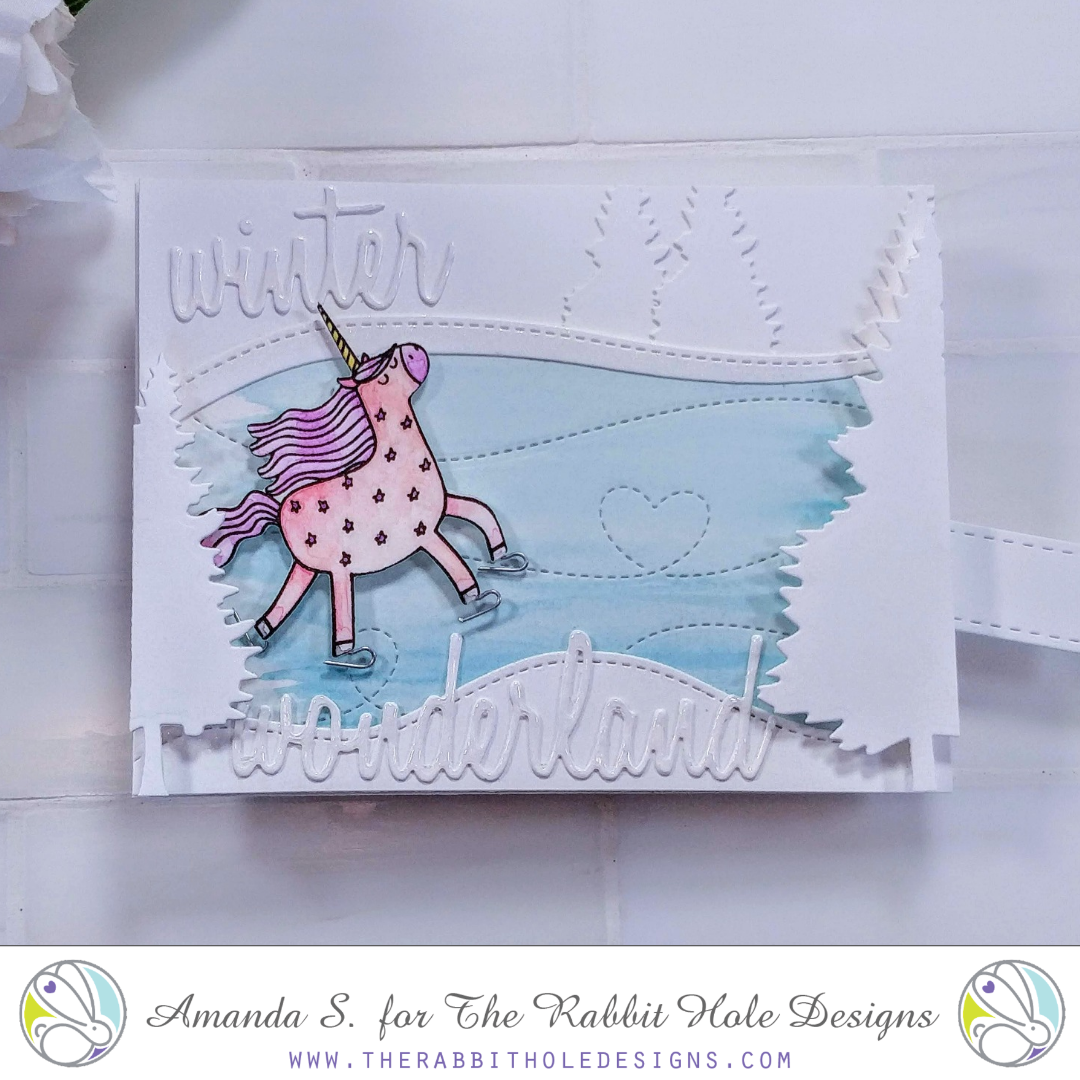
Pear Blossom Press again. Today, I've got a fun new-to-me technique. It's not a new idea mind you, I just haven't ever tried it before. I have to say, I am having a blast playing with it too. So what's the technique? A magnet slider! I'm telling you, this is so much fun, you're not going to want to give it away. Luckily, I made this card in September, so I have plenty of time to play with it before I give it to my five year old niece for Christmas. It features a
Sassy unicorn on ice skates and she can glide around the frozen pond by moving the tab.
For this card, I wanted to create a simple scene and keep the focus on the
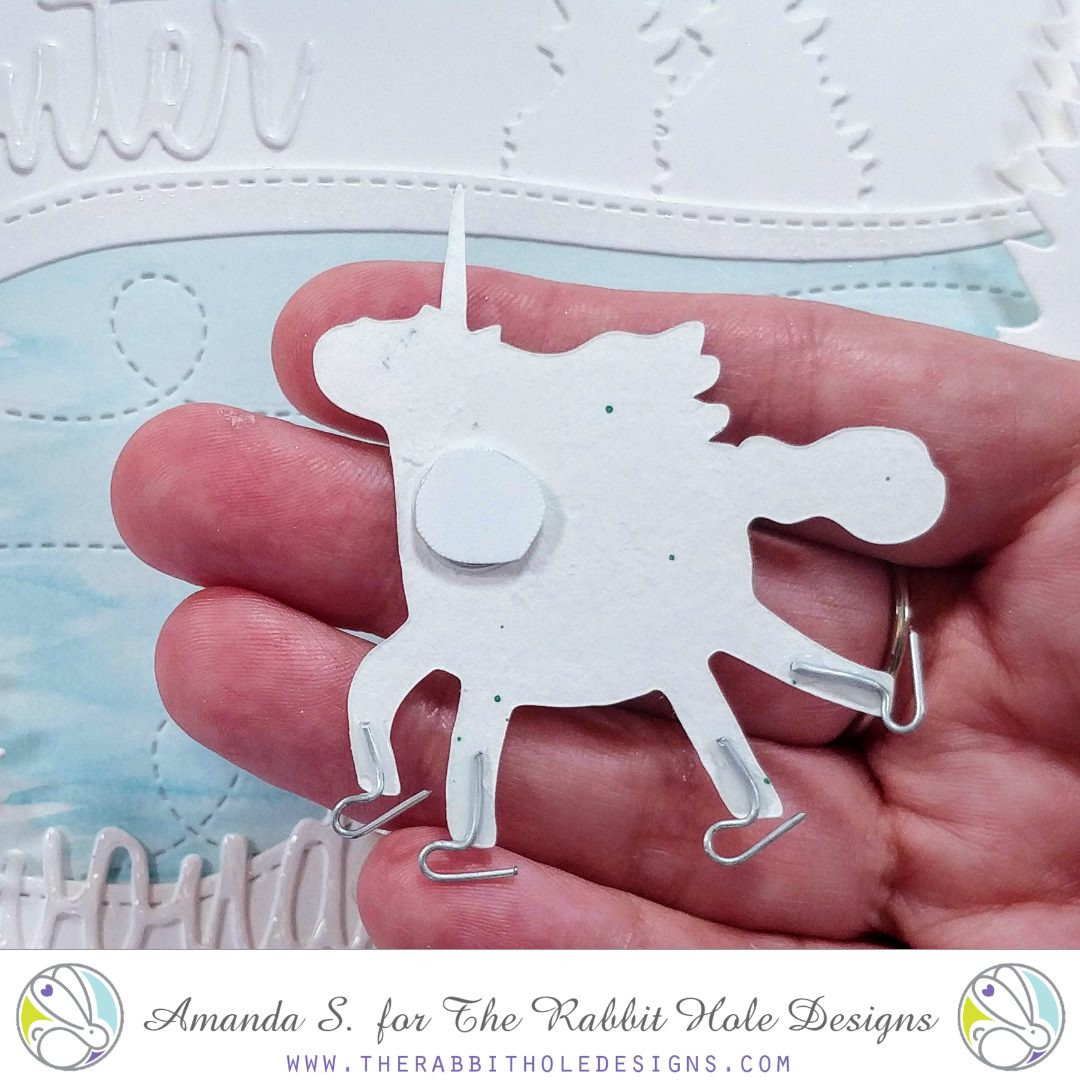
Sassy unicorn. I stamped and embossed her onto watercolor paper and painted her in pink and purple. Then, I fussy cut her with my ScanNCut. To give her ice skates, I folded my wire pieces in half with round pliers (you can achieve the same round curve if you fold the wire around the end of a small paintbrush), then curved one end up. This gave me the weird "L" shape you see in the photo above. I started with about 2" lengths of wire because longer pieces are easier to work with. Then I trimmed the pieces down at the end so all four were the same size. I glued the skates onto her feet and added a small magnet near her neck. I covered the magnet with a scrap of white cardstock to keep the magnet from transferring any grey residue to the pond as it glides around.
For the background, I added a little blue paint to a watercolor paper panel to create the ice area, then used a die to cut swirls into the blue ice. I die cut the scenic elements and sentiment from white cardstock. Then, I assembled the scene using stitched hillside pieces and pine trees around the pond area. I made sure to layer the larger trees on top with a double layer of foam tape and make them hang off the bottom and side edges, to look like they are in the foreground; smaller trees went in the background. The sentiment is only one layer, not stacked like I often do, and glued flat to the background. Once the scene was created and the unicorn was ready, it was time to make the slider bar to go underneath.


I die cut three stitched strips and glued them together with another magnet between the top two layers. This created a sturdy bar that can slide around without accidentally buckling or folding up. I added a ¼" x 1½" strip to the back side of the end with the magnet, to form a "T" shape. The small strip will act as a stop, to keep the bar from pulling all the way out. I added a layer of foam tape around the perimeter of a card base, leaving an opening for the bar, and dusted the edges of the tape with my powder tool to ensure they wouldn't stick to the slider bar as it moves around. Then I sandwiched the bar in between the card base and the background piece. To finish the card, I applied
Diamond Glaze to the words and Aqua Shimmer accents to the trees, edges of the snowbanks, and unicorn horn. When everything was dry, I attached the unicorn to the card and tested it out. Look! It's so much fun to play with!
Now, before you give a card like this to a child, please consider that the ends of the wire skates can be sharp, and if the child somehow accidentally ingests both magnets, that could be harmful. Just in case, younger children should be supervised when playing with it.
So what do you think? It's fun right?! I think the star covered
Sassy unicorn is the perfect fit for this card. I chose soft pinks and purples for my color scheme specifically for my niece, but it would be adorable in other color schemes too. What colors would you use? If you'd like to see a few more projects featuring this stamp set, check out
Unicorn Crush and
Candy Twist. You can also hop on over to
my blog to find the sister article with links to the other specific items I used for this card. Thanks for stopping by today; I'll be back soon with another new interactive card.


