Pages

Showing posts with label Twisted Sunshine. Show all posts

Orange ya Glad its your Birthday??

Knock Knock!!
Who's there?
Orange!
Orange who?????
Orange ya glad....... 
LOL!

Hello Rabbit Hole Designs Fans!! DTM Shanna here today with a cheery and ORANGE card using the Celebrate with Cake stamp set and Twisted Sunshine stencil!  I will definitely be sticking to card making, and leave the jokes for the comedians though!!
Something about the color orange just makes my heart happy.  It never fails to brighten my day (pun intended!)!  I decided to go nearly monochromatic with this card and am in love with the end result!


I started by stenciling the Twisted Sunshine stencil using distress oxides and a blending brush.  I kept the center darker, and worked outwards to a lighter shade.  
Next I stamped and colored the cake with my Nuvo alcohol markers.  I glitzed up the flowers a bit with some orange Stickles from my stash.  It needed a little bit of sparkle!!  The cake was glazed as well with Diamond glaze over the frosting.  Once everything was dry, I adhered it to the stenciled card panel with foam tape.


Lastly I added my sentiment to the card base in black ink.  The sentiment made me giggle and it is from the Sassy Birthday 2 stamp set.  I mounted the entire card panel onto a A2 orange card (you saw that coming, right?!?)  and the card was finished!

That wraps up my post for today, I will be back soon for another trip down The Rabbit Hole!  Until then you can find me over on my blog, Caffeinated Craftiness or over on Instagram-Shanna


For even more inspiration, updates, and news make sure to check out these links.

Twisted Dino Sunshine Card


Hey Rabbit Hole Crafters! Justin here, and I'm back again with another card using some of my favorite The Rabbit Hole Designs Products!

This card uses the Caffeinated-Dino Stamp Set, along with the Twisted Sunshine Stencil!

I was inspired to make this card by all the colorful citrus fruits out there, and definitely wanted to use those colors with both my Dino and the stenciled background!

I always start with coloring up my image first with my alcohol markers. Because I was using the citrus colors of Green, Yellow and Orange, I wanted to use those colors for my dinosaur! So I made my dino green, his mug yellow, and his slippers orange. One item of the Caffeinated Critters I've had a lot of fun with is their eyes. I've really been trying to use a color you don't find anywhere else on the project, so their eye sticks out. For this guy, I went with a light blue!

After cutting my Caffeinated Dino out, I started to work on my background. I cut a piece of white cardstock down to 4" x 5.25. I adhered the Twisted Sunshine Stencil with a light tack adhesive so my stencil stayed in place. Next, I came up with a pattern for the order of my colors, just to add a bit of cohesiveness to the card instead of a random order.

I used a torn up post-it note to mask each individual partial circle, and used my blending brushes to blend the respective ink color. I then repeated until the entire panel was covered!

I used a stitched scalloped die to cut out a respective scalloped circle from a yellow wood-print paper. I adhered that to the center of my stenciled panel.

I matted my stenciled pattern on an A2-sized orange wood-print-patterned paper.

I trimmed down a sentiment strip on white cardstock, matted it with leftover yellow wood print paper, and stamped my sentiment in green.

I adhered my sentiment and dino on foam tape. To finish the project, I placed green and orange enamel dots for some extra embellishment. And that's how I made my card!

I used the following products to create this project:


For more inspiration with your The Rabbit Hole Designs Creations, be sure to follow along at these other locations:

For more details about products used in this post, you may also follow along at my personal blog, Just a Note by Justin, as well!

I hope this citrus-filled card sparked some fun ideas for your future projects, and maybe sparked a craving for orange juice or lemonade! 

Thanks for reading, and happy crafting!

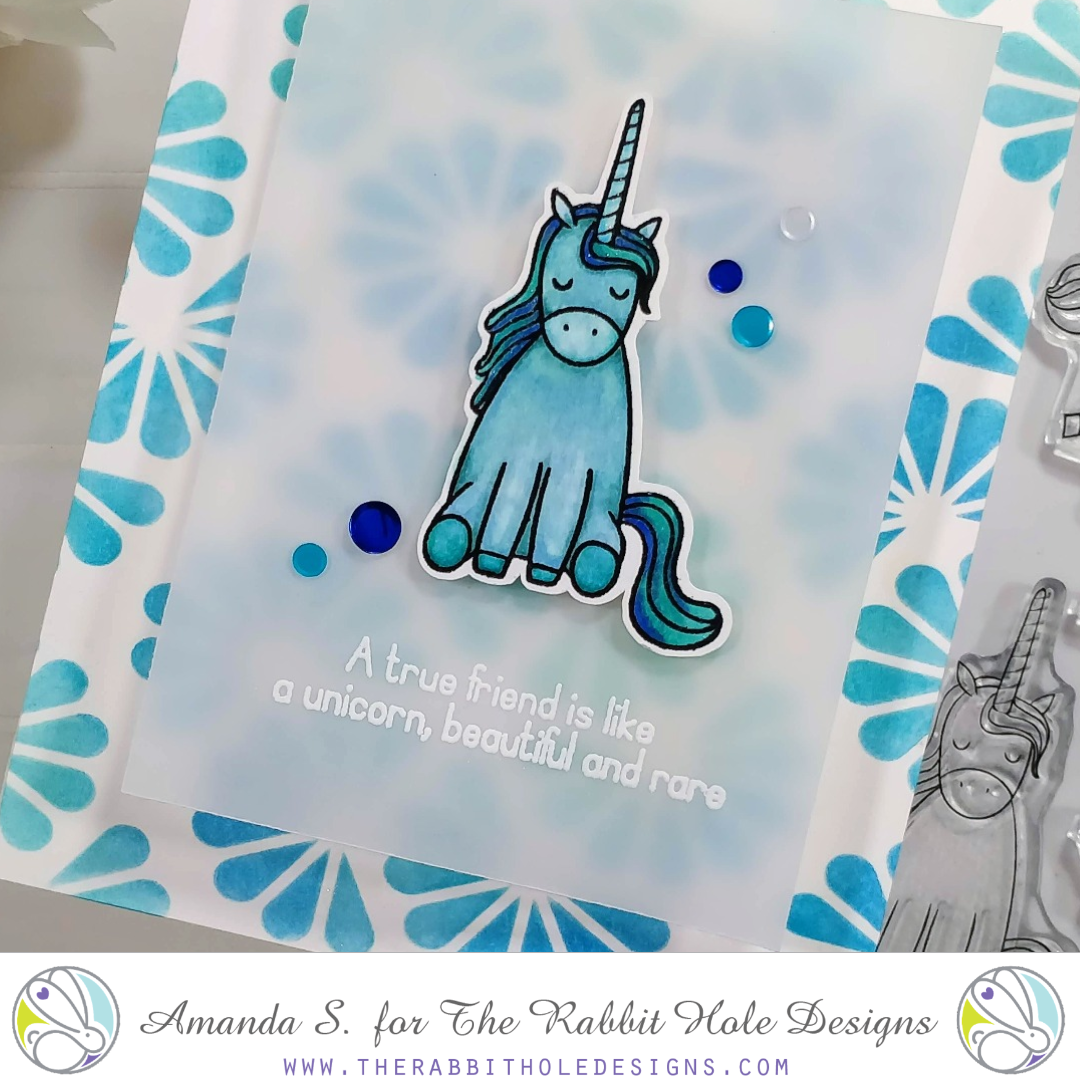
A Friend Like Blue


Hello again my crafty friend! It's Amanda from Pear Blossom Press, and I have a quick and easy card to share featuring the Sassy stamp set. I've also got a great tip I picked up at Creativation for a less messy way to apply shimmer to your backgrounds!


For this card, I Copic colored the sweet and Sassy unicorn in shades of blue, and added Aqua Shimmer pen highlights. Cutting her out with my ScanNCut was a breeze (I'm terrible at fussy cutting). I stenciled the background onto my card base using the Twisted Sunshine stencil and three shades of blue ink, then added some shimmer. 


Quick Tip

Here's a quick tip I picked up at Creativation from Fleurette, the inventor of Liquid Pixie Dust. To add shimmer to your backgrounds without splattering or misting it all over the place, try spreading a few drops of Liquid Pixie Dust onto a Gel Plate with a brayer. Then dip your background onto the plate to pick it up. It's similar to ink smooshing, but with shimmer. And there is no splattered mess! I love this new technique!!! 

Assembling the card was quick and easy. The vellum layer is sandwiched between foam tape, hidden under the unicorn. It's a heavier weight vellum that I embossed my sentiment onto. I chose the vellum because it diffused the background enough to allow the unicorn to pop, but didn't hide too much of the pretty stenciling. If the vellum was flat against the background, it wouldn't soften it enough, so the foam tape is important. A few sequins added some more sparkle and finished the card. 


You can recreate this card in any color scheme you like. Wouldn't it be fun to make a whole rainbow of cards and give them as a gift set? If you'd like to see more cards using the Sassy stamp set, check this out. You can also find the sister article to this post on my blog today! Head on over for links to the products I used and even more inspiration!


Thanks for stopping by; I'll be back soon with another super card to share! 


For more inspiration, updates, and news make sure to check out these links.

B.Y.O.Bengay


Good morning it's Lisa here with you this morning and welcome to the blog!
Today is my day on the blog and I have a snarky birthday card to share with you today. The brand new Sassy Birthday Sentiments 2 have some of the funniest birthday sentiments I've ever seen. I also love the new stencils available in the shop.  They work great as background stamps like the Twisted Sunshine Stencil or they can be masked off to create funny sayings like the "LOL" on my card using the Spell It Stencil! Since this is the birthday month for The Rabbit Hole Designs I decided to use their logo colors for this card.

Card Recipe

1) I started off by blending Tumbled Glass and Twisted Citron Distress Oxide Inks over the Twisted Sunshine Stencil on to a piece of Bristol Smooth card stock.

2) Next I took the Spell It Stencil and masked off the "L" and the "O" so I could create the abbreviation "LOL" towards the bottom of the card.  I used Shaded Lilac Distress Oxide Ink for this to complete the logo colors for The Rabbit Hole.

3) For the sentiment from Sassy Birthday Sentiments 2 I stamped it with Versamark Ink on to black card stock and heat embossed it with white powder then adhered it across the center of the card.

4) All that was left was to add some pretty Rabbit Hole sequins around the card for some fun!


I am really enjoying the Sassy Birthday sentiments, they are unexpected 
and always get a good laugh from the recipient!

Make sure to check out the shop for these products from The Rabbit Hole Designs!


Spell It Stencil 


Thanks so much for stopping by today!
And don't forget to visit Simon Says Stamp for all your Rabbit Hole needs as well!


For more inspiration, updates, and news make sure to check out these places ...

Have a great day, I already am!
👵🏻 Lisa 👨🏻‍🦳


Rainbow Happy Birthday


Good morning Rabbit Hole fans! It's Lisa here with you today on the blog!

The recent release at The Rabbit Hole Designs was all about birthday cards
and I never have enough of them on hand!

My 2 favorite products from this release were the 
Scripty Happy Birthday stamp and the 
Twisted Sunshine stencil.

I used both on today's card.

I started with the Twisted Sunshine stencil and did some ink blending
in rainbow colors. I then stamped the Scripty Happy Birthday stamp 
in black over the stenciled design.  I love how the black pops against 
the rainbow! I matted the panel on to a black card base and added
some sparkly clear sequins for some added interest.

I hope you enjoyed my card today and don't forget you can 
now purchase The Rabbit Hole Designs stamps at Simon Says Stamp!

TRHD Products used:


For more inspiration, updates, and news make sure to check out these places ...

Have a great day, I already am!
🎂Lisa 🎂