Pages

Showing posts with label Halloween card. Show all posts

Cute Pumpkin Halloween Wishes


Hi Y'all. Lauren here today to share my cute paper pieced Halloween card I created using the fun Silly Pumpkins stamp set. 

You can watch me create it in this quick video on my YT channel:


I just LOVE the cute expressions on these pumpkins! I hope I've given you some fun crafty inspiration today. I've linked products I used, below. Thanks for visiting!


 *Disclosure: I use affiliate links where I can. This does not add any extra cost to you, but I do receive a small amount which helps keep me creating. Thank You*

Silly Pumpkins Stamp Set: https://shrsl.com/4p8mr

Back Alley Stencil: https://shrsl.com/4p8mv

Jack of All Faces stamp set, The Rabbit Hole Designs: https://shrsl.com/4nuh3


You can follow me here:

BOO-tiful Silly Pumpkins

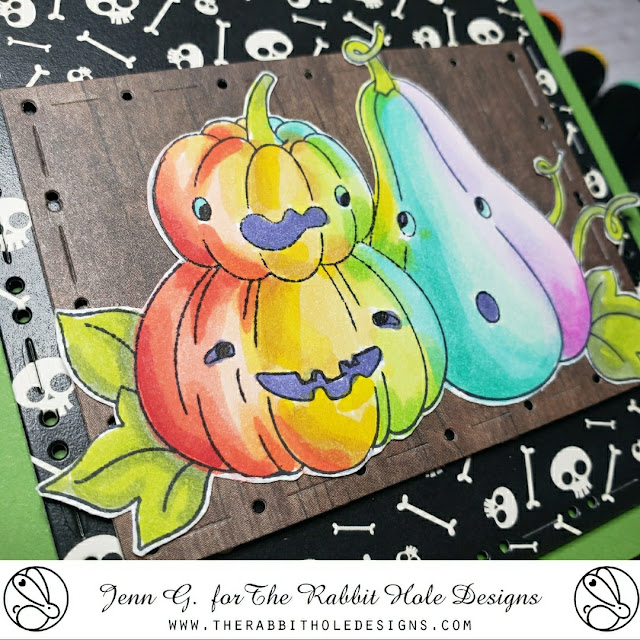
Hello my crafty friends!  Jenn here with a colorful Halloween card featuring The Rabbit Hole Designs  Silly Pumpkins stamp set paired with the You've Been Framed dies set. These pumpkins are so silly and whimsy. I decided to color them in rainbow colors. I’m using printed cardstock from my stash for the background layers.

Supply List: 

From my stash:
OLO Markers 
Boo word die
Printed cardstock 

I stamped he Silly Pumpkin image (an Agota Pop illustration) with black ink and colored them with OLO Markers in a rainbow blend.  I grabbed some printed Halloween cardstock  with skulls and die cut the medium You've Been Framed die.  The woodgrain  cardstock uses the smallest You've Been Framed die and it is cut smaller using the inside frame die to trim off about 2" from the long end.  

I layered the Halloween cardstock on a green A2 card base with adhesive foam squares and added the You've Been Framed  wood cardstock layer on top with adhesive foam squares.  The Silly Pumpkins are glued to the woodgrain cardstock The Boo sentiment from my stash and is added above the pumpkins with adhesive foam squares.

It is a super simple card.  Thank you for stopping by to check out this fun and whimsy Halloween card created with The Rabbit Hole Designs Silly Pumpkins stamp set.  I hope you are inspired to create something lovely and fun today!.

Be Creative ~ Stay Inspired

Jenn Gross


Follow me, Journey Coach Jenn, on 

Instagram - https://www.instagram.com/journeycoachjenn/

YouTube - http://www.youtube.com/c/JourneyCoachJenn

Blog - http://www.journeycoachjenn.com/


For more inspiration, updates, and news make sure to check out these places


The Rabbit Hole Designs

The Rabbit Hole Designs Instagram

The Rabbit Hole Designs Facebook Page

The Rabbit Hole Designs Pinterest

. - . The Rabbit Hole Designs YouTube

My Boo Crew!


Hi crafty friends! It's Lauren on the blog today sharing another fun card using the awesome new Jack of All Faces stamp set. These images have such fun expressions! 

I stamped my image onto a creamy cardstock then colored them using my colored pencils.


I then die cut the image out using a die from my stash, stamped on the sentiment, and ink blended
 around the edges using Black Soot distress ink.

To create my background, I ink blended Black Soot over the Connected by the Stars stencil onto a creamy cardstock panel measuring 4.25 x 5.5"(A2 sized). Then I adhered the panel onto a white, A2 sized card base.


Lastly, I adhered my cute pumpkins onto the card. I hope you have enjoyed all the different inspiration we have been bringing to you using this fun new stamp set! Happy crafting and thanks for visiting! 

Here are my links to the products I used: 

*Disclosure: I use affiliate links where I can. This does not add any extra cost to you, but I do receive a small amount which helps keep me creating. Thank You*

Jack of All Faces stamp set, The Rabbit Hole Designs: https://shrsl.com/4nuh3

Connected by the Stars stencil: https://shrsl.com/3fzr0

Cottontail Blending Brush: https://shrsl.com/3htkd


Simply Gourd-eous Halloween Card

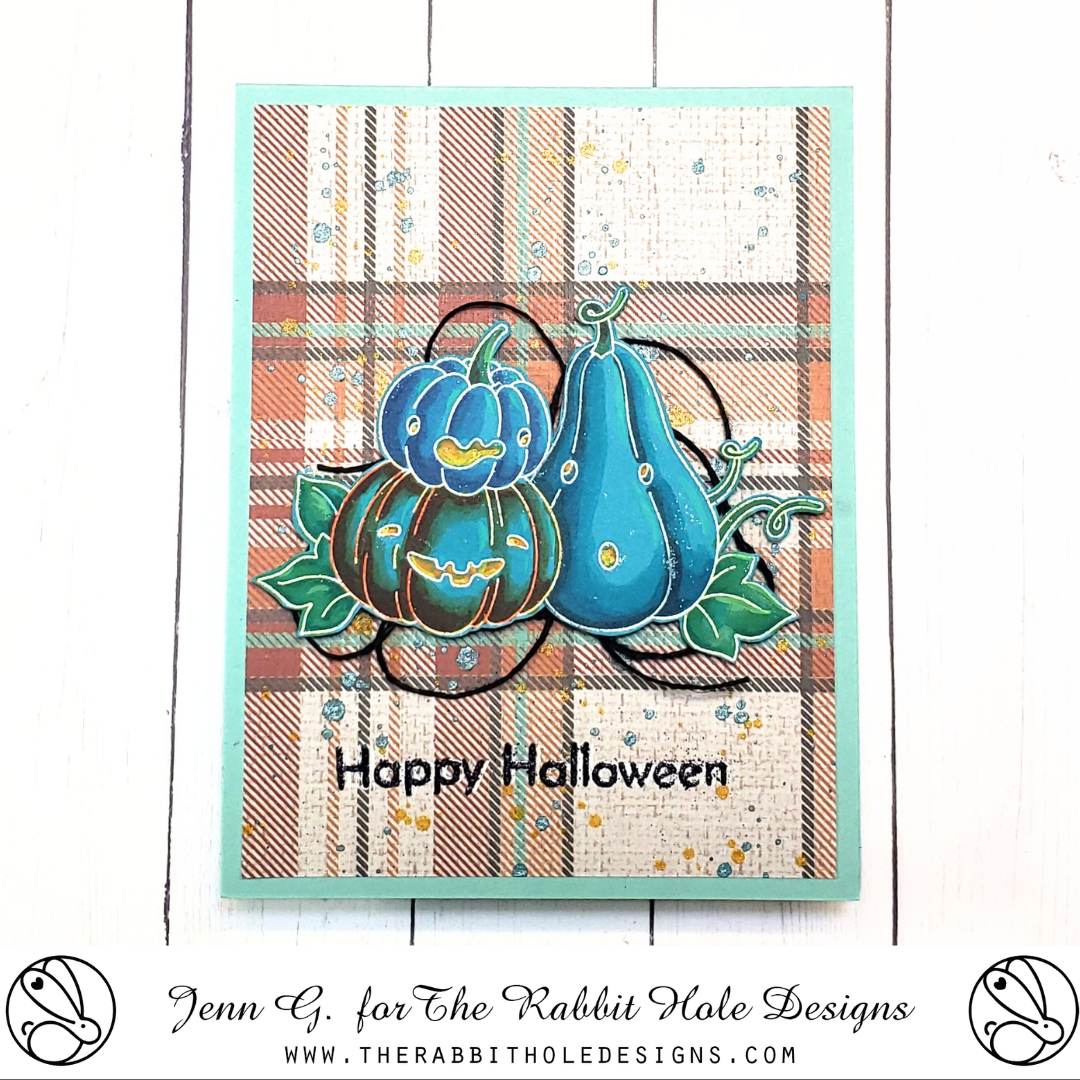
Hello creative friends!  Jenn here with this gourd-geous blue pumpkin card featuring The Rabbit Hole Designs' Silly Pumpkins stamp set, an Agota Pop illustration.

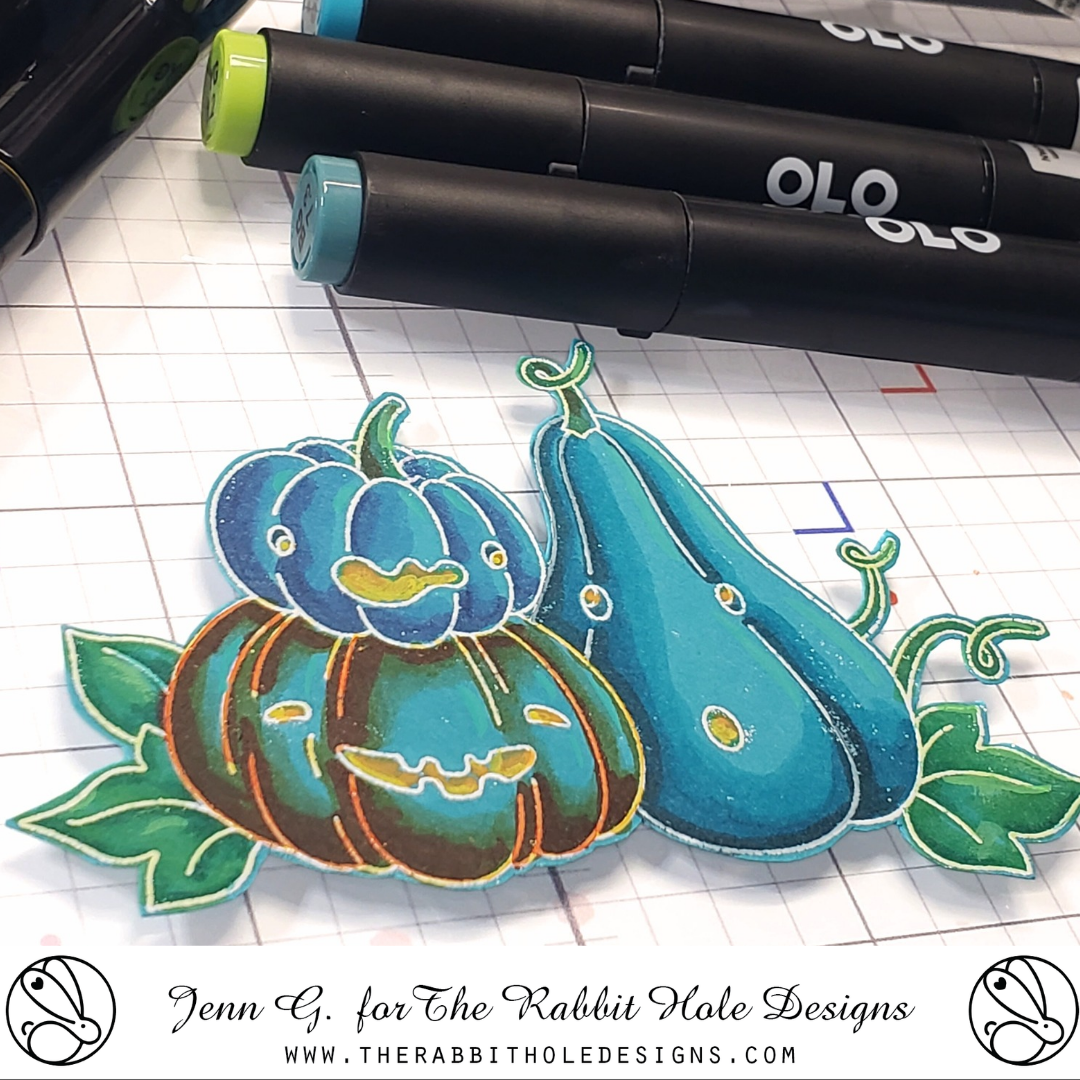
I love how vibrant these pumpkins are.  I treated a piece of bright blue cardstock with the Cottontail Embossing Powder Tool to help repel embossing powder from unwanted areas of cardstock. I stamped the image with VersaMark Watermark ink and heat set it in white embossing powder.
I shaded the Silly Pumpkins with OLO Markers using the blue (B) for the littlest pumpkin, blue green (BG) for the taller pumpkin, and orange (O) for the medium pumpkin.The leaves are shaded with green (G) and green  yellow (GY). I used a yellow Sharpie Creative Marker to brighten the pumpkins eyes and mouths. I fussy cut silly pumkind out and set the cluster to the side.
The A2 card base is cut from a light aqua cardstock.  The card front is a cut from coordinating printed cardstock in a brown, grey and aqua plaid. I splashed some gold and aqua metalic splatters on the card front. After the splatters dried, I treated the lower part of the card front with the Cottontail Embossing Powder Tool before stamping the Happy Halloween sentiment and heat setting it with black and white embossing powder.

I glues the plaid card front to the card base, added and attached twisted and looped black twine with double sided adhesive tape to the center of the card. I attached the pumpkins cluster with double sided adhesive foam tape over the twisted twine on the card front completing the card.

The Rabbit Hole Designs Supply List

Other supplies from my stash
OLO Markers
VersaMark Watermark ink
White Embossing Powder
Black Embossing Powder
Black Twine
Metalic paint (to splatter)
yellow Sharpie Creative Marker
 

Thank you, I appreciate you taking time from your day to stop by and check out this Simply Gourd-geous Halloween card created with The Rabbit Hole Designs' Silly Pumpkins stamp set. I hope you are inspired to create something lovely today! 


Be Creative ~ Stay Inspired

Jenn Gross


Follow me, Journey Coach Jenn, on 

Instagram - https://www.instagram.com/journeycoachjenn/

YouTube - http://www.youtube.com/c/JourneyCoachJenn

Blog - http://www.journeycoachjenn.com/


For more inspiration, updates, and news make sure to check out these places


The Rabbit Hole Designs

The Rabbit Hole Designs Instagram

The Rabbit Hole Designs Facebook Page

The Rabbit Hole Designs Pinterest

The Rabbit Hole Designs YouTube


Under Your Spell - Halloween Shaker Card

Hello crafty friends!  Jenn here, follow mw on social media @journeycoachjenn  Today I am sharing this fun interactive halloween card created using five products from The Rabbit Hole Designs. 

I started out with the newly released Pinwheel stencil, an A2 Shaker Acetate Sheet for the infinity shaker, the patented Cotton Tail  Embossing Powder Tool to treat the gray cardstock before heat embossing white cobweb images in the background and the sentiment on the black pumpkin, and images from the Meowgical stamp set. 

Supplies include:

Other  Supplies
OLO Markers
Chunky upper case alphabet letters to spell out "BOO" (from my stash)
Small Pumpkin die (from my stash) 
Purple and Orange sequins (from my stash)
Distress Oxide inks - Villianous Purple and Carved Pumpkin
VersaMark Clear Watermark Ink
White Embossing Powder
Bearly Arts Craft Glue
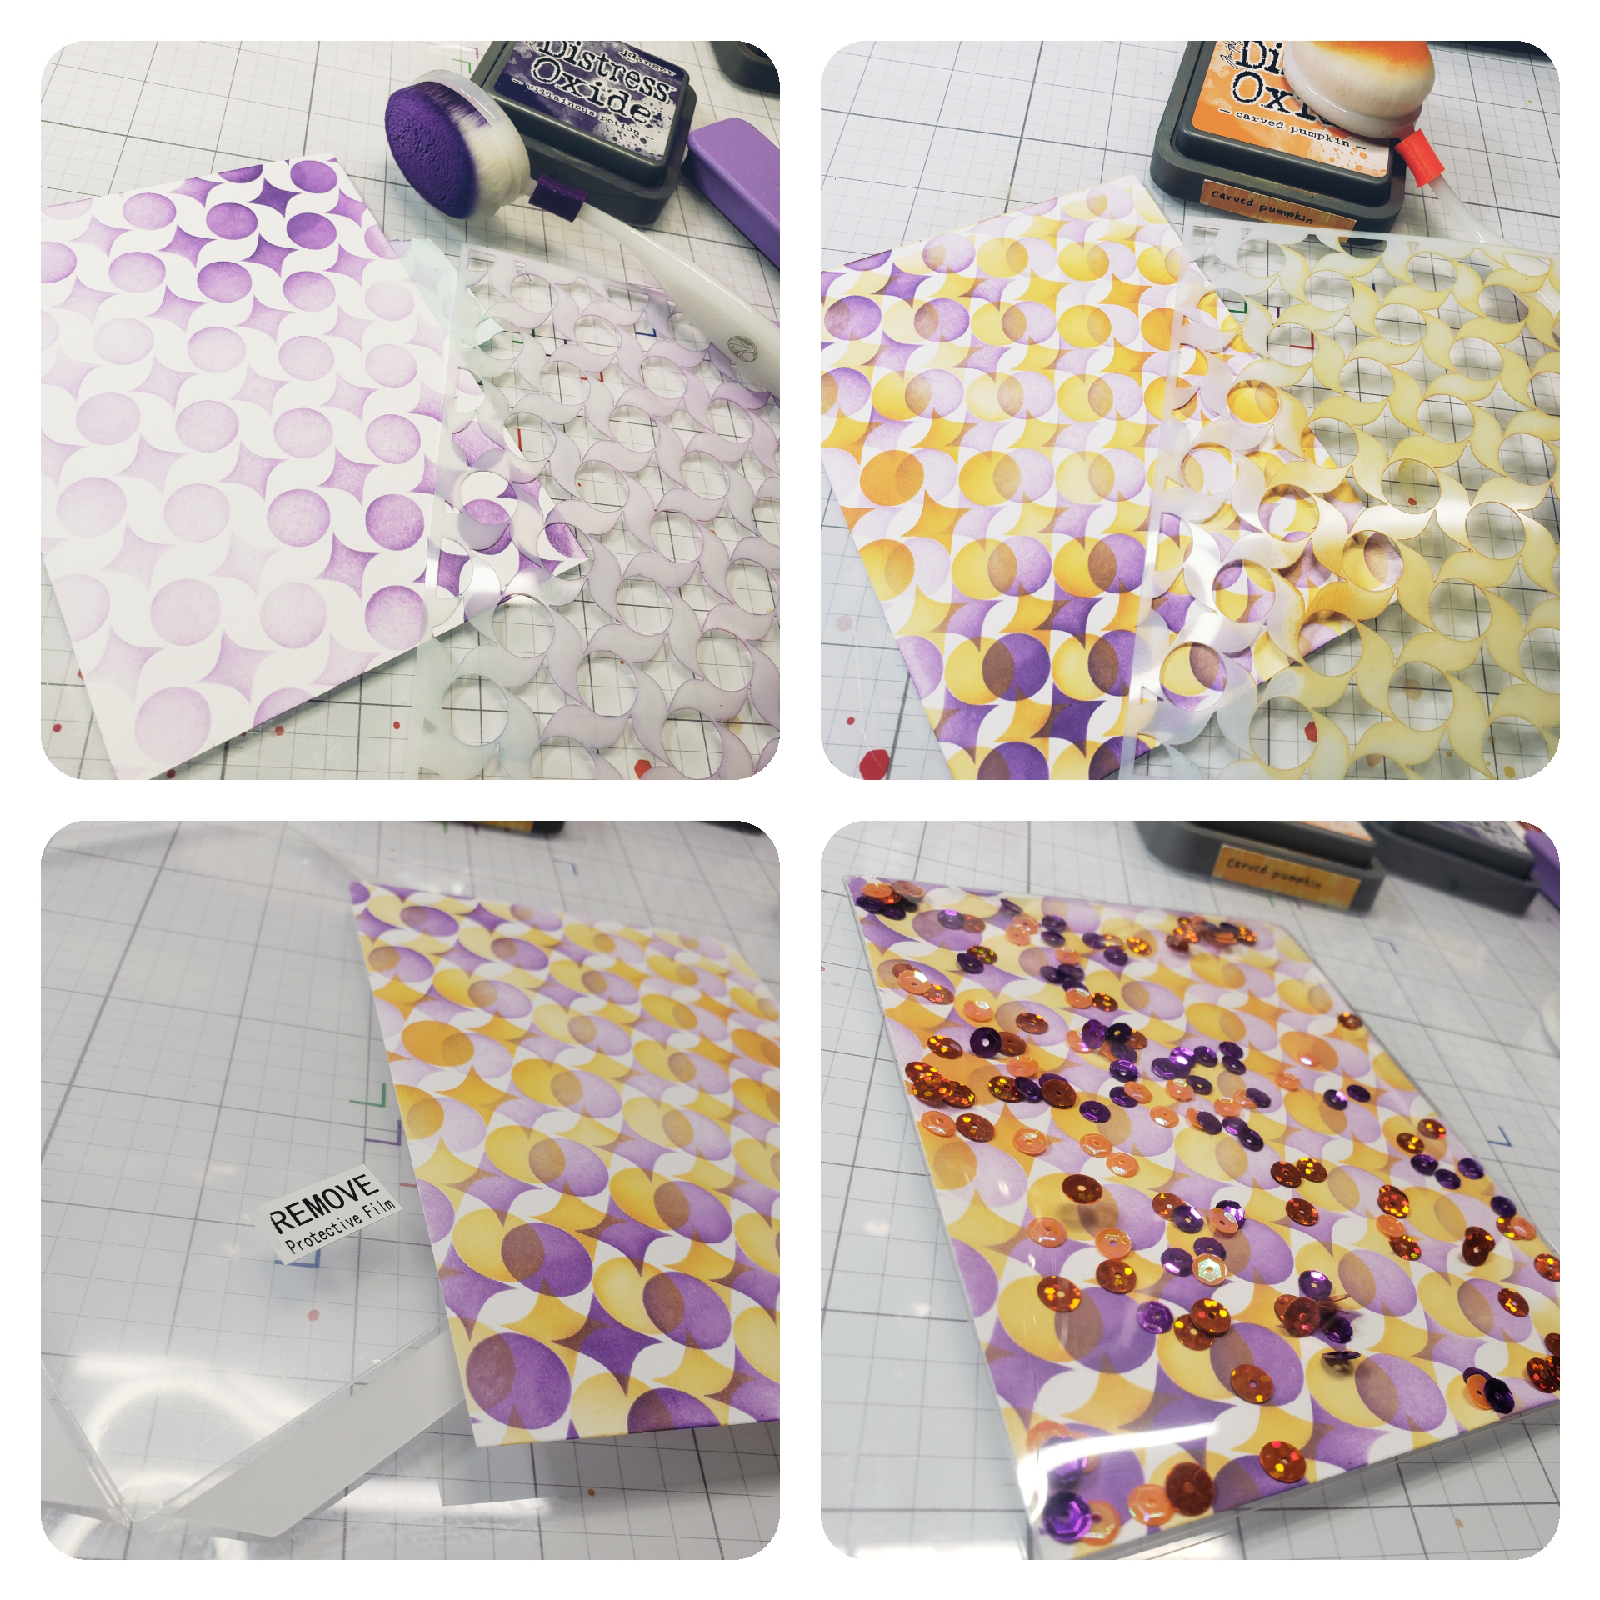
I stenciled a piece of 4 1/8" x 5 3/8" white cardstock using the Pinwheel stencil with Villanous Purple Distress Oxide ink. Clean the stencil and place it over the purple Pinwheels shifting it slightly catching the curve of the stencil circle in the curve of the purple stencil pin wheel.  Stencil it with Carved Pumpkin Distress Oxide ink.

Use one of the A2 Shaker Acetate Sheets and adhere it to three of the four sides of the Pinwheel stenciled background card. Add some purple and orange sequin shaker bits in the pocket and seal the remaining shaker window opening.
Using the Meowgical stamp set (illustrated by Agota Pop), stamp the spiderweb four times on gray cardstock. Heat emboss with white embossing powder. Use die cut alphabet letters from your stash to die cut the word "boo" from the embossd spiderweb cardstock and die cut a second set from black cardstock. Glue the spiderweb letters on top of the black letters off setting them slightly to create a black shadow. Set them aside.

Stamp the cat in the pumpkin.  I colored him with OLO markers using the Orange, Blue Green markers and cut out the image.
I stamped and heat embossed the sentiment  "I purred a spell on you" onto a piece of black cardstock treated with the Cottontail Embossing Powder Tool.   It is stamped with VersaMark Watermark ink and heat set with white embossing powder.  I used a pumpkin die from my stash to cut out the sentiment. Glue on the BOO at the top left side of the shaker card and glue the black  pumpkin sentiment with the kitty in the pumpkin image to the lower right side of the shaker card.  Attach the card to a whit A2 card base to complete the card.

Thank you, I appreciate you taking time from your day to stop by and check out today’s The Rabbit Hole Design project.  I enjoyed sharing the steps to recreate this fun halloween shaker card.  I hope it inspires you to create something lovely today!


Be Creative ~ Stay Inspired

Jenn Gross


Follow me, Journey Coach Jenn, on 

Instagram - https://www.instagram.com/journeycoachjenn/

YouTube - http://www.youtube.com/c/JourneyCoachJenn

Blog - https://journeycoachjenn.blogspot.com/  


For more inspiration, updates, and news make sure to check out these places


The Rabbit Hole Designs

The Rabbit Hole Designs Instagram

The Rabbit Hole Designs Facebook Page

The Rabbit Hole Designs Pinterest

The Rabbit Hole Designs YouTube 

Hey Boo! Halloween Card


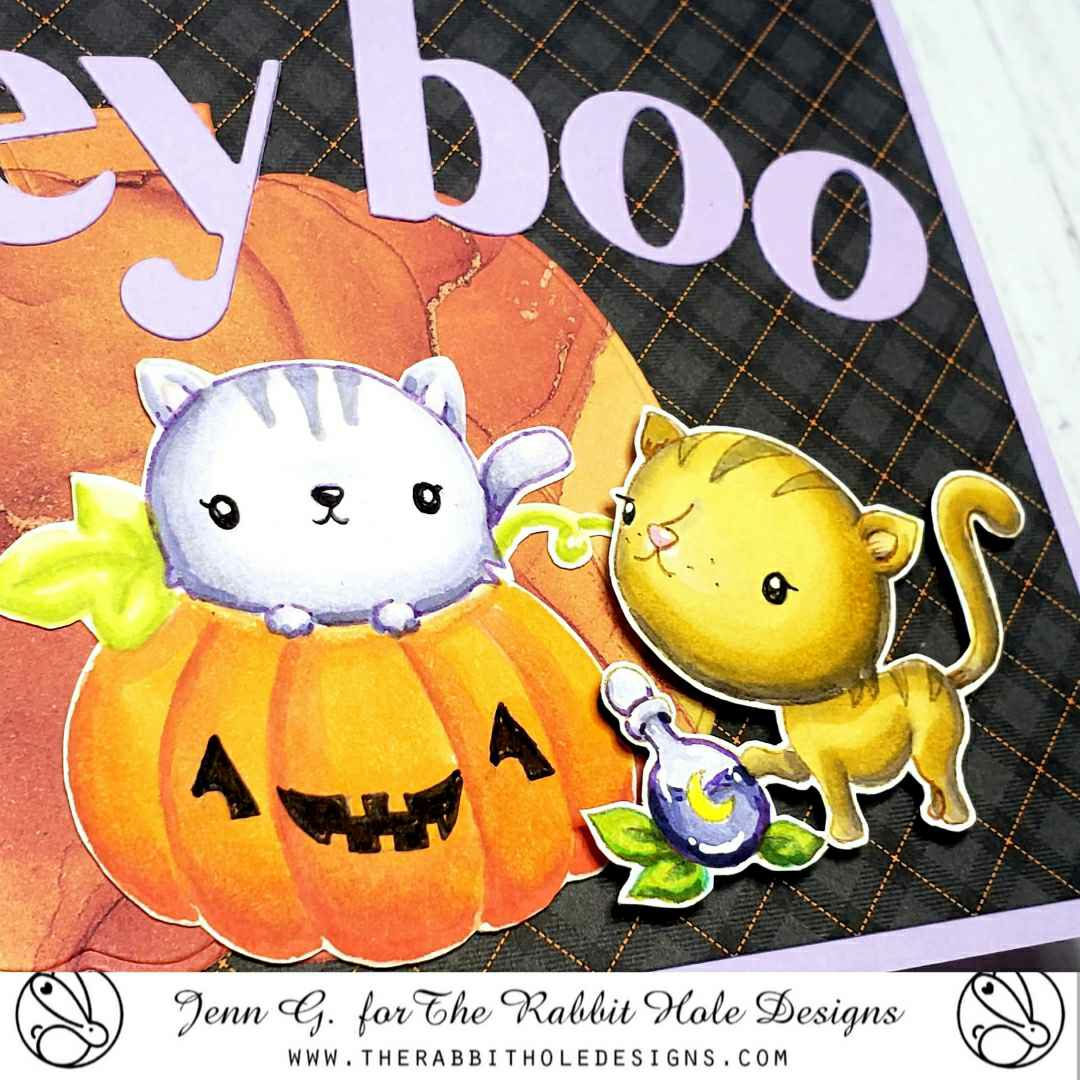
Hello crafty friends and welcome to today's blog.  I am keeping the design simple and sharing The Rabbit Hole Designs' kittens from the Meowgical stamp set. These cute kittens are an Agota Pop Illustration,   This is an easy to re-create A2 Halloween card.
The images are colored with OLO Markers and the sentiment is die cut from the retired Niccole Lowercase Alphabet dies 

The pumpkin kitten is stamped for no line coloring and colored with Blue Violet OLO markers. I took my artist liberty and slightly changed  the pumpkin eyes and smile.  The yellow potion kitten is colored with Yellow Orange and Orange OLO markers.


Products Used

Thank you, I appreciate you taking time from your day to stop by and check out this cute Hey Boo Halloween card featuring The Rabbit Hole Designs New Meowgical stamp set and Coordinating dies. I hope you are inspired to create something lovely today! 


Be Creative ~ Stay Inspired

Jenn Gross


Follow me, Journey Coach Jenn, on 

Instagram - https://www.instagram.com/journeycoachjenn/

YouTube - http://www.youtube.com/c/JourneyCoachJenn

Blog - http://www.journeycoachjenn.com/


For more inspiration, updates, and news make sure to check out these places


The Rabbit Hole Designs

The Rabbit Hole Designs Instagram

The Rabbit Hole Designs Facebook Page

The Rabbit Hole Designs Pinterest

The Rabbit Hole Designs YouTube


Pretty Mini Slimline Halloween Card


Hello! It's Lauren here again today with a cute and pretty mini slimline card. I used the new Spooky Sightings stamp set, illustrated by Agota Pop Illustration. 

I've created a short video that shows my process up on my YouTube channel. You can watch it here: 

https://youtube.com/shorts/by3_VG5wKX4?feature=share

I hope this inspires you to create a fun Halloween card. I've linked the products I used down below. Thanks for visiting!


  You can follow me at these places:

Purrfect Erie Evening - Created with The Rabbit Hole Designs Meowgical Stamp Set


Hello crafty friends!  Today I am sharing this Too Cute to Spook Halloween card created with The Rabbit Hole Designs new Meowgical stamp set along with the Torn Paper stencil, and Clouds In My Coffee stencil.  Tools include Cottontail Embossing Powder Tool, and TRHD blending brushes.

Card Step Tutorial 
A & B - On a piece of 4" x 5 1/4" navy cardstock, use the Torn Paper stencil and Bitty Blending Brushes with two Distress Oxide green inks to create a blended dimensional ground

C & D - Use the Clouds In My Coffee stencil with Cottontail Blending Brush, Shark Tooth White ink and Carved Pumpkin Distress Oxide ink to blend the clouds. Use a stencil with small stars or circles and add it to the night sky
E & F - Treat the op left of the card front with the Cottontail Embossing Powder Tool and stamp the spider web stamp (from the Meowgical stamp set) with Versamark Clear ink. Heat set the stamped spiderweb with silver embossing powder.  Glue tree branches die cut  using a die from your stash on the card front in front of the spider web

G - The Vampire cat is stamped and color with Olo Markers in Blue Violet, Violet, Red Gray and Blue Green markers. Color one of two of the small Matte White Enamel Dots blue green and the other purple with Olo Markers. Add the colored dots to create the body of the spiders

H - Attach adhesive double-sided foam to the back of the colored and die cut Vampire cat and attach it to the card front. Mount the card front onto a white A2 card base


Products used
Meowgical stamp set                        Meowgical die set
            
              Torn Paper stencil                         Clouds In My Coffee stencil 
                   
                  Matte White Enamel Dots               Cottontail Embossing Powder Tool
            
                   Bitty Blending Brushes                Cottontail Blending Brushes         
                 

Thank you, I appreciate you taking time from your day to stop by and check out today's Card - Purrfect Erie Evening, created with The Rabbit Hole Designs new Meowgical stamp set. I hope you are inspired to create something lovely today!


Be Creative ~ Stay Inspired

Jenn Gross


Follow me, Journey Coach Jenn, on 

Instagram - https://www.instagram.com/journeycoachjenn/

YouTube - http://www.youtube.com/c/JourneyCoachJenn

Blog - http://www.journeycoachjenn.com/


For more inspiration, updates, and news make sure to check out these places


The Rabbit Hole Designs

The Rabbit Hole Designs Instagram

The Rabbit Hole Designs Facebook Page

The Rabbit Hole Designs Pinterest

The Rabbit Hole Designs YouTube


Disclosure - I love designing and creating cards and papercrafts.  I hope sharing my creations, some tips and techniques inspires you to create something lovely.  Please know, I have an affiliate relationship with some of the companies and the product links found on this blog. I love the products the I use and find joy in creating with them. I will occasionally try out a new product and will give you my honest opinion.  If you purchase products from these links, I will receive a small portion of your purchase at no additional cost to you. I use affiliate links of artist and crafters that inspire me.  It is a great way to support a fellow creator.  Find additional affiliate links at https://hype.co/@journeycoachjenn


Trick or Treat Smell my Feet...

Hello crafty friends and welcome to The Rabbit Hole Designs blog.  I created a slimline door card using the The Right Shoes stamp set as door decor.  You may  also notice the panel pattern created in the door.
I stamped the shoe image with Black ink and colored it with Copic alcohol markers.  It is cut it out and set it aside.
The door is created by gluing strips of aqua cardstock on a diagonal pattern onto a 3 1/2" x 8 1/2" white cardstock card front. Trim off the excess slats and cut it into two 8 1/2"x 1 3/4" strips.  A simple turn of one of the strips will create  a chevron pattern when the two sides are plaed next to each other. Adhere these two pieces to a second sheet of 8 1/2" x 3 1/2" white cardstock. Trim them to size creating two door panels.  Frame them with strips the of 1/4" aqua cardstock.  You can see each aqua panel  sits upon a white layer and those two pannels are on top of a full aqua layer for the card front and attached to a Slimline white card base.  A door knob was added using a mat silver rectangle and two different size black gems.  The shoes are added last using adhesive foam squares.

Here are The Rabbit HoleDesigns products used in this card:

The Right Shoe stamp set

I hope you enjoyed learning how ro create a chevron pattern from paper strips used in this slimline door card featuring The Right Shoe stamp set.  Please feel free to leave a comment or ask a question      


Be Creative ~ Stay Inspired

Jenn Gross


Follow me, Journey Coach Jenn, on 

Instagram - https://www.instagram.com/journeycoachjenn/

YouTube - http://www.youtube.com/c/JourneyCoachJenn

Blog - http://www.journeycoachjenn.com/


For more inspiration, updates, and news make sure to check out these places


The Rabbit Hole Designs

The Rabbit Hole Designs Instagram

The Rabbit Hole Designs Facebook Page

The Rabbit Hole Designs Pinterest

The Rabbit Hole Designs YouTube