Pages

Inspiration Hop for the October Release ~ Day 1


Hello and welcome to Day 1 of the Inspiration Hop. We are so excited for you to join us as we present to you our October release.  Our fabulous Design Team will be sharing their projects over the next 3 days, so be sure to visit their blogs and leave them some crafty love.

 The 7 new stamp sets and coordinating die's (6) are available to purchase right now in the shop.
~
Every order placed will be eligible for a 10% discount. Discount Code TRHD2019 this code will only be accepted until Friday 10-04-2019 12:01 am PST. There are no exclusions on this code it is applicable to your whole order. Please Note: There will not be free shipping available during the time this discount code is in effect. Not applicable to previous orders. May be used more than once. Does not apply to shipping and tax.
~

The stamp set that is being highlighted today is:

Steeped in Happiness


**Giveaway**
To celebrate day 1 inspiration The Rabbit Hole Designs is giving away the stamp set Steeped in Happiness to One lucky winner. Winner will be chosen at random from the comments left on participating blogs, so make sure to visit each stop and leave a comment. Leave comments by 11:59 pm PST 10-03-19 on all participating blogs. Winner will be announced on The Rabbit Hole Designs blog 10-04-2019


Here is the line up for the hop:
Shanna Slater
Niccole Kulig
Amanda Stevens
Amanda Wilcox
Lisa Golzbein

Make sure you come back tomorrow for Day 2 of our Inspiration Hop.


Thank you so much for stopping by today!

Depresso Flamingo

Hey everybody! It's Amanda W. taking over today with a bold and bright caffeinated flamingo card. I have been playing with distress ink backgrounds lately and when this one was finished I knew I wanted to try a flamingo with it.


Here are the details:
  • Blended distress inks and spritzed the panel with water. Then adhered it to a card front.
  • Trimmed down a black panel to 4x5.25 and die cut a border out. Then popped this up with foam tape for dimension.
  • Stamped, colored and die cut my flamingo. Then I glued him directly to the black panel.
  • I chose a sentiment from the Perfectly Blended set, stamped it on a red-ish cardstock that matched my background and popped the strip up with foam tape.
  • For finishing touches I added glossy accents to the mug and gems scattered throughout. I love a little bling!


I love that black cardstock against the bright background. And the flamingo is just soft enough to pop from both of those elements and not get lost. This is such a fun card and was pretty quick to put together. I feel like a set of these with different sentiments would be a fun gift for someone. Or a great thing to have on hand for when you need to send a card on short notice.

Thanks for hanging with me today! Below are the products I used.


For even more inspiration, updates, and news make sure to check out these links.

Spooky Front Porch Card


Hello my crafty friend, it's Amanda from Pear Blossom Press again! Now that fall is here, I wanted to revisit the Front Porch Card I made over the summer and give it a Halloween makeover. This time I added lights too! Take a look at it in action...


For the spooky version of the card, I switched up the colors and decorative elements. You can see the original card and how to build the frame here. Instead of a white house, I colored it in shades of grey with Copic Markers. This time around, I kept the cutouts from the door panels and taped them back in place. I added a spooky fence in front of the pillars and swapped the flowers and stars for a jack-o-lantern and bats from the Hex Yeah stamp set. Instead of the kissing couple behind the doors, I've got the Caffeinated Spider swinging from a piece of thread. Notice she's holding candy where her coffee mugs usually are. I just masked off the mugs on the stamp before stamping, then stamped candy in their places, and used a Copic liner to connect the legs lines. I embossed boo and push here onto a die cut banner and tucked it behind the pumpkin.

This card has three different interactive elements to it. First, the doors open. The Impresslit I used both cuts the doors, and embosses the stone pattern around them. So all of the work is done with one pass in the Big Shot. The second interactive element is light! I used one of my EZ-Lights and taped the battery to the back of the bottom step (with the switch lined up under the push here stamp). Then, I simply punched a hole through the step, threaded one of the lights through, and taped it in place behind the pumpkin. I taped the other two lights above the center of the doors to light up the spider and her web. The last interactive element is the swinging spider. To do this, I just taped a piece of thread to the back of her, then sandwiched the top of the thread between two layers of foam tape. By using a double layer of foam tape all the way around the back side of the porch piece, it left her plenty of room to swing, and room for the light to bounce around.


I love how this one turned out! In fact, this card actually inspired the first card, even though it hadn't been made yet. Being on The Rabbit Hole Design's design team, I knew the jack-o-lantern stamps were coming and that got me thinking about creating a front porch to put them on. Since it was early summer, and I had been searching for porch decor on Pinterest, my feed was full of great ideas for summery porch scenes. That's when I realized this card base could be adapted to any season. (I already have a Christmas card in mind.) What kind of scene would you make?

You can find the sister article to this post on my blog today, along with links to the specific products I used. Soon, you'll be able to find my EZ-Lights here at The Rabbit Hole Designs. Until then, you can find them here. Be sure to pick up these items to recreate today's card...

Hex Yeah
Boo to You
Caffeinated Spider (available September 30th)
Liquid Pixie Dust
Diamond Glaze

Thanks for stopping by today! I'll be back soon with more fun cards to share!

Wishing you a Spooky National Coffee Day!

Hey everyone!  Shanna here today with a card featuring the ever so creepy Caffeinated Spider!  EEEEeeep!


I loathe spider in real life, they are truly creepy!!  BUT!  This guy I can tolerate, and actually kinda love him!  He is pretty darn cute, even if he has the whole spider-thing against him.

I decided to no line color him using my Zig markers, and am pretty happy with how he turned out!  I fussy cut him and then set him aside while I made up my background.


I went all sorts of colorful on my ink blending this time, using Squeezed Lemonade, Fossilized Amber, Spiced Marmalade, Barn House, Seedless Preserves, and Chipped Sapphire all layered and blended from the bottom up.  Soooo much fun!  Next I grabbed a stencil from my stash and my Gina K Glitter Gel in Black.  I love all the glitz!!

After it was dry, I trimmed it down to 3.75x5" and then die cut a frame to lay over it.  I glued a bead to the back of my spider and ran a piece of metallic thread for his *web* the full length of the card.  I sandwiched the thread in between 2 layers of foam tape and the frame, making sure to string my spider on it as well.   Adhered the stenciled panel and the frame to a card base and voila!!  I have a dancing spider card!!  I don't do a lot of interactive cards, but I do love this one!!  Here is a quick video of it in action...(mind you, videos are definitely NOT my forte right now LOL)


That wraps up my post for today, I will be back next week for another trip down The Rabbit Hole!  Until then you can find me over on my blog, Caffeinated Craftiness or over on Instagram!  
-Shanna

For even more inspiration, updates, and news make sure to check out these links.

I'd Pick you by Niccole

Hello everyone!


It's Niccole from Nic & Viv Designs back again to share another card I made using one of The Rabbit Hole Designs stamp sets. 

For today's card I used the Pumpkin Friends stamp set along with the Puzzle Box stencil.


How to create this card:


  • Standard A2 card base in dark gray
  • White panel that was stenciled with the Puzzle Box stencil in gray 
  • Glue to card base
  • Stamp your sentiment from Pumpkin Friends
  • On a piece of white card stock stamp you pumpkin image from Pumpkin Friends
  • Copic color and fussy cut your image
  • Attach to white panel
  • Finish with Nuvo Drops
Here is one more picture of the full card ...


TRHD Products used:

Pumpkin Friends

Puzzle Box

For more inspiration, updates, and news make sure to check out these places

The Rabbit Hole Designs YouTube


I have had so much fun playing with the Pumpkin Friends stamp set along with the Puzzle Box stencil.

Thank you so much for stopping by and spending some time with me.

Until next time ... Hugs & inky fingers!   -Nic-

Guest Design Team - Koren Wiskman

We are pleased to bring you another project from our September 2019 Guest Design Team member Koren Wiskman

We sent Koren the Gourd-geous stamp and we think she nailed it with her project. To see all the details please click here -> Show me the Gourd-geous


We love the use of the ink blending and the fun tombstone element to hold the hashtag sentiment included with the Gourd-geous stamp set.  If you do not follow Koren on Instagram you really need to, not only does she make some amazing projects but her Insta-Stories are one of the reasons we love and follow her most.  She is a "Keepin it Real" kind of crafter. 
This post concludes Koren's GDT time with us and we have so thoroughly enjoyed her projects.
~
Until then for more inspiration, updates, and news make sure to check out these awesome places! 

Thank you so much for stopping by today!

Resting Witch Face


You know that look? That look that will even keep a vampire away? Luckily for us, she is withholding her face so we can only see her pretty legs!!!
She is a shaker with halloween colored sequins. Lovely, isn't she?


             She is available at The Rabbit Hole Designs and at Simon Says Stamp.


Hex Yeah 4x6


Here is what I did:

  1. I created the background by using black Gina K Designs Glitz Glitter Gel and the Diamond Flower Stencil.
  2. I sloppily applied the gel on a heavy duty card stock big enough to cover a 4.25 x 5.5. top folding card.  Clean and dry the stencil.
  3. Stamp, cut and color the stamp. Stamp the sentiment.
  4. Once the gel is dry on the paper, use a frame die, like the MFT Square stitched frames, and make a shaker using a sheet of acetate.
  5. Adhere dimensional tape to the back of the frame.
  6. Add sequins to the center and adhere the frame enclosing the sequins.
  7. Use double sided tape on the stamp and the sentiment and you're done!

For more inspiration, updates, and news make sure to check out these links.


Thank you so much for stopping by today!
 Leave me a comment and let me know if she is that bewitching!


Candy Corn kisses,


Charmaine


Will you be my pumpkin friend?


Welcome back down the rabbit hole!

Echo here from Stamp N Ground with a fun card I made using Pumpkin friends! Fall is in the air for sure. I love the colder nights and the crisp morning! 


Stamped Pumpkin friends and ink blended the background! 


Mist with water to activate distress ink!


Stenciled background!


Stamped Pumpkin Friends again and Copic colored! Then fussy cut pumpkins and added them to ink blended background! Spattered with some teal paint. Added sentiment and gems. 


I am loving how this caed turned out! Pumpkins, witches, cats, ohh my. Check out all the fun fall stamps that The Rabbit Hole Designs has to offer! 


                      For more inspiration, updates, and news make sure to check out these places.                                             
The Rabbit Hole Designs
The Rabbit Hole Designs Instagram
The Rabbit Hole Designs Facebook Page
The Rabbit Hole Designs Pinterest
The Rabbit Hole Designs YouTube

Thank you so much for stopping by!
Stamp on- Echo

Pink and Fearless


Good morning Rabbit Hole fans, it's Lisa here with you today!
Did you get your Fearless Bundle yet?
This a whole package full of pink awesomeness not to mention you'll be supporting 
breast cancer research when you purchase the bundle!
With every purchase made, The Rabbit Hole Designs will be donating $5.00 to the
Breast Cancer Research Foundation! 
This bundle is on sale for $19.99 but the approximate
retail value is over $35.00

In each bundle you will receive:

A 4x6 stamp set including 2 ribbon designs and 8 sentiments
1 pink ribbon enamel pin
1 Pink Pilot G-2 pen
1 package of pink blend confetti style sequins (not pictured above)
1 Rabbit Hole Designs enamel pin (not pictured above)

The bundle is available now but supplies are limited so if you want 
all these goodies to be yours than click this link and head over there now!

I did get my hands on this fabulous package of pink goodness and I have a couple
of cards to share with you today!

For my first card I decided to make a shaker card using the pretty pink sequins in the
bundle.  I stamped one of the beautiful ribbon images in soft pink and put it behind
my shaker window then added some pretty pink sequins from the bundle and some silver 
ones from my stash. Shaker cards are one of my very favorite types of card to make.


I love how elegant that ribbon looks inside the lacy frame!
I finished off the card with a sentiment from the set embossed in silver.

For my second card I decided that our little friend the Caffeinated Bee
would look really cute all colored up in pink!
She is definitely Fearless with her little cup of caffeine!


I also used the Circles and Stars stencil for the background of my card.
I just love how the word Fearless looks stamped in black over the ribbon. 
That little Bee always cracks me up!

As always thanks so much for stopping by the blog and if you want your
very own Fearless Bundle than head over to the shop because it won't be there forever!

For more inspiration, updates, and news make sure to check out these links.

Have a great day, I already am!
💗 Lisa  💗

Curiosity with Katie

Happy Saturday!  Happy to be here on a Saturday, my fave day of the week, drinking coffee and sharing papercrafts.  What more could a girl ask for?!

So as we sprint into fall (it sure does feel that way to me), I have another fun Halloween card using the September release. 


I love the contrast of colors here and the sharpness of the edges and the background die.   I also love the embossing powder, Metalline Flame, and the sparkly enamel dots, they just complete the intense feel. 

Here's how I made it:
  • I started by stamping my image from the Hex Yeah set and colored it with my Copics.  I fussy cut it out and set it aside. 
  • Next I went about creating the layers.  I knew I wanted to use this die and make the color pop through the black, but I had to be careful about placement so that it didn't take away from her lovely orange dress.  
  • Once I had my layers and colored CS picked, I cut them to the size I wanted.  
  • I mounted my girl on top and set it aside. 
  • Next, I cut a black base.  On the base I stamped this sentiment from my stash with versamark ink and embossed with Metalline Flame embossing Powder from Wow.  I chose this color because it complimented the scene so well. 
  • I came back in and mounted my layers and dress on the card. 
  • Lastly, I added these sparkly enamel dots from Freckled Fawn. 


Well, I hope you like this card!  I truly enjoyed making it. You can head to my blog here for a full list of supplies.  


For even more inspiration, updates, and news make sure to check out these links.

Watercolor Pumpkin Friends

Hello everyone and welcome back! It's Amanda W. sharing some watercolor fun with Pumpkin Friends today.


Today I decided to get messy with watercolor. Let's be real, I'm rarely a clean crafter but when you add paint I'm an extra mess.
  • Today I used watercolor paper for the background panel and just did multiple layers of black watercolor, drying the paper in between to add texture and dimension to the paint. Then I splattered that with gold and purple watercolor and set it aside to dry.
  • I stamped, colored and cut my pumpkins and popped them up with foam squares.
  • I stamped and heat embossed the sentiment in gold and then stamped a spider hanging down from the bottom of it for an extra spooky look.
  • For finishing touches I added glossy accents to the pumpkin's eyes, noses and mouths and the spider's body.
  • This whole thing was glued onto a purple card base for a little pop of extra color around the edge.

Look at the light shine off the glossy accents. It really gives it a whole different look. I love it!

Here are the stamp sets I used.


For even more inspiration, updates, and news make sure to check out these links.


Hanging by a Thread


Hello my crafty friend, it's Amanda from Pear Blossom Press again! How do you take your coffee? I usually prefer mine sans spiders, but this one is so cute, I couldn't resist. I was inspired by my friend 
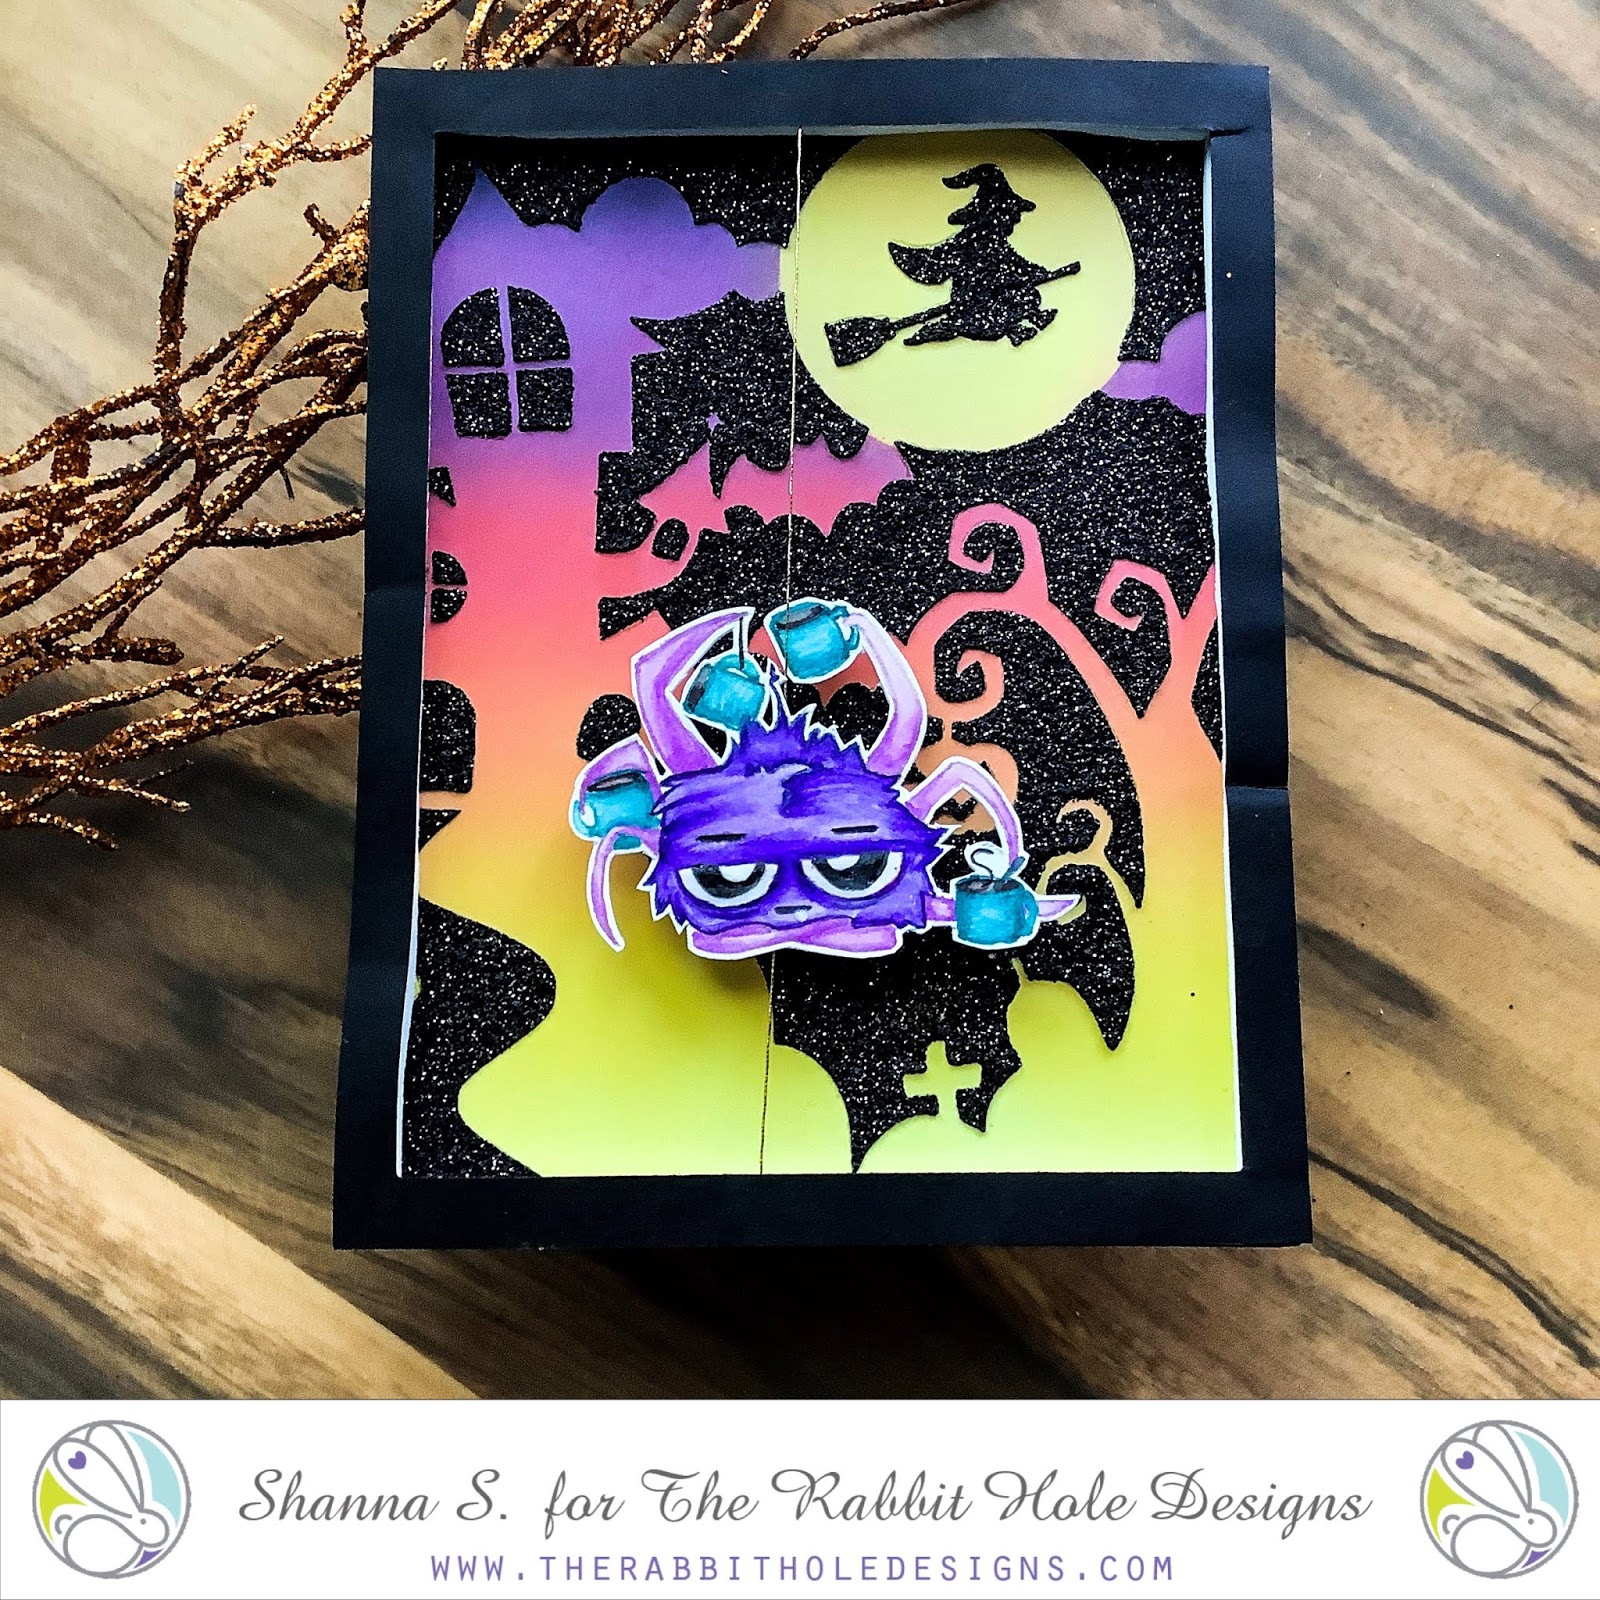
Jenn to dangle the adorable Caffeinated Spider from a thread and let her swing. Isn't she cute?!


Now I know a lot of people missed the chance to order the Caffeinated Spider when it was offered as part of a mini coloring class from Sweet Sentiment, but don't worry, she'll be available from The Rabbit Hole Designs starting on September 30th. I also missed Jammie's class, so I had to color her up on my own.

Luckily, I took a coloring class with Kathy Racoosin last weekend. It was fantastic! And I learned that I'm the Jon Snow of coloring; I know nothing! All kidding aside, I really did learn some great new techniques that I want to work on. Kathy teaches how to add details with colored pencils (a medium I rarely work with). So for this card, I wanted to practice some of the new tricks I learned.


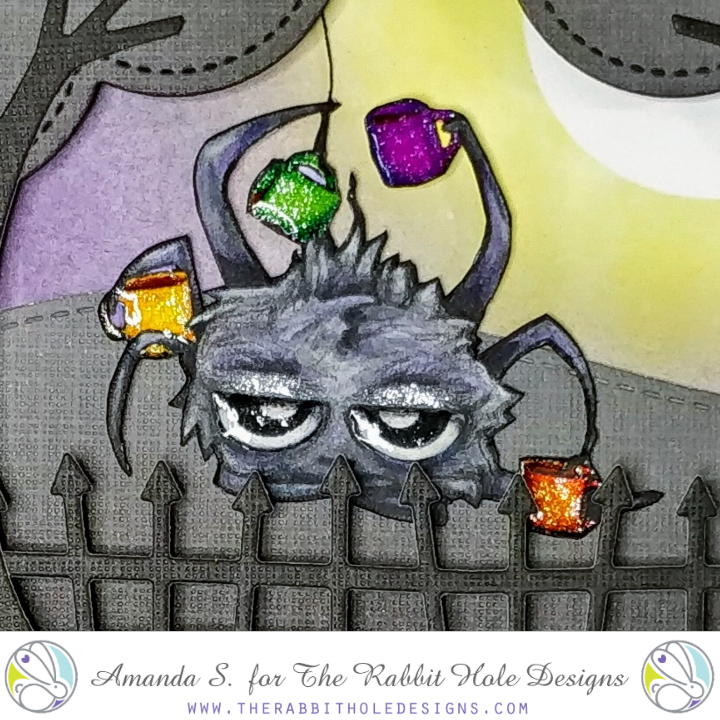
I started by stamping my spider and laying down a base coat of color with several shades of grey Copic markers (N3, N5, & N7). Then I brought in my colored pencils and went to work. I chose random dark pencils to deepen up the nooks and crannies. I added a little purple over some of the highlight areas, just for a touch of color. And I added lots of tiny strokes to look like hair all over the spider. For the mugs, I opted for bright colors and added a touch of shading. Once I was happy with the coloring, I fussy cut the spider and glued a piece of black thread behind the green mug.

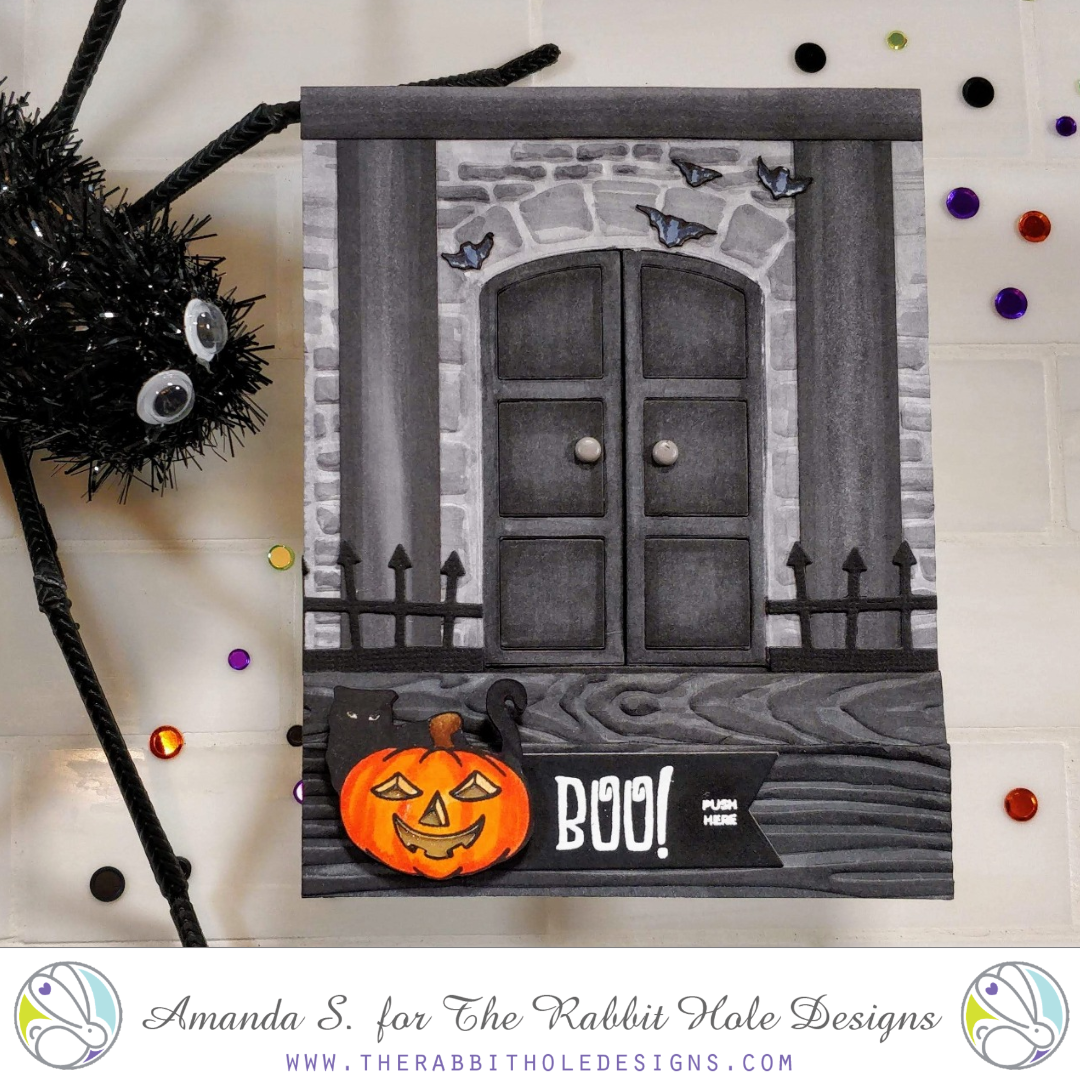
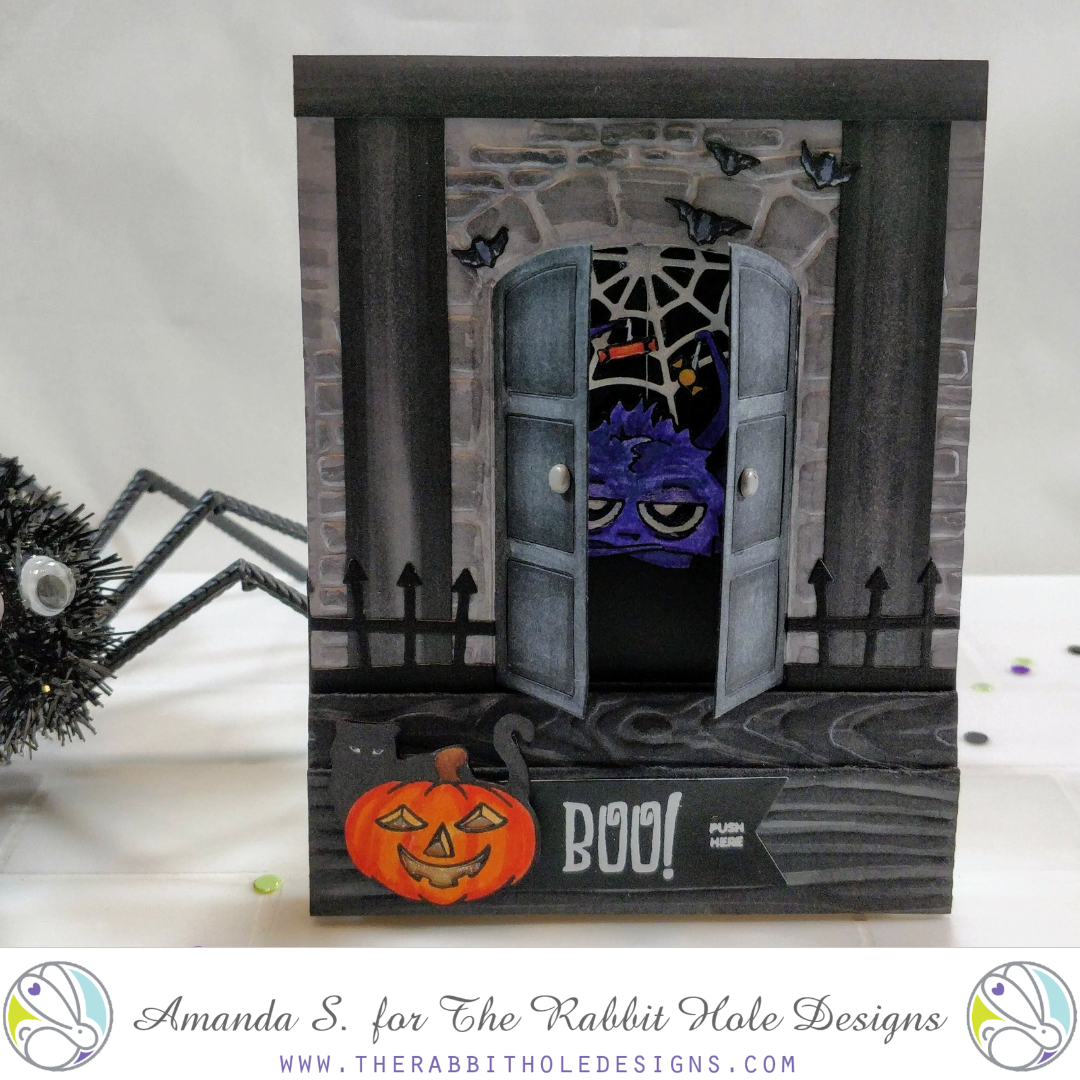
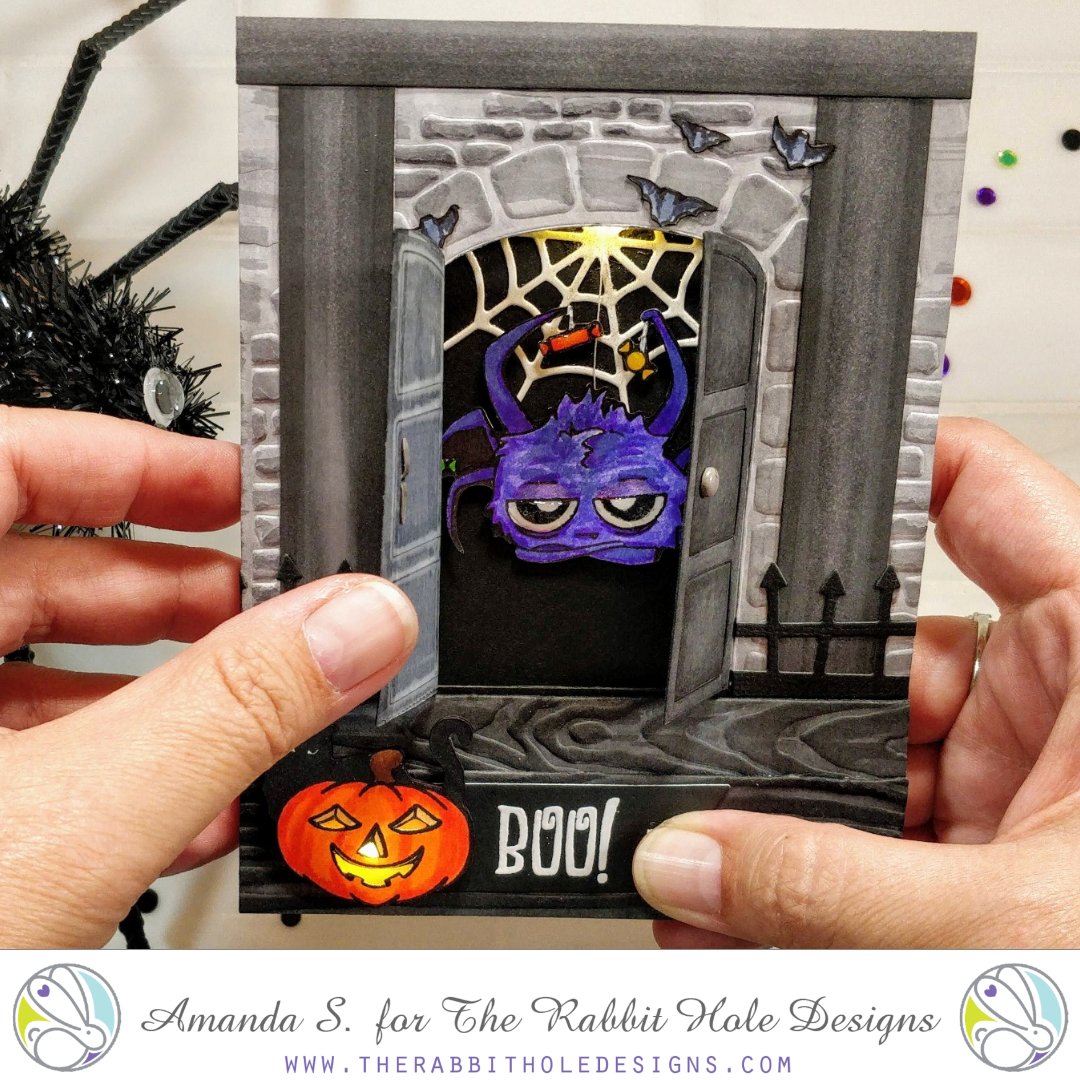
While the glue was drying, I masked off a 1¼" circle on a 3¼" x 4¼" panel. I ink blended Squeezed Lemonade Distress Oxide ink around the circle. Then I blended Wilted Violet Distress Oxide ink on from the bottom up, leaving about ½" of white space between the two colors  (don't mix them, it won't be pretty). To bring the colors together and darken up the edges of the purple, I lightly blended in Black Soot Distress ink just to where the yellow started. This gave me a nice bright moonlit sky.

To create a scene, I die cut a pair of tree trunks, a spooky fence and a stitched rectangle frame from black cardstock. I also cut a stitched hillside piece and a pair of tree tops from grey cardstock. To add a little shading to the grey pieces, I blended more black soot ink along the bottoms. I glued the hillside piece flat to the ink blended panel. Then I glued the trees and fence to the rectangle frame and added a double layer of foam tape to the back of the frame. Before sandwiching the frame to the panel, I draped the spider in between.

For the A2 card base, I cut and folded a piece of purple woodgrain cardstock. The color was more pink than I wanted, so I blended wilted violet and black soot around the edges to get the right color. Then I stamped and embossed the sentiment along the bottom right edge and glued on the scene. For a little shimmer and shine, I painted Liquid Pixie Dust onto the spider's eyelids and the coffee mugs. I added Diamond Glaze to her eyeballs and the mugs. And to finish the card, I glued on a few sequins that came for free in my last order from The Rabbit Hole Designs!

So tell me what you think. Fun right? I love the way she swings back and forth with that bothered expression on her face. She is the cutest spider I've ever seen. And the thread is one of the easiest ways to add an interactive element to your card. Plus, it couldn't be more perfect for a spider to hang from, right?

Thanks for swinging by today! (See what I did there? I must've been a dad in another life...) You can find the sister article to this on my blog today, along with links to the specific products I used. I'll be back soon with another fun card...