Pages

Showing posts with label Copics. Show all posts

Flower Whale Greeting Card

Saving the best for last!  My absolute favorite project of the year: 

Good day friends!  I am here to share a card featuring several products from The Rabbit Hole Designs, but the one that definitely takes center stage in this project is the Flower Whale stamp set.

Timeless Holiday Greeting Card

I am bringing back most recent creation for you this week ;)  

                 Hello friends, I am here to share a classy Christmas card using this timeless image from 
                               the Merry & Bright stamp set from The Rabbit Hole Designs.

My Favorite Bookmark

  My second favorite project here at TRHD is this bookmark!


Hello friends!  It's my turn on the blog today, and I have a fun bookmark to share with you today using the Book Lover stamp set from the new release here at The Rabbit Hole Designs!

You can see more about this project here :)

See you again soon!


Bunny Ballet Greeting Card

 Hello my crafty friends!  Have you had a chance to visit The Rabbit Hole Designs shop lately?  There are so many fun new stamps!  I am sharing this card with you today using the Bunny Ballet stamp set.


You can see more about my project on my blog.  

Book Lover Bookmark


Hello friends!  It's my turn on the blog today, and I have a fun bookmark to share with you today using the Book Lover stamp set from the new release here at The Rabbit Hole Designs!

You can see more about this project here :)


Don't forget the "Free gift with Purchase" this month is this lovely hot foil plate featuring three star wands.

See you again soon!


Aloe You Doin? A2 Card


For my final project this month, I am again using the Succulent Life Stamp Set from The Rabbit Hole Designs, but I am also letting the Triangle Mosaic Stencil shine too!

I colored the Succulent image with my Copic markers, but then I took a scrap of watercolor paper and traced the Triangle Mosaic Stencil with a gold gel pen.  I wanted a geometric background and decided against black because it would have been too bold.  The gold really stands out and pairs nicely with the succulents.  I layered both the image and the panel on dimensional adhesive onto some patterned paper, added the sentiment from the stamp set and some tiny bling to finish it off :)


Free with Purchase
Free with minimum $35 purchase
After discounts, before tax and shipping
While supplies last
___________________________

For more inspiration, updates, and news make sure to check out these places:


Let's Shell-Ebrate! A2 Card


For my second post this month, I have colored the stunning Shell-Ebrate clear stamp from The Rabbit Hole Designs.  I colored this image using my Copic markers and then decided an epic stamp needs an epic background...am I right?  All I had to do after that was stamp the sentiment included in the set and add some clear bling!


Free with Purchase
Free with purchase
Free with minimum $35 purchase
After discounts, before tax and shipping
While supplies last
___________________________

For more inspiration, updates, and news make sure to check out these places:


Not All Witches Ride Brooms

Greetings! Alison here. Did you know that not all witches ride brooms? Some ride bicycles! Today, my card uses the Bicycle Witch from The Rabbit Hole Designs, and this marks my last post for The Rabbit Hole Designs Team. I have had an amazing time being on this team, and I look forward to seeing what they'll have next. This is an incredible group of very talented and kind people, and I am so happy to say that I've become friends with them.

Sometimes I like to just sit and create backgrounds. Sometimes they're mono prints, sometimes they're with Distress Oxides, sometimes they're with alcohol inks, etc. I wanted my witch to appear like she was moving, so I used an alcohol ink background that I made some time ago, where I just swiped colors across some glossy photo paper.
I colored my witch and her little kitty with Copics, using some bright colors that worked really well with my alcohol inked background. This wasn't planned, as I chose the background after I had finished coloring the witch.
I added a sentiment with StazOn, a mat of Bo Bunny cardstock with cute teal dots, and put everything on to a gray card base. But she needed some sparkle, of course, so I added some sequins from a few different Sparkle Blends from Doodles Paper Playground coming off the back of the bicycle, as if she was leaving a trail of magic behind.
I love the colors on this card. This is definitely not a witch to fear, and I like that about all of the witches from TRHD. I want to thank The Rabbit Hole Designs for having me on their amazing Design Team over the last few months. I had a blast, and will truly miss working with them. But, you'll still see me using TRHD on my own blog. Please visit me HERE. Thanks so much for stopping by. Have an inspiring day!

For more inspiration, updates, and news make sure to check out these places:

Look at you ... you little FLOCKSTAR you!

Hello everyone!


It's Niccole from Nic & Viv Designs back again to share another card I made using one of The Rabbit Hole Designs stamp sets.

For today's card I used the Caffeinated Flamingo stamp set and the Twisted Sunshine stencil.


How to create this card:

Here is one more picture of the full card ...


TRHD products used:

For more inspiration, updates, and news make sure to check out these places:


I have had so much fun playing with the Caffeinated Flamingo stamp set and the Twisted Sunshine stencil.

Thank you so much for stopping by and spending some time with me.

Until next time ... Hugs & inky fingers! -Nic-

Rare and Beautiful- with Katie

Happy Tuesday!  Are you having a good week? So far so good here.  

Today I have another fun card using the Sassy Stamp set


Isn't it cute?  I just love this color combo, it is so magical, especially with those sparkly stars. 

Here is how I made it: 
  • Stamped out the unicorn from the Sassy set and colored it using my Copics (RV02, RV14, V04, V17, YG23, C1, C3).  I added some highlights with my white gel pen and then fussy cut it out. 
  • Next I die cut this scene using this die from my stash, it is inclusive of the clouds and rainbow.  I used colored paper for the rainbows and added a little blue distress ink to my clouds. 
  • I added a blue sky behind and mounted on a white base, then I added the clouds and rainbow, popping some of them out.  
  • Next, I added my unicorn in front of the rainbow.  
  • I stamped the sentiment on an extra bit of white and put it up front. 
  • Lastly, I die cut these stars out of some sparkly pink paper and placed them on my scene.  


A pretty simple card to make.  Here is the close up of the unicorn with those bright and fun colors.  The sentiment is lovely too- "A true friend is like a unicorn, beautiful and rare."


Well that's it for today. I hope you enjoyed this post and will share your thoughts below.  You can visit my blog for a full list of supplies.

Please come back tomorrow to see what our Guest DT Tanya has in store!

For even more inspiration, updates, and news make sure to check out these links.

Blue Crab- with Katie

Howdy!  Katie here today.  I have an encouragement card today that has a few puns in it that gives it just a teensy bit of humor,  


Get it?  Blue Crab is sad...and holding a shell?  Lol, hopefully you find that silly but encouraging. Here is how I made it: 

  • I started with the background.  Die cutting the sand, palm trees and fronds from a Lawn Fawn die. I added some dots to the sand with a brown Copic. 
  • Next I added this cloudy paper, I chose that because it also symbolizes a rough day. 
  • After that, I stamped the crab from the Caffeinated Crab set on Copic friendly paper and colored it like a blue crab.  I fussy cut it out and removed the coffee cup and donut.  I die cut the shell and set both aside. 
  • I die cut the Sorry sentiment in blue and added some gel highlights. 
  • I stamped my sentiment from the By The Shore set. 
  • Lastly, I put all the parts together. 


I hope you like this card and of course I always appreciate you stopping by and commenting.  Have fun shopping in the store! ;)  You are always welcome to stop by my blog as well- KBStamps.


For more inspiration, updates, and news make sure to check out these places:


Have a great day!


Hop To It- with Katie

Hello peeps!   It's Katie, back today to share one more bunny card.  I really can't get enough of her, she is too sweet!


She just melts my heart!  I love that she is out there playing with her butterfly friends, enjoying nature. 


Here is how I did it: 

  • Used a stencil and distress inks to create the cloud and grass background.  Die cut to the smaller square shape.  
  • Stamped and colored the bunny from the Easter Bounty set with my Copics.  Die cut and set aside. 
  • Die cut the fence and grass dies and placed in the scene. Placed the bunny on top.  
  • Die cut rainbow of butterflies and added them to the scene with some pearl embellishments.

Pretty easy peasy right!?


That is all I have for you today.  I hope you have enjoyed this fun and fairly simple spring card.  


You are welcome to stop by my blog to see the full list of supplies I used. 

For more inspiration, updates, and news make sure to check out these places.


Have a most fabulous day! 


Coffee & Donuts


Hello crafty friends, it's Amanda from Pear Blossom Press again and today I've got a fun shaped card for you featuring the Caffeinated Unicorn! I don't know about you, but the caffeinated critter series is one of my favorite collections to play with. The unicorn is just too hilarious; she even has little narwhal slippers! I thought she'd pair well with a donut shaped card covered in lots of sprinkles.

I started by stamping and embossing my Caffeinated Unicorn, then coloring it with Copic markers. Then I fussy cut her with my ScanNCut. Using some of the same markers, I colored scraps of white cardstock in coordinating colors. I stamped and embossed caffeine makes me sparkle, then die cut it with a fishtail banner die. I also die cut the word yippee three times, once from the scrap I colored blue. I glued the three layers together, with the blue layer on top. I glued a thin strip of silver glitter paper to the bottom of the fishtail banner.

To make the card, I grabbed my nesting circle dies and found a set that looked like a good size donut and appropriate hole. I used a 4 1/2" circle for the outer cut, and a 1 1/4" circle for the inner cut. I cut a pair of blush colored circles for the card base. I trimmed about 1/8" from the bottom edge of the back circle. Then I lined it up in my Scor Pal and scored 1/2" from the top to form a hinge. I glued the two pieces together at the hinge. The tiny cut across the bottom of the back piece allows the card to stand up when it's open. I sponged on a little brown ink to add shading to the inner and outer edges of the donut. That makes it look like it's been cooked to a golden brown.


For the frosting, I cut a third circle from pink stock and increased the inner die to a 1 1/2" circle, so that some of the center of the blush circles would be visible when stacked. I used scissors to freehand a wavy cut around the outer edge of the pink circle. Then I stamped and embossed it with sprinkles. To add a little more dimension, I sponged on a little pink ink around the inner and outer edges and glued it onto the donut.

To finish the card, I lined everything up and trimmed the fishtail banner to end behind the unicorn's legs. I glued the banner in place and glued the word yippee above it. I popped the Caffeinated Unicorn up with foam tape to give the card a little more dimension. For a final touch, I added shimmer pen to the unicorn's mug and horn. Then, I coated the horn, mug, her eye, and the word yippee with a layer of Diamond Glaze. I think it gives the card just the right amount of sparkle and shine!

Now don't tell anyone, but I've got a little secret to share. Even though I love to make cards, I always draw a blank when it comes to writing the sentiment inside. A card like this doesn't have a lot of room to write a long message and that suits me just fine. If you'd like a bigger area to write inside, you can omit cutting the center holes from the card base. In that case, I'd cut the base from white cardstock and layer on a blush layer and a pink layer onto the top of the card. You might consider adding a white doily to the back of the card, so it looks like a donut on a doily.

So that's my card for today, another fun shaped card. Do you prefer shaped cards or traditional rectangles? Let me know in the comments below. Is your caffeinated critter collection complete? If not, head on over to the shop and fill up your cart today! And don't forget the new release comes out next week! I can't wait to show you what I've been working on with those sets! (Hint, hint, even if you think your caffeinated critter collection is complete, it's probably not ;) See you soon my crafty friend!

Heave Ho!- with Katie


Happy Monday! With Easter just around the corner I have been busy with bunnies!  This card was inspired by MaryAnn, her bunny flying the kite gave me the inspiration for the bunny to pull string to heave this huge carrot out of the ground.  I assume Ms. Rabbit is planning on having a feast. :)


Here is how I did it: 
  • I started by die cutting my background with the scallop frame die.  Next, I used my distress inks and stencil to create the cloud background. I set that aside.
  • I stamped and colored my images using my Copics.  I cut them out using a die cut machine. 
  • Next, I went about to create the rest of the scene, die cutting grass, branches and leaves and carefully placed them on the scene using foam tape. 
  • I added twine to my carrot and mounted my carrot on the background and then wrapped it around the tree branch and wrapped it around the bunny's hand.  I mounted the bunny with foam tape as well. 
  • Lastly, I mounted the entire scene on to my white cardstock base.


She looks pretty happy for someone working so hard to pull that carrot out of the ground.  I would be sweating up a storm!  ;)


 This bunny is pretty much the cutest thing EVER!  She is from the Easter Bounty set. 
I hope you enjoyed this card and post, I enjoyed making it!  For further details on supplies feel I would be happy for you to visit my blog- KBStamps.

For more inspiration, updates, and news make sure to check out these places.


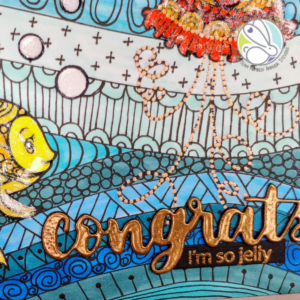
SoFishticated Zentangle


Hey crafty friends, it's Amanda with Pear Blossom Press again! Today, I've got a fun zentangle card for you. If you're not familiar with the term, let me explain. It's the art of doodling, or drawing tiny repetitive patterns within the lines of a bigger image or scene. For those of us who love to doodle, but wouldn't consider ourselves great artists, the Sofishticated stamp set is the perfect way to get started! It is full of gorgeous underwater creatures drawn in zentangle fashion. (And some great sentiments too.) You can use these images as focal points for your own zentangle scenes, like I did.

For this card, I started by stamping my images with black ink, then I used my stitched hillside dies as guides to draw in the wave lines around the images with a Copic liner. You can freehand that part, but I wanted to make sure my lines curved in the same places. Next, I filled in the waves with little doodles and patterns. (Don't be intimidated by this; think dots, scallops, Vs, swirls, and crosshatched lines. This is the fun part!)

Once the patterns were all filled in, I used Copic markers to color the waves and images. Then I glued the scene onto a blue A2 card base. For the sentiment, I stacked the die cut word, Congrats, several times and added a layer of copper embossing powder on top. I stamped the smaller sentiment onto a strip and embossed it with the same powder, then glued them in place. Details on the fish were added with white, gold, and copper gel pens. I try to save anything with a long dry time as the last thing I add to a card, so I'm less likely to smear it. So for my final touch, the fish and bubbles got some extra pizzazz with an Aqua Shimmer pen and a coat of Diamond Glaze (the most challenging of all things to photograph).

Are you a doodler? Have you tried any zentangle art yet? This card was a ton of fun to create, but I never would have given it a try without the Sofishticated stamp set to get me started. I have several more ideas for different scenes that I can't wait to try! I hope you'll give it a try too and let me know what you think.

If you'd like links to other specific products I used for this card, you can find them on the sister post here. I'll be back soon with another fun card. Until then my friend, thanks for swimming by and I'll SEA you soon!