Pages

Happy New Year


Hello there! Michelle here, sharing a card for the New Year! I started off by trimming a piece of cardstock slightly smaller than 4 1/4 x 5 1/2. I used the cluster of bubbles from the stamp set Spellcaster Witch and stamped the background repeatedly.  I colored the bubbles using Copic Markers in shades YR30, YR21, YR31.  Next step, I stenciled the words New Year using Spell It Stencil. I inked the stenciled words using picked raspberry distress oxide ink.

Lastly, I stamped the 'Happy' sentiment from the set Scripty Happy Birthday. I added a few embellishments to finish the card, some clear gems to the word 'Happy', stickles clear glitter glue to the bubbles, and white accents to the stenciled words.  I adhered the decorated panel to a piece of glitter cradstock than adhered the glitter cardstock to the card base.

Thanks for stopping by for a peek!
I want to wish you all a very Happy and Healthy New Year!!!


Pretty Peony Note cards


Happy Wednesday!!  Tangii here with a simple note card using the Pretty in Peony stamp set.  I wanted to try something a little different (for me) for the card front base, so I split it!  I started with an 8.5" x 11 piece of cardstock, then I scored it at 2.5" and 6.75".  This gave me a card that opens with 2 flaps in the front.  I wanted one flap smaller than the other, but you could easily put your split in the middle or whatever.  Then I just used a die to give me fun edges, but you could just as easily draw/trace your own curves and then just cut yourself.

  
Next up I laid out my flowers and stem images to get good placement and then stamped, also stamping my sentiment.  I colored everything with Copics.

Finally, using a glue pen I went over both edges and then added some silver glitter.  I also added a silver twine ribbon to help keep the card closed and since it has a little elastic it easily slips on and off!

All of the items I linked in my post are available at The Rabbit Hole Designs.

You can also read about this card on my blog, here with links to the products I used, etc.  Thanks for popping by, come back again soon!

Shabby Chic


I love it when flowers bloom in unexpected places. I created this card with that in mind. I combined the flowers from the Botanical Turtle and the leaves from Pretty in Peony with the Intersection stencil.

I started by creating my background. I wanted an imperfect, kind of shabby look to it. I inked up my stencil with versamark ink, then I placed it on a piece of computer paper and laid my white A2 sized cardstock panel (after using my antistatic tool on it) on top and applied pressure all over the panel. Then I removed the panel and applied black embossing powder over top. I used a paint brush to clean up any areas where I didn't want powder. Then heat set it. You can watch the video below to see my process.


Next I stamped the flower, leaves and turtle onto white cardstock. I colored them using Prismacolor pencils then fussy cut them all out. The colors I used were:
Flowers: Mulberry, Process Red, Pink, White
Leaves: Spring Green, Apple Green, Prussian Green

I arranged the cut outs onto the embossed panel then adhered them down using liquid glue. After they where set, I backed the panel with black cardstock and adhered it to an A2 card base.

Then onto black cardstock, I stamped the sentiment from the Flamingo Botanical set using my versamark ink pad. I sprinkled white embossing powder over it then heat set the powder. After trimming the sentiment, I adhered it to the card front.

I think this is a fun way to get a different look out of the stencil and I love how the card turned out with the flowers added.
Thanks for visiting and I hope you have a wonderful day. Lauren.


A Sassy Good Bye 2020


 Hello my crafty friends and welcome to today's blog. I'm featuring The Rabbit Hole Designs' Caffeinated Bear and Circle Illusion stencil to create this sassy good-bye 2020 card.  This card is snarky and caffeinated.  


I used Spectrum Noir TriBlend alcohol markers to transform the bear into a panda bear.  I colored the ears and around the eyes with black and grey markers. To perk up the Panda, I colored the robe in bright pink and added yellow polka-dots. The fun bunny slippers and mug are colored an aqua blue.


I used a piece of 4" x 5 1/4" teal cardstock for the card front.  I used Pixie Spray to lightly tack the Circle Illusion stencil to the teal card front.  I added an oval stencil over the left side of the card front and stenciled Squeezed Lemonade Distress Oxide ink over the stencil using a Cotton Tail Blending Brush.


I die cut the words using letter dies in my stash and a glossy black cardstock and glued them on the card front.  I created the mask by scoring light blue cardstock every 1/8th inch and added lines.  I cut the scored cardstock into a small rectangle, angled the corners, and punched holes in each corner. I threaded twine through the holes to create a small face mask.


I added a die cut black glossy frame to the card front and glued it to a white A2 card base to complete the card.

Here are The Rabbit Hole Design products used in this card:

Caffeinated Bear stamp set


Optical Illusion stencil


Cotton Tail Blending Brushes


Thank you so much for joining me today.  I hope you enjoyed this Sassy Good Bye to 2020 card featuring the Caffeinated Bear stamp set and the Circle Illusion stencil.   May 2021 bring you joy and blessings.  See you in the New Year!


Be Creative ~ Stay Inspired

Jenn Gross


Follow me, Journey Coach Jenn, on 

Instagram - https://www.instagram.com/journeycoachjenn/

YouTube - http://www.youtube.com/c/JourneyCoachJenn

Blog - http://www.journeycoachjenn.com/


For more inspiration, updates, and news make sure to check out these places


The Rabbit Hole Designs

The Rabbit Hole Designs Instagram

The Rabbit Hole Designs Facebook Page

The Rabbit Hole Designs Pinterest

The Rabbit Hole Designs YouTube

Birthday Wishes and Coffee Kisses


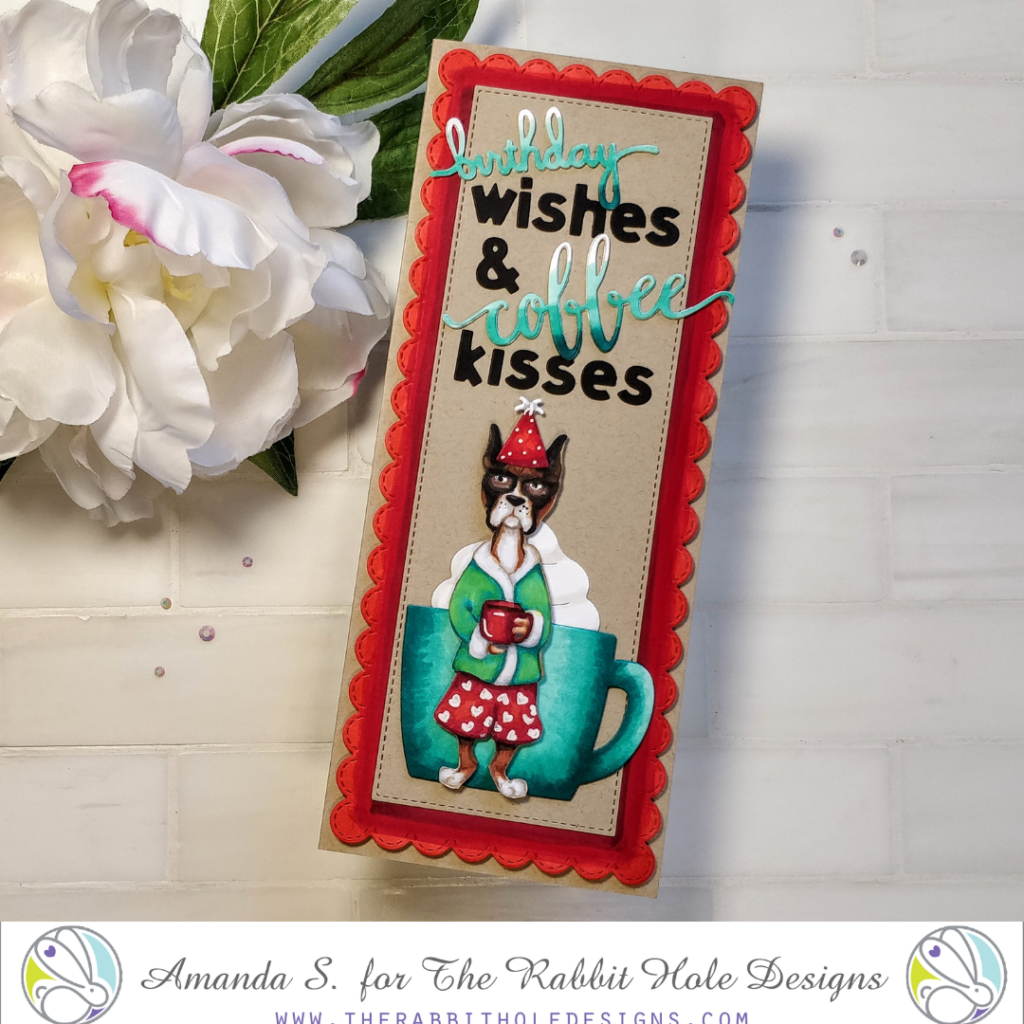
Hello my crafty friend! Amanda from Pear Blossom Press here again. As the year comes to a close, I'm wrapping things up with a fun birthday card. I made this slimline card for my coffee-loving nephew. It's hard to believe he's 23 now; seems like just yesterday he was a little boy. He still has the same cute smile though.

Originally, I was going to hide the Caffeinated Boxer behind the coffee mug, and reveal him with a pull-tab, but since I stacked the cursive words in the sentiment, I was afraid he'd get caught as he pulled up. I actually think I like it better this way though. You get to see all of the dog, instead of only the top half.

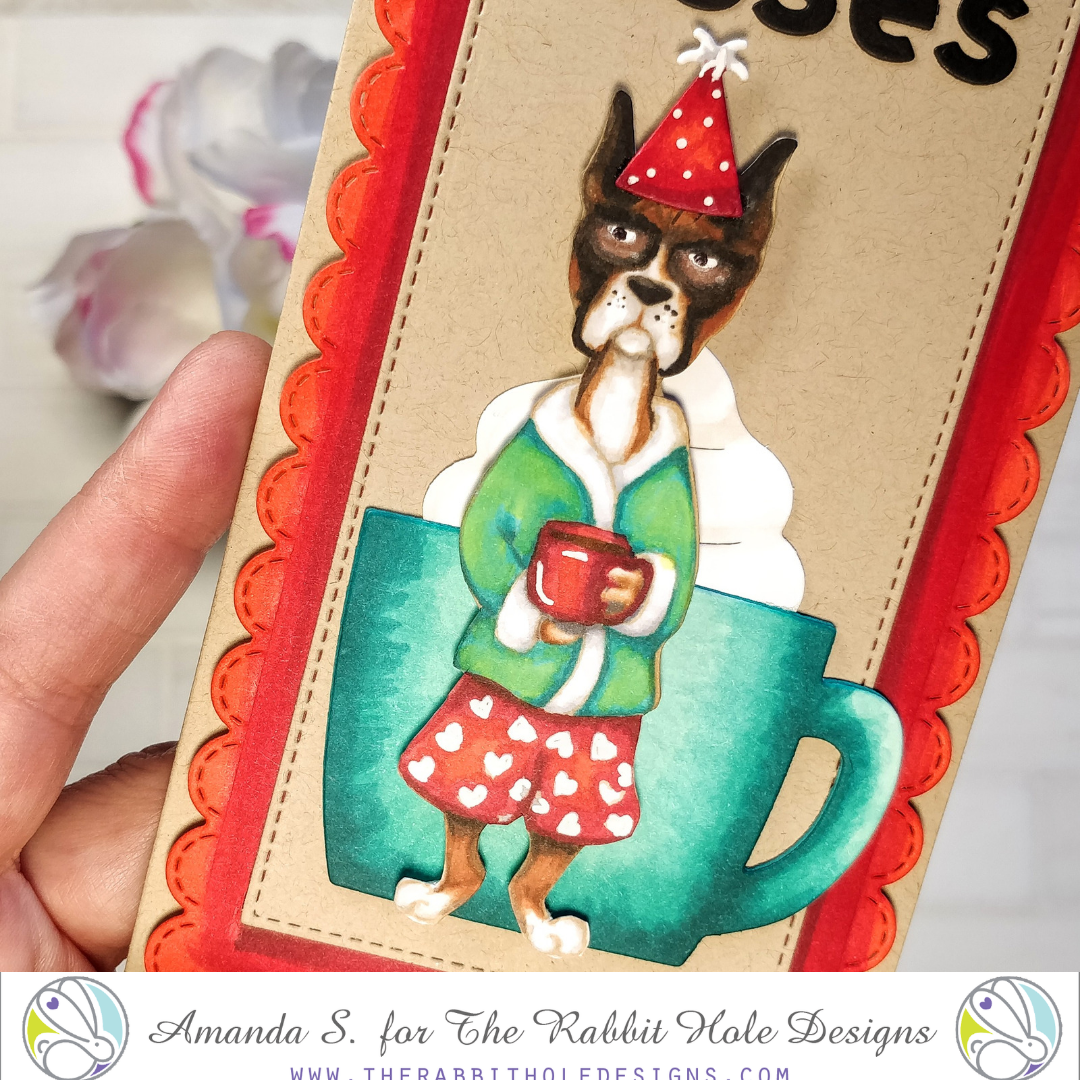
To begin, I stamped the Caffeinated Boxer with Warm Glow ink and Copic colored him for a no-line look. I used my ScanN'Cut to fussy cut him, leaving no border. I shopped my stash for the dies to create the sentiment and other layers of the card.

One of my favorite tricks is die cutting shapes from white cardstock and coloring them myself. You can start with light colored cardstock and use your markers to add shading too (this saves you a little time and ink), but I often cut from white. This way I can really control the highlight color, and I don't have to dig for the right colors of cardstock.

Once I Copic colored my die cut mug, whipped cream, party hat, cursive sentiments, and scalloped border pieces, I started assembling the card. In addition, I die cut the rest of my sentiment from black cardstock, and the card base and top layer from kraft stock.

For extra dimension, the mug is stacked four layers high, with the whipped cream sandwiched in between. The cursive words are stacked three layers high. I popped the boxer up with foam tape, and there is another layer of foam between the kraft and scalloped panels too. I didn't add any glitter or gems because I didn't want the card to feel too feminine. I was already pushing things with the scallops; remember, this card was for my nephew.

He loves the card, and I do too. I hope I've inspired you to give it a try. Of course, you can substitute any of the Caffeinated Critters for the focal point of your card, but I thought my nephew would really like the boxer. Which is your favorite?

Thanks for stopping by today. I'll be back soon with more fun cards to share. You can head over to my blog at pearblossompress.com for a complete list of supplies I used. Until then, happy holidays, and I wish you a safe and healthy new year. (Just think, this time next week, we can say hindsight is 2020!)

For more inspiration, updates, and news make sure to check out these places.


Glitzy Star Power!

Hi TRHD friends! Today is all about stencils! Today's card features the Splish Splash Stencil and the Intersection Stencil


I don't know about you guys and gals, but I really like to stretch my supplies. It's for this reason that I really LOVE stencils. They can be used in so many ways and the price point on them is so reasonable! 

For today's card I wanted to show you two different techniques to use your stencils and really get the most out of them. 


To start I took some heavyweight white card stock and placed the Splish Splash Stencil down on top of it. I used a scraper tool and applied some glitz glitter gel through the stencil to create that awesome design. I then die cut multiple stars from it (once it dried of course).

For the background panel I did a dry embossing technique with the Intersection stencil from the December Mini release. I used my manual platform die cutting machine and a rubber pad and essentially turned the stencil into an embossing folder of sorts. Look at the instructions for your particular embossing machine to see what the best embossing plates "sandwich" would be for your machine. 

I chose a sentiment that I felt fit it really well from the Turtle Botanical stamp set. I stamped it on some card stock and cut it into a sentiment strip. I assembled all the pieces onto an A2 size card base. I used foam tape to pop up the pieces and give it more dimension and interest. That's it guys, easy peasy lemon squeezy! 


I hope that you enjoyed today's card and that you are positively beaming with new ideas on how to use your stencils! Be sure to check out all the  fabulous products that The Rabbit Hole Designs carries. You can follow this link HERE to see their whole product line. 


Thanks for stopping by!
If you want to check out additional information on the products that I used to create this card you can visit my blog at amyswares.com 

-Amy


For more inspiration, updates, and news make sure to check out these places.


Heard You Got a Bug

 It's Kelly here today on the Rabbit Hole Designs Blog.

I am sharing a card I made using "Got a Bug".

The design for this card came from an Online Card Class I took in the spring.

I used purple tape and masked off areas.  Then, I used several different shades of green ink to fill in the spaces.  I used the TH edge distressor tool on the sides of the top panel for a bit of texture.  I stamped colored and cut out the frog and added large googly eyes for a bit of fun. I wrapped the string around the card and hid the overlap point with the frog. The sentiment from the set was embossed in white and adhered.  To maintain the rustic look, I adhered the top panel to a kraft card base.   


 I added large googly eyes and a bit of yellow neon glitz gel on his belly.


For more inspiration, updates, and news make sure to check out these places.
 
 
Thanks for visiting the blog today,
Kelly 


Ho Ho Ho And Bouncy Juice!

 Hello everyone! Von Marie here and I am so Happy to be on the Blog today. I have a Christmas Card to share with you using some of my Favorite Products from TRHD.


On my card I used Caffeinated Kangaroo, Slice of Christmas Stencil, and the Cotton Tail Blending Brushes. I first made my background cutting out some Bristol Smooth Cardstock. I used the stencil with Crackling Campfire Distress ink to get the Ho three times on my A2 panel. I then used Rustic Wilderness around the edges and centers of my panel. I flicked some paint splatters of red and green paint using water and a paint brush. I then cut my panel out using a pierced rectangle die.


I stamped my Kangaroo using my Misti with Lawn Fawn Jet black ink onto Sweet Sentiment cardstock. I then colored it in with my Copic Markers. When I was done I fussy cut it out. I made my card base using green cardstock and glued my rectangle panel and my Kangaroo with Nuvo Deluxe Adhesive. I ink blended a strip of Bristol paper with Crackling Campfire Distress ink to stamp my sentiment. I cut it out with my paper trimmer and attached it to my card front. Lastly, I added some sequins. I hope you like my card. I wish you a Happy Holiday! Thank you for stopping by!

TRHD Products Used:


Slice Of Christmas Stencil


For more inspiration, updates, and news make sure to check out these Awesome places! 

The Rabbit Hole Designs 

The Rabbit Hole Designs Instagram

The Rabbit Hole Designs Facebook Fan Page

The Rabbit Hole Designs Pinterest

The Rabbit Hole Designs YouTube

Thank you for stopping by and Happy Crafting!

Von Marie

Skating Santa


Hello there! Michelle here...sharing this adorable skating Santa! All images and sentiment are from the stamp set Kringle 

I stamped the images in black ink than used Copic Markers in shades G20, G21, G24; E57;
R81, R83, R85; B32, B34; C6, C8; W00, W0, W1, W4; R00, E93.
I fussy cut Santa and the trees. 
I inked up the background with tumbled glass and chipped sapphire distress oxide inks. 

I adhered the two large trees with liquid glue than added the other images with foam tape.
Than I added some snow with a white gel pen. I embossed the sentiment and scattered some gems.

Thanks for taking a peek!
Hope you have a great week!

Michelle


A Caffeinated Giraffe's Christmas

 Hello everyone! Von Marie here and I am so happy to be on the Blog today. I have a fun Christmas Card to share with you using some of my favorite products from TRHD.

On my card I used Caffeinated Giraffe, Kringle stamp, Kringle Die, Candy Twist Die, Back Alley Stencil, and Cotton Tail Blending Brushes. I first stamped my giraffe onto alcohol friendly paper with Lawn Fawn Jet Black ink. I colored in the giraffe in with Copic markers and then paper pieced the robe and slippers with pattern paper from my stash. I then fussy cut my giraffe out.


I used the Back Alley Stencil with Crackling Campfire Distress ink with my blending brush. I then sprayed it with Festive Berries Distress Oxide Spray. I used the same pattern paper for the Candy Twist Die along with red textured paper. I cut out some pattern paper for my rectangle panel and added everything with Nuvo Deluxe Adhesive. I stamped my sentiment and banner with red and black dye ink from the Kringle Stamp set and cut it out with the coordinating die set. My panel was then added to a red A2 card base. Lastly, I added red sequins. I hope you like my card, thank you for stopping by!

TRHD Products Used:

Caffeinated Giraffe


Back Alley Stencil


Candy Twist Die


Kringle


Kringle Die


Cotton Tail Blending Brushes


For more inspiration, updates, and news make sure to check out these places:

The Rabbit Hole Designs

The Rabbit Hole Designs Blog

The Rabbit Hole Designs Instagram

The Rabbit Hole Designs Facebook Page

The Rabbit Hole Designs Pinterest

The Rabbit Hole Designs YouTube

Thank you for stopping by!

Happy Crafting!

Von Marie