Pages

Showing posts with label A2 Shaker Acetate Sheets. Show all posts

Made for Each Otter

 Hi everyone!  Amy here today sharing a shaker card I created using two gorgeous stamp sets, Otterly Adore and Sea-ing is Believing, illustrated by Agota Pop!  This card also features the fun and super easy to use A2 Shaker Acetate Sheets!

Otterly Adore Stamp and Die Set illustrated by Agota Pop, Sea-ing is Believing Stamp and Die Set illustrated by Agota Pop, A2 Shaker Acetate Sheets by The Rabbit Hole Designs #therabbitholedesignsllc #therabbitholedesigns #trhd

I started this card by cutting a piece of smooth white cardstock just under A2 size so it would fit perfectly in the Shaker Acetate Sheet!  I then blended on Distress Oxide Inks Salvaged Patina, Tumbled Glass, and Salty Ocean to create a beautiful background!

I stamped out these super cute otter images from the Otterly Adore Stamp Set, colored them with copic markers, and cut them out using the coordinating die set.  I then stamped the awesome fish images from the Sea-ing is Believing Stamp Set, colored them, and cut them out using the coordinating die set.

Otterly Adore Stamp and Die Set illustrated by Agota Pop, Sea-ing is Believing Stamp and Die Set illustrated by Agota Pop, A2 Shaker Acetate Sheets by The Rabbit Hole Designs #therabbitholedesignsllc #therabbitholedesigns #trhd

Next, I stamped the sentiment, which is from the Otterly Adore Stamp Set, directly onto the background in black pigment ink, and clear heat embossed.

I assembled my card adhering the images directly onto the background.  I put my card in the Shaker Acetate Sheet, added embellishments, sealed the Shaker Acetate Sheet, and adhered my card to a dark gray card base. 

Otterly Adore Stamp and Die Set illustrated by Agota Pop, Sea-ing is Believing Stamp and Die Set illustrated by Agota Pop, A2 Shaker Acetate Sheets by The Rabbit Hole Designs #therabbitholedesignsllc #therabbitholedesigns #trhd

 Thank you and I hope you enjoyed my card today!

For more inspiration, updates, and news make sure to check out these places:

Bunny Christmas Shaker Card

This is Wendy, back to share another fun Christmas card.

Today I am sharing the fun shaker card I made with the Bunny Christmas stamp set from The Rabbit Hole Designs.


I used the A2 Shaker Sheet from The Rabbit Hole Designs to create a full card front shaker. For the background inside the card, I used Copic markers to create a winter forest scene. 

For all the details on this card and a video visit my blog, here.

Christmas Penguin

Hello, Erin here to share a card I made using the Penguining Stamp Set from The Rabbit Hole Designs!  Now that Halloween has passed, I am in full Christmas mode!  I haven't allowed myself to drag out the totes of Christmas decorations yet but it won't be long.    


To start this card, I stamped the three penguin images. In this stamp set they are all connected but the coordinating dies are perfectly shaped to cut them apart.  It's nice because you can either use them together in a row or separate them.  I decided to separate them for this card.  I picked the penguin with the candy cane and colored it with colored pencils.  I like that the images in this set are pretty quick to color.  I don't mind long coloring projects sometimes but occasionally it is nice to have something that doesn't require too much coloring.  I don't think I spent more than 10 minutes coloring the penguin and probably even less than that.


My intention was to make a red and white striped background to look like a candy cane.  I really struggled with it, I just couldn't get the exact look that I had in my mind.  So after a bit I gave up on the candy cane background idea and pulled out my stencils.  The Back Alley stencil is one of my favorites, I use it fairly often.  I do love products that I reach for again and again!  I used red ink for the stenciling and left a white area in the middle for the sentiment and the image.

Next, I loaded the background onto my Misti and placed the sentiment stamps  at the top and bottom of the white space.


After I added the penguin in the middle, I mounted the background on red card stock. I didn't feel like it was quite done so I grabbed an Acetate Shaker Sheet and some red and green sequins. The shaker sheets make it so easy to turn a simple card into something interactive in just minutes!


Pretty Christmas Poinsettia Shaker Card


Hello. It's Lauren here today to share this pretty, full panel shaker card I created featuring the new Poinsettia & Pinecones. This set, illustrated by Kelly Taylor is super fun to create with. 

I wanted to use it to create a non-traditional poinsettia color. Something soft and subtle.  

I created a video showing how I created this shaker card that you can watch on my YouTube channel here: 

https://youtu.be/gLG20mrJ28w

You will find the products I used for this card linked below. Thanks for visiting! 

Poinsettia & Pinecones Stamp Set: Poinsettia & Pinecones 6x8 – The Rabbit Hole Designs

Cottontail Embossing Powder Tool: Cottontail Embossing Powder Tool – The Rabbit Hole Designs

A2 Shaker Acetate Sheets: A2 Shaker Acetate Sheets – The Rabbit Hole Designs


 You can follow me at these places:

Foxy Fall Infinity Shaker Card


Hello there crafty friend!  Today's inspiration is a foxy fall interactive infinity shaker card using The Rabbit Hole Designs new Fall Foxes stamp and coordinating die set. the Falling Leaves stencil, the Happy Scripty Word with Shadow layer die and an A2 Shaker Acetate Sheet


Have you ever made an infinity shaker card? An infinity shaker spans the entire card front, an A2 card is the size.  Let's check out easy steps to recreate this interactive card.

You will want to start with a card front panel that measures 4 1/8" x 5 3/8".  This will ensure you have the correct fit for the Shaker Acetate Sheet to fold around.
Used the Falling Leaves stencil  over the top of the card front daubbed ink instead of blending.  The colors looks slightly airbrushed instead of blended. I used orange, purple and bright green inks in random daubs.
After the stenciled 4 1/8" x 5 3/8" card front is dry,  I glued a few (5-7) shaker bits to the stenciled panel (see phot above).Take your A2 Acetate Shaker Sheet and remove the protective film from the front of the panel and set it on your work surface with the adhesive tabs facing up (you should feel the the release paper on the tabs).   Place the card panel with the glued embelishments face down on the acetate shaker sheet.  Fold ONLY three of the four shaker sheets tabs over, removing the release paper to adhere them to the back of the card panel.  This creates a pocket with the colored background inside (see photo above).  I added more shaker bits to the pocket and removed the fourth tabs release paper.  I folded the tab to the back of the panel creating the infinity shaker card front.
I colored the fox image from the Falling Foxes stamp set with OLO markers and die cut the image. I die cut the word Happy from a beautiful bronze specialty cardstock in my Your Paper Insider subcription box and the shadow layer from a purple cardstock. Glue the Happy die cut sentiment together. Prep a piece of purple cardstock with the Cottontail Embossing Powder Tool before stamping and heat embossing the "fall y'all" sentiment in copper embossing powder. Cut it in a strip for the card front.

Attached the sentiment and fox to the front of the infinity shaker and secured the shaker panel to a white A2 card base with double-sided adhesive tape completing the Foxy Fall card.


Thank you, I appreciate you taking time from your day to stop by and check out this Foxy Fall Infinity Shaker Card featuring the new Fall Foxes stamp and Coordintaing dies, the Falling Leaves stencil, and A2 Shaker Acetate Sheet from The Rabbit Hole Designs. I hope you are inspired to create something lovely today! 


Be Creative ~ Stay Inspired

Jenn Gross


Follow me, Journey Coach Jenn, on 

Instagram - https://www.instagram.com/journeycoachjenn/

YouTube - http://www.youtube.com/c/JourneyCoachJenn

Blog - http://www.journeycoachjenn.com/


For more inspiration, updates, and news make sure to check out these places


The Rabbit Hole Designs

The Rabbit Hole Designs Instagram

The Rabbit Hole Designs Facebook Page

The Rabbit Hole Designs Pinterest

The Rabbit Hole Designs YouTube

Happiness Is Chilling With You


Today I'm sharing a card that I made with the super cute Warm and Cozy Stamp set.  I knew as soon as I saw this stamp set that I would made at least one shaker card!   I used a silver glitter paper for the background to resemble shimmering snow.  I colored the two adorable snowmen with colored pencils and used the coordinating die to cut them out.  The sentiment is heat embossed for a little added texture.  I mounted the whole thing on a dark blue card stock and used the A2 Shaker Acetate Sheets to create the shaker.  I mixed and matched several types of sequins and shaker bits to get a combination that is perfect for winter and snow.  


For more inspiration, updates, and news make sure to check out these places!

A Berry Sweet Shaker Card


Hello. My name is Wendy and I am brand new to the design team. I'm so happy to be here and hope I inspire you to make some beautiful projects. 

Today's card features the Berry Best stamp set illustrated by Agota Pop.


To create this card I stamped the macaron stacks 5 times in alcohol safe ink and then colored each with Copic Markers.

I used The Rabbit Hole Designs A2 Shaker Acetate Sheets for my shaker card. These acetate sheets are incredibly easy to use. They come with adhesive ready to go. The background of the shaker is ink blended over the Overlapping Circles stencil, which sadly is sold out now, in colors to match the macarons

For the sentiment I stamped in VersaMark Ink and white heat embossed.

Thank you for stopping by and checking out my card. I hope you enjoyed and if you'd like to see more about this card and a video on how I made it you can visit my blog.

Hugs
Wendy


Thanks a Melon

Hello everyone!  Today I'm sharing a card made with the stamp set One in a Melon, illustrated by Agota Pop.  This is such a fun stamp set!  I knew as soon as I saw this set that I needed to make a shaker with red and green sequins.  First I colored the melon slice with pencils and cut it out using the coordinating die.  Next, I used the the Mesh Optical Illusion stencil to create a watermelon colored background.  I mounted the stenciled background and sentiment onto green card stock.  It is really easy to turn any card into a shaker card with the A2 Shaker Acetate Sheets!  

For more inspiration, updates, and news make sure to check out these places

Made For Each Otter

 Hi everyone!  Amy here today sharing a shaker card I created using two gorgeous stamp sets, Otterly Adore and Sea-ing is Believing, illustrated by Agota Pop!  This card also features the fun and super easy to use A2 Shaker Acetate Sheets!

Otterly Adore Stamp and Die Set illustrated by Agota Pop, Sea-ing is Believing Stamp and Die Set illustrated by Agota Pop, A2 Shaker Acetate Sheets by The Rabbit Hole Designs #therabbitholedesignsllc #therabbitholedesigns #trhd

I started this card by cutting a piece of smooth white cardstock just under A2 size so it would fit perfectly in the Shaker Acetate Sheet!  I then blended on Distress Oxide Inks Salvaged Patina, Tumbled Glass, and Salty Ocean to create a beautiful background!

I stamped out these super cute otter images from the Otterly Adore Stamp Set, colored them with copic markers, and cut them out using the coordinating die set.  I then stamped the awesome fish images from the Sea-ing is Believing Stamp Set, colored them, and cut them out using the coordinating die set.

Otterly Adore Stamp and Die Set illustrated by Agota Pop, Sea-ing is Believing Stamp and Die Set illustrated by Agota Pop, A2 Shaker Acetate Sheets by The Rabbit Hole Designs #therabbitholedesignsllc #therabbitholedesigns #trhd

Next, I stamped the sentiment, which is from the Otterly Adore Stamp Set, directly onto the background in black pigment ink, and clear heat embossed.

I assembled my card adhering the images directly onto the background.  I put my card in the Shaker Acetate Sheet, added embellishments, sealed the Shaker Acetate Sheet, and adhered my card to a dark gray card base. 

Otterly Adore Stamp and Die Set illustrated by Agota Pop, Sea-ing is Believing Stamp and Die Set illustrated by Agota Pop, A2 Shaker Acetate Sheets by The Rabbit Hole Designs #therabbitholedesignsllc #therabbitholedesigns #trhd

 Thank you and I hope you enjoyed my card today!

For more inspiration, updates, and news make sure to check out these places:

Floral Thanks


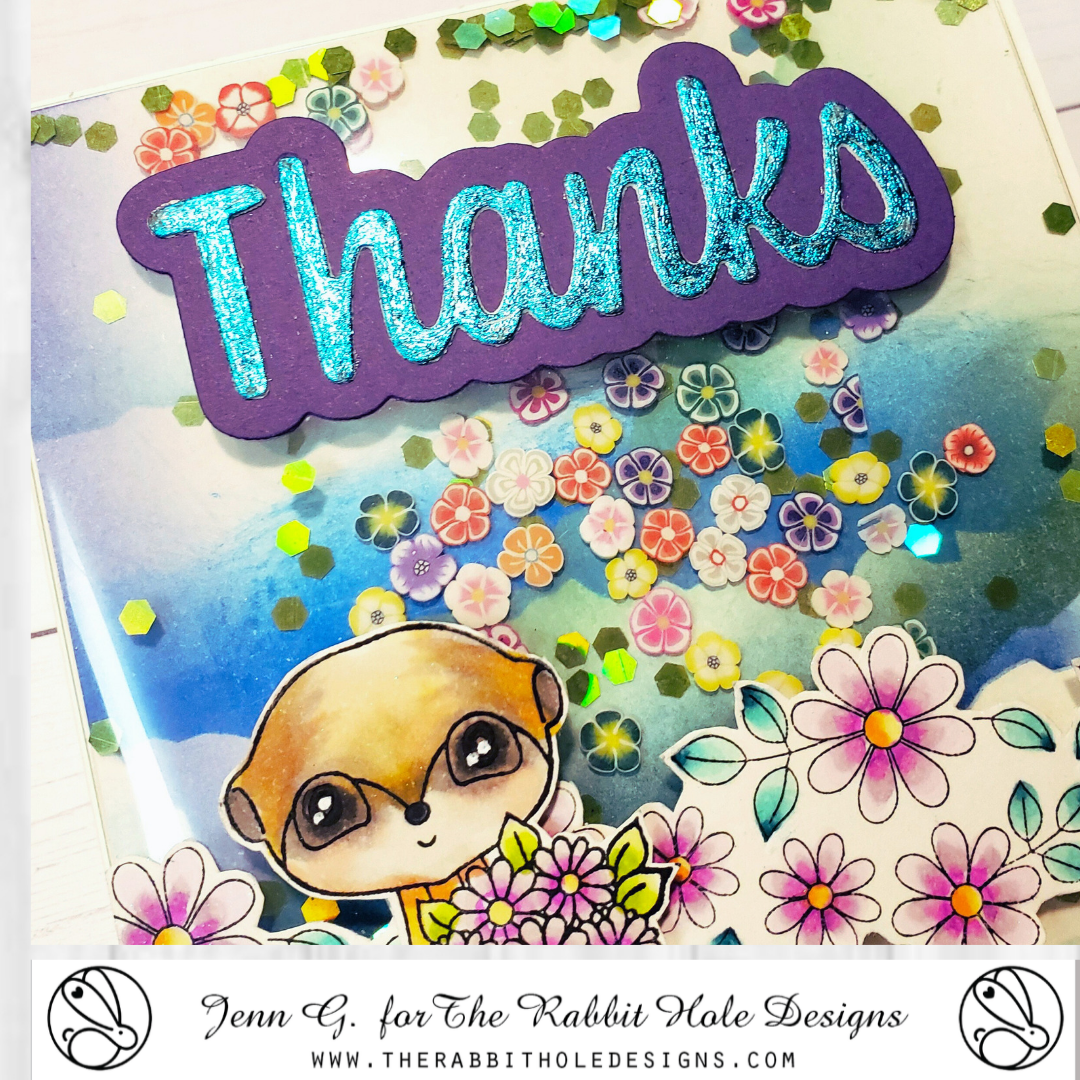
Hello my crafty friends!  I have created a lovely floral collaboration to share with you today on The Rabbit Hole Designs blog today! I love mixing and matching a variety of stamp stencils and dies to create!

I colored the Meaningful Meerkat and Daisy Chain images with OLO markers.

The background is stenciled with the Torn Paper stencil to create a cloud-like background with blue and green inks on a 4 1/8" x 5 3/4" piece of white cardstock.
The Thanks sentiment is cold foiled with adhesive.  I added a piece of 2" double-sided adhesive tape to a piece of cardstock and die cut the word Thanks.  I removed the release paper and place the word on a piece of teal foil release sheet and rubbed/burnished the foil to the word before glueing it to the purple shadow layer.
The stenciled background is placed face down onto the A2 Shaker Acetate Sheets.  Remove 3 of the 4 adhesive tabs and fold them to the back of the background to create a pocket.  Add shaker pieces to the opening in the shaker pocket and seal the final tab.  Attach this shaker front to an A2 card base.
Adhere the Thanks sentiment to the top part of the shaker card and the Daisy Chain to the lower half of the card front with double-sided adhesive tape.  Attach the Meerkat image to the lower left front with double-sided adhesive foam tape to complete the card.


Thank you for taking time to visit today's post.  I hope you enjoyed this Floral Thanks shaker card featuring products from The Rabbit Hole Designs.  I hope you are inspired to create something lovely today.

Be Creative ~ Stay Inspired

Jenn Gross


Follow me, Journey Coach Jenn, on 

Instagram - https://www.instagram.com/journeycoachjenn/

YouTube - http://www.youtube.com/c/JourneyCoachJenn

Blog - http://www.journeycoachjenn.com/


For more inspiration, updates, and news make sure to check out these places


The Rabbit Hole Designs

The Rabbit Hole Designs Instagram

The Rabbit Hole Designs Facebook Page

The Rabbit Hole Designs Pinterest

The Rabbit Hole Designs YouTube 

Meerkat Shaker Card

Hello Everyone!  I'm excited to share a card that I made using some of the new products from The Rabbit Hole Designs latest release.  If you haven't looked at the new stamp sets, you definitely should check them out.  The Meerkats in both stamp sets are illustrated by Agota Pop and they are really adorable.  
For this card I decided to use the I Really Dig You stamp set.  I colored the meerkat with colored pencils and used the coordinating die to cut it out.  I really like that the die doesn't leave too much white space around the edge of the stamp.


For the background, I used the Connected by the Stars stencil and ink blended some light yellow in the middle and some darker orange around the edges and mounted it on a piece of orange cardstock.  I stamped one of the sentiments from the I Really Dig You stamp set directly on the background and added the meetkat to the center.  

To finish off the card, I used the new A2 Shaker Acetate Sheets to create a quick and easy shaker card.  I filled it with some sequins that matched the orange and yellow theme and mounted the whole shaker front to a card base of the same orange card stock.  I really love how the shaker sheets make it so easy to turn any card front into a shaker card in no time at all!
 

For more inspiration, updates, and news make sure to check out these places

The Rabbit Hole Designs

The Rabbit Hole Designs Instagram

The Rabbit Hole Designs Facebook Page

The Rabbit Hole Designs Pinterest

The Rabbit Hole Designs YouTube