Feel Better Soon
Festive Holiday Earrings
Thank you, I appreciate you taking time from your day to stop by and check out The Rabbit Hole Designs Blog. I hope you are inspired to create something lovely today!
Be Creative ~ Stay Inspired
Jenn Gross
Follow me, Journey Coach Jenn, on
Instagram - https://www.instagram.com/journeycoachjenn/
YouTube - http://www.youtube.com/c/JourneyCoachJenn
Blog - http://www.journeycoachjenn.com/
For more inspiration, updates, and news make sure to check out these places
The Rabbit Hole Designs Instagram
The Rabbit Hole Designs Facebook Page
Monochromatic Spring Kitty
To start off I stamped the image onto 80lb Neenah cardstock with Memento Tuxedo black ink. Then I grabbed several Copic markers in the Red family (and some light reds/dark pinks)
Flower Whale/You Make Life Fun card
Oceans Of Love/Flower Whale
Hi Rabbity Friends! Kelly Fusco here with a fun mixed media card featuring The Flower Whale Stamp.
To Start off I stamped the Flower Whale image onto 80lb Neenah cardstock using Memento Tuxedo Black ink. I colored my whale with Gray Copics and I used Teals, Blues & dark reddish browns THEN I added some shimmer pen (a wink of stella) to it as well..
Then I took my paper distresser and distressed the edges of the panel. I fussy Cut my whale out and I die cut the word "Love" and stacked it 3x high.
Clarence Loves YOU!
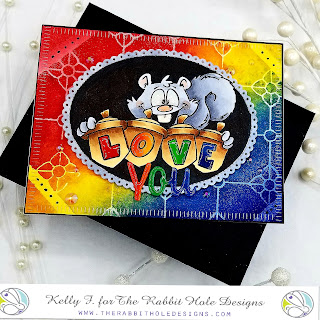
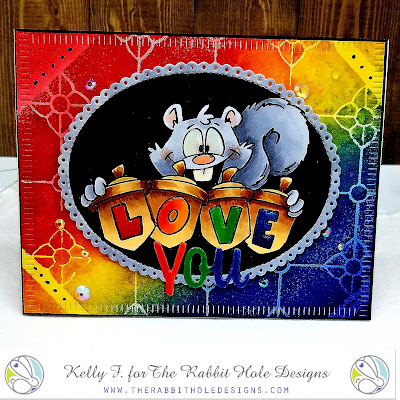
Hi Guys! Kelly Fusco here with my very 1st blog post for The Rabbit Hole Designs featuring the Clarence & Clarice Stamp.
Happy Easter
Hello Rabbit Hole Fans!
It is Kelly here sharing my new card using "One Line Easter"
by The Rabbit Hole Designs.
To make this card, I stamped the bunny image on pink card stock with Versamark ink and used white embossing powder. Then, I used a heart die and cut the image out. I cut a bigger heart in white card stock twice and layered them with foam tape.
To make the background, I used the "Happy Easter" from the set and stamped it repeatedly in a slightly darker pink ink than the background. I adhered that pink panel to my white card base. I felt like it needed something to anchor the heart so I put of strip of washi tape across the pink panel and then adhered the heart stack on top. The repeated sentiment makes a lovely background.
Ruff Life
I think this card says it all! Life is rough before coffee, no matter what day of week it is! The boxer and the sentiment get Oscar for sure, but that paper get's best supporting actor. LOL
I made this card by:
- Stamping my image on Copic friendly paper and coloring it with my Copics. I used my 0 blender to make the edges of the robe look fluffy like terry cloth.
- You'll notice that next, I used my gold gel pen to make his boxer shorts a bit sassy.
- After it was dry (not to smudge the gel pen), I fussy cut it out and put it aside.
- Next, I pulled out this DP from Echo Park and I die cut it using my Wonky Stitches die.
- I brushed the edges with a blue distress ink and then I adhered it to my base.
- Next, I cut the red CS and my white smaller. I stamped the sentiment on my white and adhered that to the red, which I adhered to my DP.
- Lastly, I added my pooch into the scene with some foam tape.
So, do you love the latest release and all the caffeinated critters? What is your fave stamp/set? I am not sure I can chose.
Don't forget you can now get these stamps in the shop and at Simon Says Stamps as well.
Thanks for visiting and head on over to my blog for a list of supplies. Have a fantastic day! ~Katie
Curiosity with Katie
So as we sprint into fall (it sure does feel that way to me), I have another fun Halloween card using the September release.
- I started by stamping my image from the Hex Yeah set and colored it with my Copics. I fussy cut it out and set it aside.
- Next I went about creating the layers. I knew I wanted to use this die and make the color pop through the black, but I had to be careful about placement so that it didn't take away from her lovely orange dress.
- Once I had my layers and colored CS picked, I cut them to the size I wanted.
- I mounted my girl on top and set it aside.
- Next, I cut a black base. On the base I stamped this sentiment from my stash with versamark ink and embossed with Metalline Flame embossing Powder from Wow. I chose this color because it complimented the scene so well.
- I came back in and mounted my layers and dress on the card.
- Lastly, I added these sparkly enamel dots from Freckled Fawn.
Well, I hope you like this card! I truly enjoyed making it. You can head to my blog here for a full list of supplies.
Humboldt Spinner with Katie
- I started by cutting my blue cardstock 8.5 X 5.5. I scored it at 4.25 inches.
- Next, I stamped this background ocean stamp on all sides with Stormy Sky Distress Ink.
- After that, I scored the card at 2.125 to make it a Z-fold card.
- Then, I used a circle die cut and cut half of a circle form the Z portion of the card.
- I die cut the same sized circle from white cardstock and used the distress ink to color it. I adhered it to the card base so it lined up with half circle die cut.
- On a bit of Navy CS, I embossed the sentiment with platinum embossing powder and used foam tape to mount it on the card.
- I stamped one squid from the Inky set and colored it using red and pink Copics.
- I mirror stamped another squid, made it a little darker with my Copic friendly liner pen and colored it with blue Copics.
- I colored the edges of both images with my black liner and added some black to the back as well in case they didn't perfectly line up.
- I used mono adhesive on both squids. I also added some extremely sticky double sided tape along the middle of the image and then added some fishing line down the middle.
- I ran the line down the edge in the z fold and taped it down so it was taught, then I used liquid glue (Glossy Accents) to ensure it held tight and trimmed the ends.
Kitty Dreams with Katie
- I stamped this kitty from the Cattitude set and the bird from the Love You More set on Copic friendly paper. I colored them both and fussy cut them out and set them aside.
- I cut a piece of light blue paper to 3.75 X 3.75. I stamped some clouds from the Love you More set directly on the blue. then I added some white highlights.
- I die cut the flowers and grass scene builders and added them to the blue background.
- Next, I added my kitty and added a bit more grass in front.
- Lastly, I mounted it all on a 4X4 notecard.
Supplies Used:
Cattitude
Love you More
Beach Day Comic Strip Style Card
Hi, everyone it's Lynnea with a quick and simple comic strip style card using the Beach Day stamp set! This style of card is great for when you have a bunch of images you want to use on your card! Let's dive in to the card!
- Die cut comic strip frame from kraft cardstock and glue onto dark teal/blue cardstock.
- Stamp, color, and cut images from the Beach Day stamp set.
- Glue images into die cut windows.
- Stamp and white heat emboss sentiment.
Thank you all so much for joining me! See you soon!
Die Cut Overlay with Caffeinated Shark
Hi, everyone! It's Lynnea Hollendonner with a SUPER quick card! Actually really quick! From start to finish took me less than 15 minutes! We all need a card in a pinch sometimes and I hope you can take the supplies you have and the inspiration for this card and create something fun!
- Ink blend a rainbow of inks onto a square card base.
- Die cut a square piece of cardstock with desired pattern and glue over the rainbow ink blending.
- Stamp sentiment and shark from the Caffeinated Shark stamp set.
- Watercolor shark image and cut out.
- Add to card front with foam squares.
Here's my quick video tutorial!
Thank you all so much for watching! See you soon!
Best Day Ever
Hello The Rabbit Hole Designs fans! Maria here on the blog with you with you today! I am so looking forward to seeing my children next month and be able to spend some quality time with them. This is my inspiration for today to create this card, showcasing the We are Family stamp set.
- Stamp the images on smooth white card stock and color the images in with Copic markers (or any coloring medium of your choice).
- Die-cut the image with an electronic die-cutting machine or fussy cut with scissors. I used my Brother Scan N Cut 2.
- Cut an A2 size piece of Bristol smooth white card stock and use the Drifts and Hills stencil to create the grassy hills with Mowed Lawn distress oxide ink.
- Use the Winter Wonder background stencil to create the mountain with Pumice stone distress oxide ink. Cover this with painter's tape to mask the background.
- Use the Ray of Light stencil to add the sunrays with Fossilized Amber and Spiced Marmalade distress oxide inks.
- Here's what it looks like when the background is completely finished:
- Use the distress sprayer to spritz some water on the colored background and dab it dry with some paper towel.
- Adhere the colored background on an A2 size side-fold card base.
- Adhere the colored images on the card with Nuvo liquid adhesive and some foam adhesive.
- Die-cut the sentiment using the Best Day Ever fri-dies and adhere to the foreground with liquid glue.
