Pages

Showing posts with label Interactive Cards. Show all posts

I am here to kelp! - a Fin-tastic interactive wobbler card.


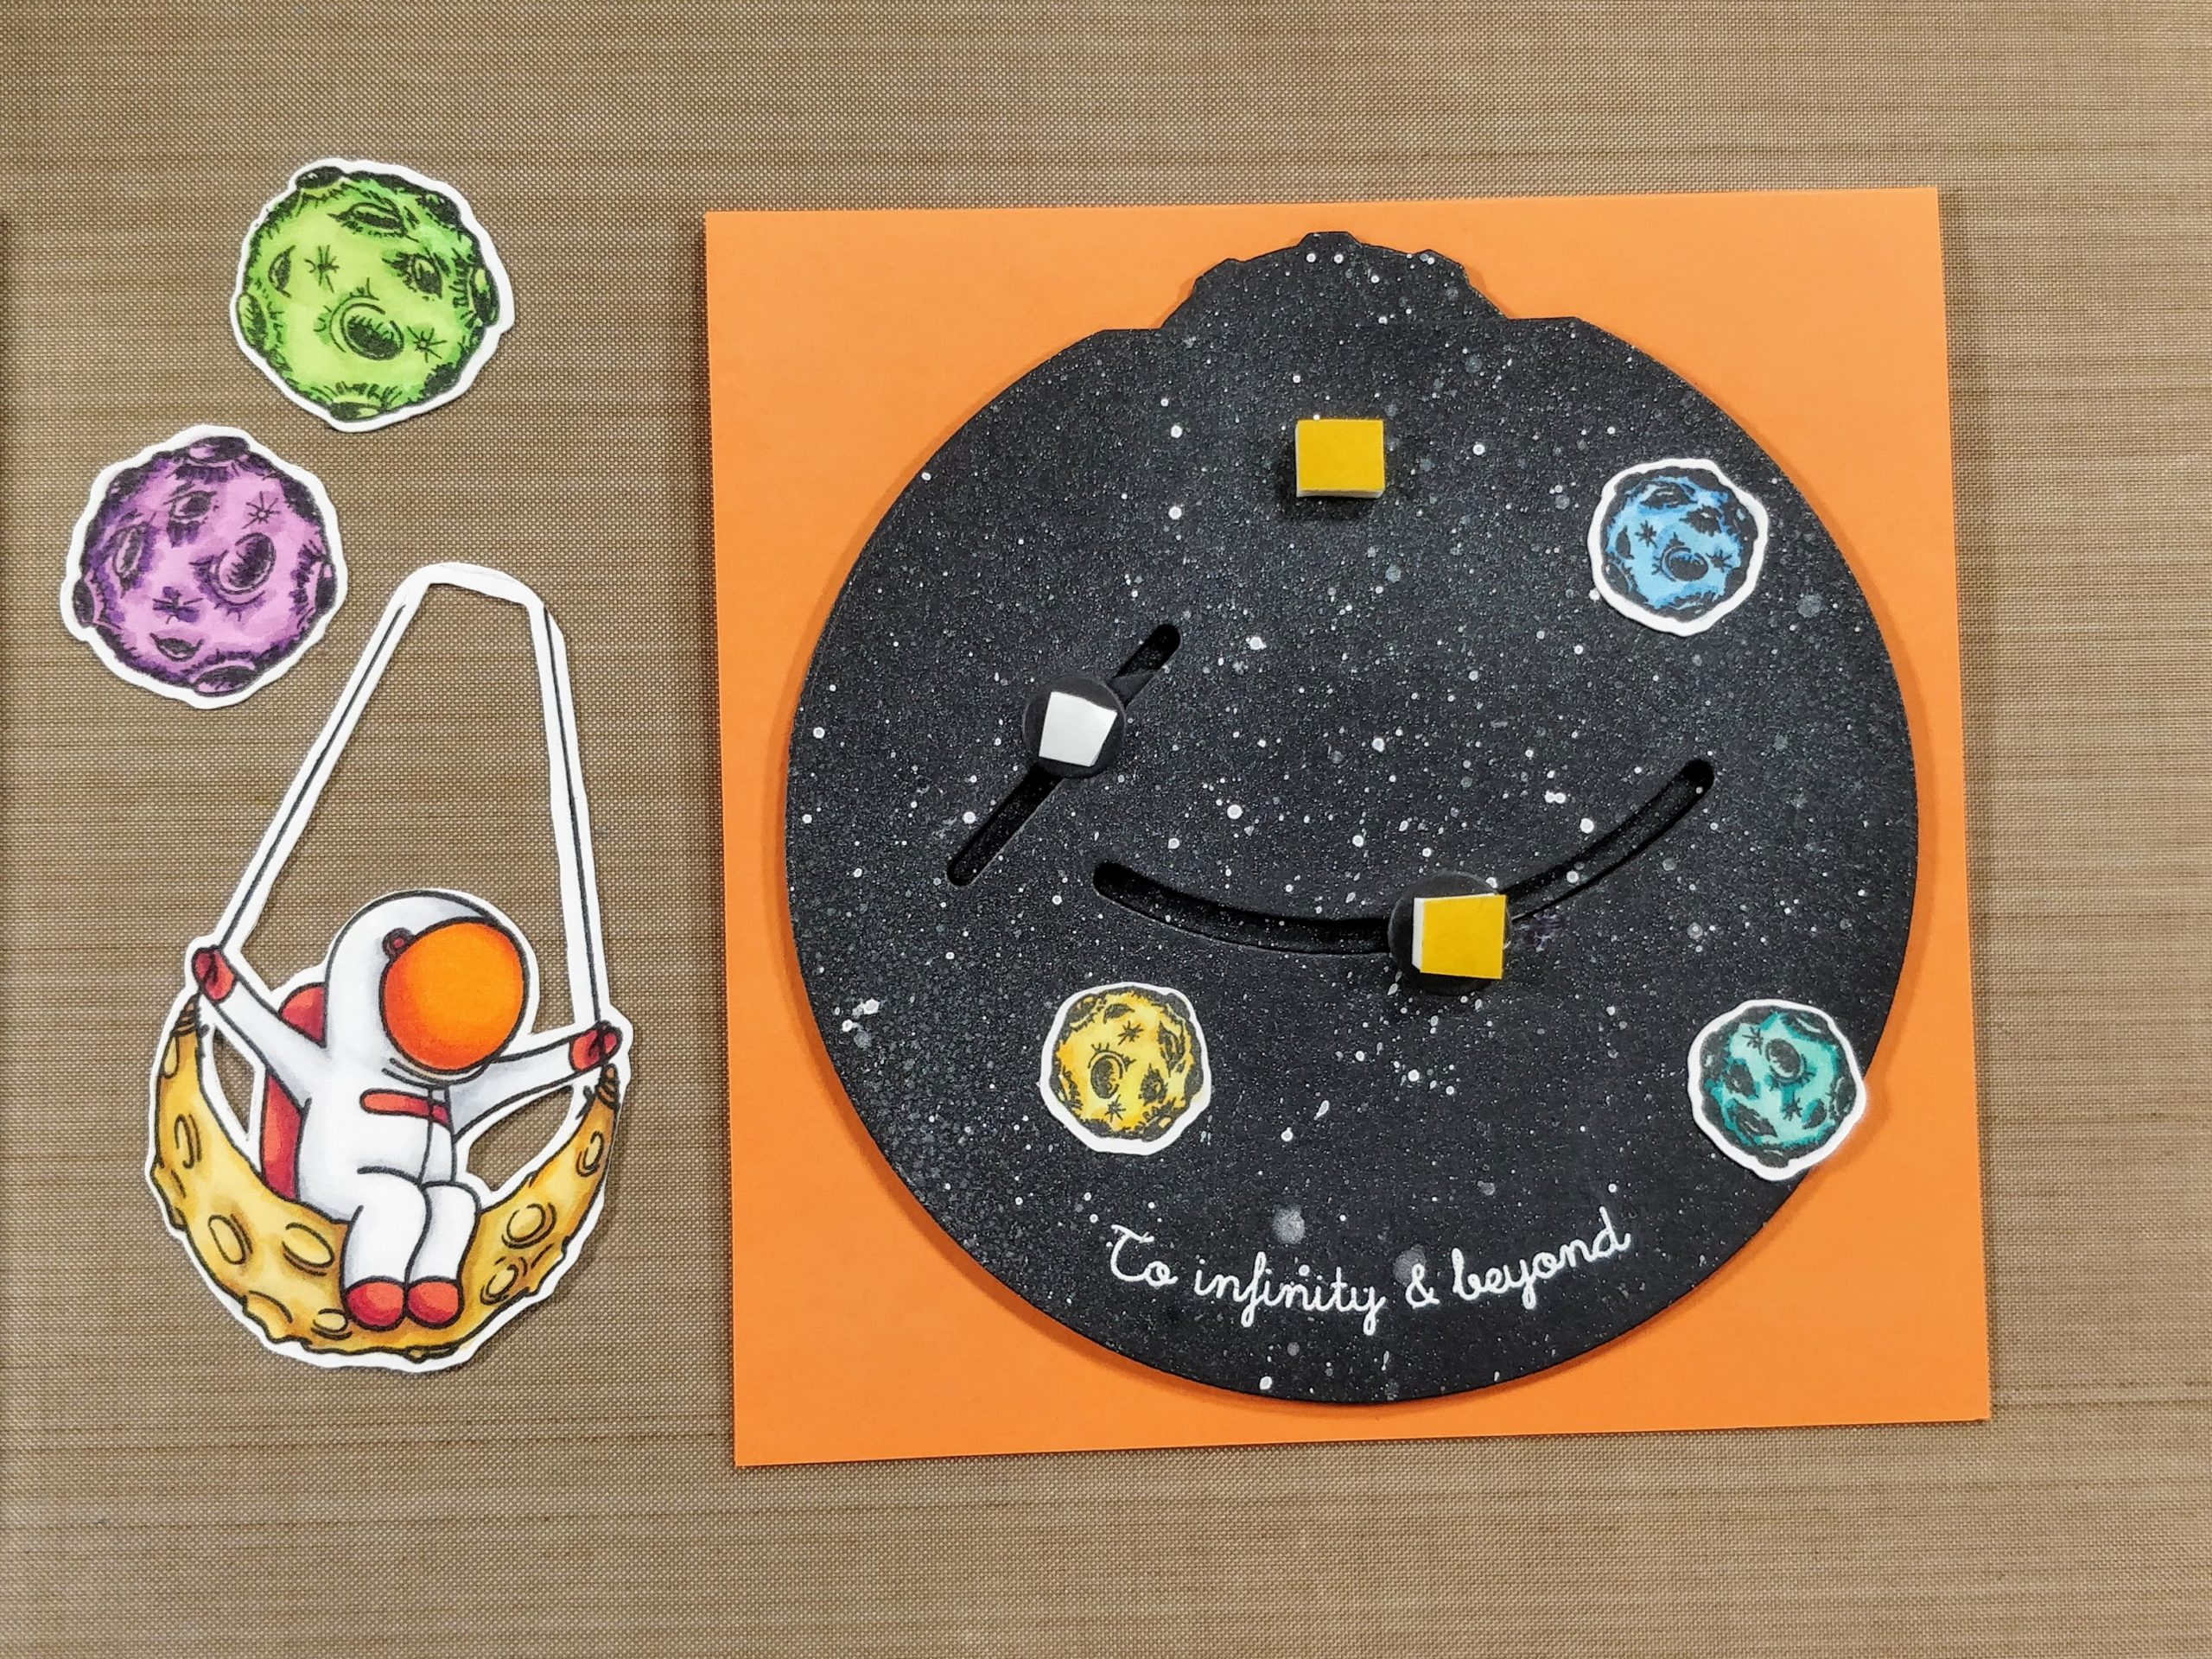
Hello crafty friends!  Jenn here! You can also find me on social media @journeycoachjenn.  Today I am on The Rabbit Hole Designs Blog sharing an adorable  interactive wobbler card.  It is created with The Rabbit Hole Designs new Fin-tastic stamp set (an Agota Pop illustration) paired with the Deco Flowers layered stencil, You've Been Framed dies, Splish Splash Stencil and the Making Waves stencil.
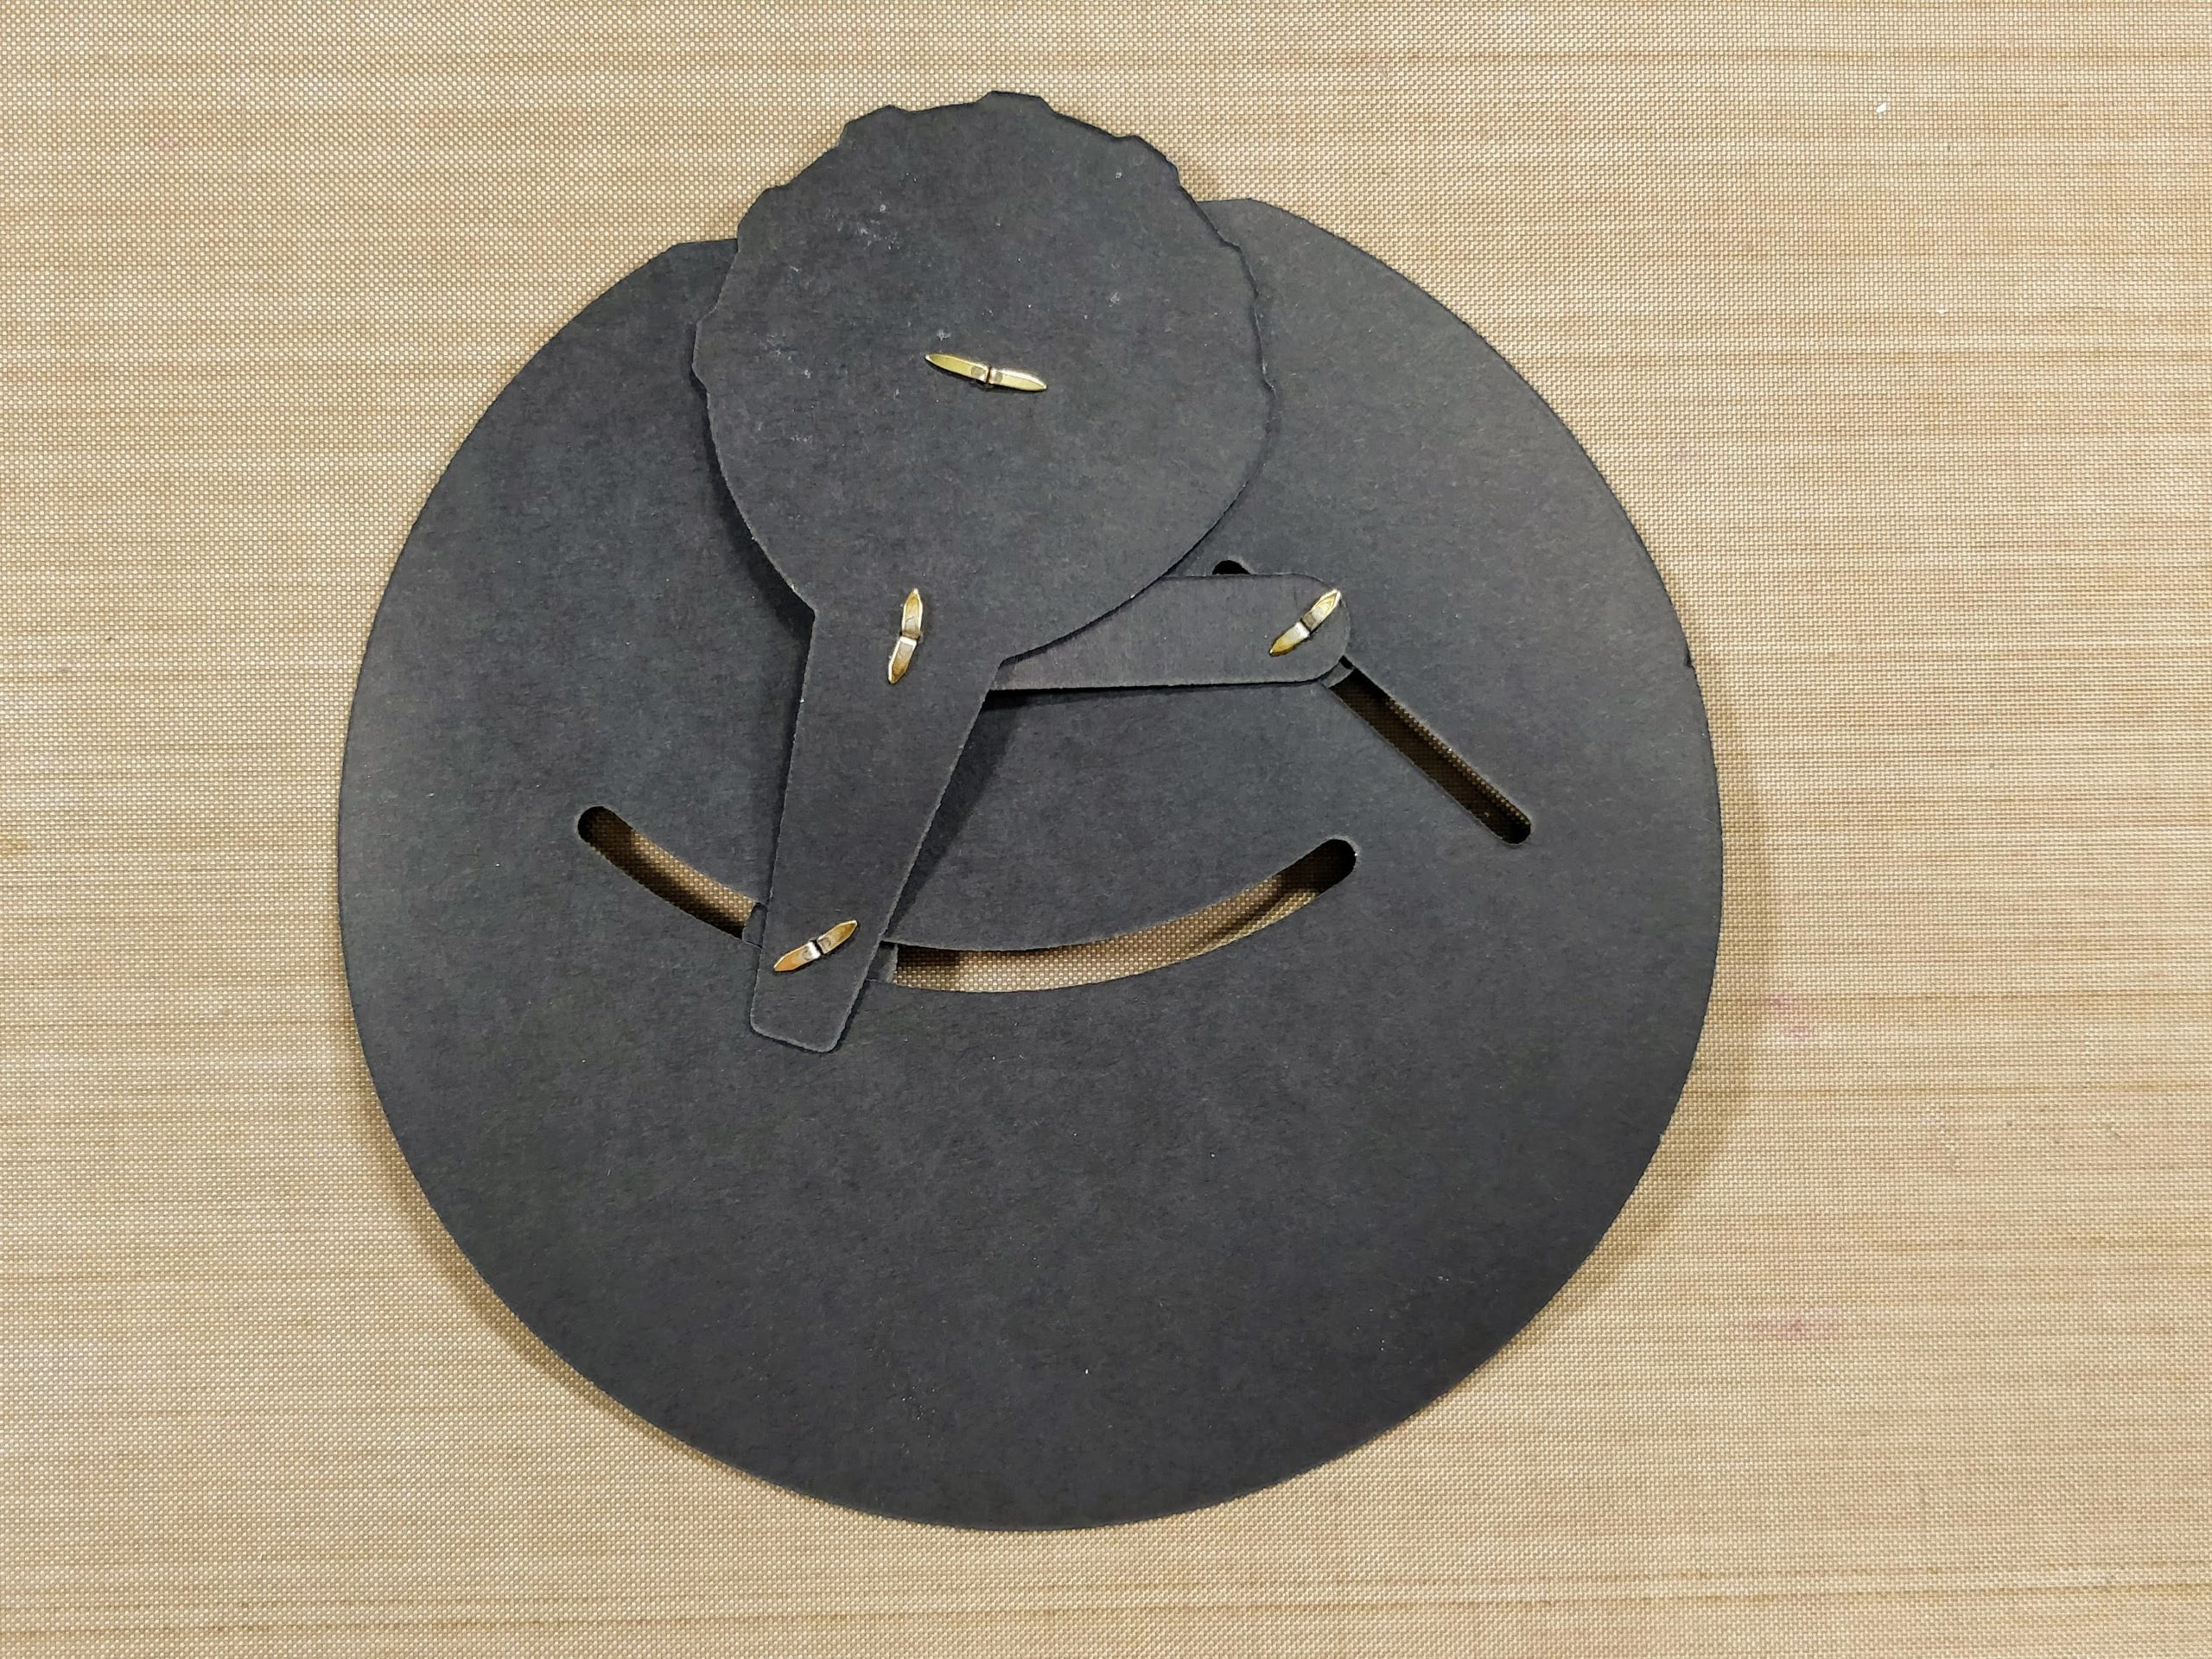
I colored the Mermaid with OLO markers using YG 8.3, 8.5 and 8.7 for the hair. The skintone is BG 7.0, 7.2, and 7.3.  The mermaid tail is colored with BG 2.1, 2.3 and 2.4.  The sea shells and coral are colored with R 2.2 , 2.4 and OR 1.3 and 1.6. She has been cut out and a wobbler has been attached to her back and then to the card panel. 

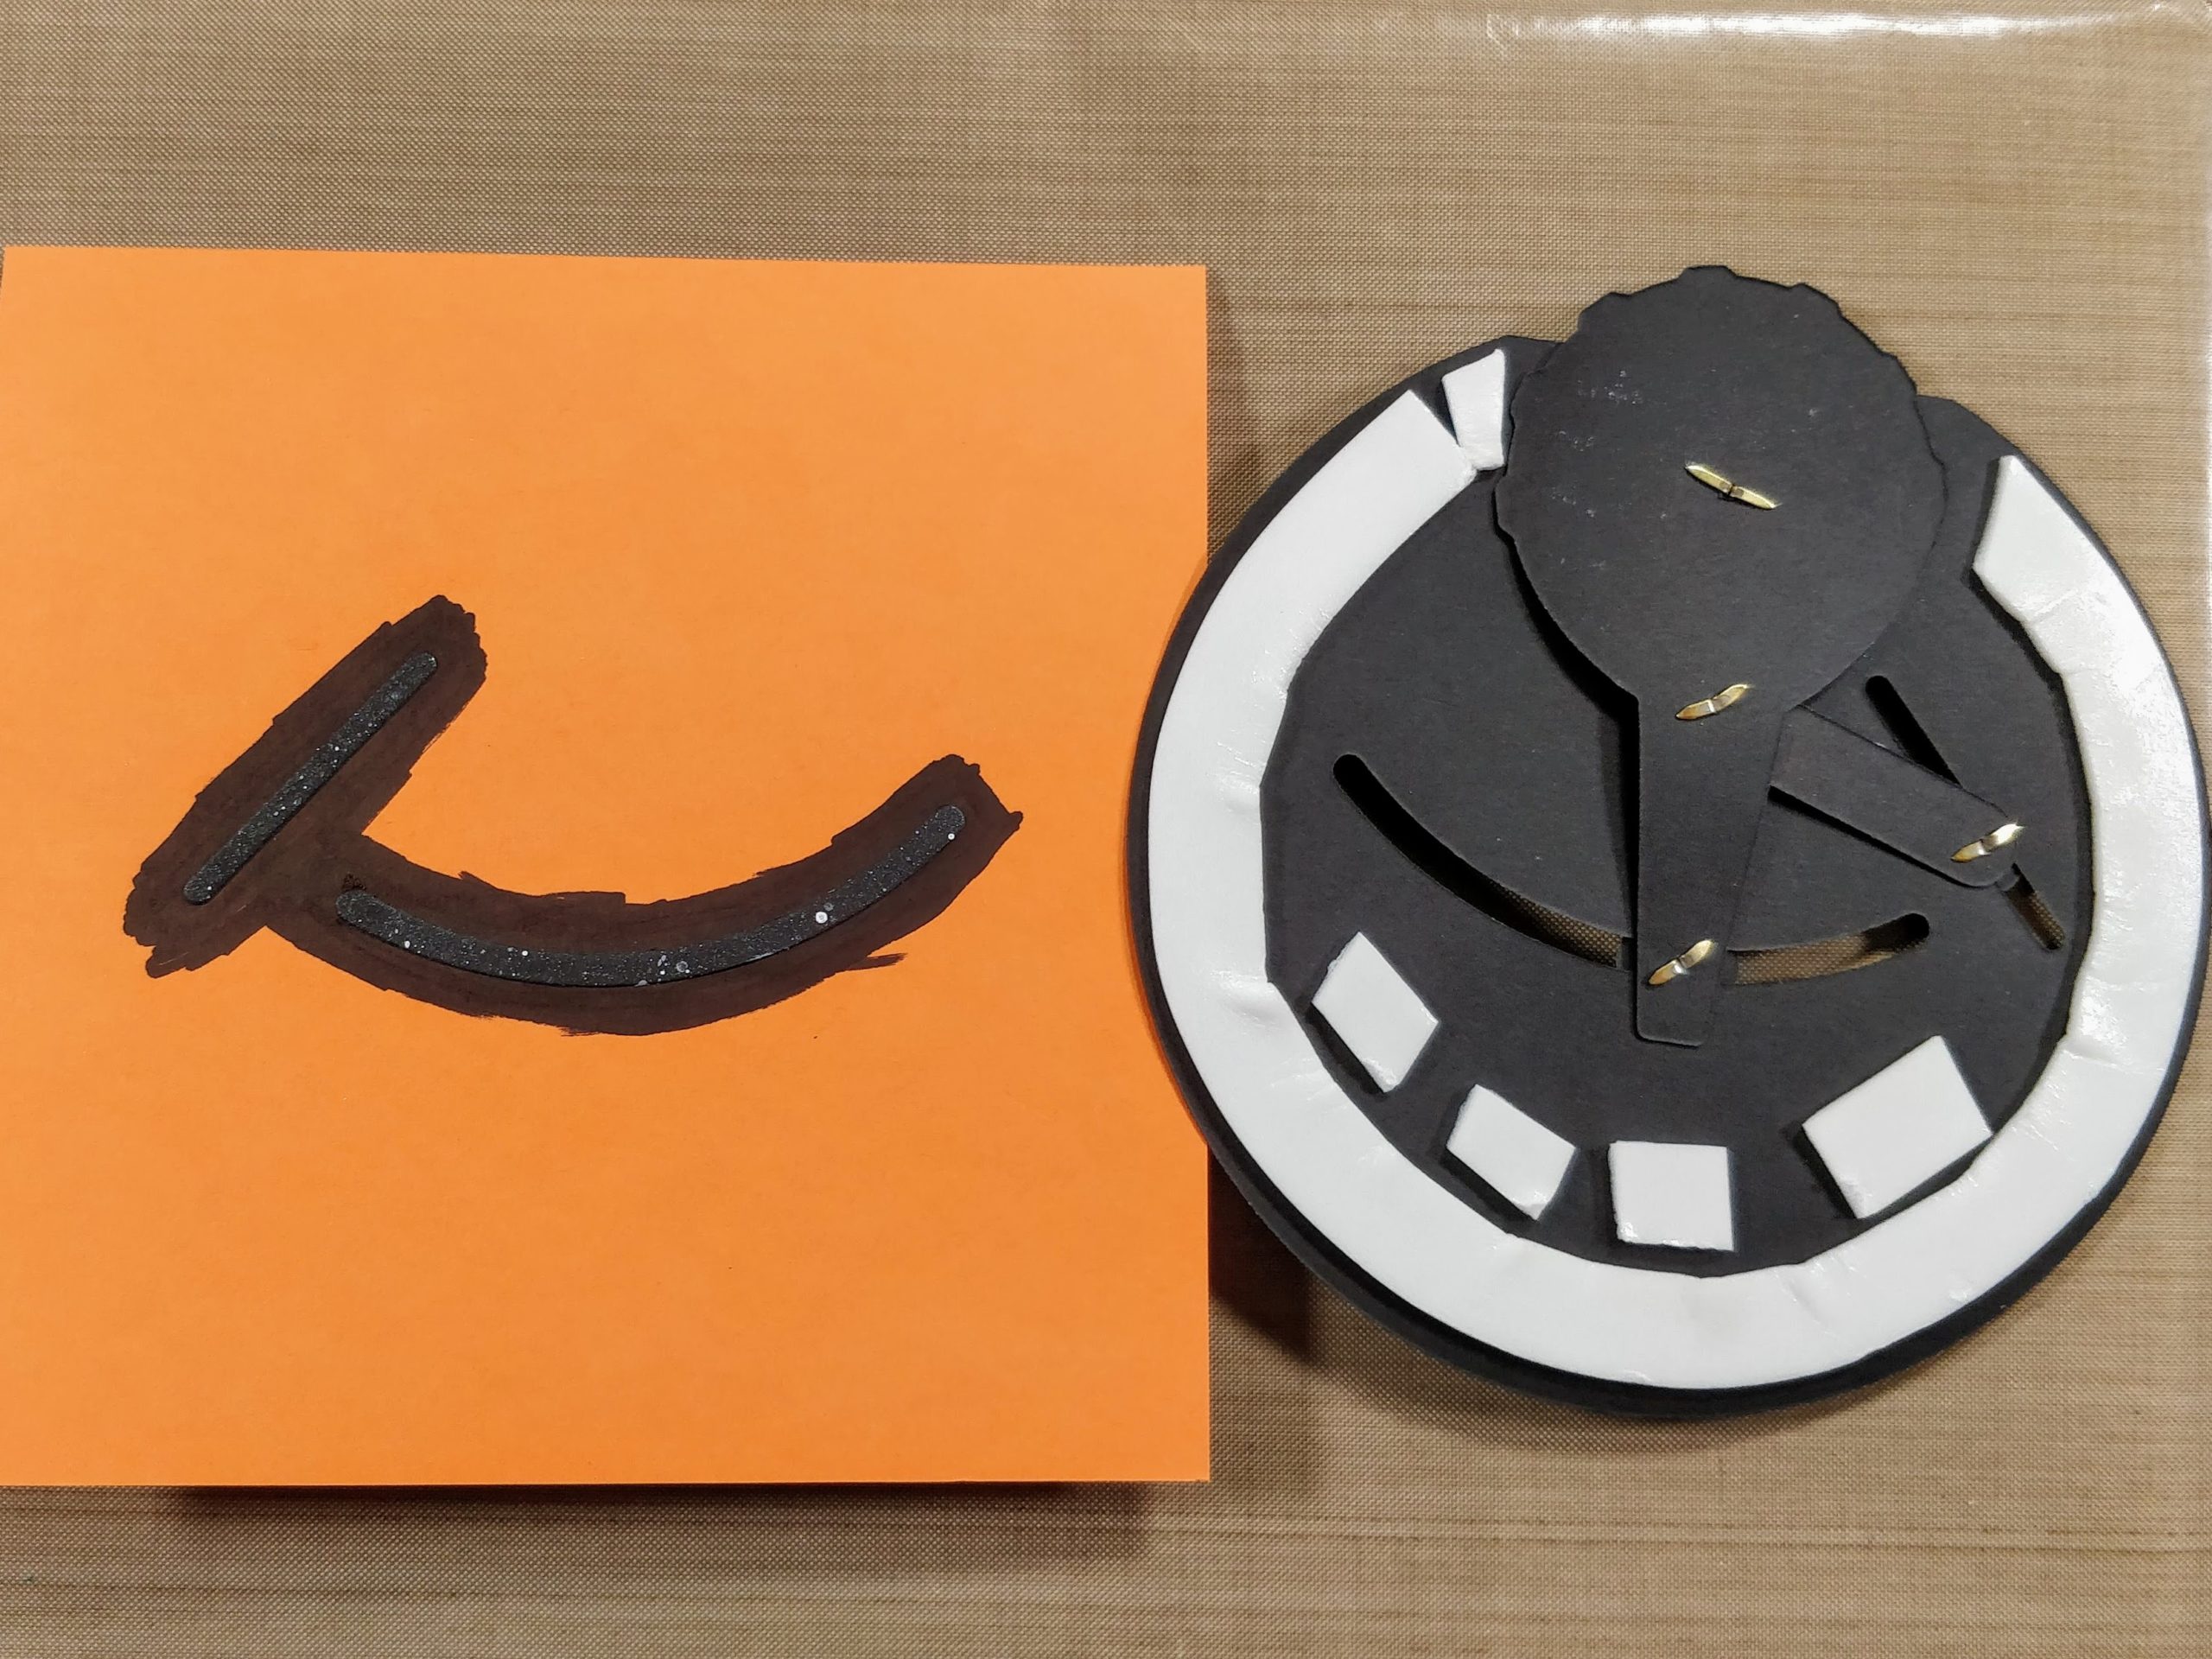
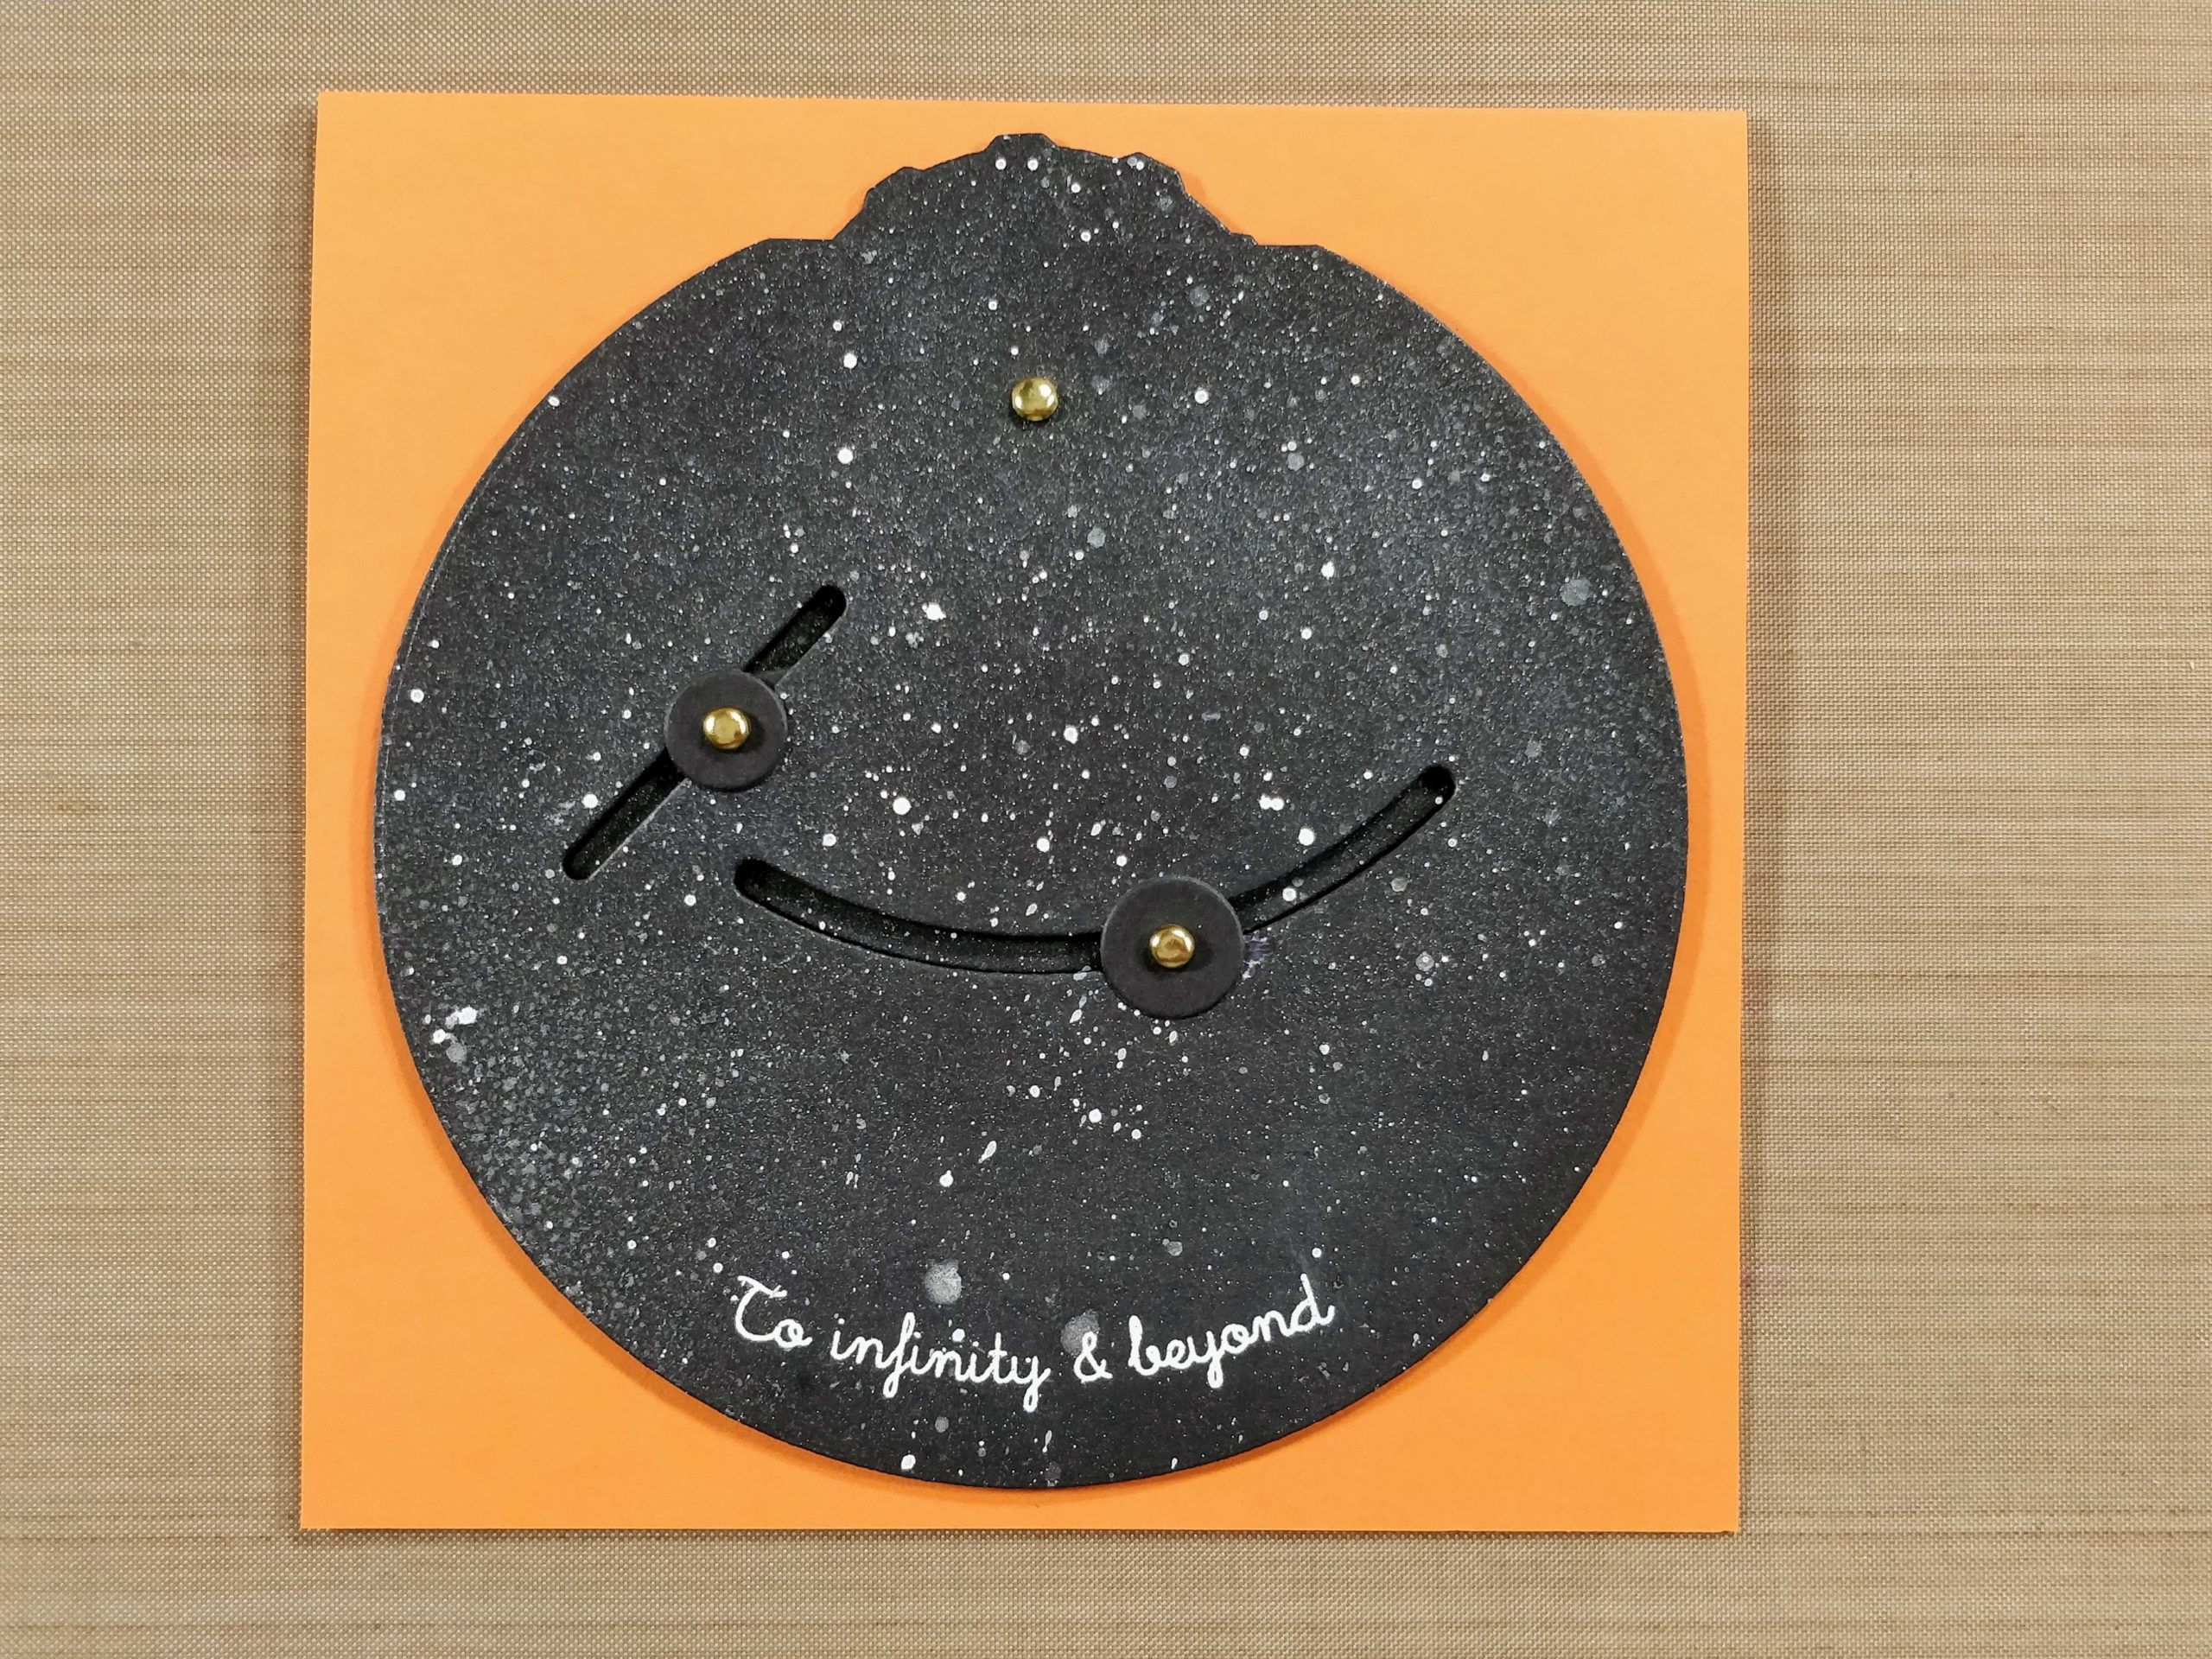
I created the card background by lightly stenciling the Splish Splash stencil in a light blue. I added the kelp using 3 of the stencil layers from the Deco Flower stencil. The ocean floor is stenciled in brown gray ink using the Making Waves stencil.

The sentiment is stamped on a blue cardstock  and fussy cut. I use the You've Been Framed dies to cut out the card front and the blue layer, before attaching them to an A2 kraft cardstock card base.

Supplies List
Action Wobblers 
Liquid glue

Thank you, I appreciate you taking time from your day to stop by and check out today’s The Rabbit Hole Design project.  I hope you are inspired to create something lovely today!


Be Creative ~ Stay Inspired

Jenn Gross


Follow me, Journey Coach Jenn, on 

Instagram - https://www.instagram.com/journeycoachjenn/

YouTube - http://www.youtube.com/c/JourneyCoachJenn

Blog - https://journeycoachjenn.blogspot.com/  


For more inspiration, updates, and news make sure to check out these places


The Rabbit Hole Designs

The Rabbit Hole Designs Instagram

The Rabbit Hole Designs Facebook Page

The Rabbit Hole Designs Pinterest

The Rabbit Hole Designs YouTube


Save the Bees - Shakercard with New Product Sneak Peek


Hello crafty friends and welcome to today's blog featuring The Rabbit Hole Designs' Sunny Days and Rainbows stamp set pair with the Daisy Chain stamp set (both illustrated by Agota Pop) 

SNEAK PEEK ALERT! 
I am so excited to be able to share this sneak peek at a new product being introduced during next week new release on Monday, March 20.  You have to wait until then to order, but they come in a convenient pack of 10, are pre-scored (A2 size) with a protective film on the top and adhesive on all four tabs.
Are all bees yellow? ...No!   I discovered, in North America, there are Blue Orchard bees. They are blue in color and are attracted to spring fruit flowers.  If you Google blue bees, you will find there are several species all over the world.
I stamped and colored the two bees images with Olo Markers.  I used Blues B2.0, B0.3, B0.5, B0.7 for the bee bodies and the Cool Grays (C-G) for the bee wings.
The card is a full shaker card.  I cut a piece of yellow cardstock  to measure 4 3/16" x 5 7/16".  I stamped the Twisted Daisy Chain on the card front and colored it with colored pencils.
I removed the protective film from the shaker window and placed the card front, face down, in the center of the A2 shaker window.  I remove adhesive release paper and attached the three of the tabs to the back of  card front creating a pocket. Add the shaker bits of your choice and seal the last tab to create your shaker card front.  You can see two black die cut hexagon frames (from my stash) are added to the front.  I used the Niccole Lowercase Alphabet dies to add "save the" sentiment.  I added the two blue bees to the bottom of the card creating this  "save the blue bees" card.

Products used

Thank you, I appreciate you taking time from your day to stop by and check out my card using the The Rabbit Hole Designs' Sunny Days & Rainbows stamps set with the Twiated Daisy Chain stamp set. Thank you for taking tome to learn more about the blue bees!. I hope you are inspired to create something lovely today! 


Be Creative ~ Stay Inspired

Jenn Gross


Follow me, Journey Coach Jenn, on 

Instagram - https://www.instagram.com/journeycoachjenn/

YouTube - http://www.youtube.com/c/JourneyCoachJenn

Blog - http://www.journeycoachjenn.com/


For more inspiration, updates, and news make sure to check out these places


The Rabbit Hole Designs

The Rabbit Hole Designs Instagram

The Rabbit Hole Designs Facebook Page

The Rabbit Hole Designs Pinterest

The Rabbit Hole Designs YouTube

Cookie Box Cards


Hello crafty friend, it's Amanda from Pear Blossom Press again! I'm back with another fun pair of Christmas cards today. These we're really fun to make, and even though they have a few more parts, they came together pretty quick because they don't involve any coloring. 

Unlike many of the cards I make, the fronts are simple, setting the stage for the big reveal inside.

The new Christmas Sweets stamp set helps create the cookies inside. And the mix and match sentiments allow you to be sweet or sassy. For step-by-step photo instructions, head on over to my blog... pearblossompress.com.

Aren't these cards fun?


Thanks so much for stopping by today! I'll be back soon with more fun cards to share. In the meantime, I'll see you in the Facebook fan group.


Clean, Simple, Masculine...


Why are masculine cards so hard? Is it just me, or are clean and simple cards hard too? It's never that they take a lot of work; it's just that the ideas are hard to come up with. And it's hard to know the difference between clean and simple, versus plain and boring, right? Amanda from Pear Blossom Press here again, and today, I'm sharing a two versions of a clean and simple, masculine card. Since I already took care of the hard part (coming up with the idea), you're going to love how fast you can whip up a whole batch of these to have on hand!

STEP ONE:

Stamp HAPPY BIRTHDAY from the Marquee Words set onto a white panel. Turn the exclamation point upside down and stamp the bottom portion of it (mask off the top of the dot) above the words. Move it over and stamp it two more times. Next, use a Copic Multiliner and draw the top of the dot to look like a candle flame.  

STEP TWO:

Color the dots and flames with Copic markers. I used shades of green for one card, and blue greens for the second. Next, I trimmed the panels down to 5" x 3¾" and added a raised border, by scoring 1/8" on all four sides of the panels in my Scor-Pal. At this point, you can pop the panels up with fun foam on black mats and white card bases. (That's what I did for the green card.) But if you want to spend a few more minutes on the cards, you can add lights to the flames with EZ-Lights. They'll add a real pop of light! To do that, you'll want to punch a small hole at the base of each candle flame. And if you look closely, you'll see that I embossed PUSH HERE next to the Y in happy. I used white powder to allow it to blend into the background. In person, you can see the raised, shiny text, but it doesn't detract from the clean layout. 

STEP THREE:

Add lights! Flip your panel over and use double-stick tape to adhere the battery of your EZ-Light to the panel, making sure to line up the button right under PUSH HERE on the other side. Line up the three LEDs with the holes in the candles and secure them with tape. Add a layer of double-thick foam tape around the edges of the panel. I promise, it's really simple. Then you can attach it to the black mat and card base.

STEP FOUR:

Add clear raindrop gems on top of the flames. I did this on both cards; they're a great detail whether or not they light up. In the pictures below, you can see how the entire gem will light up when you put it on top of a light. You can also see what it would look like if you don't cover up the light... 

That's it. Pretty easy, right? Obviously, you can change up the colors, or even stamp on colored cardstock and fill in the dots with a white gel pen if you want a different look. Adding the lights only takes a few more minutes, but the card is great without them too. Here is a look at the finished cards. (The green doesn't have lights, the teal does.)

And here is a closeup of the lights, after the glue is dry. (Make sure to use a glue that will dry clear.) See how the whole gem lights up, instead of just the bottom of the flame? Pretty cool, right? You can use this same trick for other gems too, as long as they are clear or translucent (no silver paint on the back). 

What do you think of my clean and simple, masculine cards? I hope I've inspired you to give them a try. Want to see another card made using the Marquee Words stamp set? Check this out. How about another card with gems that are lit up? This Christmas card has lights under the star and Rudolph's red nose.

Thanks for stopping by today! Head on over to my blog, to read the sister article and find links to the specific products I used for today's cards. If you give this a try, tag me on social media so I can see and cheer you on! I'll be back soon with more fun cards to share. 


Making Cards with a Single Stamp Set


Hello my crafty friend. Amanda from Pear Blossom Press back again, with another recipe for quick cards. I used a holiday stamp set, but you can substitute virtually any set. You want one that has an image and sentiment you like. Just think of the design, or layout of the card, as a template.

For this design, I broke it up into two parts: the coloring, and the background. Let's start with the coloring...

I have been coloring along with Kathy Racoosin for her 30 Day Coloring Challenge again. I like to stamp images onto quarter sheets and Copic color them while watching TV, or crafting online with friends. Usually, I do this without a specific plan for finished cards; I just color and die cut, or fussy cut the images with my ScanNCut, and set them aside for later. That's what I did here with the cute little pig from Hoggy Holidays.

hoggy holidays The Rabbit Hole Designs

For the background of the card, I wanted something simple that would add a pop of color and ground the pig, but be fast and easy. I decided to use my Karin markers and do some ink smooshing. If you don't have these markers, you can use any water based markers, or even watercolor paint, or ink pads. I will however, recommend using a ceramic palette, not a plastic one, to help keep the ink from beading up. Just scribble (or swipe your pad) onto your palette, and spritz with a little water. Dip a panel of watercolor paper into the wet ink and lift.

You can dip it several times to create lines and variation of pattern. For markers or inks that aren't as concentrated as the Karin markers, you may want to apply more ink to the palette and repeat the process until you reach the desired vibrancy (remember, most colors dry back a little softer). After I dipped the panel, I let it dry for a minute, then splattered concentrated ink onto it (I just picked up more ink with a wet paintbrush and flicked it on). This gives the panel a little texture and adds interest. 

Ink Smooshing with Karin Markers Ink Smooshing with Karin Markers

Once the panel was dry, I lined it up in my Misti, with the pig roughly where I wanted him to live, and decided on sentiment placement. I was trying to create a visual line from the top left to the bottom right. Inking up the sentiment with the same green markers, I stamped it onto the panel. (You can color directly on your stamps with water based markers.)

Stamping with Karin Markers Stamping with Karin Markers

Assembling the card was really fast. I trimmed the panel to 3¾" x 5" and mounted it to a green card base. To add a little sparkle, I brushed shimmer pen onto the white parts of the pig's hat and the ink smooshing. Then, I mounted the pig to the card with a Mini Action Wobble. This creates a fun, interactive element, and makes the card extra special. For a little more sparkle, I glued on a few sequins. Here is the finished card in action...


I love the way this one turned out. The design lends itself to mass production, and virtually any stamp set can be used. I think this card would be fun to recreate with kids too. Let them color the die cut images and ink smoosh until their hands are nice and stained. And what kid wouldn't love to play with the Action Wobblers (even us big kids), right?

Thanks for stopping by today. You can find the sister article to this post on my blog. Hop on over for more fun and links to the specific products I used! If you'd like to see another card I made with the Hoggy Holidays set, click here. I'll be back soon with another fun card to share.

hoggy holidays The Rabbit Hole Designs Action Wobble hoggy holidays The Rabbit Hole Designs Action Wobble


Swinging on the Moon - Double Dial Card

Swinging on the Moon Double Dial Card

Hey crafty friend, Amanda from Pear Blossom Press here again. I've got an awesome new interactive card for you today! I paired up images from Space - Infinity & Beyond, and Space - Miss You, along with a neat double dial die set, to create a fun swing card. Check it out in action...


To prep, I stamped my images and Copic colored them. I extended the arms of the astronaut's swing and connected them at the top with a black pen. Then, I cut out all of the images with my ScanNCut. To create the galaxy background, I borrowed a trick from my friend Cassie, and just splattered white paint and shimmer mist onto black cardstock. It's fast and easy. I cut out a 5" circle and trimmed the top off to create the card front. I used the die set to cut the slots from the circle, as well as the dial, link and washers. It may seem complicated, but I promise, this was really easy to put together. Here are step-by-step photo directions to assemble the pieces...

Swinging on the Moon Double Dial Card 
Parts for Swinging on the Moon Double Dial Card.

Swinging on the Moon Double Dial Card 
1. Attach link to dial with brad.

Swinging on the Moon Double Dial Card 
2. Attach dial to card front (narrow tweezers help create extra space when opening brad).

Swinging on the Moon Double Dial Card 
3. Use brads and washers to attach link and dial arm to card front (view from front).

Swinging on the Moon Double Dial Card 
(View from back.)

Swinging on the Moon Double Dial Card 
4. Attach black slot pieces to card base and use marker to darken area around them. Apply foam tape to back of card front, away from moving parts.

Swinging on the Moon Double Dial Card 
5. Attach card front to card base.

Swinging on the Moon Double Dial Card 
6. Apply double thick foam tape (yellow) on dial brads. Apply regular foam tape (white) on link brad. Glue small moons flat to panel.

Swinging on the Moon Double Dial Card 
7. Attach swing to foam on dial arm. Attach purple moon to foam on link.

Swinging on the Moon Double Dial Card 
8. Attach green moon to top brad.

To finish the card, I added a few dots to the top right, and bottom left corners of the card base with black and white pens. I glued a bunch of round and star shaped gems all over too. And a hand drawn arrow on the dial, lets the recipient know how to operate the mechanism. 

Swinging on the Moon Double Dial Card Swinging on the Moon Double Dial Card Swinging on the Moon Double Dial Card

Thanks for stopping by today. I'd love to know what you think of this one! You can find the sister article to this post on my blog. Head on over for links to the specific products I used. If you'd like to see more cards using these stamp sets, you might like this article, and this one. I'll be back soon with more fun cards to share.

For more inspiration with your The Rabbit Hole Designs Creations, be sure to follow along at these other locations:
The Rabbit Hole Designs BlogThe Rabbit Hole Designs InstagramThe Rabbit Hole Designs Facebook PageThe Rabbit Hole Designs PinterestThe Rabbit Hole Designs YouTube

Coffee Loving Shaker Card

Caffeinated Terrier Shaker Card Coffee Card

Hello my crafty friend. Amanda here, from Pear Blossom Press again. Grab a cup of joe, and I'll tell you all about this fun shaker card...

I really love the new Caffeinated Terrier. Unlike many of the other caffeinated critters in the series, this little guy has a very satisfied expression on his face. Don't get me wrong, the tired eyes on the other critters crack me up, but the terrier helps you create a different mood. 

Having no idea what I was going to do with him when I stamped him, I played it safe and placed him in the middle of an A2 panel, then I colored him with Copic markers. I often stamp out one or more images on a panel and take them to the couch to color while I'm watching TV, or helping my daughter with schoolwork. 

As I colored him, I thought about masking him off and ink blending a background behind him. But, if I'm being completely honest, I didn't want to fussy cut a mask when I sat down to complete the card the next day. And I've had a beautiful pack of Sparkle Blends in my stash for a long time, that are perfect for coffee themed shakers, so I decided to pair them up. I rummaged through my scraps and found orange stripe pattern paper, trimmed it down, and die cut a window with a circle die. (If I had cut the window first, then trimmed the panel down, it would have been easier. But that's what I'm here for, to make the mistakes and let you know how to avoid them, right?) I also pulled out the new orange sequins that came for free with my Rabbit Hole order. I figured I'd mix them in with the coffee blend, to pull all of my colors together. 

I used Scor-tape to adhere acetate behind the window; double stick tapes seem to work better than any of my wet glues for acetate. I used double thick foam tape to frame the back of the window and the border of the orange panel. A quick pass of the powder tool around the edges of the foam (before I removed the release paper) keeps the shaker bits from sticking to the sides. Then I peeled up the release paper, added the shaker bits, (got the order right there) and stuck the terrier panel to the frame. 

Caffeinated Terrier Shaker Card

Since I had trimmed the orange panel smaller than A2, and wanted to leave the stamped panel whole, I used a neat trick I learned in my friend Roslyn's video. I simply placed the frame face down on another A2 panel, lined it up, and used the outer edges of the second panel to line up the stamped panel. This is such a great idea for lining up larger pieces on top of smaller ones! Normally, I pile up the shaker bits in the center of the larger panel and place the smaller frame on top, but if you bump it, you can send that pile all over the place. 

To finish the card, I glued a sentiment banner along the bottom and a card base to the back. A few more sequins scattered on top add more interest and pull the whole thing together. I love the way it turned out, and the fun interactive element. What do you think? There's something so satisfying about the sound of a shaker...


Well, I hope I've inspired you to shake things up a little, and make some shaker cards of your own. And I hope your coffee didn't get cold while you were reading this. You can find the sister article to this on my blog. Hop on over for more inspiration. And be sure to come back on Monday, as we kick off the new release; it's outta this world! See you then...

For more inspiration, updates, and news make sure to check out these awesome places!


Pulling Rabbits Out of a Hat


Hey crafty friend, it's Amanda from Pear Blossom Press again with a fun new interactive card! I haven't been shy about saying the All Ears set is my favorite of the new release. As soon as I saw the image, I knew I wanted to create a pocket card shaped like a top hat and have the cute little bunnies pull out. And I'm happy to report, this card came out as cute in real life as it was in my head! (Lol, that isn't always the case.)


I stamped the bunny pile onto a panel and channeled my inner Mona Toth for coloring inspiration (she does yellow and turquoise like nobody's business!) I used Copic markers to color the bunnies, then added a drop shadow around the outer edge with a pale blue marker. You can see how that little bit of color helps the image not look so flat. (By the way, it's day 2 of the new 30 Day Coloring Challenge; are you coloring along with us?)

Rabbit Out of a Hat Pocket Card Rabbit Out of a Hat Pocket Card

I stamped my sentiment and cut the panel out with a tag die. Because I used Copic markers, I cut a second tag to layer behind to cover the bleed through. The tag I used was a little long for my image, so I slid the die up and re-cut the bottom to shorten it.

Rabbit Out of a Hat Pocket Card

The top hat might look a little complicated, but it was actually pretty easy to make, and I've got step-by-step pictures to help guide you through. Basically, I cut a pair of oval donuts, and a pair of tags (slightly larger than the tag I used for the bunnies). Some black Glitter Glitz Gel stenciled on the tags give the top hat some pizzazz and lend to the magical feeling I was trying to create.

Rabbit Out of a Hat Pocket Card Rabbit Out of a Hat Pocket Card

The tags I used for the hat are the same width as the inner oval, so they slip right inside.* I trimmed the front tag down with the inner oval die so when I glued outer the edges together, they created a library pocket.

Rabbit Out of a Hat Pocket Card

Next, I slipped the pocket in through the center of the first oval and lined it up with the pocket opening. I glued it in place. (It's going to look weird and you're going to wonder if you're doing it right. Don't worry, if it looks like the picture below, it's right.) Now to fix the weird lines at the top, I glued the second oval on top of the first oval. (It doesn't slide around anything, just gets glued right on top.) This hides the top edge of the back of the pocket and makes it look like a hat brim. Test to make sure no glue has seeped out and sealed your pocket shut.

Rabbit Out of a Hat Pocket Card Rabbit Out of a Hat Pocket Card

Every dapper top hat has trim, and I decided to add a yellow band to the back of mine. (From the front side's perspective, you wouldn't be able to see the band, so I only added it to the back.) I used the same larger tag and smaller oval dies to cut it out, then I glued it to the hat.

Rabbit Out of a Hat Pocket Card Rabbit Out of a Hat Pocket Card

To finish the card, I punched a hole in my bunny tag, tied on some ribbon and twine, then added some flat-backed stars and gems to both the tag and hat. I love it! It's all ready for a very magical birthday...my Grandpa's 90th! (I'll let you know what he thinks of it ☺️)

Rabbit Out of a Hat Pocket Card Rabbit Out of a Hat Pocket Card Rabbit Out of a Hat Pocket Card Rabbit Out of a Hat Pocket Card

Thanks for stopping by today! You can find the sister article to this on my blog, along with links to the specific products I used. Hop on over for more inspiration. If you'd like to see another card I made using this stamp, check this out. I'll be back soon with another fun card.

*If you don't have tag or rounded rectangle dies that are wide enough to fit the exact opening of your inner oval, just cut the right size panels with your paper trimmer and use a corner rounder at the bottom. If your die is too wide, you can cut the panels out, then slide your die over and trim the panels down with it in a second pass through your machine (like I did to shorten the bunny tag).


For more inspiration, updates, and news make sure to check out these places