Pages

Showing posts with label By the Shore. Show all posts

Mermaid Kisses


Hello again my crafty friend, it's Amanda from Pear Blossom Press. I am so happy summer is finally here. I love the long, warm days and splashing around in the pool. There are bright colors everywhere and we get to sleep in while school is out. Kelly and I have been hanging out more in the craft room; she's been busy drawing while I've been coloring along with Kathy Racoosin's #thedailymarker30day coloring challenge. In the spirit of summer, I've been coloring everything in rainbow colors.
Mermaid Hair Perfectly Blended

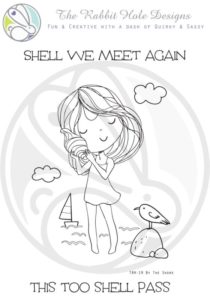
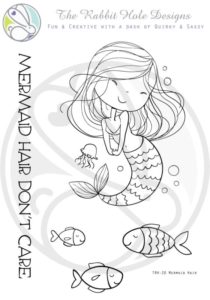
For today's cards, I did some masking and turned the little girl holding a shell in By the Shore into a mermaid. I stamped the top half of her, then stamped the bottom half of the mermaid in Mermaid Hair. It was super simple to do since they both have the same sized waists. I drew in a line to turn her dress into a bikini top and I gave her a little belly button. I considered using a mirror stamp for the tail, so they'd curl in opposite directions, but I wasn't sure I'd be able to get the lines as crisp (sometimes my mirror images end up a little fuzzy). I stamped a pair of mermaids like this. I also stamped out a bunch of fish and a pair of the whole images of the mermaid so I had two different girls (four mermaids in total). I colored them all with Arteza Real Brush pens. I knew I could cover up most of the shell in the first mermaid's hands with the hair of the other mermaid, so I chose to color the shell like it was her hair. It worked out perfectly! Once the images were all colored, I cut them out with my ScanNCut and outlined the cut edges with a black Sharpie. Then it was time to turn them into cards...

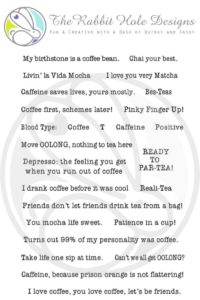
I think I've seen the Starbucks® logo so many times that the idea of combining mermaids with coffee/tea just seemed natural. I decided to put these little cuties into a large teacup, sort of like a hot tub. My ScanNCut has preset designs; one of which is a teacup and saucer set. I scaled it to 4" wide and cut out two sets. I pulled out the Perfectly Blended set for sentiments and got to work...


For the Ready to Par-Tea card, I ink blended Twisted Citron and Peacock Feathers Distress Oxide ink over a mermaid scale stencil onto one teacup and saucer. With the stencil still in place, I applied a thin coat of Vicki Boutin's Iridescent Glitter Paste. This paste is AWESOME! There are big chunks of iridescent glitter in there and it really shimmers. (You can now find it in The Rabbit Hole Designs' shop - woot, woot!) Once I removed the stencil and let the paste dry (on the paper, not the stencil; don't let it dry on the stencil), some of the chunky glitter pieces extended beyond the edges of the teacup. I just flaked those off for a cleaner look. I stamped and embossed the sentiment onto a small square, then chopped off the top corners to look like a tea bag label. I stapled on a piece of twine and tucked it into the top of the cup. I colored the tea with brown markers, then glued the cup parts together. I was going to put the girls into the cup, but I decided to put them in front of it for this card.


To pull the card together, I popped up a jade colored wonky stitched rectangle with a thin piece of fun foam onto a top folding A2 card base. I glued the cup on top of the rectangle, then popped the mermaids on top with foam tape. Since the sentiment is party themed, I decided to give them party hats. I cut out a pair of hats and quickly colored them with the same colors I used for their tails. I glued/foam taped the hats in place and added the fish to the scene. To keep the sentiment from just hanging limply, I secured it with foam tape. I used a combination of tiny rhinestones and sequins to add more sparkle to the card. To help the sequins look more like gems, I coated them with Diamond Glaze after they were glued in place. It's hard to see in the photos, but in person, the extra dimension is really cool.


For my second card, I went with a similar design layout, but I tried a different technique for the teacup. I spread a thin layer of white texture paste over a floral stencil. I removed the stencil and let the cup and saucer dry. Once they were dry, I dropped on Coral, Orange, and Fuchsia Aqua Pigments, along with a few drops of water, and tilted them from side to side so the colors would spread and mix. This is a technique I saw in a video from Pretty Little Button and I just had to try it. I love the way the paste grabbed the colors, but if you want it to resist more and be darker in the grooves, you can add the color while the paste is still wet. To add some sparkle to my teacup, I sprayed it with Glimmer Mist. I really like the way the mist settled into the grooves and bumped up the contrast.

Once the cup was completely dry, I assembled it the same way as the first one, except I tucked the mermaids inside this time. (To be honest, so much of the tails were covered up, I didn't need to alter the girl holding the shell at all.) I chose a sentiment that says Bes-Teas for the label and added a small fish to help fill some of the extra space. I decided on a neutral grey for the background color. It helped all of the other colors pop and, even though I die cut it with a fancy scalloped rectangle, it still has a modern feel. I popped the cup and mermaids in place with foam tape (I was generous with the foam tape since the paper was fairly warped). I added the fish to the scene and this time I used red flat backed gems to finish the card.


I love these cards so much that I'm thinking about making them in different colors for different seasons. Imagine them in reds and burnt oranges for pumpkin spice season (that is an official season now, right?!)... I also had a ton of fun playing with my stencils! I've got a whole list of other techniques to try and a bunch of new pastes too! I've made space on my desk for a glass baking dish that I'll fill with water and a squirt of dish soap to pop the dirty stencils into. #planningahead

What is your favorite stenciling trick or technique? Let me know in the comments below! If you'd like to see more cards made with these stamp sets, check out Watercolor Fun for Beachy Cards. You can find the sister article to this one on my blog too. Feel free to hop on over for even more inspiration and links to the specific products I used! I'll be back soon with another fun card for you...

Shell We Meet Again by Niccole


Hello everyone!!! It's Niccole from Nic & Viv Designs back again to share another card I made using one of The Rabbit Hole Designs stamp sets. Have I told you how much I love love their stamps??  LOL - I know I say it all the time, but it's true! I LOVE their stamps! I still pinch myself knowing I am a guest designer for them this month.  

For today's card I used the By The Shore stamp set.  It is one of the newly released sets for June. 


How to create this card:
  • White A2 card base
  • Watercolor background, glue to card base
  • Die Cut circles in white card stock
  • Stamp mini clouds and sentiment to white card stock
  • Attach white card stock to water-colored background with foam tape
  • Add die cut clouds to white card stock
  • Water color stamped image
  • Fussy cut stamped image
  • Attach water-colored girl to card front with foam tape


TRHD Products Used:


For more inspiration, updates, and news make sure to check out these places

The Rabbit Hole Designs YouTube

I have had so much fun playing with the By The Shore stamp set this month. Thank you so much for stopping by and letting me guest design. I hope our paths cross again soon!

Until next time ... Hugs & inky fingers!   -Nic-


By the Shore by Martha Lucia

Hello, Martha Lucia here with you! 
Today I’m excited to share this project featuring the gorgeous By the Shore stamp set.


I stamped all of the images from By the Shore stamp set with Memento Tuxedo Black ink onto Whisper White card stock. I colored the images using Spectrum Noir Alcohol Markers. I fussy cut the images with scissors and let them a side for a while.


I decorated a whisper white card base with one vertical strip of Tangerine Tango Card stock and one decorated border die from my stash on Pool Party card stock. I pasted the borders directly over the base and then, pasted the stamped By the Shore image on the right corners above of the stamped sentiment. I used some Teal Jewels.

For more inspiration, updates, and news make sure to check out these places


Thanks so much for stopping by! 

Blue Crab- with Katie

Howdy!  Katie here today.  I have an encouragement card today that has a few puns in it that gives it just a teensy bit of humor,  


Get it?  Blue Crab is sad...and holding a shell?  Lol, hopefully you find that silly but encouraging. Here is how I made it: 

  • I started with the background.  Die cutting the sand, palm trees and fronds from a Lawn Fawn die. I added some dots to the sand with a brown Copic. 
  • Next I added this cloudy paper, I chose that because it also symbolizes a rough day. 
  • After that, I stamped the crab from the Caffeinated Crab set on Copic friendly paper and colored it like a blue crab.  I fussy cut it out and removed the coffee cup and donut.  I die cut the shell and set both aside. 
  • I die cut the Sorry sentiment in blue and added some gel highlights. 
  • I stamped my sentiment from the By The Shore set. 
  • Lastly, I put all the parts together. 


I hope you like this card and of course I always appreciate you stopping by and commenting.  Have fun shopping in the store! ;)  You are always welcome to stop by my blog as well- KBStamps.


For more inspiration, updates, and news make sure to check out these places:


Have a great day!


By The Shore Circle Card

Hello everyone!!! I am one giddy girl!! My name is Niccole from Nic & Viv Designs. I am so happy to be a guest designer this month for The Rabbit Hole Designs.  I fell in love with their stamps from the very first release.  They are so fun and unique.

For today's card I used the By The Shore stamp set.  It is one of the newly released sets for June. I knew as soon as I looked at the stamp set I wanted to do a circle card with Kraft card stock. I decided what better to pair it with than white heat embossing.


How to create this card:
  • Cut white piece with scalloped circle
  • Cut kraft stitched circle
  • Cut kraft card base out of same circle
  • Glue white circle to card base
  • On kraft top circle use VersaMark to stamp image on front 
  • Heat emboss stamp image with white embossing powder
  • Add die cut clouds
  • Glue to white scalloped piece
  • Repeat steps 5 & 6 for the inside sentiment


TRHD Products Used:


For more inspiration, updates, and news make sure to check out these places

The Rabbit Hole Designs YouTube

Don't you love how simple this card is?  There is something so calming with just the two colors.  I had a lot of fun playing with the By The Shore stamp set.  Please stop back later this month and see what else I have been up to.  Thank you for welcoming me so warmly as a guest designer this month! You all rock!

Until next time ... Hugs & inky fingers!   -Nic-


By The Shore Cards by Maria


Hello The Rabbit Hole Designs fans!  Maria here with you.   I forgot to add these projects to my blog post on release day so I thought I'd share them with you.  For today's post, I am showcasing the By The Shore stamp set.


Here's my card using the stamp set:


Here's how I made the card:
  • stamp the image on Neenah solar white card stock and color the images in with Spectrum Noir alcohol markers (or any medium of your choice.
  • die-cut this colored piece using a polaroid die from my stash.
  • on another piece of A2 110 lb white card stock, use the Sun-rays embossing folder.
  • Assemble the card.

Here's a closer look:


And here's another card that I made using the set:


I stamped the image on an A2 size Neenah solar white card stock and colored the images in with Spectrum Noir markers.  I used my alcohol markers to create the sand.  Also used a clouds stencil to add the clouds on the background. 

I stamped the sentiment on some piece of black card stock with Versamark ink and heat-set with my heating tool and adhered this piece on the card.

Here's a closer look:


If you are looking for further details about my project including supplies used, I would be so grateful if you can stop by my blog today at:


I hope you like my cards and got inspired.  Have an amazing day and happy crafting!

For more inspiration, updates, and news make sure to check out these places.

Inspiration Hop for June ~ Day 2 ~ By the Shore & Mermaid Hair


Hello and welcome to Day 2 of the Inspiration Hop. We are so excited for you to join us as we present to you our June release.  Our fabulous Design Team will be sharing their projects over the next few days, so be sure to visit their blogs and leave them some crafty love.

 All of the new stamp sets are available to purchase right now in the shop.
~
FREE SHIPPING 
on orders of $25 or more before taxes and shipping
(applies to US orders only)
No code necessary, exclusions apply
ends 05-30-2019


The stamp sets that are being highlighted today are: 

By The Shore


**Giveaway**
To celebrate day 2 of the release The Rabbit Hole Designs is giving away winners choice of either Mermaid Hair or By the Shore to One lucky winner.  Winner will be chosen at random from the comments left on participating blogs, so make sure to visit each stop and leave a comment.  Leave comments by 11:59 pm PST 05-30-2019 on all participating blogs. Winner will be announced on The Rabbit Hole Designs blog 05-31-2019


Here is the line up for the hop:


Thank you so much for stopping by today!