Hello friends, I am here to share a classy Christmas card using this timeless image from the Merry & Bright stamp set from The Rabbit Hole Designs.
Masculine Holiday Holly Card

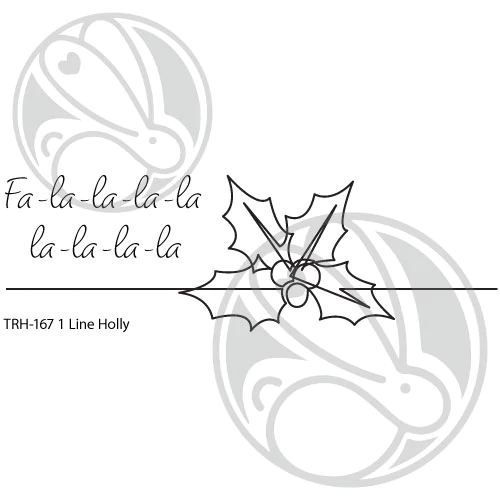
Hello! It's Lauren here sharing a slightly mixed media holiday card using the 1 Line Holly stamp set. This is a really versatile set for creating beautiful cards with.
To create this card, I started by adhering this Christmas music tissue paper that I had in my stash. You can also use any patterned tissue paper or plain tissue paper for a cleaner look. I then applied a thin layer of collage medium (you can use mod podge or also clear gesso) to a 4.25 x 5.5" piece of bristol smooth cardstock. I laid the tissue paper on top and then applied another thin layer of collage medium over top. It is ok to have the tissue paper crumple and/or fold when you apply it. Then I set it aside to dry.
When the panel was dry, I trimmed of any tissue paper that was hanging over the edges of the panel. Then I stamped my Holly Line and sentiment in black ink onto the panel.

I used a heat gun to make sure my ink was dry before coloring it with metallic gold watercolor.

Once the gold watercolor was dry. I trimmed the panel down slightly and adhered it onto a black panel measuring 4.23x5.48". Then adhered that onto a white top folding A2 (4.45x5.5") card base.

I really love how this turned out. I would make a great masculine card and would go through the mail easily.
I hope this has inspired you to give this technique a try with your 1 Line Holly stamp. Thanks for visiting!
Here's a link to the 1 Line Holly Stamp set:
1 Line Holly 2x6 – The Rabbit Hole Designs
Thanks again for visiting. You can follow me here:
YouTube channel: Lauren Z. – Queenlore Creations – YouTube
For more inspiration, updates, and news make sure to check out these places
Flower Whale Friends
Good day friends! I am here to share a card featuring several products from The Rabbit Hole Designs, but the one that definitely takes center stage in this project is the Flower Whale stamp set.
Merry Christmas!
Hi everybody! Amy here today sharing a card I created using the gorgeous Bunny Christmas Stamp Set illustrated by Tatsiana Zayats, and the Mid-Century Modern #2 Stencil.

I started this card by die cutting a piece of smooth white cardstock and blended on Distress Oxide Inks Salvaged Patina, Saltwater Taffy, and Shaded Lilac. I then splattered on some white paint and set it aside to dry. After the paint was dry, I used the Mid-Century Modern #2 Stencil to create the large, gorgeous snowflakes in the background.
Next, I stamped this adorable image from the Bunny Christmas Stamp Set, colored it with copic markers, and cut it out using the coordinating die set.

I die cut a teal banner for the sentiment, prepped it with the Cottontail Embossing Powder Tool, stamped the sentiment from the Bunny Christmas Stamp Set, and white heat embossed.
I assembled my card using teal cardstock for the base, and popped up the image and sentiment banner with foam tape for some dimension!

For finishing touches on this card I added accents with a white gel pen, glitter, and glossy accents to the bunny's nose! Thank you and I hope you enjoyed my card today!
For more inspiration, updates, and news make sure to check out these places:
You Make My Heart Dance

Today I'd like to share with you a card I made using the Bunny Ballet stamp set and the Cat eye stencil. I used Nuvo Mousse and some glitter along with the stencil to add some texture and interest. I want to showcase the many ways to use stencils. They are by far, my favorite art supply when creating anything. Another great idea, would be to use embossing ink and powder to this stencil as well.
I colored the single dancing bunny with a mixture of Copic and Prismacolor markers, making sure to blend thoroughly. On pink cardstock, I used the cat eye stencil and Nuvo Mousse in Triple Berry for the background. Before that dried, I sprinkled some chunky glitter on top.
To finish of this card, I heat embossed the sentiment "you make my heart dance" onto purple cardstock. Don't forget to use your Cottontail embossing tool to prep your surface before embossing. I use a bit of foam tape to pop up the strip as well as our dancing bunny. I glued the finished product onto a card base and this card is complete.
I challenge you to recreate this. Make sure to tag me @craftwithme101 and The Rabbit Hole Designs on Instagram if you do.
For more inspiration, updates, and news make sure to check out these awesome places!

Have a Jolly Holly-Day!
.jpg)
Hello there. It's Lauren today sharing this winter night card that is full of prettily wrapped gifts. I used one of the images and a sentiment from the adorable Bunny Christmas Stamp set.
To create my card, I first stamped my image onto a white cardstock panel that I cut to 4.25x5.5".
Then, I colored the image using colored pencils.
.jpg)
Next, I colored the rest of the cardstock panel using Copic Markers in C7 first and then finished off with black colored pencil.
.jpg)
With the whole panel colored, I used a white gel pen and white acrylic paint pen to add white dots (stars) all around the bunny and gifts.
.jpg)
When the white stars were dry, I trimmed the panel using a stitched rectangle die from my stash. and adhered the panel to a white, A2 sized (4.25x5.5") top folding card base.
Next, I created my white embossed sentiment. First, I prepared my black cardstock using the Cottontail Embossing Powder Tool. I then stamped my sentiment using an embossing ink pad. I covered my stamped sentiment with white embossing powder, tapped off the excess, then heat set it.
.jpg)
I backed the sentiment with a slightly larger piece of white cardstock and then adhered the sentiment onto my card front.
.jpg)
I love how the dark background really allows those colorful gifts to pop! I hope I've inspired you to try creating a dark background for your colored images. Thanks for visiting!
Here are the links for The Rabbit Hole Designs products I used:
Bunny Christmas 6x8 Stamp Set: Bunny Christmas 6x8 – The Rabbit Hole Designs

Cottontail Embossing Powder Tool: Cottontail Embossing Powder Tool – The Rabbit Hole Designs
Thanks again for visiting. You can follow me here:
YouTube channel: Lauren Z. – Queenlore Creations – YouTube
For more inspiration, updates, and news make sure to check out these places
All Aboard the Peanut Express!

Whoo Whoooo! ALL Aboard my crafty friends! The Peanut Express is about to depart The Rabbit Hole Designs depot.
Clarence is so full of joy riding his Christmas train. This image is from the Clarence Christmas stamp set (Illustrated by Dustin Pike). I paired it up with two of The Rabbit Hole Designs stencils; the Mesh-Optical stencil is used to create the Christmas tree and the Nutty 2 Layer stencil is used for the tree ornaments.
Let's have a look at the step tutorial...

A - Stamp the Clarence Train image on a piece of coloring cardstock and colored it with Olo alcohol markers. Cut out the image and set aside for later.
B - Use paper masking tape to outline a Christmas tree on the Mesh-Optical stencil and position it on the right side of a 4" x 5 1/4" piece of light blue/grey cardstock securing it with additional paper tape.
C, D, & E - Select light, medium, and dark green inks to use with the Bitty Blending Brushes and randomly stencil the tree opening with all three color. Removed the stencil from the card front after stenciling.

F & G - Position the solid nut layer stencil from the Nutty 2 Layer stencil on top of a 4" x 5 1/4" piece of kraft cardstock. Select three inks (a light, medium, and dark) to stencil and shade the solid peanut.(I chose Fossilized Amber, Brushed Corduroy, and Ground Expresso Distress Oxides to color the solid nuts).
H - Removed the solid peanut stencil first layer and replace it with the gridded peanut 2nd layer stencil. Add a bit more color shading with the darkest ink of the three ink colors.
I - Use a palete knife and small bit of the gold (Slippery When Wet) Lunar Paste to add guilded highlights (only to the upper right area of the each nut. Remove the stencil and wipe it off immediately. Use a heat gun to help dry the Lunar Paste quicker by gently blowing heat over the stenciled kraft paper to dry the nut. This should only take a few seconds.
J - Replace the gridded peanut 2nd layer stencil layer back over the kraft paper and the stenciled nut images. (This dies NOT have to line up perfectly. Slightly off alignment is better) Using a clean palette knife, add a layer of Transparent Grit Paste over the top of the peanut grid stencil. Remove the stencil and clean it off immediately. Let the peanuts dry. Once the nuts are dry, cut out 4 - 6 individual nuts and set them aside for later.

K - Use Speckled Egg ink and to add a Cottontail Blending Brush to inkbkend the sides of the card
L - Draw Clarence's train track at the bottom of the card front
M - Ink blend the bottom of the card with one of the darker blue inks. Grab four of the peanuts and the Clarence Train image to use to assembling the card front.
N - Treat the top left of the card front this the Cottontail Embossing Powder Tool and use your stamping tool to add the sentiment with VersaMark Watermark clear ink.Add and heat emboss the stamped sentiment with red embossing powder. Glue the card front to a red A2 card base. Glue the Clarence and his train on the left side of the card onto the drawn train track. Select the placement of the four stenciled peanuts on the Christmas tree. Use double sided adhesive foam squares behind the nuts and adhere each to the tree as shown in the photo above.
Products use


Thank you, I appreciate you taking time from your day to stop by and check out The Rabbit Hole Designs Blog. I hope you are inspired to create something lovely today!
Be Creative ~ Stay Inspired
Jenn Gross
Follow me, Journey Coach Jenn, on
Instagram - https://www.instagram.com/journeycoachjenn/
YouTube - http://www.youtube.com/c/JourneyCoachJenn
Blog - http://www.journeycoachjenn.com/
For more inspiration, updates, and news make sure to check out these places
The Rabbit Hole Designs Instagram
The Rabbit Hole Designs Facebook Page
Peace on Earth
Hi everyone! Amy here with you today sharing a card I created using the gorgeous Bunny Christmas Stamp Set illustrated by Tatsiana Zayats.

I started this card by stamping this big, beautiful image from the Bunny Christmas Stamp Set. I colored the image with copic markers, and cut it out using the coordinating die set.
Next, I die cut a teal sentiment banner, prepped it with the Cottontail Embossing Powder Tool, then stamped and white heat embossed the sentiment.

I assembled my card using teal cardstock for the base, and adhered the image and sentiment banner to a piece of white cardstock with foam tape for some dimension!

For finishing touches on this card I added white gel pen accents, glitter with a glitter pen, glossy accents to the bunny's nose, and a few sparkling sequins! Thank you and I hope you enjoyed my card today!
For more inspiration, updates, and news make sure to check out these places:
From Your Flaky Friend

Center stage for this adorable snowman! The line that creates this 1 Line Snowperson can be positioned so it looks like he is on a hill of snow. This little guy was colored with a no-line watercoloring technique. The background was created by blending 2 different Distress Oxide inks and stenciling the Mid-century Modern #2 stencil. Stenciled only 2 of the 4 layers of the stencil set and offset them.

For more inspiration, updates, and news make sure to check out these places:
Holly-day Copper Tag/Ornament Tutorial using the 1 Line Holly stamp set

Hello my crafty friends! I think you are going to like this fun holiday stamping project. I'm featuring The Rabbit Hole Designs' 1 Line Holly stamp set along with the Mid Century Modern #2 layering stencil, using the small dotted layer stencil.

I got a set of copper dimpled tags from the dollar store. I removed one from the package and cut off the jute loop at the top. I removed the protective layers of plastic from each side of the tag.
A - Using the MISTI stamp positioner and the corner magnet, I secured the tag into place in the corner of the MISTI. I initially thought I would heat emboss the image on the tag, so I treated it with the Cottontail Embossing Powder Tool.
B & C - I positioned The Rabbit Hole Designs' 1 Line Holly stamp on the tag and grabbed it with the MISTI lid. I changed my mind and decided to use Forest Green Stazon ink to stamp the image.
D - I removed the stamped tag from the MISTI and heat set the ink, so it was dry for the next steps. I positioned the small dot stencil layer from the Mid Century Modern #2 stencil over the tag and daubbed a fluffy white modeling paste from my stash stenciling the dots on the left side of the stamped image. This gives the impression of falling snow. I removed the stencil and heat set the modeling paste.

E - I grabbed a few colors of acrylic paints in red, white, dark green, light green, yellow, and black. I placed a small dots of each color onto a mixing palette. I used the red and white paint to color the berries.
F & G - I painted the holly leaves mixing combinations of the two greens, yellow, and white to create a blended look.
H - I painted the narrow strip of copper to the right side of the holly with the black acrylic paint. After the paint dried, I added a red and black checked ribbon to the top of the tag to complete the project..

The Rabbit Hole Designs products


Thank you for stopping by to learn how to recreate this Holly-Day Copper Tag.i hope you create something lovely today!
Be Creative ~ Stay Inspired
Jenn Gross
Follow me, Journey Coach Jenn, on
Instagram - https://www.instagram.com/journeycoachjenn/
YouTube - http://www.youtube.com/c/JourneyCoachJenn
Blog - http://www.journeycoachjenn.com/
For more inspiration, updates, and news make sure to check out these places
The Rabbit Hole Designs Instagram
The Rabbit Hole Designs Facebook Page
Snowflake Snowperson Ornament

I wanted to create an ornament for our Christmas Tree. I used the 1 Line Snowperson set. The snowman was watercolored and glitter glue was added to add sparkle. To create a look of falling down a hill I moved the line from the 1 Line Snowperson down. The snowflake is one of those cuts you learn to do when you are little. I added bits and pieces of ribbon, glitter glue, chunky glitter, jute, and Retro Christmas paper scraps.


For more inspiration, updates, and news make sure to check out these places:
Subscribe to:
Posts (Atom)