Pages

Showing posts with label Bunnies. Show all posts

Versatility on Your Stamps


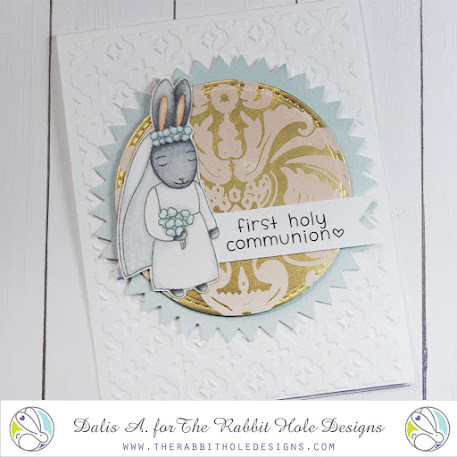
Looking at your stamps in a different way is always the best part of getting a new stamp set. The "Happily Ever After" is a sweet wedding stamp set, but what else can it be? If you mask the groom bunny out of the picture you get this adorable girl bunny that is perfect for a First Holy Communion card. What else do you see when you look at the Happily Ever After couple? Maybe a PROM card, if you mask the veil of the bride? 
After coloring the bunny with alcohol markers, I decided to create the golden backdrop with some stickers to convey the idea of the osties. The embossed folder used even though does not have a cross image, it does bring an idea of a cross, helping bring the theme and the card all together.


For more inspiration, updates, and news make sure to check out these places:

Hoppy Easter Egg Card


Hey Everyone! Justin here, and today I am sharing a fun Easter card that I made using the new All Ears set, part of the March 2020 release and available now!

There are so many fun ways to use these adorable little bunnies, and, for this project, I decided to only use 4 of them!

First, I stamped out my bunny pile from All Ears and colored up 4 bunnies from the bottom row (starting at the bottom left bunny and working my way over) with my warm gray alcohol markers. I then fussy cut the bunnies out so there is no border.

To create my Easter egg background, I cut (2) 4.125" x 5.375" panels from white cardstock, once of which also had an Easter egg cut out from the center. I laid the Easter egg cut-out piece on top of the no-cut-out piece, and taped them together with a few pieces of purple tape for stability while stenciling. Then, I put the Candy Twist Stencil on top of the attached panels and ink-blended a pastel ombré. After I was done blending, I removed the stencil (you know, that moment that perfectly emotes the emoji that has hearts for eyes). Before removing my Easter egg cut-out piece, I splattered the inked area with some sparkle silk for extra shimmer. I removed my Easter egg cut-out piece and let my panel set aside to dry.

From here, the card became fairly easy to put together. After the Easter egg panel dried, I adhered it to an A2-sized piece of light blue cardstock. I stamped the sentiment "Hoppy Easter" from All Ears on a .5" high sentiment strip, and framed that with some light pink cardstock. I placed my 4 little bunnies from All Ears into a position where it looked like they were over hanging the strip, and covered the back of my bunnies and strip with some foam tape, and adhered the piece to my card.

I then took some sequins from one of the packs I received when ordering from The Rabbit Hole Designs that had a pearly pastel palette, and adhered them to my card.

I adhered my panel to an A2-sized card base and I was done!

Here are the products I used to make my project:

All Ears


Candy Twist Stencil


For more inspiration with your The Rabbit Hole Designs Creations, be sure to follow along at these other locations:


For more details about products used in this post, you may also follow along at my personal blog, Just a Note by Justin, as well!

I hope this card is providing you with some fun ideas with how to make some adorable Easter cards or just fun bunny cards in general! Thanks for stopping by the Rabbit Hole Designs blog!

Nobunny Like YOU


Hello there! Michelle here...
I couldn't resist playing with this stamp set, All Ears! Their faces and ears...and that cutie with 
the bow!!!!! I stamped the bunny cluster with antique linen distress ink and used Copic Markers to color. I used shades E40, E41, E42, E43, E44 and E000 for their bodies. I used RV10 and RV13 for ears, cheeks and bow. I used N0, N1, N2 for the shadow. 
 After I finished coloring, I used the Spell It stencil to ink up the word YOU. I used distress oxide inks in spun sugar and picked raspberry.  I stamped the sentiments with Memento black ink.
For a finishing touch I added some white accents with a gel pen and a few sparkly gems.
Thanks for taking a peek!!!
Hope you are keeping yourself safe and your mind busy with fun things!!!

All the best!
Michelle


Supplies used:
All Ears 4x4

Spell It - 6x6 Stencil


For more inspiration with your The Rabbit Hole Designs Creations, be sure to follow along at these other locations:

Somebunny is Awesome!


Hello my crafty friends and welcome to The Rabbit Hole Designs blog!  Has any-bunny told you, you’re awesome today?  Well I am!    This card features the fun and whimsy 4" x 4" stamp set All Ears! 


I stamped out the bunnies with black ink onto a piece of my favorite coloring cardstock. I colored them with a light grey alcohol marker to add shading and added a pale pink shade to the bunnys' ears and noses. After fussy cutting the group of bunnies out, I glued them to the piece of purple printed paper.


I wanted to frame the bunnies with some love in mind, so I used this fun circle and heart frame die and I die cut it to the upper part of a piece of 4"x 5 1/4" pink cardstock creating the opening for the bunnies to be seen through. I positioned the bunnies on printed paper behind the opening in the pink card front and attach it with foam squares.   I added double side adhesive foam tape to the back of the pink card front and attached it to an A2 white card base.


This sentiment, "Somebunny is"  just happens to be stamped from two different sentiments in the All Ears stamp set.  I masked off the words/letters I did not need and stamped out the sentiment with my stamp positioner onto white cardstock.. Once complete,  I cut out the sentiment. I created a frame layer from the same purple printed paper  I used behind the bunnies. I cut it slighty larger than the sentiment and used it as a layered frame. I glued this sentiment  to the card front above the bunnies as shown.


I love looking through my craft stash to see what I might have available to use with my projects. I found the "awesome" die cut word and knew it would be perfect for this card. I die cut the word from white cardstock and the back accent layer from the purple printed paper. I glued them together and then glued it just below the bunnies on the card front completing the card.


Here are the TRHD products used in this project:

All Ears 4” x 4” stamp set


I hope this fun “Somebunny is Awesome” card inspires you in your creations. Thank you so much for stopping by the blog!

Be Creative ~ Stay Inspired
Jenn Gross
@journeycoachjenn

For more inspiration, updates, and news make sure to check out these places