Pages

Showing posts with label #momlife. Show all posts

Magical AF


Hello there, The Rabbit Hole Designs fans!  Maria here on the blog with you today.  I guess I am on a roll because I just finished this cute shaker card to share with you today by The Rabbit Hole Designs.  

For my project, I am showcasing the Caffeinated Unicorn 3x4 stamp set.


Here's how I made the card:
  • Stamp the image on smooth white card stock and color the image in with Copic markers (or any coloring medium of your choice).
  • Die-cut the image with an electronic die-cutting machine or fussy cut with scissors.
  • Stamp the unicorn image again on patterned paper and fussy-cut the robe to paper-piece on the image.
  • On an A2 size of Bristol smooth white card stock, ink up the background using the mini ink blending tool and spun sugar distress oxide with the sunburst stencil by Tim Holtz.
  • Use a die o die-cut the frame and the window.
  • Cut an acetate sheet and run it through your die-cutting machine with a snow embossing folder. Adhere this acetate sheet on your frame.
  • Add foam adhesive to create the well.
  • Add confetti or sequins as the shaker element.
  • Adhere this piece on the colored background for a seamless look.
  • Die-cut the clouds twice using a clouds die.
  • Stamp the sentiment on the clouds with gray ink.
  • Adhere the Unicorn on the card.
  • Add stardust stickles on the unicorn's hair to finish the design.

This stamp set also makes me giggle because the unicorn's hair is so frizzy, it reminds me of my big frizzy hair during summertime in Florida.  I swear my hair gets so big, it's the size of Texas!  Thank God for flat irons and anti-frizz magical potions because without them, I would look like a cave woman!  Here's a closer look:


Fussy-cutting the patterned paper to paper-piece the robe made it look more realistic and added some nice touch to the overall card design.  Can you also just admire the glitter on the unicorn's hair?  She is so stylish and is indeed magical AF!  Haha!  Here's another look:


For more inspiration, updates, and news make sure to check out these places.


If you are looking for further details about my project including supplies used, I would be so grateful if you can stop by my blog today at:


I hope you like my shaker card today.  Have a wonderful day and happy crafting!


Caffeinated Cat with Maria


Good morning my crafty peeps!  Maria here on the blog with you today.  I am so excited to share with you my very first post as a design team member of the The Rabbit Hole Designs.  They have recently launched a couple of stamp sets and I ordered a few of them because I fell in love with the design.  

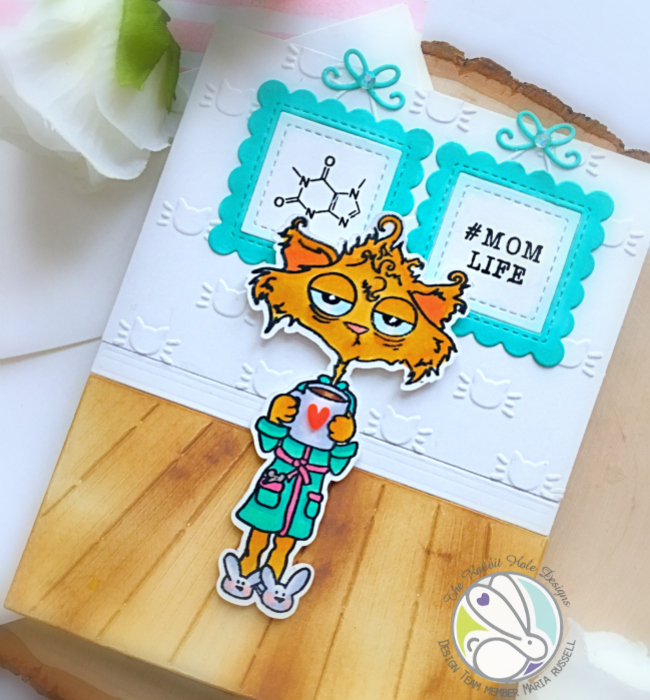
For my project today, I am showcasing the Caffeinated Cat 3x4 stamp set.   When I saw this stamp, I knew I just had to have it.  Honestly, what is not to love?  I adore cats, I love coffee and I love being a mom!  Okay to be honest I used to feel like this cat when my kids were little, haha! and I had a full-time job too!  I don't even know how I survived those days; I guess I had lots and lots of coffee!
Here's how I made the card:
  • Stamp the image on Neenah solar white card stock (or any card stock you have in  stock) with alcohol friendly ink.
  • Color the image with alcohol markers (or any coloring medium of your choice).
  • Either fussy-cut or die-cut the image using an electronic die-cutting machine. For mine, I used my Scan N Cut 2.
  • Die-cut a piece of Neenah solar white card stock using the wood/floors dies and ink it up with gathered twigs distress oxide ink to make it look like wooden panels.
  • Cut another piece of white card stock and use embossing folder to create the "wallpaper".
  • Adhere the floor, the moulding and the "wallpaper" on an A2 size card base.  Cut the excess.
  • Die-cut the little decorative frame and little bows on some colored card stock and stamp the sentiment and image on both. Adhere the frames with liquid glue.
  • Adhere the Caffeinated Cat image (ahem, star of the show!) in the middle of the card with foam adhesive to give it dimension.
  • Add the heart embellishment on the coffee cup.
  • Add Sparkling clear jewels and bow on the decorative frame to finish the design.

Everything about this cat just makes me giggle!   The tired look on her face, the bunny slippers and the robe!   I think we can all relate.  Here's a closer look:

trhdcaffeinatedcat1b

That cat wallpaper just added more cuteness to the whole design, don't you agree?  The mom cat looked tired but her house is spotless!

trhdcaffeinatedcat1c

What do you think of my card?  Does it make you want to have a cup of coffee?   You guys really need to grab this stamp set while you can.


For more inspiration, updates, and news make sure to check out these places.


If you are looking for further details about my project including supplies used, I would be so grateful if you can stop by my blog today at:


I hope I have given you some inspiration to create something beautiful today.  Have a wonderful day and happy crafting!