Pages

Showing posts with label Shaped Cards. Show all posts

Deer Santa... Sweet Cookie Card


Hello crafty friends,  Jenn here with sweet treat of a card for you using The Rabbit Hole Designs' 1 Line Reindeer stamp set and making them into cookies for Santa.  I also added a sentiment from the Bunny Christmas stamp and die set.

Make sure to take advantage of the BLACK FRIDAY and CYBER MONDAY sales at The Rabbit Hole Designs!  
Sales are from 11/27/2024 through 12/02/2024 11:59pm PST  (No Codes Needed)
Use Code Jenn at check out to share you saw this sale on today's blog!
Let's take a look at this easy step tutorial:
A & B - I stamped out the 1 Line Reindeer using brown ink on light brown cardstock and colored three of them with OLO Markers

C & D - I die cut three 2 1/2" circles from kraft cardstock and shaded the edges using a Bitty Blending Brush and Gathered Twigs Distress Oxide ink to look like a baked cookies
E & F - I die cut three 2 1/4" white cardstock circles to use as frosting on the cookies.  I softly recut the edges to give it a slight wave for more of a hand-iced  look.  I added shadowing with OLO Markers BV2.0 and BV2.2   I fussy cut the reindeer heads and glued them down on the white frosting circles.  I glued these on top of each cookie

G - To create the cookie plate, I die cut a 5" circle with a 4" circle centered inside from a piece of double sided winter printed cardstock in my stash

H - The circle card base is die cut from a piece of folded kraft cardstock and a 5 1/4" circle leaving 1 1/4" of the fold intact as shown in the photo
I & J -  I opened up the circle card base and glued the outer plate circle centering it on one side of the card base.  I truned over the middle circle for the plate and glued it to the center

K - I glued one cookie to the plate and attached the second cookie with adhesive foam squares.  The third cookie has a  bite taken out of it.  I uses a circle die form my stash that has a zig zag decorating the edge and die cut a bit out of the third cookie.  The bitten cookie is attached to the card  with two layers of foam tape.

L - I stamped out the Jolly Holly-Days to you using a sentiment from the Bunny Christmas stamp and die bundle.  I cut out the sentiment and added it above the cookies on the plate to complete the Deer Santa cookie card.

Supply List

Other Supplies (from your stash)
OLO Markers
Gathered Twig Distress Oxide
Circle Nesting Dies

Be sure to check out The Rabbit Hole Designs for the BLACK FRIDAY Specials
Use the code Jenn at check out to let us know you saw this post!

Thank you, I appreciate you taking time from your day to stop by and check out today's blog featuring The Rabbit Hole Designs stamps and dies. I hope you are inspired to create something lovely today!

Be Creative ~ Stay Inspired
Jenn Gross

Follow me, Journey Coach Jenn, on 
Instagram - https://www.instagram.com/journeycoachjenn/
YouTube - http://www.youtube.com/c/JourneyCoachJenn
Blog - https://journeycoachjenn.blogspot.com

For more inspiration, updates, and news make sure to check out these places 

Cupid is Stupid


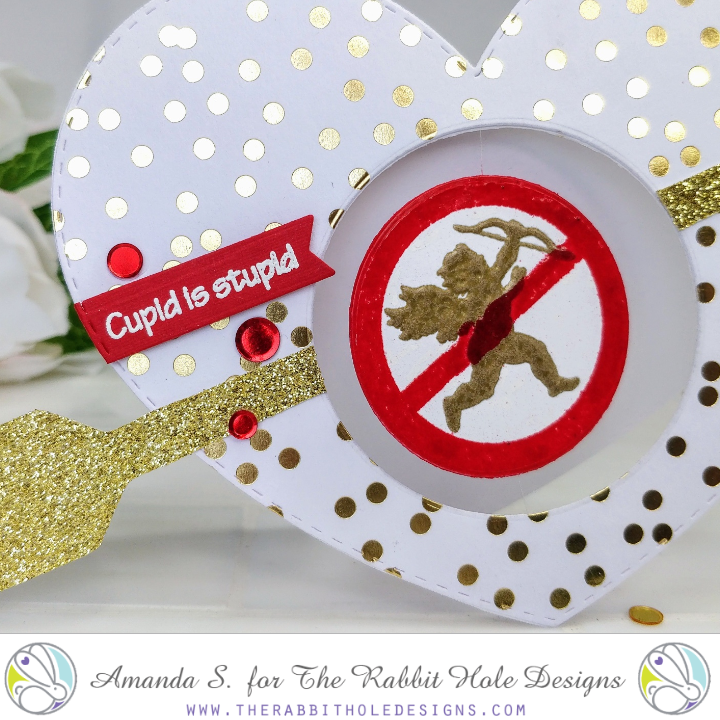
Hello my crafty friend, it's Amanda from Pear Blossom Press again. As we wrap up the Thanksgiving holiday here in the US, I'm busy making valentines. Or in this case, more sassy galentines! This card is easy to recreate and has no coloring at all, so it's also very quick. The spinner element and heart shape, make this card extra fun!


To make this card, I die cut a large heart three times, twice from white cardstock, and once from a gold foiled piece. I scored a line ¾" from the top of one white heart to make the back panel. I die cut a circle from the center of the other two hearts. Using Scor-Tape, I sandwiched in a line of clear thread, before sealing the two hearts together to form the front card panel. Then, I glued the back panel to the front, above the score line. This gave me a heart shaped card with a hole in the front.

I cut an arrow out of gold glitter cardstock using a preset image in my ScanNCut, then cut it in half and glued it to the card front, trimming the edges to mimic the hole in the center. I made sure to position the bottom of the arrow near the bottom of the card, so it would balance when the card is open.


My sentiment and images are all from the new Sassy Sentiments Anti-Valentine set. I stamped and embossed the sentiment with white powder and die cut it with a fishtail banner. I used the large heart die again to cut the left edge of the banner. For the spinner element, I stamped and embossed two cupids with a double layer of gold powder. Then, I lined up the cross out image and embossed it over the top with a double layer of red powder. I used a powder tool in between coats and had to use a Versamarker pen and more red powder to fill in gaps where the second image overlapped the gold powder. I die cut the images with a circle die and glued them together around the thread. A few red sequins finished off the card nicely.

This card is fun to play with when you wind it up and let it go. Plus, the sentiment is hilarious! I keep pulling this stamp set out; I think it's going to get a permanent spot on my desk! If you'd like to see a few more cards using this set, you might like this article. For more inspiration and links to the specific products I used, check out the sister post on my blog today.

Thanks for stopping by; I'll be back soon with another fun card to share!


Bowl of love


Hi TRHD fans!  Shanna here today with a fun shaped card showcasing my favorite goldfish!!  The stamps set is The Rabbit Hole Design's So-Fishticated set, and it is gorgeous!  I love how artsy all the different stamps are, it makes them so fun to color!  


I started off by die cutting 2 fish bowls and creating a "hinge" on one of them to attach and make a card.  I inked the edges of the top bow with Tumbled Glass Distress Ink to give some dimension to the bowl.  My water is another diet piece, that I die cut out of Bristol paper knowing I wanted to do some watercoloring on it.  I stamped the pretty goldfish from So-Fishticated on the water piece using Versa Clair Nocturne ink and heat set it to dry.  My coloring was done with Tombow markers, in shades of orange and teal.  Once I was don't coloring the fish, I masked it off with some masking fluid and then used a wet on wet technique with a couple of blue tones from my Tombow collection for the water.  


My sentiment came from the set, and I stamped it on white cardstock, cut it down to a strip, and popped it up with foam adhesive.  I did trim the line of the strip to match the shape of the bowl.  A white gel pen helped me add some final highlight lines to the bowl and I was done!

 **Well, ALMOST done**  

At the last minute I decided that gorgeous Goldy needed some sparkle!  Liquid Pixie Dust to the rescue! (cue Peter Pan music??!!)  I am in LOVE with this stuff, and guess what?!?  The Rabbit Hole Designs carries it in their shop!!  They actually have a bunch of new *Crafter's Essentials* that are totally worth checking out!  Take a peek at what they have to offer here.

Well, that's all today....Thank you so much for stopping by!  Be sure to swing by and say hi over at my blog, and follow along with my caffeinated adventures on Instagram!  See you all again soon
~Shanna


For more inspiration, updates, and news make sure to check out these places


Coffee & Donuts


Hello crafty friends, it's Amanda from Pear Blossom Press again and today I've got a fun shaped card for you featuring the Caffeinated Unicorn! I don't know about you, but the caffeinated critter series is one of my favorite collections to play with. The unicorn is just too hilarious; she even has little narwhal slippers! I thought she'd pair well with a donut shaped card covered in lots of sprinkles.

I started by stamping and embossing my Caffeinated Unicorn, then coloring it with Copic markers. Then I fussy cut her with my ScanNCut. Using some of the same markers, I colored scraps of white cardstock in coordinating colors. I stamped and embossed caffeine makes me sparkle, then die cut it with a fishtail banner die. I also die cut the word yippee three times, once from the scrap I colored blue. I glued the three layers together, with the blue layer on top. I glued a thin strip of silver glitter paper to the bottom of the fishtail banner.

To make the card, I grabbed my nesting circle dies and found a set that looked like a good size donut and appropriate hole. I used a 4 1/2" circle for the outer cut, and a 1 1/4" circle for the inner cut. I cut a pair of blush colored circles for the card base. I trimmed about 1/8" from the bottom edge of the back circle. Then I lined it up in my Scor Pal and scored 1/2" from the top to form a hinge. I glued the two pieces together at the hinge. The tiny cut across the bottom of the back piece allows the card to stand up when it's open. I sponged on a little brown ink to add shading to the inner and outer edges of the donut. That makes it look like it's been cooked to a golden brown.


For the frosting, I cut a third circle from pink stock and increased the inner die to a 1 1/2" circle, so that some of the center of the blush circles would be visible when stacked. I used scissors to freehand a wavy cut around the outer edge of the pink circle. Then I stamped and embossed it with sprinkles. To add a little more dimension, I sponged on a little pink ink around the inner and outer edges and glued it onto the donut.

To finish the card, I lined everything up and trimmed the fishtail banner to end behind the unicorn's legs. I glued the banner in place and glued the word yippee above it. I popped the Caffeinated Unicorn up with foam tape to give the card a little more dimension. For a final touch, I added shimmer pen to the unicorn's mug and horn. Then, I coated the horn, mug, her eye, and the word yippee with a layer of Diamond Glaze. I think it gives the card just the right amount of sparkle and shine!

Now don't tell anyone, but I've got a little secret to share. Even though I love to make cards, I always draw a blank when it comes to writing the sentiment inside. A card like this doesn't have a lot of room to write a long message and that suits me just fine. If you'd like a bigger area to write inside, you can omit cutting the center holes from the card base. In that case, I'd cut the base from white cardstock and layer on a blush layer and a pink layer onto the top of the card. You might consider adding a white doily to the back of the card, so it looks like a donut on a doily.

So that's my card for today, another fun shaped card. Do you prefer shaped cards or traditional rectangles? Let me know in the comments below. Is your caffeinated critter collection complete? If not, head on over to the shop and fill up your cart today! And don't forget the new release comes out next week! I can't wait to show you what I've been working on with those sets! (Hint, hint, even if you think your caffeinated critter collection is complete, it's probably not ;) See you soon my crafty friend!