Pages

Oh Nuts I forgot your Birthday


Hi Everyone Cindy here with another fun card using the Clarence Birthday set
I have colored him up and put him on a fun stenciled background  which I used the Nutty 2 Layered Stencil, then added the sentiment. More details can be found on my blog here

A Pretty Surprise from Clarice!


Hello there! It's Lauren on the blog today sharing a pretty surprise card! This image illustrated by Dustin Pike is just so much fun! I adore that acorn shaped balloon!

To start this card, I stamped the image onto white cardstock then colored her up using colored pencils in shades of warm grays. I colored her accessories and balloon in shades of red and pink. Then I die cut her out using the coordinating die.


I then ink blended Salvaged Patina Distress Oxide ink, onto the front of a white A2 sized (4.25x5.5) card base. I did this in a circular shape on the center of the card to be the background for Clarice to pop!

Next, I repeat stamped the "SURPRISE" sentiment across a 4.25 long white cardstock strip.


Then I adhered Clarice and the sentiment strip onto the card. I also added some pink heart gems from my stash to bling the card up a bit. 

I hope you enjoy my card today and that it inspires you to make your own pretty Clarice card!

Here are the products I used for today's card:

https://therabbitholedesigns.com/collections/stamps/products/clarice-surprise-3x4


https://therabbitholedesigns.com/collections/dies-stencils/products/clarice-surprise-die


___________________
For more inspiration, updates, and news make sure to check out these awesome places! 


Thank you so much for stopping by today!

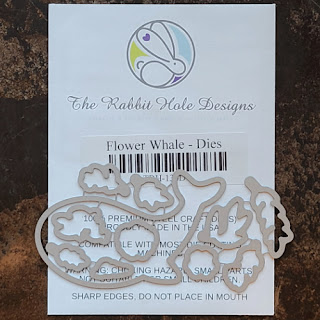
Oceans Of Love/Flower Whale

 Hi Rabbity Friends! Kelly Fusco here with a fun mixed media card featuring The Flower Whale Stamp.


To Start off I stamped the Flower Whale image onto 80lb Neenah cardstock using Memento Tuxedo Black ink. I colored my whale with Gray Copics and I used Teals, Blues & dark reddish browns THEN I added some shimmer pen (a wink of stella) to it as well.. 
For my panel I used a piece of Watercolor cardstock and I wet it with a sprayer and then sprayed Blue, Light Blue & brown onto it . I added layers of colors and sometimes drying in between. After it was 100% dry I added some texture paste with a stencil for some dimension. I wanted it to look ocean-y. Is that a word? lol
Then I took my paper distresser and distressed the edges of the panel. I fussy Cut my whale out and I die cut the word "Love" and stacked it 3x high.
I added foam tape to the back of the whale and I curved my Love sentiment to curve along the top of the whale. 
I added Glossy Accents to the LOVE & to the floral parts of my whale and a few holographic flat back pearls. Thanks for stopping by.

For more inspiration, updates, and news, make sure to check out these places...


February 2022 - New Release Day 3


Hello and welcome back to day 3 of the inspiration hop. We are excited for you to join us as we present to you our February 2022 release. Our Brand Ambassadors will be sharing their projects today and throughout the month, so be sure to visit their blogs and leave them some crafty love.

The 3 new stamps sets with coordinating dies, 1 word die with shadow layer and 1 Hot Foil Plate are all available to purchase right now in the shop.

The products being highlighted today are:


Here is the line up for today:
__________________
**Giveaway**

To celebrate the February 2022 release, The Rabbit Hole Designs is giving away two savings vouchers; one to a lucky Instagram follower and one to a lucky Fan Page follower.  Winner will be chosen at random from the comments left on the INSTAGRAM post, and tagging friends, and also from commenting on the Fan Page post.  So make sure to head on over to INSTAGRAM and look for the giveaway post @therabbitholedesignsllc and look for the post at The Rabbit Hole Designs Fan Page
by 11:59 p.m. PST 01-27-2022 
Winners will be contacted via DM for the IG winner and announced in the Facebook Fanpage group on
01-28-2022

This is the graphic you are looking for on our IG and FB
___________________
For more inspiration, updates, and news make sure to check out these awesome places! 

Thank you so much for stopping by today!

February 2022 - New Release Day 2


Hello and welcome back to day 2 of the inspiration hop. We are excited for you to join us as we present to you our February 2022 release. Our Brand Ambassadors will be sharing their projects over the couple days, so be sure to visit their blogs and leave them some crafty love.

The 3 new stamps sets with coordinating dies, 1 word die with shadow layer and 1 Hot Foil Plate are all available to purchase right now in the shop.

The products being highlighted today are:


Friend - Scripty Hot Foil Plate

Make sure you stop back tomorrow for day 3 of our inspiration hop.

Here is the line up for today:
__________________
**Giveaway**

To celebrate the February 2022 release, The Rabbit Hole Designs is giving away two savings vouchers; one to a lucky Instagram follower and one to a lucky Fan Page follower.  Winner will be chosen at random from the comments left on the INSTAGRAM post, and tagging friends, and also from commenting on the Fan Page post.  So make sure to head on over to INSTAGRAM and look for the giveaway post @therabbitholedesignsllc and look for the post at The Rabbit Hole Designs Fan Page
by 11:59 p.m. PST 01-27-2022 
Winners will be contacted via DM for the IG winner and announced in the Facebook Fanpage group on
01-28-2022

This is the graphic you are looking for on our IG and FB
___________________
For more inspiration, updates, and news make sure to check out these awesome places! 

Thank you so much for stopping by today!

February 2022 - New Release - Day 1


Hello and welcome to day 1 of the inspiration hop. We are excited for you to join us as we present to you our February 2022 release. Our Brand Ambassadors will be sharing their projects over the next few days, so be sure to visit their blogs and leave them some crafty love.

The 3 new stamps sets with coordinating dies, 1 word die with shadow layer and 1 Hot Foil Plate are all available to purchase right now in the shop.

The products being highlighted today are:


Friend - Scripty Hot Foil Plate

Make sure you stop back tomorrow for Day 2 of our inspiration hop.

Here is the line up for today:
__________________
**Giveaway**

To celebrate the February 2022 release, The Rabbit Hole Designs is giving away two savings vouchers; one to a lucky Instagram follower and one to a lucky Fan Page follower.  Winner will be chosen at random from the comments left on the INSTAGRAM post, and tagging friends, and also from commenting on the Fan Page post.  So make sure to head on over to INSTAGRAM and look for the giveaway post @therabbitholedesignsllc and look for the post at The Rabbit Hole Designs Fan Page
by 11:59 p.m. PST 01-27-2022 
Winners will be contacted via DM for the IG winner and announced in the Facebook Fanpage group on
01-28-2022

This is the graphic you are looking for on our IG and FB
___________________
For more inspiration, updates, and news make sure to check out these awesome places! 

Thank you so much for stopping by today!

Surprise! Clarice is ready to party


Happy Sunday!!!  Tangii here again with one last share from the Birthday release, before we kick off the February release tomorrow (Monday)!.  I whipped up a quickie card with Clarice (coordinating dies help soooooo much!!!).


I stamped Clarice, colored her up with Copics then ran her through the die machine with her coordinating die.  I just set her in place and then stamped those candles around her.  I popped her up  with some foam tape, stamped my sentiment and popped it up with some foam tape...Voila!  A few sprinkles of confetti sequins and it's done.

You can also read about this card on my blog, here with links to the products I used, etc.  Thanks for popping by, come back again soon!

Let's squirrel-a-brate!


Hello!  Vanessa here today to bring you a fun A2 sized birthday card using the newly released Clarence Birthday set, colored with alcohol inks and colored pencils.

I created the background panel using the Tastes Like Honey stencil, blending purple onto purple to create a little interest on the otherwise flat cardstock.  I used that same stencil on the panel with Clarence.  I made a mask, for his image from masking paper, then blended several fun colors.  TIP:  the Bitty Bunny Blending Brushes are PERFECT for that. Using different die shapes from my stash, layered it onto the purple card base.

Such a happy Happy Birthday card!  Have a great day!


For more inspiration, updates, and news make sure to check out these places.

Clarence Loves YOU!

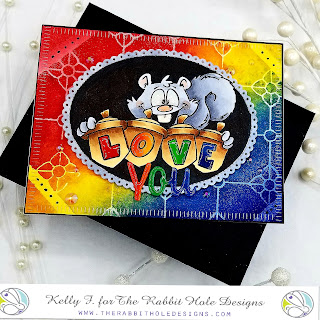
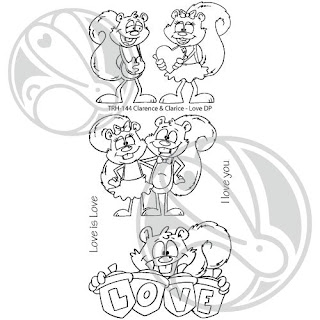
 Hi Guys! Kelly Fusco here with my very 1st blog post for The Rabbit Hole Designs featuring the Clarence & Clarice Stamp.

To start off I stamped my image onto 80lb Neenah cardstock with Memento Tuxedo Black ink. Then I colored in the image with copic markers. I used C05,C03,C01 & C0 I used a couple browns E31,E33 & E35. Then I took the Garden Trellis stencil and I sprayed it with distress spray stains (red,yellow,blue) in a rainbow order across my panel. I removed the stencil & went over it again with the coordinating colors in distress inks so the white wasn't too bright white. 
I originally had the stencil on a diagonal so that created these white stripes where the stencil border was. I added a few black dots to it 
I colored in the background of my image with Copic 100. I die cut it out with a scalloped oval die and colored the scalloped edges gray to match Clarence. I added foam tape to the back of my focal image & I die cut the word YOU and colored it to match the rainbow theme.
Its hard to see in pics but I added some glossy accents to his eyes, teeth, cheeks and the "LOVE" as well as the "YOU"

I took a black copic marker and went around the edges of my rainbow panel for a bit of definition. 
I added a few iridescent gems and I was done. I hope you like this card. 
If you want to stop by my blog please do so. 


Clarence Birthday


Hi Everyone, Cindy here with my first post here on the Rabbit Hole Designs Blog with Clarence Birthay which I have colored using copics. 
I used the matching dies to cut him out. 
For the background of the card I used the stamp with the Birthday Scripty Words Set and stamped it all over a piece of 4.75 by 6.75 inches and attached it to a picked of black card stock
For the two outer squares I used my Nutty 2 Layer Stencil  with two different colored brown inks, then cut out and layered onto black, leaving the center one plain, I then added Clarence and the Sentiment from the Birthday Scripty Words Set and some sequins
Thanks for looking and see you soon
Cindy 

Love is in the air...


Hey yall, happy Friday-eve!!  Tangii here sharing a sweet card using the Clarence & Clarice: Love set from the NEW Birthday release.  I paired up the new set with the Coordinating dies and the Scripty Love word & shadow dies.
Aren't those two just sweet as can be?!?  I stamped them and then used the coordinating dies to cut them out.  Once done I colored them up with Copics.  I layed them on my Red Postage stamp layer to place them, then taped my Scripty Love Shadow die where I wanted it.  Now I set the squirrels aside and die cut the shadow from the Red Postage stamp layer. Next I adhered the squirrels using foam tape.


The entire Red Postage stamp piece is also adhered with foam tape.  Before attaching it though, I stuck a piece of pink heart patterned paper where the shadow was cut out.  Once the Red Postage piece was in place, I glued in my Scripty Love word die pieces (in gray) and added some fluttery hearts.  Swoon!  I just love the way this turned out!!

You can also read about this card on my blog, here with links to the products I used, etc.  Thanks for popping by, come back again soon!

Surprise!

Hello, hello! Vanessa here today to share with you a one layer card I created using two new stamp sets released this month; both illustrated by Dustin Pike. They are Clarence Birthday and Clarice Surprise. What a cute pair!

I stamped onto white cardstock, then created masks for each image using masking paper. I then inked the background with blue distress inks, then splattered red, yellow, and purple watercolor ink all over. I like to color my main images after my background incase I mess up, so I lifted the masks and colored in the images with alcohol ink markers and colored pencils. After matting my stamped panel to white cardstock, I glued it to a red A2 card base. 

Happy Stamping!

For more inspiration, updates, and news make sure to check out these places.

The Happy Couple


Hello! Lauren here today sharing my cute polka dotted Clarence and Clarice card. I love these adorable squirrels illustrated by Dustin Pike. This image is included in the newly released Clarence & Clarice - Love Stamp set. I thought it would make a cute engagement or wedding card when paired with the Congrats Scripty stamp set. 

I started by stamping my image in black onto white cardstock. I then colored it using colored pencils. I wanted them to match and be a little formal so I chose to color the bows and skirt in shades of cool gray. I used a white gel pen to add the polka dots to the bows and skirt.


With the coloring done, I die cut out the happy couple using a heart die from my stash. 

I then adhered the heart to a black polka dotted A2 (4.25x5.5) panel, then onto a white A2 sized card base. 

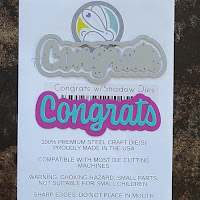
Next, I stamped the word Congrats and also the sentiment "to the happy couple" in black onto white cardstock. I used the coordinating congrats shadow die to cut out the word. I trimmed the sentiment down and added it to the card, below Clarice and Clarence. I waited for the ink of the Congrats to dry fully before using my white gel pen to add polka dots to it too. Then I adhered it to the card above the heart.


I love how this polka dotted card turned out! I think Clarence and Clarice look super cute fancied up! I hope you enjoy this card too! Thanks for visiting! 

For more inspiration, updates, and news make sure to check out these awesome places!