Pages

Showing posts with label Love. Show all posts

Love Forever

Hello there! Michelle here. I love the newest stencil, Broken Glass! It's one of the most versatile 
stencils out there! I paired it up with Old School Tattoo- Anchor and love the way it turned out.


I inked up the stencil with victorian velvet and dried marigold distress oxide inks. I spritzed the stenciled background with water, than splattered some gold and black paint. Allow to dry.
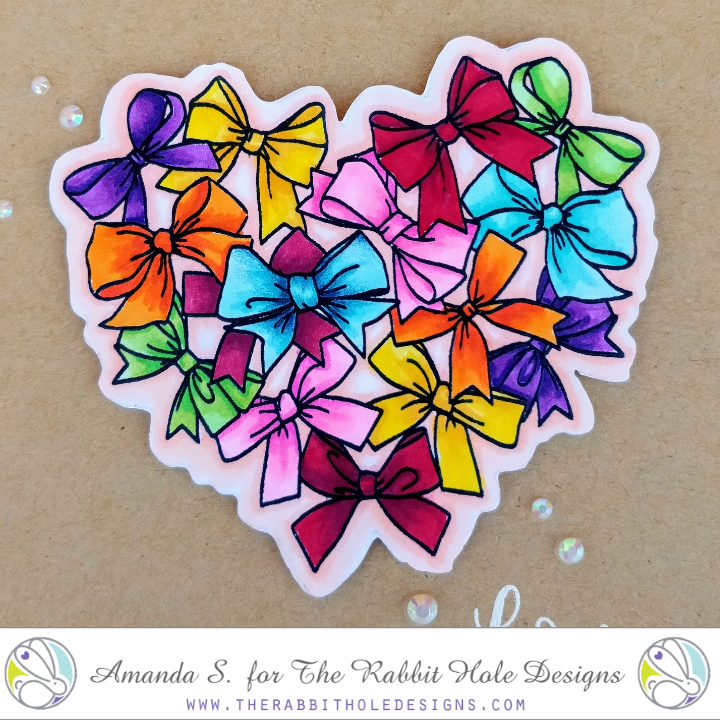
I trimmed the panel to 4 x 5 1/4inches.  Next, I trimmed a piece of vellum to 2 1/4 inches and kept it long enough to fold over the stenciled panel. I embossed the sentiments with black embossing powder. The 'love' sentiment is from the stamp set Put a Bow on It.  
Adhere the vellum strip to the stenciled panel, than adhere to a piece of glitter paper that measures the same as the card base, 4 1/4 x 5 1/2.


I stamped the anchor with black ink than colored up with Copic Markers. I used shades:
W1, W3, W5, W7; RV32, RV34; YR00, YR61, YR02. I fussy cut the anchor. I laid down a piece of gold thread, than adhered the anchor on top. 
For a finishing touch I added some stickles glitter glue and sequins.

Thanks for stopping by for a peek!

Michelle


For more inspiration with your The Rabbit Hole Designs Creations, be sure to follow along at these other locations:


Love is Never Wrong Card

Hey Everyone! Justin here and today I am sharing a fun project using the new Affirmation set and Tattoo Icons stencil, part of the Rabbit Hole Designs April 2020 Release!

What I love the most about the Affirmation stamp set is that there are so many possibly sentiment options. You can either use words on their own, or build them together with other sentiments. For this project, the sentiments "love" and "is never wrong" spoke to me the most. I also decided it was definitely time to break out a rainbow color palette (again).

I knew I wanted to use the swallow with the flower image from the Affirmation set for this project. I stamped that image and colored the image with my alcohol markers. I colored the feathers in the wings with a rainbow palette, and colored the main bird itself a very light blue. I then fussy cut out my rainbow bird.

I also took the sentiments "love" and "is never wrong" and heat embossed them in white powder on a black cardstock strip. I set my sentiment strip and bird aside to work on the main panel of the project.

First, I ink blend a rainbow ombré with my inks on a 4.125" x 5.375" panel of white cardstock. I spritzed this with some water and set it aside to dry.

When the panel was entirely dry, I took my Tattoo Icons stencil, and used full-adhesive backed post-its to adhere my rainbow panel to my stencil.

Tip: I don't always use a low tack adhesive spray on my stencils when applying an ink or glitter layer. I usually take into account if there are fine lines in the stencil that are difficult to keep in place. If there are fine lines, I spray. If no fine lines, I usually tape it down.

Next, I took a clear glitter gel and applied a thin, but solid layer, on top of the stencil. I carefully peeled the stencil off, had that "ah ha" moment of when a stencil comes off perfectly, and set it aside to dry in an undisturbed location. I always let glitter gels dry for at least a good half hour so that I don't have any accidental smears or smudges.

I was in the home stretch with my project. Once my glitter gel panel was dry, I adhered it to an A2-sized panel of black cardstock. I took my sentiment strip, adhered the swallow image to it, put foam tape on the back, and adhered it to my card. I finished off by adhering some sequins and mounting the card to an A2 card base.

And that's how I made my card!

I used the following products on this card:


For more inspiration with your The Rabbit Hole Designs Creations, be sure to follow along at these other locations:


For more details about products used in this post, you may also follow along at my personal blog, Just a Note by Justin, as well!

I hope you're loving these projects with the new Old School style tattoos and stencils, and that you're finding some great inspiration!

You Make My Heart Dance by Niccole

Hello everyone!

It's Nic from Nic & Viv Designs back again to share another card I made using one of The Rabbit Hole Designs new stamp sets. 
For today's card I used the Love You More - Heart Dance stamp set, along with the Square Illusion stencil that was released this month.

How to create this card:
  • A2 red card base that is 4.25"x5.5".
  • Apply transfer gel over your stencil on a black card piece and let it dry clear.
  • Add silver foil to your stenciled background and run through your hot laminator.
  • Trim background to 4"x5.25" and apply to your red card base.
  • Add a red stripe across the middle of your background that is 1.5"x5.25"
  • Trim the top and bottom of your red piece with a thin black piece of card stock. 
  • Clear emboss you stamped image of the couple dancing from the Love You More - Heart Dance stamp set. 
  • Place silver foil over embossed image and run through your hot laminator.  Trim around the couple dancing.
  • Add your trimmed foiled couple from the Love You More - Heart Dance stamp set. I raised them up with foam tape.
  • Add White Nuvo Drops to the center of the squares of the Square Illusion stenciled background.  It adds some dimension to the card.
  • Add a few White Nuvo Crystal Drops randomly to finish the card.
Here is one more picture of the full cards ...

What do you think of the foiled couple? Isn't a neat technique?  It does work better with outline images, but play around ... you never know what you might come up with.

TRHD Products used:

For more inspiration, updates, and news make sure to check out these places

The Rabbit Hole Designs YouTube

I have had so much fun playing with the Love You More - Heart Dance stamp set and the Square Illusion stencil.


Thank you so much for stopping by and spending some time with me.

Until next time ... Hugs & inky fingers!   -Nic-


Stepping It Up With Colored Pencils


Hey crafty friends, it's Amanda from Pear Blossom Press again. Have you played with the new Put a Bow on It stamp set from The Rabbit Hole Designs yet? It is so pretty and offers a ton of coloring possibilities. After seeing Kathy Racoosin's take on it, I almost didn't want to post my first card with it.

This time around, I had an ace up my sleeve though. I stamped, embossed, and Copic colored my image. I fussy cut it with my ScanNCut and popped it up on a square kraft card base with foam tape (a coordinating die is available). A few scattered gems dressed the card up and it was basically finished. Then, I got on a plane to Florida and took it to Kathy's Coloring Challenge Road Trip class for some advice on how to step it up!

This first picture shows my image before I went to class...


I showed it to Kathy and she used a dark blue colored pencil to deepen the shadows on the blue bow in the center. She used more pressure near the black outlines and then soft squiggles and circles to blend the color out. You can see how much more dimension it has than the others.


Then it was my turn. I got to work on the other bows, adding some shading to the outside edges of the loops, as well as the centers and overlapping areas. I seem to have a heavier hand when it comes to blending so I lost some of the lightest highlight areas, or sweet spots, as Kathy calls them. I will continue to practice, but the additional shading makes a huge difference!


Kathy shares some fantastic tips and techniques in her classes. I took my first one with her in September. I still have lots of practice to do, but the second class was a great refresher and reminded me of tips I forgot about after the first one. Luckily, she will be sharing her coloring classes online soon! Keep an eye out for Kathy's Coloring Challenge Road Trip on Online Card Classes!

Overall, I'm much happier with the updated card. Now I will tell you, she recommends not embossing images because the raised edges keep you from getting your pencil tip all the way to the lines. The more I practiced on this image, the more I understood what she meant. So I'll be forgoing the embossing for a while to compare. Let me know what you think. Can you see the difference between the before and after?


Thanks for stopping by today; I'll be back soon with another fun card. You can find more inspiration and ideas and links to the specific products I used on my blog.

Love by Niccole

Hello everyone!

It's Niccole from Nic & Viv Designs back again to share another card I made using one of The Rabbit Hole Designs new stamp sets. 


For today's card I used the Put A Bow On It stamp set. I love how versatile this stamp set is.

I have a lot of pictures today for you. This way I can show you each card and a close up of the foil on each card.


How to create this card:
  • Square card base that is 4.25"x4.25".
  • Stamp the bows stamp from the Put A Bow On It  stamp set with Versamark Ink on a 3.75"x3.75" square.
  • Add clear embossing powder and heat emboss bow image.
  • Cut a piece of foil to cover embossed image.
  • Run bow image with foil through laminator.
  • Remove foil to reveal foiled image.
  • Frame out square stamped image with coordinating color to frame it.
  • Add image to square card base.
  • Stamp the word LOVE from the Put A Bow On It stamp set in the bottom right corner at an angle coinciding with the heart shape.
  • Add a few black Nuvo Crystal Drops randomly to finish the card.
Here is one more picture of the full cards ...


What do you think of the three foiled Put A Bow On It cards? Which is your favorite I really love how they turned out.

TRHD Products used:

For more inspiration, updates, and news make sure to check out these places

The Rabbit Hole Designs YouTube

I have had so much fun playing with the Put A Bow On It stamp set today.

Thank you so much for stopping by and spending some time with me.

Until next time ... Hugs & inky fingers!   -Nic-


Happily Ever After Times 2


Hello Rabbit Hole fans, It's Lisa here with you today and I have 2 
classy cards to share with you using the Happily Ever After stamp set.
I'm so smitten with these stamps and I had an idea for a card
using the sweet images and some really pretty flowers.


For my first card I used a background die that had thick black stripes and 
I adhered it to a white card base.  I wanted a black and white background 
so that the pretty red roses would really stand out.
I colored the sweet couple from Happily Ever After with my Copic markers 
and cut them out with my scan n cut machine.
I watercolored the layered roses and leaves and arranged them in a bouquet
in the top left corner. I popped my sweet couple up on foam tape in the
bottom right corner and added a few sparkly jewels for some sparkle and shine.
For my sentiment I added a large "Love" die cut in 
silver foil layered on a vellum background.


For my second card I used the same couple but with a much lighter
and softer background. I used a background die again but instead of 
cutting it out, I decided to emboss it instead. I love the subtle texture it gives
to a card background. I colored the couple with my Copic markers and
sent them to the scan n cut once again. For my flowers on this card I decided
to use smaller roses in a simple cluster at the top middle of the card.
I added the same sparkly jewels for shine and I embossed the sentiment
from Happily Ever After to a piece of vellum at the bottom of the card.

One stamp set with 2 very different looks!
I hope you enjoyed my 2 cards today and if you are interested in any
of the products I used today, please head over to my blog for more information.


For more inspiration, updates, and news make sure to check out these links.

Thanks for stopping by today.
Have a great day, I already am!
👰🏼Lisa 🤵🏼

Release Hop for April ~ Day 1 ~ Happily Ever After


Hello and welcome to Day 1 of the release hop. We are so excited for you to join us as we present to you our April release.  Our fabulous Design Team will be sharing their projects today featuring the stamp set Happily Ever After.  So please, be sure to visit their blogs and leave them some crafty love. 

All of the new stamp sets are available to purchase right now in the shop.

FREE SHIPPING 
on orders of $25 or more before taxes and shipping
(applies to US orders only)
No code necessary, exclusions apply


The stamp set that is being spotlighted today is: 

Happily Ever After


**Giveaway**
To celebrate day 1 of the release, The Rabbit Hole Designs is giving away the stamp set Happily Ever After to one lucky winner.  Winner will be chosen at random from the comments left on participating blogs, so make sure to visit each stop and leave a comment.  Leave comments by 11:59 pm PST 03-28-2019 on all participating blogs. Winner will be announced on The Rabbit Hole Designs blog 03-29-2019

Here is the line up for the hop:

Lisa Golzbein
Katie Brooks
Maria Russell
Lynnea Hollendonner
Amanda Stevens
Martha Lucia Gomez
MaryAnn Samuelson

Make sure you come back tomorrow for Day 2 of our release HOP.


For more inspiration, updates, and news make sure to check out these inspiring places! 

The Rabbit Hole Designs 

Thank you so much for stopping by today!