Pages

Showing posts with label Card. Show all posts

Who want's birthday cake?

I know, silly question huh?  We all want birthday cake,  the kind that doesn't find it's way directly to your hips!  DT Jammie here with another project to hopefully inspire you.... to stamp, not to eat cake.... well, maybe BOTH!


I began by stamping the awesome new "Celebrate with cake" stamp on a scrap of Sweet Sentiment coloring paper. I colored it with my copic markers in fun teals and pinks.  Then I used some Nuvo drops to created that clear yellow glittery icing. .... then it was time to get to work.

I used an A2 size piece of Sweet Sentiment paper and pretty much all of my T, C and W Copic markers to create this little kitchen background.  I used R83, R81, and RV10 to create the little canisters on the counter, and a silver pen to draw in the hardware on everything. Then I then cut a bajillion layers of pinks and grays to mount the background to and used Distress Oxide inks to "distress" the edges. Then, I drank coffee.... no seriously, because I wanted something else but I didn't know what to do, then it totally hit me! I grabbed my entire bin of flowers and found these tiny roses. I grabbed 6 of them and wrapped them in a square of... wait for it.... brown packing paper! lol! Yup, it was the perfect consistency and thickness to wrap the flowers in and tied them with a little bakers twine bow. Then I used foam squares to give the cake a little pop off the page and stamped a sentiment from "Sassy Birthday 1" onto a scrap of paper.  I adhered that to the card and BOOM! Done! Now I can finish my cup of coffee...... mmmmmm.......

I hope that you totally are inspired by this card and that it makes you wanna try using any of these techniques and/or stamps!  Thanks everyone for stopping by today! See you all soon!
Toodles!

Put a Bow on it...for Christmas!

Hey everyone, DT Jammie here with another awesome way to use the "Put a Bow On It" stamp set.  I love this set because it is super versatile and I can use it for nearly any holiday, and birthdays, and even sympathy.  Today, I've decided to use it for CHRISTMAS!!!!! Yup... check it out:


Pretty sure I used almost every G and YG marker that Copic has to offer, and if they had more, I'd likely have used those too!  But it was so fun to create this gradient of green bows!!! 

This is the stamp set I used named "Put a Bow On It" and here's the link to purchase it from:

For more inspiration, updates, and news make sure to check out these places


I hope this card inspires you and I really hope to see some of your projects using this awesome stamp!  Happy Holidays from my family to yours!
Toodles!!!!
-Jammie 

Coffee Lovers Blog Hop

Hello and a well caffeinated welcome...
DT member Jannie here and I am so excited for you to accompany us as we join up with the Coffee Loving Cardmakers  for their Fall/Winter Coffee Lovers Blog Hop. I am joining in as part of The Rabbit Hole Designs. This is our second time joining them and we are happy to announce we are Super Sponsors for this event. For the duration of the Coffee Lovers Blog Hop, The Rabbit Hole Designs will be offering specials ...
We are offering 15% off everything in the Caffeinated section of the shop!
Use Code: FALLBREW at checkout.
You can shop for all of the Caffeinated Critters HERE
So, now I'll show you the caffeinated critter I chose to use.... the BOXER!
His expression just cracks me up so much!  I mean, LOOK at him!  I decided to make him into a Christmas card by coloring heavy on the red and green and changing his sentiment a bit.  I used the script font from the "Love You More" set.  I'm still giggling at this silly pup. 

Make sure you come back tomorrow to see Michelle Bala sharing more Caffeinated Critters. Make sure you also head over to CLC Fall/Winter Blog Hop to link up to win some awesome prizes. The hop goes through November 8th.

See ya all soon! Toodles!

Whoooo Needs Coffee???


Hello & welcome!!

I have always loved Owls, and the Caffeinated Owl is one of my favorite critters! I started my card by masking off a 2-ish inch section on my card base and ink blended some distress oxides in a nice fall palette. I watercolored the owl using my Zig markers. Isn't he cute and under-caffeinated?? There is a coordinating die that can be used to cut him out, but I used my scan n' cut. Then the card was easily finished by mounting the owl with some foam tape and it was done!!

I am so excited for you to accompany us as we join up with the Coffee Loving Cardmakers for their Fall/Winter Coffee Lovers Blog Hop. I am joining in as part of The Rabbit Hole Designs. This is our second time joining them and we are happy to announce we are Super Sponsors for this event. For the duration of the Coffee Lovers Blog Hop, The Rabbit Hole Designs will be offering specials ...


SPECIALS WE ARE OFFERING FOR THE DURATION OF THE HOP: 15% off everything in the Caffeinated section of the shop.
Use Code: FallBrew
You can shop for all of the Caffeinated Critters HERE


Make sure you come back tomorrow to see Charmaine sharing more Caffeinated Critters. Make sure you also head over to CLC Fall/Winter Blog Hop to link up to win some awesome prizes. The hop goes through November 8th.


That wraps up my post for today, I will be back next week for another trip down The Rabbit Hole!  Until then you can find me over on my blog, Caffeinated Craftiness or over on Instagram! 
-Shanna


For even more inspiration, updates, and news make sure to check out these links.


This is My Costume!

Hello everyone! DTM Shanna here today with a card featuring The Rabbit Hole Design‘s new release for November, Hoggy Holidays! With today being Halloween, I just couldn't bring myself to make a Christmas card!!  Sooooo....who else loves a piggy dressed up for halloween in a Rudolph mask??  LOL


My card design actually used a lot of pattern paper scraps from a 6x6 pad I had in my stash. I inked all the edges in black ink to help tie everything in together.  My Pig was colored using my Zig Real Brush Markers and fussy cut out.  I popped him up with foam tape on top of the tag to add some dimension. Extra touches included adding glossy accents to the lenses of the glasses to make them more  “realistic”!


My sentiment came from the Pumpkin Hair Don't Care stamp set.  It was the perfect sentiment to turn my *Christmas* stamp into something for Halloween!!  


Here is the full stamp set, isn't it cute??  


That wraps up my post for today, I will be back next week for another trip down The Rabbit Hole!  Until then you can find me over on my blog, Caffeinated Craftiness or over on Instagram! 
-Shanna


For even more inspiration, updates, and news make sure to check out these links.

Golden Boo to You

Hello TRHD fans!! Did you have fun falling down the rabbit hole this last week with our new release inspiration hop??  Aren't the new stamps just fabulous!?! Just in time for all of our Halloween and Fall crafting and card making!


I have been having so much fun coloring these stamps, but today wanted to do something that *GASP* has NO COLORING!! 
I was inspired by a background I made using Deco Foil Mettalix gel in Gold on black cardstock, and the Circles and Stars stencil.  I kept going with the black and gold theme and my card was born!


I heat embossed the sentiment and image from Boo to You in detail gold embossing powder, and fussy cut out both.  Before fussy cutting the sentiment though, I added the spider to the bottom of the "N" in Halloween and heat embossed it as well to make it look like all one stamp.  After all the fussy cutting was done (phew!) I matted my stenciled panel on top of a gold foil cardstock panel, then lastly onto a black card base.  My image and sentiment were adhered using foam tape for dimension.  I really enjoy how classic this color combo is, and it could be turned into any occasion, not just Hallloween!

Do you have a favorite color combo you like to use?? 

As always, thanks so much for stopping by! You can see more of my creations on my blog Caffeinated Craftiness, or be sure and follow my crafty adventures over on Instagram!
 See you all soon!
~Shanna

For even more inspiration, updates, and news make sure to check out these links.


Coffee is the new Black


Hello and welcome TRHD fans!  Shanna here today to share another adorable  card featuring the caffeinated critters from The Rabbit Hole Designs! 
The critter line is my favorite (no big secret there!!!) and I had so much fun combining a few trouble makers for this card!

I started by coloringstamping the Caffeinated Rabbit, Caffeinated Unicorn, and Caffeinated Dino in Versa Clair Nocturne ink on a 5x7 panel of bristol cardstock
Next I watercolored them all using my Zig Real Brush pens...I especially had fun individualizing their mugs!  That volcano still makes me giggle!!


Next I drew a light pencil line to guide my floor coloring, and watercolored it as well.
For the background I wanted a "line up" look, so I got handy with my ruler and drew lines every 1/4 inch.  Every fourth line I made slightly larger, and added height measurements.  Bring up the question...

"How tall are the critters!?!"

Lastly I added my sentiment.  I had a couple I liked, but decided to go with "Caffeine, because prison orange is not flattering" from the Perfectly Blended sentiment set.  It seemed all to appropriate for the scene!  I heat embossed it on black cardstock with white embossing powder.

That wraps up todays card, hope you all enjoyed it!

As always, thanks so much for stopping by! You can see more of my creations on my blog Caffeinated Craftiness, or be sure and follow my crafty adventures over on Instagram!
 See you all soon!
~Shanna

For even more inspiration, updates, and news make sure to check out these links.

Born to be a Unicorn!


Hello and welcome TRHD fans!  Shanna here today to share another fun card using one of The Rabbit Hole Designs newest releases, Sassy!

I have a soft spot for Unicorns...Fun fact: I used to collect unicorns as a child!!  I have been coloring up these Sassy unicorns like crazy!  They are addictive!


I wanted to play around with my metallic watercolors, so I created a shimmery background for my unicorn.  I love the glimmer it came out with!
To ground my image some, I pulled out the new Candy Twist stencil and some opaque matte distress paste from Ranger.  That paste gives a slight peek of background color through it, but still dries fairly white.  I just stenciled a small area on the bottom right corner, adding some interest.  
I wanted a soft look to my unicorn, so I opted for no line coloring and some muted watercolor tones using my Zig markers.  Just dreamy!
I opted to heat embossed my sentiment in gold, but embossed “unicorn” 3 times to give a really smooth and raised appearance.


This week has been full of AMAZING projects with the new release!  Have you had a moment to hop yet??  If not, there is still time!  Here are some links to get you started!


Or just visit The Rabbit Hole Designs blog and check it all out there too!!
You have until 11:59 PST TONIGHT to hop for a chance at the prizes! Good luck!!

As always, thanks so much for stopping by!  See you all soon!
~Shanna

For even more inspiration, updates, and news make sure to check out these links.

Stalker Alert

Hello TRHD fans! This is Shanna here today to show to a card that has BEEn in my head for a while now! (Sorry!?!) This is a compilation of not one, not two, but THREE different TRHD fabulous stamp sets!  Pretty in Peony, Caffeinated Bee, and Sassy Sentiments .  


I started out by stamping the bee on a Bristol cardstock panel.  I knew that I was going to mask the bee, so while it was still inked I stamped an additional bee on a post-it note and fussy cut it out.  I carefully lined up the mask over my bee and then added my flower and leaves following the same masking technique.  


After all the images were stamped, I watercolored them with my Tombow markers.  A little bit of blue shading around the scene really helped it stand out on the panel. I chose to stamp my sentiment straight on to the panel using a colored ink. My daughter is always saying that the bees in our yard “stalk her” so this sentiment made me literally laugh out loud!  I completed the card with a few scattered sequins in coordinating colors, and I was done! 

Masking is one of my favorite stamping techniques because I really enjoy combining different sets! What is one of your favorite techniques?  

Thanks so much for stopping by, see you all again soon!
-Shanna


Bowl of love


Hi TRHD fans!  Shanna here today with a fun shaped card showcasing my favorite goldfish!!  The stamps set is The Rabbit Hole Design's So-Fishticated set, and it is gorgeous!  I love how artsy all the different stamps are, it makes them so fun to color!  


I started off by die cutting 2 fish bowls and creating a "hinge" on one of them to attach and make a card.  I inked the edges of the top bow with Tumbled Glass Distress Ink to give some dimension to the bowl.  My water is another diet piece, that I die cut out of Bristol paper knowing I wanted to do some watercoloring on it.  I stamped the pretty goldfish from So-Fishticated on the water piece using Versa Clair Nocturne ink and heat set it to dry.  My coloring was done with Tombow markers, in shades of orange and teal.  Once I was don't coloring the fish, I masked it off with some masking fluid and then used a wet on wet technique with a couple of blue tones from my Tombow collection for the water.  


My sentiment came from the set, and I stamped it on white cardstock, cut it down to a strip, and popped it up with foam adhesive.  I did trim the line of the strip to match the shape of the bowl.  A white gel pen helped me add some final highlight lines to the bowl and I was done!

 **Well, ALMOST done**  

At the last minute I decided that gorgeous Goldy needed some sparkle!  Liquid Pixie Dust to the rescue! (cue Peter Pan music??!!)  I am in LOVE with this stuff, and guess what?!?  The Rabbit Hole Designs carries it in their shop!!  They actually have a bunch of new *Crafter's Essentials* that are totally worth checking out!  Take a peek at what they have to offer here.

Well, that's all today....Thank you so much for stopping by!  Be sure to swing by and say hi over at my blog, and follow along with my caffeinated adventures on Instagram!  See you all again soon
~Shanna


For more inspiration, updates, and news make sure to check out these places


Doggone Simple!


Hello everyone!  Shanna here again today And I am sharing a fun  and easy card featuring TRHD newest release, Doggone.  This card came together quickly, as it involves NO COLORING ! *gasp*. I truly love coloring,  but every once and a while I like the simplicity of leaving the stamps to stand out on their own..
I started with a white 110lb cardstock base slightly smaller than 4.25x5.5".  I stamped each of the dogs included in Doggone scattered and partially off the base to create a "frame" effect using VersaFine Clair Nocturne ink (my hands down favorite black!).  I added in some paw prints, bones, and "woof" sentiment to fill in some more space.  Lastly I heat embossed my sentiments in white on some black cardstock and cut down to strips.


Easy peasy, and a great beginner card!  These images are so cute, they can totally be left uncolored! If you haven't already checked out the *pawsome* new release this month, head on over to The Rabbit Hole Designs website and take a woof, err I mean look!
Well, that's all today....Thank you so much for stopping by!  Be sure to swing by and say hi over at my blog, and follow along with my caffeinated adventures on Instagram!  See you all again soon
~Shanna


For more inspiration, updates, and news make sure to check out these places


Gold Watercolored Peonies


Hi, all! It's Lynnea with more inspiration from the Pretty in Peony stamp set! This stamp set has a permanent spot on my desk - I love it that much! I watercolored them with gold paints this time for added shimmer!


How - To

  • Stamp flowers and leaves from the Pretty in Peony stamp set and watercolor with gold paints. 
  • Adhere cut out florals to patterned paper. 
  • Stamp and heat emboss sentiment from the Pretty in Peony stamp set onto white cardstock and adhere on top of flowers. 
  • Add pearls scattered around the card front. 


Products Used


For more inspiration, updates, and news make sure to check out these places


Thank you all so much for stopping by! I hope this card inspires you to try out some gold watercoloring for yourself! See you soon! 

Whale Hello there!


Hi everyone! Shanna here from Caffeinated Craftiness today with another adorable card featuring TRHD's Beach Day stamp set.  I thought the whales in the set were cute enough to have their own card, and thus this card was born!

I started by cutting out die cut circle out of a panel I had previously stenciled some clouds on with distress ink.  I took an acrylic block, that happened to have a wavy edge to it and smooshed on a decent amount of Salty Ocean distress ink.  I spritzed it and then played it over the bottom half of the circle.  I sat a glass of water on top for some weight, and then let it dry.  I find that if I don't rush it and lift the block off sooner, I don't get the deeper color I am wanting.  
While it was drying I stamped, colored, and cut out my Beach Day images using my Scan n' Cut.  I thought the whale would enjoy having a few friends, so the seagulls joined him while he visited his own little uncharted island.  
Next I dry embossed a solid white A2 panel and added a couple strips of nautical and gold washi.  After the circle had fully dried, I affixed it to the panel and then glued my images on it.  I had a sentiment all ready to go (Whale Hello! of course) but at the last minute decided I wanted to leave the card open to other possibilities if I needed a quick card to grab.  That is the beauty of a genuinely versatile stamp set, it can literally pull off any occasion from Thank you, Happy Birthday, I miss you, or just a plain Hello!  I like having options some times, and will leave the sentiment off for that reason.


I love visiting the ocean, being a California girl.....That's exactly where this card transports me!  Are you more of a lake or ocean type of person?  Does your crafting style ever reflect your preference?  


For more inspiration, updates, and news make sure to check out these places:


See you all again soon, and thanks for stopping by!!
~Shanna

Framed Pretty Peony

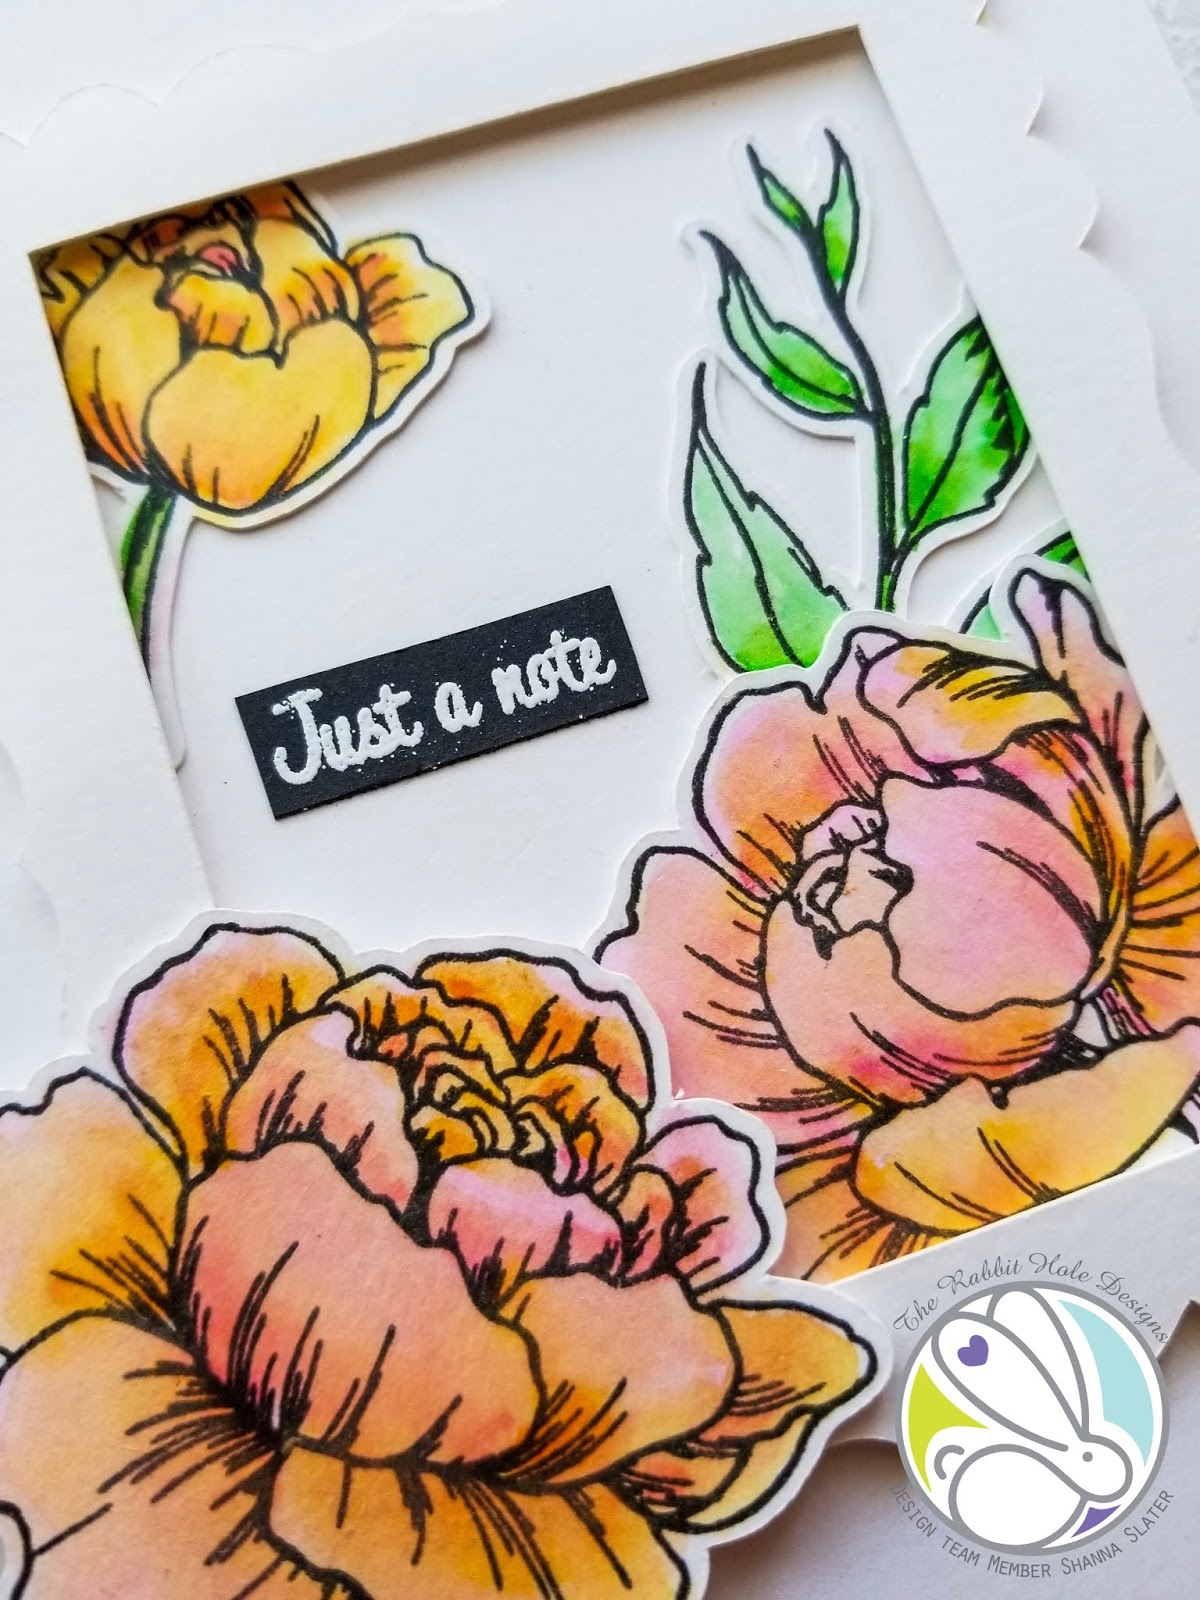
Hello TRH fans!  Shanna here today with my very first post as an official member of the ahh-making design team for The Rabbit Hole Designs...I am so excited to be a part of this team, and of course to share some fabulous projects showing off such a fun line of stamps! I am sharing another fabulous card showcasing the TRH Pretty in Peony that was just released this month! I am in love with the versatility that a good floral stamp set provides, and let me tell you friends....this one does NOT disappoint!


I started off by stamping my flowers all on Canson mixed media paper. I tend to use that paper when I am undecided in what coloring medium I plan on using as it works well with a good variety.  I ended up coloring them with my Tombow markers and blending with a small water brush.  I love the corally-pink!


I cut a wavy frame shape using my Cameo and then arranged the flowers carefully begins the frame and glued them directly to the card front.  I popped up my frame with some foam tape and the mounted a final flower on the front of it.  I really like the dimension the simple framing gave the whole card, super easy but really effective.

I finished it off by heat embossing one of the sentiments included in the set on a strip of black card stock and then adhering it to the card front as well.


For more inspiration, updates, and news make sure to check out these places.


What is your favorite technique for adding dimension to your cards?
See you all again soon!
-Shanna