Pages

Showing posts with label Caffeinated Chameleon. Show all posts

Rainbow Chameleon

Hello my crafty friends and welcome to The Rabbit Hole Designs blog. Today I am sharing a colorful and caffeinated card. The Caffeinated Chameleon has been camouflaged many ways this month.  I thought I would celebrate Pride Month by camouflage him in Rainbow stripes.
Cut strips of 10 different pieces of colored cardstock and started sticking them in rainbow order on a piece of white cardstock using a double-sided Adhesive Sheet.  Cut a piece of the newly created rainbow cardstock to 4" x 5 1/4" to use as a card front. Stamp the Caffeinated Chameleon on the piece of the remaining rainbow cardstock lining up the top of the head in the red stripe. Fussy cut the rainbow chameleon. Add shading to the rainbow chameleon matching each rainbow colors as closely as you can using alcohol markers. Stamp the chameleon on a piece of white cardstock.  Colored the eyes and the coffee cup.  Cut the colored eyes and coffee cup out and glue them to the rainbow chameleon. 
Here you can see his eyes and coffee cup were colored, cut out and glued onto the front of Caffeinated Chameleon.  Add foam squares to he back of the chameleon and attach it to the card front, placing it slightly lower off center of the card front rainbow.  Stamp the sentiment above the chameleon and add die cut coffee cups to the card front. Attach the card front to an A2 white card base. 


I hope you enjoyed the Rainbow Chameleon card featuring the Caffeinated Chameleon stamp set


Be Creative ~ Stay Inspired

Jenn Gross


Follow me, Journey Coach Jenn, on 

Instagram - https://www.instagram.com/journeycoachjenn/

YouTube - http://www.youtube.com/c/JourneyCoachJenn

Blog - http://www.journeycoachjenn.com/


For more inspiration, updates, and news make sure to check out these places


The Rabbit Hole Designs

The Rabbit Hole Designs Instagram

The Rabbit Hole Designs Facebook Page

The Rabbit Hole Designs Pinterest

The Rabbit Hole Designs YouTube


Coffee First, Schemes Later


Hey yall!  Happy, happy Tuesday!  Hope your week is off to a great start. Tangii here, with another share from the June Release.  For today's card I used all 3 of the newest Caffeinated Critters, Meerkat, Hippo & Chameleon and the coordinating dies for all 3.

These guys made for a great trio for a slimline, check out their profiles!  I stamped and then die cute each of these guys out.  Once I got them all colored up, I placed them on my background piece and then sliced off the rest of their bodies (lol).  The frame is popped up for a little dimension.

The caffeine formula was stamped in a chat bubble in French Roast ink, and the sentiment from the Perfectly Blended set, was also stamped in French Roast on a separate tag and then popped up.
 
You can also read about this card on my blog, 
here with links to the products I used, etc.  Thanks for popping by, come back again soon!

Clean and Simple Chameleon


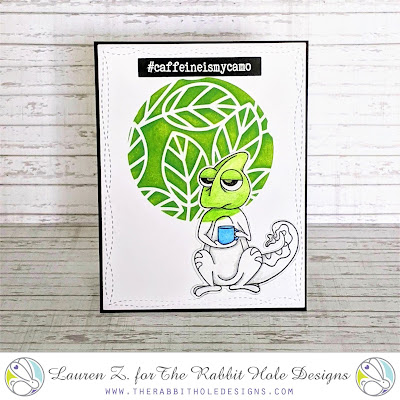
 Hello! It's Lauren here again with this easy, clean and simple Caffeinated Chameleon card. This little guy is one of favorite Caffeinated Critters yet! There is so much you can do with him! 

For my card today, I chose to have him blend in with both the white background and the leaf circle. 

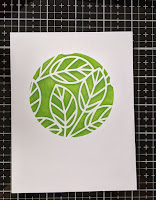
Creating the leaf circle was my first step in making this card. Using a circle die from my stash, I die cut a circle out of a  piece of regular copy paper.


I then positioned the circle over a white 4.25" x 5.5" cardstock panel and adhered it down using washi tape.


Then over the circle, I adhered the Amanda stencil down. 


With the stencil secure, I blended Mowed Lawn Distress Oxide ink over the stencil. I made sure to ink the whole circle area. Then I carefully removed both the stencil and the copy paper from the white cardstock panel.


Next, I stamped the chameleon in black ink on a separate piece of white cardstock. I positioned the paper with the chameleon over the panel with the leaf circle where I wanted the colored chameleon to end up. Then I lined up the copy paper circle over the chameleon and the circle on the cardstock. I used Prisma color pencils to color part of the chameleon that showed through the circle green to match the leaves.  


I then die cut him out using the matching Caffeinated Chameleon die. Then used colored pencils to add shading to the rest of the chameleon and also color the mug blue.


Before adhering my chameleon on the panel, I trimmed the panel down using a wonky stitched rectangle die from my stash. I then lined up the green curve of my chameleon with the leaf circle and adhered him on.

To create my sentiment, I stamped the #caffeineismycamo in Versamark ink onto black cardstock. I them covered it with white embossing powder, shook off the excess and heat set it. I trimmed the sentiment down and adhered it above the circle.


To finish the card, I adhered the panel onto an A2 (4.25" x 5.5") black cardstock panel and then onto my top folding card base.

I hope my card inspires you to give this stenciling technique with your Caffeinated critters. Thanks for visiting! 

Products used: