Pages

Showing posts with label Sassy Sentiments - Anti Valentines. Show all posts

Cupid is Stupid


The Spell It Stencil is absolutely one of my favorite stencils, because of it's versatility!  Hey, it's Cassie, back with another card for you today.  I have another anti-Valentine, because honestly I just love making them, lol.

Once again, I put the Spell It Stencil to great use and spelled out the word 'CUPID' all over my background just doing some ink blending.  It was so easy!  Then I stamped out my sentiments using the Sassy Anti Valentine stamp set, and even did some stamping on the inside of my card.


If you'd like to see exactly how I made this card, you can watch it here or head over to my YouTube Channel.


And here is a closer look at the products I used to make this card.


I hope you enjoyed what I made for you today and that you were inspired to go out and get a little crafty.  

For more inspiration, updates, and news make sure to check out these links.

Thank you so much for stopping by!
Cassie

Drunken Goat Anti Valentine - Gel Press Tips


Hello my crafty friends! today I am on The Rabbit Hole Designs Blog sharing my Anti Valentine Drunken Goat Card. This card features the Caffeinated Goat and Sassy Sentiments-Anti Valentine stamps sets.  The back ground is created using a gel plate and the coffee mug has be replace with a bottle of... well you can read the sentiment 😂😂😂

If you have not used a Gel Press/plate it is a lot of fun and can be a tad messy, but then again, creativity is not clean.  

A - a gel plate is a solid jelly like plate.   They comes in various sizes.  I am using a 5" x 7" gel plate. You add pigment to the plate (inks, re-inkers, paints, etc...)  and  pull a print from it with a brayer and paper.   You will notice the press is stained, not to worry,  pigments will stain it, but that will not affect the prints you pull.
B - the second gel plate I used has raised heart images
C - I tapped out a yellow, pink, and berry hybrid in in a random pattern on the gel plate
D - I take my soft brayer and roll it over the gel plate blending the inks together and then placed the heart gel plate (heart side down) on top of the inked gel plate, gave it a gentle rub and then lifted it off.  I set the heart plate off to the side as we will be using it in a moment.


A - I place a piece of 4" x 5 1/4" white cardstock on top of the gel plate
B - I added a piece of copy paper on top of the cardstock and gel plate creating a sandwich and keep the back of my card front clean
C - I used the brayer to roll even pressure over the sandwiched paper.  You will see the ink from the brayer  is coming off on the copy paper
D - As the paper is lifted it exposes the background image of hearts
A - We get a second print from the heart gel plate.  I set the heart gel plate down heart side up (the ink is on the hearts from earlier)
B - I added another piece of 4" x 5 1/4" white cardstock on top of the heart gel plate and covered it with a piece of copy paper
C - After rolling it with the brayer, I pulled the print
D - Here you see both pulled prints next to each other.  I chose to use the print pulled from the heart plate for my card.
A - I created a heart stencil using a plastic grid template and one of my heart dies.  I centered it on the heart card front
B - I stenciled the heart in a berry oxide ink
C - I added water droplets to the stenciled heart
D - Using my heat gun to dry the droplets created a distressed heart


A - I blended the outer edges of the card front with a subtle pink oxide ink
B -  Using my stamp positioner, I stamped my Sassy Sentiments - Anti Valentine poem in the upper right part of the stenciled heart with black ink
C - I added the #meh-Meh Sentiment from the Caffeinated Goat sentiment to  the lower right side of the card front using a teal ink
D - I colored the Caffeinated Goat with my alcohol markers. He has a die you can use to die cut him out.  I cut of his coffee mug so he could hold the bottle.  I found a bottle stamp and colored it to look like a adult beverage bottle 😉  The bottle is glued into the goats hand.  He is added to the card front using adhesive foam squares, placing him to the left side on the card front.

A - C - I added nine 1/2 gem embellishments to the card to finish it off before adhering it to the ice blue card base


The Rabbit Hole Designs products use:


Thanks for stopping by!  I has a fun time getting messy and creating  with the Gel Press.  It has been a while since I used it.  I love revisiting techniques and products in my stash.  I hope you enjoyed today's blog and this inspires you to try using a gel plate. As always, please feel free to ask me any questions

Thank you so much for stopping by the blog!

Be Creative ~ Stay Inspired
Jenn Gross
@journeycoachjenn


Who Needs a Soulmate When There is a Kitten


Have you ever tried doing some creative masking with your stamps?  That's exactly what I did here using the Heart Dance stamp set and the Sassy Anti Valentine stamp set.  Hey friends, it's Cassie back with another card!

In order to stamp just the girl from the set, I put the stamp into my Misti, and masked off the boy using some masking tape.  I inked it up and then pulled the tape away, and stamped the girl.  I colored her and one of the cats from the Cattitude stamp set using Copic Markers.  My background was made using some more masking paper along with the Diamond Flower Stencil and a couple different colors of Distress Oxide Ink.


I basically stamped the sentiment on the inside in the exact same manner, since I wanted to be creative with my sentiment.  The only difference is that I wrote the letter 'a' in between 'is' and 'kitten'.  If you'd like to see exactly how I did it, I do have a video that you can watch here, or over on my YouTube Channel.


And here are close ups of the products that I used:

Heart Dance stamp set

Cattitude stamp set


I hope you enjoyed what I made for you today and that you were inspired to go out and get a little crafty.  

For more inspiration, updates, and news make sure to check out these links.

Thank you so much for stopping by!
Cassie


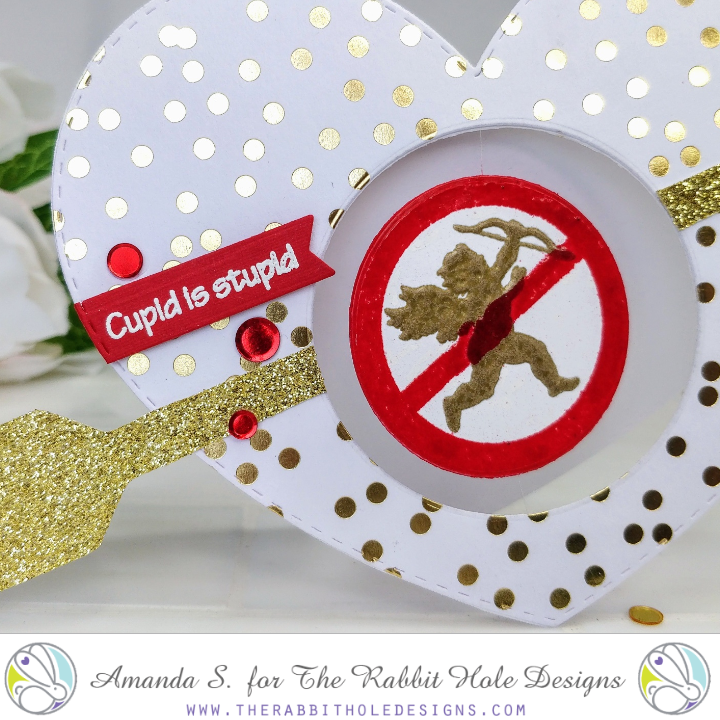
Cupid is Stupid


Hello my crafty friend, it's Amanda from Pear Blossom Press again. As we wrap up the Thanksgiving holiday here in the US, I'm busy making valentines. Or in this case, more sassy galentines! This card is easy to recreate and has no coloring at all, so it's also very quick. The spinner element and heart shape, make this card extra fun!


To make this card, I die cut a large heart three times, twice from white cardstock, and once from a gold foiled piece. I scored a line ¾" from the top of one white heart to make the back panel. I die cut a circle from the center of the other two hearts. Using Scor-Tape, I sandwiched in a line of clear thread, before sealing the two hearts together to form the front card panel. Then, I glued the back panel to the front, above the score line. This gave me a heart shaped card with a hole in the front.

I cut an arrow out of gold glitter cardstock using a preset image in my ScanNCut, then cut it in half and glued it to the card front, trimming the edges to mimic the hole in the center. I made sure to position the bottom of the arrow near the bottom of the card, so it would balance when the card is open.


My sentiment and images are all from the new Sassy Sentiments Anti-Valentine set. I stamped and embossed the sentiment with white powder and die cut it with a fishtail banner. I used the large heart die again to cut the left edge of the banner. For the spinner element, I stamped and embossed two cupids with a double layer of gold powder. Then, I lined up the cross out image and embossed it over the top with a double layer of red powder. I used a powder tool in between coats and had to use a Versamarker pen and more red powder to fill in gaps where the second image overlapped the gold powder. I die cut the images with a circle die and glued them together around the thread. A few red sequins finished off the card nicely.

This card is fun to play with when you wind it up and let it go. Plus, the sentiment is hilarious! I keep pulling this stamp set out; I think it's going to get a permanent spot on my desk! If you'd like to see a few more cards using this set, you might like this article. For more inspiration and links to the specific products I used, check out the sister post on my blog today.

Thanks for stopping by; I'll be back soon with another fun card to share!


Not a Valentine Card by Niccole

Hello everyone!

It's Niccole from Nic & Viv Designs back again to share another card I made using one of The Rabbit Hole Designs new stamp sets. 

For today's card I used the Sassy Sentiments - Anti Valentine stamp set and the Circle Illusion stencil.


How to create this card:


  • White A2 card base
  • Stamp repeatedly with your Misti the heart from the Sassy Sentiments - Anti Valentine  stamp set on the right side vertically  Copic color and set aside
  • Add Glitz Gel in three colors to a piece of gray card stock with the Circle Illusion stencil
  • Let dry
  • Trim panel and apply to left side of card base
  • Add a thin strip of black card stock to incorporate the two pieces together
  • Add black Nuvo drops randomly to hearts
  • Stamp sentiment from Sassy Sentiments - Anti Valentine stamp set to thin strip of white card stock
  • Cut a banner end to one side of sentiment strip
  • Add sentiment strip to card with foam tape
Here is one more picture of the full card ...
What do you think of the change from red to black with the Glitz Gel?  I really love how it turned out.

TRHD Products used:

For more inspiration, updates, and news make sure to check out these places

The Rabbit Hole Designs YouTube

I have had so much fun playing with the Sassy Sentiments - Anti Valentine stamp set and the Circle Illusion stencil today.

Thank you so much for stopping by and spending some time with me.

Until next time ... Hugs & inky fingers!   -Nic-