Pages

Inspiration Hop for the August Release ~ Day 3 ~ Stencils

Hello and welcome to Day 3 of the Inspiration Hop. We are so excited for you to join us as we present to you our August release.  Our fabulous Design Team has been sharing their projects over the last few days, so be sure to visit their blogs and leave them some crafty love.

The 2 (Two) new stamp sets and 4 (Four) Stencils are available to purchase right now in the shop.
~
Every order placed will be eligible for a 10% discount. Discount Code TRHD2019 this code will only be accepted until Friday 08-02-2019. EXCLUDES Dies and Crafters Essentials. Not applicable to previous orders. May be used more than once.
Does not apply to shipping and tax.
~

The Stencils are being highlighted today they are:
Candy TwistDiamond FlowerPuzzle BoxCircles & Stars 

**Giveaway**
To celebrate day 3 of inspiration The Rabbit Hole Designs is giving away 2 (Two) of the stencils featured to One lucky winner.  Winner will be chosen at random from the comments left on participating blogs, so make sure to visit each stop and leave a comment.  Leave comments by 11:59 pm PST 08-01-2019 on all participating blogs. Winner will be announced on The Rabbit Hole Designs blog 08-02-2019


Here is the line up for the hop:
The Rabbit Hole Designs


Thank you so much for stopping by today!

Inspiration Hop for the August Release ~ Day 2 ~ Inky

Hello and welcome to Day 2 of the Inspiration Hop. We are so excited for you to join us as we present to you our August release.  Our fabulous Design Team will be sharing their projects over the next couple of days, so be sure to visit their blogs and leave them some crafty love.

 The 2 (Two) new stamp sets and 4 (Four) Stencils are available to purchase right now in the shop.
~
Every order placed will be eligible for a 10% discount. Discount Code TRHD2019 this code will only be accepted until Friday 08-02-2019. EXCLUDES Dies and Crafters Essentials. Not applicable to previous orders. May be used more than once. Does not apply to shipping and tax.
~

The stamp set that is being highlighted today is:

Inky


**Giveaway**
To celebrate day 2 of inspiration The Rabbit Hole Designs is giving away the stamp set Inky to One lucky winner.  Winner will be chosen at random from the comments left on participating blogs, so make sure to visit each stop and leave a comment.  Leave comments by 11:59 pm PST 08-01-2019 on all participating blogs. Winner will be announced on The Rabbit Hole Designs blog 08-02-2019

Here is the line up for the hop:
Lisa Golzbein
Katie Brooks
Shanna Slater
Niccole Kulig
Maria Russell
Amanda Stevens
Amanda Wilcox

Make sure you come back tomorrow for Day 3 of our Inspiration Hop.


Thank you so much for stopping by today!

Inspiration Hop for the August Release ~ Day 1 ~ Sassy


Hello and welcome to Day 1 of the Inspiration Hop. We are so excited for you to join us as we present to you our August release.  Our fabulous Design Team will be sharing their projects over the next 3 days, so be sure to visit their blogs and leave them some crafty love.

 The 2 (Two) new stamp sets and 4 (Four) Stencils are available to purchase right now in the shop.
~
Every order placed will be eligible for a 10% discount. Discount Code TRHD2019 this code will only be accepted until Friday 08-02-2019. EXCLUDES Dies and Crafters Essentials. Not applicable to previous orders. May be used more than once. Does not apply to shipping and tax.
~

The stamp set that is being highlighted today is:

Sassy


**Giveaway**
To celebrate day 1 of inspiration The Rabbit Hole Designs is giving away the stamp set Sassy to One lucky winner.  Winner will be chosen at random from the comments left on participating blogs, so make sure to visit each stop and leave a comment.  Leave comments by 11:59 pm PST 08-01-2019 on all participating blogs. Winner will be announced on The Rabbit Hole Designs blog 08-02-2019


Here is the line up for the hop:
Lisa Golzbein
Katie Brooks
Shanna Slater
Niccole Kulig
Maria Russell
Amanda Stevens
Amanda Wilcox

Make sure you come back tomorrow for Day 2 of our Inspiration Hop.


Thank you so much for stopping by today!

Thinking of You Peony

Hello everyone!!! 


It's Niccole from Nic & Viv Designs back again to share another card I made using one of The Rabbit Hole Designs stamp sets. 

For today's card I used the Pretty In Peony stamp set.


How to create this card:
  • Standard A2 size card trim 2" off of non folded side
  • Score three lines in paper 1/2' from edge of cut card front - this is for decoration
  • Stamp Thinking of You in lower left corner of card front
  • Add three gems
  • Stamp flower images on edge of 4 1/4' x 5 1/2" card 
  • Mask off flowers and stamp leaves and buds
  • Copic color your image 
  • Trim a sliver off non colored side so it lines up with card front when closed
  • Glue card front to colored panel 
  • Add black strip of card stock 
  • Add a few more gems to the colored portion of card
  • Add Wink of Stella to flowers
Here is one more of the full card ... 


TRHD Products Used:

Pretty In Peony


For more inspiration, updates, and news make sure to check out these places

The Rabbit Hole Designs YouTube


I have had so much fun playing with the Pretty In Peony set. The possibilities are endless with this set.  Flowers are my downfall if you don't know that already.

Thank you so much for stopping by and spending some time with me.

Until next time ... Hugs & inky fingers!   -Nic-


Livin' La Vida Mocha

Hello The Rabbit Hole Designs fans!  Maria here and it's my turn to take over the blog today.   I made this cute coffee-themed card showcasing the Caffeinated Bee and its coordinating die with the Perfectly Blended stamp set.


.


Here's my card using the stamp set:


I stamped the image on some Neenah solar white card stock and colored the images in with my Spectrum Noir and Copic alcohol markers.  I used the Citrus Blend for the yellow and blended it with the Coral TriBlend marker to create a deeper shadow.

I used a (D.I.Y.) patterned paper for the background that I adhered on an A2-size card base.   This D.I.Y. patterned paper is just in my stash of ready-to-use backgrounds.  I made it by using some stamps from an old craft magazine that I purchased awhile back.  Sometimes when I have some free time, I stamp images on Neenah solar white to create my own patterned paper.   

I die-cut the hexagon piece using an old die from my stash and I used my Copic marker to color it so that it matches the bee.  I adhered this piece on an oval-shaped white card stock to add more texture to the card, without overwhelming the whole card design. 

I adhered the bee with some foam adhesive to add more dimension.  To finish my design, I added the enamel hearts from Doodlebug and stamped the sentiment from the Perfectly Blended stamp set.  Here's a closer look at the card:


Isn't she a cutie??  This Caffeinated Bee is one of my favorite stamp set from The Rabbit Hole Designs.  I hope you like my card and got inspired.  If you are looking for further details about my project including supplies used, I would be so grateful if you can stop by my blog today at:


For more inspiration, updates, and news make sure to check out these places.  Happy stamping!

Doggone Birthday


Good morning Rabbit Hole fans!
It's Lisa here with you today and I have a fun shaker card to share with you
using the Doggone stamp set.


I just love the looks on the dogs faces in this stamp set!
I also love making shaker cards and I never have enough birthday cards on hand. 

Card Recipe

1)  I layered some cute dog themed patterned paper on a kraft card base.

2) Next I covered the patterned paper with another smaller kraft panel and stamped
my sentiment directly in the center.

3) Then it was time to create a shaker frame from more kraft paper and acetate.

4) I poured some red and gold sequins over the sentiment to match the patterned paper
and then laid the shaker frame over the sequins.

5) The last step was to color my cute doggies with some Copic markers 
in some light grays and adhere to the shaker frame.

Easy peasy and a cute card to give for some belated birthday wishes!
Thanks so much for stopping by today and make sure to check back
on the 29th for the exciting August release!

For more inspiration, updates, and news make sure to check out these links.

Have a great day, I already am!
🐶Lisa 🐶 

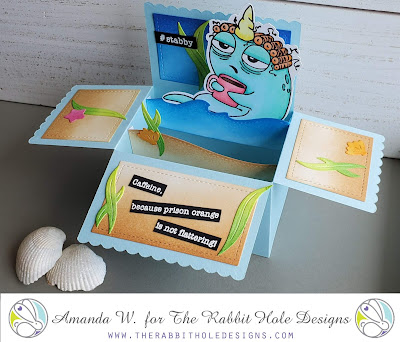
Caffeinated Narwhal Box Card

Welcome back and thanks for stopping by! It's Amanda W. guest designing for The Rabbit Hole Designs again today and so happy to be sharing this awesome Caffeinated Narwhal box card. The Caffeinated Narwhal is available in the shop so be sure to head over and snatch yours up!


Here's how I did it:
  • I die cut all the pieces needed for the box card, ink blended them for dimension, then started assembly.
  • I cut, stamped and colored my Caffeinated Narwhal and added it to my box.
  • After that, I stamped and heat embossed my sentiment on black cardstock and cut it into a thin strip. This is a long sentiment from the Perfectly Blended stamp set so I cut it into pieces to fit it on the front flap. I also heat embossed the smaller #stabby from the Caffeinated Narwhal and attached it to the back panel. 

This card turned out so cool! I love how box cards fold up and fit in an envelope to surprise the recipient with 3-D awesomeness! I can't wait to pop this one in the mail and make someone smile.


For more inspiration, updates, and news make sure to check out these places.
The Rabbit Hole Designs
The Rabbit Hole Designs Instagram
TheRabbit Hole Designs Facebook Page
The Rabbit Hole Designs Pinterest
The RabbitHole Designs YouTube

I appreciate you sharing your time with me. Have a fabulous day!


Feline Fine- with Katie

Hey, Hey, Katie here today!  Let's see, what day is it?  Wednesday!  Oh wait, it is only Tuesday- lame, but Happy Almost Hump Day to you!  


Last week I had one for the dog lovers and today I have one for the cat lovers... with a teensy bit (literally) of dog too.  Hopefully this one makes someone feel a teensy bit better if they are under the weather. 


Here is how I made it: 
  • Started by stamping my cats and pups from Cattitude and Doggone on Copic Friendly paper. 
  • I die cut them out using my ScanNCut and colored them with my copics. 
  • For the dog, I paper pieced a bit of plaid paper for his scarf.
  • Next I die cut the blueprint die using a light shade of brown paper.  Then I mounted it on Kraft. 
  • I decided where I wanted to place each of my critters and then set them aside. 
  • I stamped the paws and the different bits of sentiment in the different grids based on where I wanted the pets. 
  • Lastly, I came back in and added my pets using foam tape. 
My biggest challenge with this card was the Tortoiseshell Kitty, but I think it turned out pretty good.  What do you think? Have you attempted this type of pet coloring? What was your technique and how did it turn out? 


Well, I had such a fun time making this card and I hope it perks someone up. :)

If you would like to see a full list of supplies, feel free to visit my blog here. Thank you very much for checking out my post today!


For even more inspiration, updates, and news make sure to check out these links.


Pinky Finger Up!


Hello again my crafty friends, it's Amanda from Pear Blossom Press! Now that another of Kathy Racoosin's 30 day coloring challenges is over, I've got a stockpile of colored images all ready to be made into cards. Have you colored along for any of the challenges? The idea is simple, just color a little every day. No pressure; just practice. I love the challenges because I approach cardmaking a little differently during the run. Instead of starting with an idea for a card, picking out all of the papers and elements, and then coloring my images to coordinate, I just stamp out lots of images and color them in. Usually, I fussy cut the images with my ScanNCut so I have images ready to go. (If I don't use them right away, I will tuck the cut out pieces into the pockets with the stamp sets.) Once I have the images ready to use, I lay them out on my grid mat and play with different configurations. So instead of starting with an overall design, then decorating it, I start with the decorations and work backwards.

Often when I'm coloring, I will color images from different sets in the same colors schemes, since I already have those supplies out. This inadvertently allows stamps from different sets to work together. Hooray for happy accidents! For today's card, I pulled several watercolored images from different sets from The Rabbit Hole Designs and combined them because they were all yellow. I laid out the flowers and leaves from Pretty in Peony on my grid mat and decided I liked the Caffeinated Bee up in the top corner. To keep the images in the exact same configuration, I picked them all up with a piece of Press'n Seal, then glued the flower pieces together from the back.


I wanted to create a background for my card that would tie the elements together and also add a little pizzazz to the scene. I needed to use a color in the yellow family since the flowers and bee took up so much of the space on the card. If I introduced another color under them, it would get too busy. I opted to apply Gold Deco Foil Metallix Gel over a hexagon stencil. It gave the illusion of golden honeycombs. I only applied it where it would be mostly covered by the flowers. After the gel was dry, I stamped my sentiment from Perfectly Blended and popped the Caffeinated Bee and peonies up with foam tape. To add some of the gold shimmer to the flowers and bee, I used a gold gel pen to draw on highlights and quickly blended them out with my finger. I also added some Aqua Shimmer to the bee's wings and coffee mug. I applied a thick coat of Diamond Glaze to the bee's eyeball and mug to finish the card.

I love how this card turned out and I honestly don't think I would have ever considered using the bee and peonies together if I hadn't colored them at the same time for the coloring challenge. So what do you think? Too big of a stretch, or do you like them together? Let me know down in the comments below.

Thanks for buzzing by today. If you'd like to see more cards featuring these stamps, check out Sassy Peonies and March Release. You can also find links to the other products I used for this card in the sister article to this post on my blog. I'll be back again soon with another fun card for you... And now I'm wondering what other caffeinated critters the peonies might go with!

Stalker Alert

Hello TRHD fans! This is Shanna here today to show to a card that has BEEn in my head for a while now! (Sorry!?!) This is a compilation of not one, not two, but THREE different TRHD fabulous stamp sets!  Pretty in Peony, Caffeinated Bee, and Sassy Sentiments .  


I started out by stamping the bee on a Bristol cardstock panel.  I knew that I was going to mask the bee, so while it was still inked I stamped an additional bee on a post-it note and fussy cut it out.  I carefully lined up the mask over my bee and then added my flower and leaves following the same masking technique.  


After all the images were stamped, I watercolored them with my Tombow markers.  A little bit of blue shading around the scene really helped it stand out on the panel. I chose to stamp my sentiment straight on to the panel using a colored ink. My daughter is always saying that the bees in our yard “stalk her” so this sentiment made me literally laugh out loud!  I completed the card with a few scattered sequins in coordinating colors, and I was done! 

Masking is one of my favorite stamping techniques because I really enjoy combining different sets! What is one of your favorite techniques?  

Thanks so much for stopping by, see you all again soon!
-Shanna


Paws-ing To Say Thanks!


Hello everyone!!! 

It's Niccole from Nic & Viv Designs back again to share another card I made using one of The Rabbit Hole Designs stamp sets. 

For today's card I used the Doggone stamp set. This set was just released this month. It is quickly becoming on of my favorites.


How to create this card:
  • Light blue A2 card base
  • Add polka dot pattern paper to left half of the card base
  • add skinny strip of gold glitter paper to side of polka dot paper
  • Stamp Doggone dog on white card stock
  • Copic color Doggone dog and cut him out 
  • Attach Doggone dog to the light blue and cream circle
  • Add light blue and cream circle to the larger kraft circle
  • Glue circles  onto card
  • Stamp sentiment on top and bottom of circle, centered.


Here is one more of the full card ... 


TRHD Products Used:

Doggone


For more inspiration, updates, and news make sure to check out these places

The Rabbit Hole Designs YouTube


I have had so much fun playing with the 

Thank you so much for stopping by and spending some time with me.

Until next time ... Hugs & inky fingers!   -Nic-


Caffeinated Fox by Martha Lucia

Hi there, Martha Lucia here!
I’m back with with one of my favorites stamp sets Caffeinated Fox.


I stamped the images from the Caffeinated Fox stamp set with Memento Tuxedo Black Ink and colored the fox with Spectrum Noir Alcohol Markers . I fussy cut the fox with my scissors. 

For the background, I blended distress inks on five different colors over a whisper white card layer and ran the inked layer with the On the Curve Cover Panel from Reverse Confetti though my die cutting machine. After have the cover plate cut from the layer and without remove it from the die cut.


I pasted double sided foam tape over the negative curve designs. I placed my card base over the cover plate and used only the negatives to save the traditional die cut to other project.

I love how this card turned out. The colors and dimension of all curves made this a really special card. For me it is also special because this is my last card as designer of The Rabbit Hole Designs. Thank you for let me share my talents with you.

Thanks for stopping by and see you soon!