Pages

Showing posts with label Squirrel. Show all posts

Acorn-y Card - Clean and Simple Card

Hello my crafty friend!  I hope your day is light and filled with laughter.  Let me start you with a pun and share acorn-y card with you!   This A2 card is a clean and simple design.  You can achieve a lovely looking card with a  simple colored image and crisp stamped sentiment.  I am using The Rabbit Hole Designs' new Tenting with Tailette stamp set

I positioned and stamped the squirrel roasing an acorn image and the sentement in Memento Tuxedo Black ink in the middle of a 4" x 5 1/4" piece of coloring cardstock.  I colored the squirrel in OLO Markers;  Blues - B0.2, B0.3, B4.3, and B4.6.  I added fire highlights to the squirrel using Y1.2.  The acorn and fire are colored in OLO dark oranges (O and OR) and red (R) for the flames.  The card front is mounted on a light blue A2 card base.

Supply List

Thank you, I appreciate you taking time from your day to stop by and check out today’s The Rabbit Hole Design project.  I hope you are inspired to create something lovely today!


Be Creative ~ Stay Inspired

Jenn Gross


Follow me, Journey Coach Jenn, on 

Instagram - https://www.instagram.com/journeycoachjenn/

YouTube - http://www.youtube.com/c/JourneyCoachJenn

Blog - https://journeycoachjenn.blogspot.com/  


For more inspiration, updates, and news make sure to check out these places


The Rabbit Hole Designs

The Rabbit Hole Designs Instagram

The Rabbit Hole Designs Facebook Page

The Rabbit Hole Designs Pinterest

The Rabbit Hole Designs YouTube

Camping Adventure

Hello crafty friends! Jenn Gross here sharing an adventure card today, you can also follow me on Social media @journeycoachjenn. I love this vibrant card.  I pulled out my colored pencils for a coloring adventure. The images are from The Rabbit Hole Designs New June Release. The three stamp sets; Glamping with Tailette, Tenting with Tailette, and Let's Wander are all illustrated by Agota Pop.

I masked off the cute squirrel head from the Glamping with Tailette stamp set and put her inside the tent from the Tenting with Tailette stamp set.  You can see how I drew the tent flap to place it in Tailette hands.  She is taking a look outside to appreciate her surrounding.  

The background is created by extending the Let's Wander stamp set by masling and stamping an extra mountain. 

The sky is  created with color pencils and the Clouds in My Coffee stencil.  I die cut the word "Adventure" from the Adventure Word with Shadow Layer die glueing three word layers together.  The "awaits" sentiment is from the Adventure Word stamp set.  The sentiment is glued to the top of the card front following the mountain's ascent.
I added the Tented Tailette to the bottom right of the card front using foam squares.

Supplies List
Liquid glue 
Colored pencils 

Thank you for taking the te to checkout  today's vibrant card camping adventure with Tailette.  I hope you are inspired to create something lovely today!

Be Creative ~ Stay Inspired

Jenn Gross


Follow me, Journey Coach Jenn, on 

Instagram - https://www.instagram.com/journeycoachjenn/

YouTube - http://www.youtube.com/c/JourneyCoachJenn

Blog - https://journeycoachjenn.blogspot.com/  


For more inspiration, updates, and news make sure to check out these places


The Rabbit Hole Designs

The Rabbit Hole Designs Instagram

The Rabbit Hole Designs Facebook Page

The Rabbit Hole Designs Pinterest

The Rabbit Hole Designs YouTube


Head in the Clouds - Interactive Valentine Swing Card


Hello crafty friends!  Jenn Gross here, with and interactive card using stamps and stencils from The Rabbit Hole Designs, You can also find my projects on IG under @journeycoachjenn.  It seems that love is in the air and in the clouds!

Today I am sharing aninteractive Valentine card.  This swinging cupid card is created with The Rabbit Hole Designs' Cupid Clarence stamp set (a Dusting Pike illustration) I used Cottontail Blending Brushes,  Clouds in my Coffee stencil paired with the radiant die from the You've Been Framed die set for the background.

Let's take a look at how this card is created:
A - I stamp the Cupid Clarence image twice.  I colored the head of one of the images  and the body of the other image using blue violet (BV) Olo Markers.   I fussy cut the colored head and body, leaving about 1/2" of paper above the neck of the body piece to attach Clarence's head with a foam square.  I angle the head at a slight upward angle and secured it to the body.

B - I randomly ink blended a cloud background with the Clouds In My Coffee stencil using Cotton Tail Blending Brushes. and Victorian Velvet, Spun Sugar, Kitsch Flamingo and Wilted Violet Distress Oxide ink on a 4" x 5 1/4' piece of white cardstock.

C & D - Using a standard hole punch, I added a hole 5/8" below the top center of the card front.  I positioned the radiant die from the You've been Framed die set about 1/2' below the hole and die cut the design. 
E - I used the standard hole punch to add a hole on each end of a 2' x 1/2" strip of clear acetate. This will be used for an interactive swing bar.

F - I added small jump rings to  the back of  Clarence's envelope and on the bottom of Clarence's shorts to add a small bit of weight for balance. The jump rings are attached with redline tape and a small piece of paper is glued over the top to secure the jumb rings into place.  I used Gem-Tack adhesive to attach a slider snap on side of the back of Clarence's arrow hand. 

G & H - I let the snap dry in place and attached one hole at the end of the acetate strip over the snap on Clarence's hand and snapped it in place. I snapped the other end of the acetate to the hole on the top of the card and tested the swing movement.  I removed the snap and acetate from the top card hole so I could stamp the sentiment at the bottom of the card.
I & J - I snapped the acetate swing bar to the top of the card front  I used a small cloud die cut from my stash to die cut a cloud to hide the snap attachment at the top of the card.  The cloud is placed over the snap with thick double-sided adhesive foam tape on each side of the cloud.  This space allows the acetate bar to swing freely.

K - I attached the card front to a lilac A2 card base using  double-sided adhesive foam tape completing this fun interactive card. 

Products Used

Thank you, I appreciate you taking time from your day to stop by and check out today’s interactive Valentine card featuring The Rabbit Hole Designs' new Cupid Clarence stamp set.  I hope you are inspired to create something lovely today!


Be Creative ~ Stay Inspired

Jenn Gross


Follow me, Journey Coach Jenn, on 

Instagram - https://www.instagram.com/journeycoachjenn/

YouTube - http://www.youtube.com/c/JourneyCoachJenn

Blog - http://www.journeycoachjenn.com/


For more inspiration, updates, and news make sure to check out these places


The Rabbit Hole Designs

The Rabbit Hole Designs Instagram

The Rabbit Hole Designs Facebook Page

The Rabbit Hole Designs Pinterest

The Rabbit Hole Designs YouTube


All Aboard the Peanut Express!


Whoo Whoooo!  ALL Aboard my crafty friends!  The Peanut Express is about to depart The Rabbit Hole Designs depot.

Clarence is so full of joy riding his Christmas train.  This image is from the Clarence Christmas stamp set (Illustrated by Dustin Pike). I paired it up with two of The Rabbit Hole Designs stencils; the Mesh-Optical stencil is used to create the Christmas tree and the Nutty 2 Layer stencil is used for the tree ornaments.

Let's have a look at the step tutorial... 
A - Stamp the Clarence Train image on a piece of coloring cardstock and colored it with Olo alcohol markers. Cut out the  image and set aside for later.
B - Use paper masking tape to outline a Christmas tree on the Mesh-Optical stencil and position it on the right side of a 4" x 5 1/4" piece of light blue/grey cardstock securing it with additional paper tape.
C, D, & E -  Select light, medium, and dark green inks to use with the Bitty Blending Brushes and  randomly stencil the tree opening with all three color.  Removed the stencil from the card front after stenciling.
F & G - Position the solid nut layer stencil from the Nutty 2 Layer stencil on top of a 4" x 5 1/4" piece of kraft cardstock.  Select three inks (a light, medium, and dark) to stencil and shade the solid peanut.(I chose Fossilized Amber, Brushed Corduroy, and Ground Expresso Distress Oxides to color the solid nuts).
H - Removed the solid peanut stencil first layer and replace it with the gridded peanut 2nd layer stencil. Add a bit more color shading with the darkest ink of the three ink colors.
I - Use a palete knife and small bit of the gold (Slippery When Wet) Lunar Paste to add guilded highlights (only to the upper right area of the each nut. Remove the stencil and wipe it off immediately.  Use a heat gun to help dry the Lunar Paste quicker by gently blowing heat over the stenciled kraft paper to dry the nut. This should only take a few seconds.
J - Replace the gridded peanut 2nd layer stencil layer back over the kraft paper and the stenciled nut images. (This dies NOT have to line up perfectly.  Slightly off alignment is better)  Using a clean palette knife, add a layer of Transparent Grit Paste over the top of the peanut grid stencil. Remove the stencil and clean it off immediately. Let the peanuts dry. Once the nuts are dry, cut out 4 - 6 individual nuts and set them aside for later.
K - Use Speckled Egg ink and to add a Cottontail Blending Brush to inkbkend the sides of the card
L - Draw Clarence's train track at the bottom of the card front
M - Ink blend the bottom of the card with one of the darker blue inks. Grab four of the peanuts and the Clarence Train image to use to assembling the card front.
N - Treat the top left of the card front this the Cottontail Embossing Powder Tool  and use your stamping tool to add the sentiment with VersaMark Watermark clear ink.Add and heat emboss the stamped sentiment with red embossing powder. Glue the card front to a red A2 card base. Glue the Clarence and his train on the left side of the card onto the drawn train track.  Select the placement of the four stenciled peanuts on the Christmas tree. Use double sided adhesive foam squares  behind the nuts and adhere each to the tree as shown in the photo above.

Products use


Thank you, I appreciate you taking time from your day to stop by and check out The Rabbit Hole Designs Blog. I hope you are inspired to create something lovely today! 


Be Creative ~ Stay Inspired

Jenn Gross


Follow me, Journey Coach Jenn, on 

Instagram - https://www.instagram.com/journeycoachjenn/

YouTube - http://www.youtube.com/c/JourneyCoachJenn

Blog - http://www.journeycoachjenn.com/


For more inspiration, updates, and news make sure to check out these places


The Rabbit Hole Designs

The Rabbit Hole Designs Instagram

The Rabbit Hole Designs Facebook Page

The Rabbit Hole Designs Pinterest

The Rabbit Hole Designs YouTube


You Donut Know How Much I Love a Midnight Snack Card


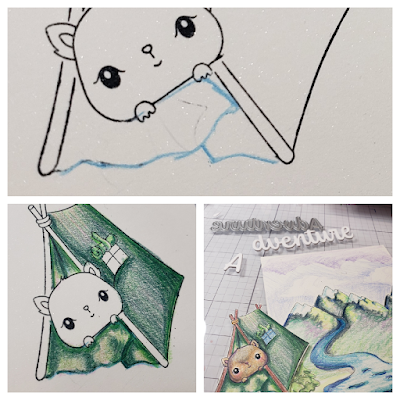
Hey Rabbit Hole Crafters! Justin here and I'm super excited to share with you this fun creation I made using the More Than Donuts set, paired with the Circles and Stars stencil!

I knew I wanted to make something with this adorable, donut-loving squirrel, but wanted to get a little bit of inspiration. While thumbing through my stencils, I came across the Circle and Dots stencil and thought it would be fun to create a night time scene with it, giving a little bit of a backstory that this squirrel must have woken up for a midnight snack, and decided to munch on a purple donut (because I would totally do this too)!

First, I colored my More Than Donuts squirrel up with some warm gray alcohol markers. I used some longer marker brush "flicks" on the tail to make it look bushy, and not flat. I also used a light blue green marker on top of the gray inside the glasses, and then used some clear glossy gel to make the glasses 3D. I also used some violet markers for the frosting, earthy brown colors for the donut itself, and used some purple gems and white gel pen markers to make donut sprinkles.

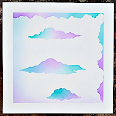
For my background, I ink-blended with brushes a purple night sky, going from a light purple, to mid purple, to dark blue to black. I really love to make non-traditional sky colors, because they're a little more striking than your standard blue sky. I then took my Circles and Stars stencil, adhered it with some light tack spray to my purple night sky panel, and used a champagne colored metallic gel over the top to get some pretty and shiny dots and stars in my night sky! Always remember that when applying a gel to your stencil to A) remove the stencil and set aside your panel to dry in a place it won't be disturbed and B) clean your stencil off immediately with warm water and soap.

I took a piece of brown wood-print paper, cut it down to the same size as my purple night sky panel, and hand cut it into a wonky "L" so it looked like a tree. I then adhered it directly to my purple night sky panel, and adhered my squirrel in it's place. To add some shadow, to make it really look like this squirrel was perked on a branch, I took a warm gray alcohol marker and shaded in any part where my squirrel touched the tree branch. I placed my night sky panel onto a patterned A2-sized piece of paper.

To finish my card out, I stamped my sentiment on to a light purple strip of card stock, mounted it to a darker purple slightly thicker card stock, and made it into a banner. I adhered my banner into it's correct location, and trimmed the edges so it fit onto the card.

I adhered a few purple jewels into the night sky, and that's my card!

Here are the products I used in this card:


For more inspiration with your The Rabbit Hole Designs Creations, be sure to follow along at these other locations:

For more details about products used in this post, you may also follow along at my personal blog, Just a Note by Justin, as well!

I hope this card sparked some fun ideas for your future projects, and maybe an idea for your next late night snack! Thanks for reading, and happy crafting!

December Guest Designer Andrea Shell

As December wraps up; We are pleased to bring you one more card from one of our December 2019 Guest Design Team Member ... Andrea Shell. 


We sent Andrea the More Than Donuts stamp and we think she knocked it out of the park with this project. 

To see all the details please click here -> More Than Donuts


This is what Andrea had to say about our More Than Donuts stamp set ...

"Hi there!  It's Andrea back with my second project as a guest for The Rabbit Hole Designs.  This card also features the new More than Donuts set, but this time I went for a more traditional Valentine card.

I had a lot of fun watercoloring this adorable squirrel, using an image I found on Google for color inspiration (Who knew there are so many color variations for squirrels?!).  I couldn't resist adding some details with a white gel pen, along with Glossy Accents to those cute specs of his!  I popped my image onto a stenciled background and white heat-embossed a sentiment from More than Donuts.

Thank you, Mary Ann, for inviting me to guest-design this month!  I had a great time and hope I inspired you even a little."


You can find Andrea here at her blog ------> Blissfully Scrappy
You can also find her IG here ------> @wesie1702

Make sure you go back and see Andrea's post from Friday December 20th, to see what Andrea originally had to share with us. 
~

Thank you so much for stopping by today!

December Guest Designer Andrea Shell

We are pleased to bring you another one of our December 2019 Guest Design Team Members ... Andrea Shell.

We sent Andrea the More Than Donuts stamp and we think she knocked it out of the park with this project. 

To see all the details please click here -> More Than Donuts


This is what Andrea had to say about our More Than Donuts stamp set ...
"When I first saw the More than Donuts stamp, I immediately thought of my husband.  It's a bit of a joke around our house that my husband can be talking about one thing and then out of nowhere - SQUIRREL! - switch to another topic.  It can be a bit maddening, yes, but we love him nonetheless.

The squirrel in this set is so cute and the perfect size to practice flicking with Copics.  I couldn't resist adding Glossy Accents to his glasses - they're so cute! 
I'll see you next week with more inspiration with this fun set!"


You can find Andrea here at her blog ------> Blissfully Scrappy

You can also find her IG here ------> @westie1702

Make sure you stop back on Friday December 27th, to see what Andrea has to share with us one more time.
~

Thank you so much for stopping by today!