Pages

Showing posts with label coffee-themed cards. Show all posts

Meh....leftovers!


Hello crafty coffee loving peeps!

Welcome back down the rabbit hole. Echo here with another caffeinated critter! This turkey is hilarious and I love all the sentiments that go with it too. 


This Caffeinated Turkey is just in time for the crazy holiday season! This is what I will probably look like the day after Thanksgiving! Although I will probably be thankful for leftovers! 

Here is a quick how to:


Stamp turkey with Copic friendly ink. 


Colored turkey with Copic markers and used the Caffeinated Turkey die to cut him out.


Build a background with some patterned paper and die cuts. Stamp the sentiment and add to matting and card base. Glue down turkey.


For further details on this card head on over to my blog! 

  For more inspiration, updates, and news make sure to check out these places.

The Rabbit Hole Designs
The Rabbit Hole Designs Instagram
The Rabbit Hole Designs Facebook Page
The Rabbit Hole Designs Pinterest
The Rabbit Hole Designs YouTube

Thank you so much for stopping by!
Stamp on- Echo


Ruff Morning?


Good Morning crafty friends!

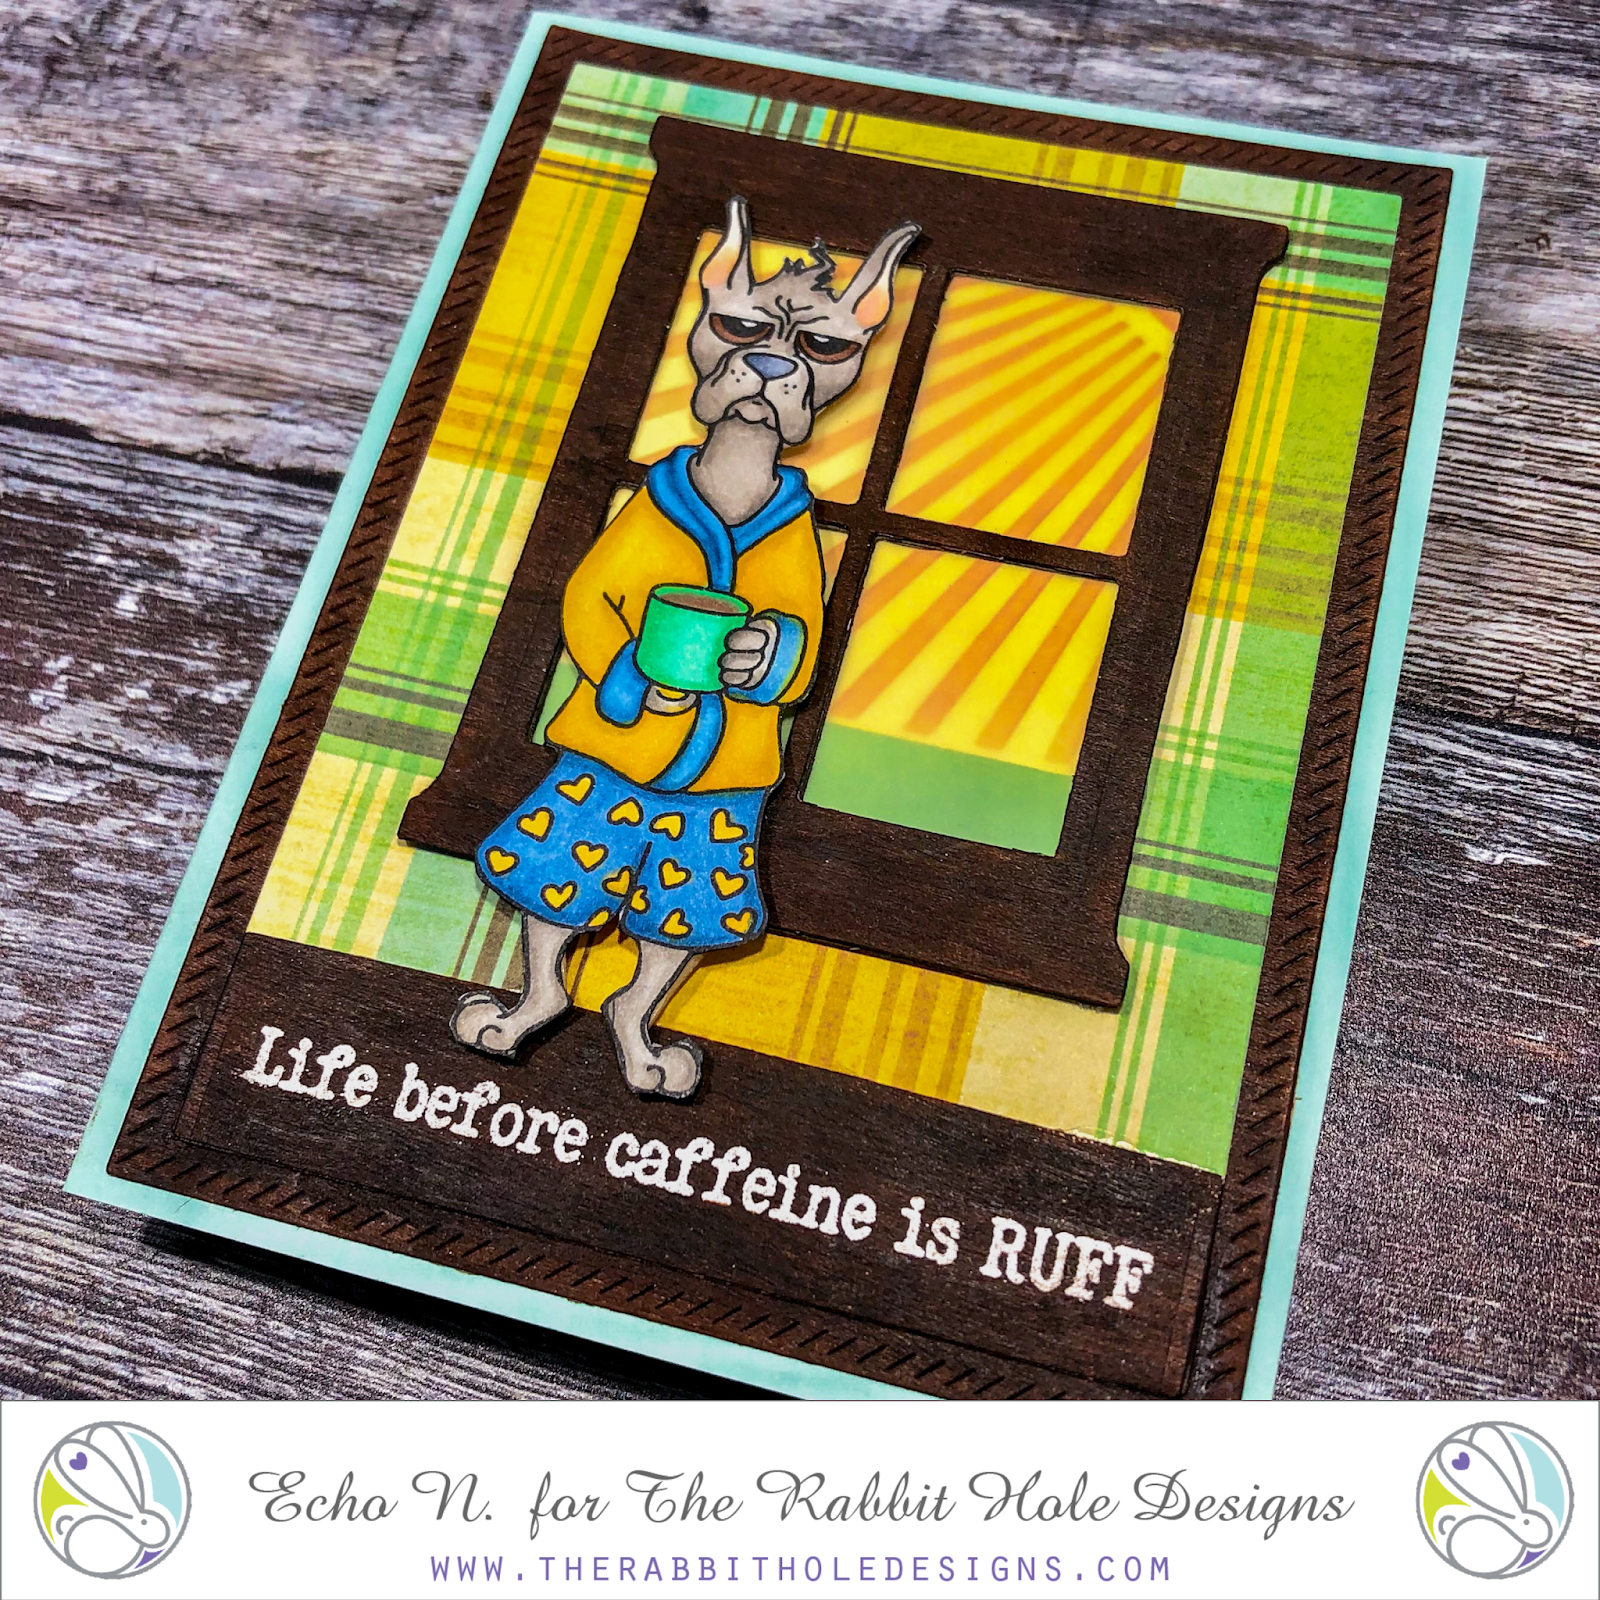
Welcome back for some coffee loving inspiration. Echo here down the rabbit hole. Do you have ruff mornings? There are days I certainly do. This boxer is my spirit animal for sure. I love this new addition to the coffee critter line up. You can find him here. I thought it would be fun to back a scene with him standing in front of a window with the sun shiny bright through the window and the boxer looking not very happy about it!

Here's how I made this card.


Stamp image on Copic friendly paper with Copic friendly ink. Color with Copic markers.


Fussy cut.


Die cut window. Then I colored the die cut window with a Copic marker. E59 walnut


Die cut a wood panel and a piece and piece of patterned paper. 


Cut a panel of white card stock to fit behind die cut window.


Mask of the bottom a bit to add grass later. Ink blend sun rays on white window card panel.


Move mask up and mask off the sun rays. Ink blend grass.


With a Copic marker- E59 walnut color die cut wood veneer paper. No need to do all just the little bit that will be showing.


I cut another strip of the wood veneer paper and colored it. Stamp sentiment in VersaMark and emboss with white embossing powder. 


Cut a piece of vellum for window. Assemble window panels and die cut card panels. Add to card base. Add caffeinated boxer with foam tape.


​For further detail head over to my blog 

  For more inspiration, updates, and news make sure to check out these places.


Thank you so much for stopping by!
Stamp on- Echo


Caffeinated Fox with Maria

Hello The Rabbit Hole Designs fans!  Maria here on the blog with you today.   I am back to share this simple coffee-themed card, showcasing the Caffeinated Fox stamp set and the Perfectly Blended stamp set.


.


Here's my card using the stamp set:


I stamped the images on some Neenah solar white card stock and colored the images in with my Spectrum Noir alcohol markers.  I used the Gold Brown, Light Pink and Blue Turquoise blend.  Since this stamp set didn't come with coordinating dies, I used my Brother Scan N Cut 2 machine to cut the image.

I used a Scalloped Border die to die-cut a Bristol smooth white panel and ink-blended this with Tattered Rose distress oxide ink. I adhered a pink patterned paper on my card base and added the inked backdrop to the card.  Lastly, I adhered my image and stamped the sentiment on my card.  

To finish my design, I added some glossy accents to the fox's nose.  Here's a closer look:


I hope you like my card and got inspired.  If you are looking for further details about my project including supplies used, I would be so grateful if you can stop by my blog today at:


For more inspiration, updates, and news make sure to check out these places.  Happy stamping!

Take Life One Sip At a Time

Hello The Rabbit Hole Designs fans!  Maria here with you and it's my day to take over the TRHD blog.   For today's project, I am showcasing the Caffeinated Rabbit and the Perfectly Blended stamp set.


I have a cute and simple card for you today with one of my favorite caffeinated creature.


Here's how I made the card:
  • stamp the rabbit image on smooth white card stock and color the images in with alcohol markers (or any medium of your choice).
  • die-cut the image with an electronic die-cutting machine or fussy cut with scissors.  I used my Brother Scan N Cut 2.
  • cut an A2 size piece of smooth white card stock and use the solar burst stencil and a blending brush with Tattered Rose distress oxide ink and antique linen to add color to the background.
  • use the "hello" die to die-cut the word from the background.
  • adhere some fun foam to the back of the card stock and adhere this piece onto a chocolate brown card base.
  • line up the negative pieces of the die-cut and adhere using liquid glue.
  • adhere the bunny on top of the "hello" using liquid glue.
  • finish the design by adding the sentiment from the Perfectly Blended stamp set.

Here's a closer look:


Another simple card but I really love how it turned out.  If you are looking for further details about my project including supplies used, I would be so grateful if you can stop by my blog today at:


I hope you like my card and got inspired.  Have an amazing day and happy crafting!

For more inspiration, updates, and news make sure to check out these places.

I'm a T-Wreck Without My Caffeine


Hello The Rabbit Hole Designs fans!  Maria here on the blog with you.  April is almost here and do you know what is happening tomorrow down at the rabbit hole?  Tomorrow is the start of our April release and you will be seeing some AWESOME stamp sets and projects made by the entire design team.  Oh yeah, be prepared to ooohhh and aaaahhhh!  You definitely need to stay tuned! 


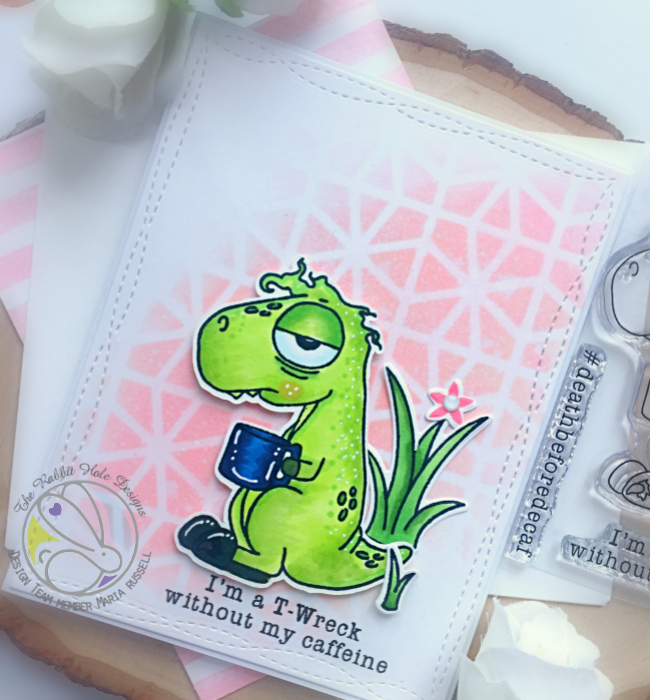
For my project today, I am showcasing the adorable Caffeinated Dino 3x4 stamp set.   Here's what it looks like:


HERE'S HOW I MADE MY CARD:
  • Stamp the images on smooth white card stock and color the images in with Copic markers (or any coloring medium of your choice).
  • Die-cut the image with an electronic die-cutting machine or fussy cut with scissors.  I used my Brother Scan N Cut 2.
  • Cut an A2 size piece of Bristol smooth white card stock and use the geometric stencil to ink up the background.  I used Worn Lipstick and Antique Linen distress oxide inks.
  • Use the distress sprayer to spritz some water on the colored background and dab it dry with some paper towel.
  • Adhere the colored background on an A2 size side-fold card base.
  • Adhere the images on the card with either Nuvo liquid adhesive and foam adhesive.
  • Stamp the sentiment using Versafine Onyx black ink.

Here's a closer look:


I finished my design by using my Sakura white gel pen to add some dot details to my Dino and the coffee cup.  Here's another look:


If you are looking for further details about my project including supplies used, I would be so grateful if you can stop by my blog today at:


I hope you like my coffee-themed card today.  Have an amazing day and happy crafting!

For more inspiration, updates, and news make sure to check out these places.

Caffeinated Bee with Martha Lucia

Hello everyone Martha Lucia here with you! Do you know the Caffeinated Bee
Well today I am featuring this fabulous stamp set created by The Rabbit Hole Designs, that is part of their amazing collection of Caffeinated Stamp Sets.


I created this card in a different way from normally I made. Today, I first stamped the Caffeinated Bee over a whisper white card stock and colored it with Alcohol Markers. Then I started playing with the layers and after saw the eyes of the Caffeinated Bee, I though that it to be the focal point because it reflect our faces many times!


On this card I combined different colors and different textures. First I embossed a basic black layer and pasted it directly over the whisper white card base, then I created a set of banner on three different colors of card stock that I coordinate with the background piece of designer paper. At the end I attached the banners with two yellow brads and added my stamped images, the Caffeinated Bee and the #Buzzed sentiment with double sided foam tape over the colorful card base.

I hope that you like me explore all the possibilities with the caffeinated images and be ready to start every day with the energy of the Caffeinated Bee!

For more inspiration, updates, and news make sure to check out these places.

If you are looking for further details about my project including links to instruction and products not listed please feel free to drop on by my Stampartpapel Blog.


See you soon!

Easter Bounty and Caffeinated Crab by Martha Lucia

Hi crafters, I have two cards to share with you featuring two of the recently released stamps. Take a look to my first card using the Easter Bounty stamp set:


To create my card I used the masking technique. Let me share with you how make this:
  1. Create the card base using Pool Party card stock. The size of this card is 4-1/4″x11″ with score in 5-1/2″.
  2. Cut a second layer using a stitched rectangle frame.
  3. Take a piece of scrap paper with the same size of the layer that you cut on the before step and die cut from that a heart.
  4. Arrange the die cut piece of scrap paper over the pool party card stock and secure it with masking tape.
  5. Sponge the colors of Distress Ink that you want to use to fill your heart. In my card I used Picked RaspberryWorn Lipstick and Twister Citron.
  6. Remove the scrap paper and keep to be used in another project.
  7. In a separate piece of whisper white card stock, stamp the bunny girl included on the stamp set Easter Bounty with Memento Tuxedo Black Ink.
  8. Color the image with alcohol markers or color pencils and fussy cut with the scissors.
  9. Paste the image over the decorated card base using double sided foam tape.
  10. Stamp the sentiment and little details included on the Easter Bounty stamp set over the card using Memento Tuxedo Black Ink.
  11. Paste the decorated layer over the card base using double sided foam tape.
  12. Finalize your decoration adding some Jewels or sequins.

For my second card is using the Caffeinated Crab stamp set. To create this card I used Poppy Parade card stock for the card base and Tangerine Tango for the second layer. I just dry embossed the second layer with an embossing folder and pasted it directly over the card base.

Over whisper white card stock stamp the Caffeinated Crab and one of the sentiments included on the stamp set with Memento Tuxedo Black Ink. Color the image with alcohol markers and fussy cut it with the scissors.


Paste the caffeinated crab with double sided foam tape and the sentiment directly over the decorated card base.  To finalize the card add a die cut leaves on top of the second panel.
You can find these stamps sets HERE in The Rabbit Hole Designs Store and let me tell you, you need to see the entire store because their images are really different and beautiful.
Thank you for stopping by and remember that you can follow us in all our social media venues and in our Facebook Group.

Magical AF


Hello there, The Rabbit Hole Designs fans!  Maria here on the blog with you today.  I guess I am on a roll because I just finished this cute shaker card to share with you today by The Rabbit Hole Designs.  

For my project, I am showcasing the Caffeinated Unicorn 3x4 stamp set.


Here's how I made the card:
  • Stamp the image on smooth white card stock and color the image in with Copic markers (or any coloring medium of your choice).
  • Die-cut the image with an electronic die-cutting machine or fussy cut with scissors.
  • Stamp the unicorn image again on patterned paper and fussy-cut the robe to paper-piece on the image.
  • On an A2 size of Bristol smooth white card stock, ink up the background using the mini ink blending tool and spun sugar distress oxide with the sunburst stencil by Tim Holtz.
  • Use a die o die-cut the frame and the window.
  • Cut an acetate sheet and run it through your die-cutting machine with a snow embossing folder. Adhere this acetate sheet on your frame.
  • Add foam adhesive to create the well.
  • Add confetti or sequins as the shaker element.
  • Adhere this piece on the colored background for a seamless look.
  • Die-cut the clouds twice using a clouds die.
  • Stamp the sentiment on the clouds with gray ink.
  • Adhere the Unicorn on the card.
  • Add stardust stickles on the unicorn's hair to finish the design.

This stamp set also makes me giggle because the unicorn's hair is so frizzy, it reminds me of my big frizzy hair during summertime in Florida.  I swear my hair gets so big, it's the size of Texas!  Thank God for flat irons and anti-frizz magical potions because without them, I would look like a cave woman!  Here's a closer look:


Fussy-cutting the patterned paper to paper-piece the robe made it look more realistic and added some nice touch to the overall card design.  Can you also just admire the glitter on the unicorn's hair?  She is so stylish and is indeed magical AF!  Haha!  Here's another look:


For more inspiration, updates, and news make sure to check out these places.


If you are looking for further details about my project including supplies used, I would be so grateful if you can stop by my blog today at:


I hope you like my shaker card today.  Have a wonderful day and happy crafting!


Caffeinated Cat with Maria


Good morning my crafty peeps!  Maria here on the blog with you today.  I am so excited to share with you my very first post as a design team member of the The Rabbit Hole Designs.  They have recently launched a couple of stamp sets and I ordered a few of them because I fell in love with the design.  

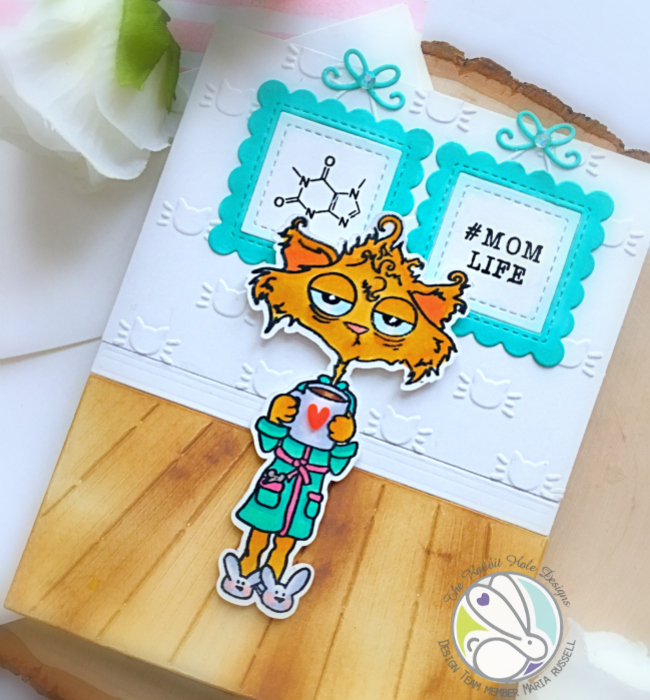
For my project today, I am showcasing the Caffeinated Cat 3x4 stamp set.   When I saw this stamp, I knew I just had to have it.  Honestly, what is not to love?  I adore cats, I love coffee and I love being a mom!  Okay to be honest I used to feel like this cat when my kids were little, haha! and I had a full-time job too!  I don't even know how I survived those days; I guess I had lots and lots of coffee!
Here's how I made the card:
  • Stamp the image on Neenah solar white card stock (or any card stock you have in  stock) with alcohol friendly ink.
  • Color the image with alcohol markers (or any coloring medium of your choice).
  • Either fussy-cut or die-cut the image using an electronic die-cutting machine. For mine, I used my Scan N Cut 2.
  • Die-cut a piece of Neenah solar white card stock using the wood/floors dies and ink it up with gathered twigs distress oxide ink to make it look like wooden panels.
  • Cut another piece of white card stock and use embossing folder to create the "wallpaper".
  • Adhere the floor, the moulding and the "wallpaper" on an A2 size card base.  Cut the excess.
  • Die-cut the little decorative frame and little bows on some colored card stock and stamp the sentiment and image on both. Adhere the frames with liquid glue.
  • Adhere the Caffeinated Cat image (ahem, star of the show!) in the middle of the card with foam adhesive to give it dimension.
  • Add the heart embellishment on the coffee cup.
  • Add Sparkling clear jewels and bow on the decorative frame to finish the design.

Everything about this cat just makes me giggle!   The tired look on her face, the bunny slippers and the robe!   I think we can all relate.  Here's a closer look:

trhdcaffeinatedcat1b

That cat wallpaper just added more cuteness to the whole design, don't you agree?  The mom cat looked tired but her house is spotless!

trhdcaffeinatedcat1c

What do you think of my card?  Does it make you want to have a cup of coffee?   You guys really need to grab this stamp set while you can.


For more inspiration, updates, and news make sure to check out these places.


If you are looking for further details about my project including supplies used, I would be so grateful if you can stop by my blog today at:


I hope I have given you some inspiration to create something beautiful today.  Have a wonderful day and happy crafting!